iPhone 12 SIM Card Reader Replacement
This document serves as a comprehensive instruction manual for substituting the SIM card reader component.The procedure detailed herein is specifically applicable to the iPhone 12 model.Successful completion of this repair necessitates adherence to all provided steps and safety precautions.Carefully follow each instruction to ensure proper functionality and avoid potential damage to the device.This guide provides the necessary information for a SIM card reader replacement on the specified iPhone 12.
Step 1 | Eject the SIM card tray
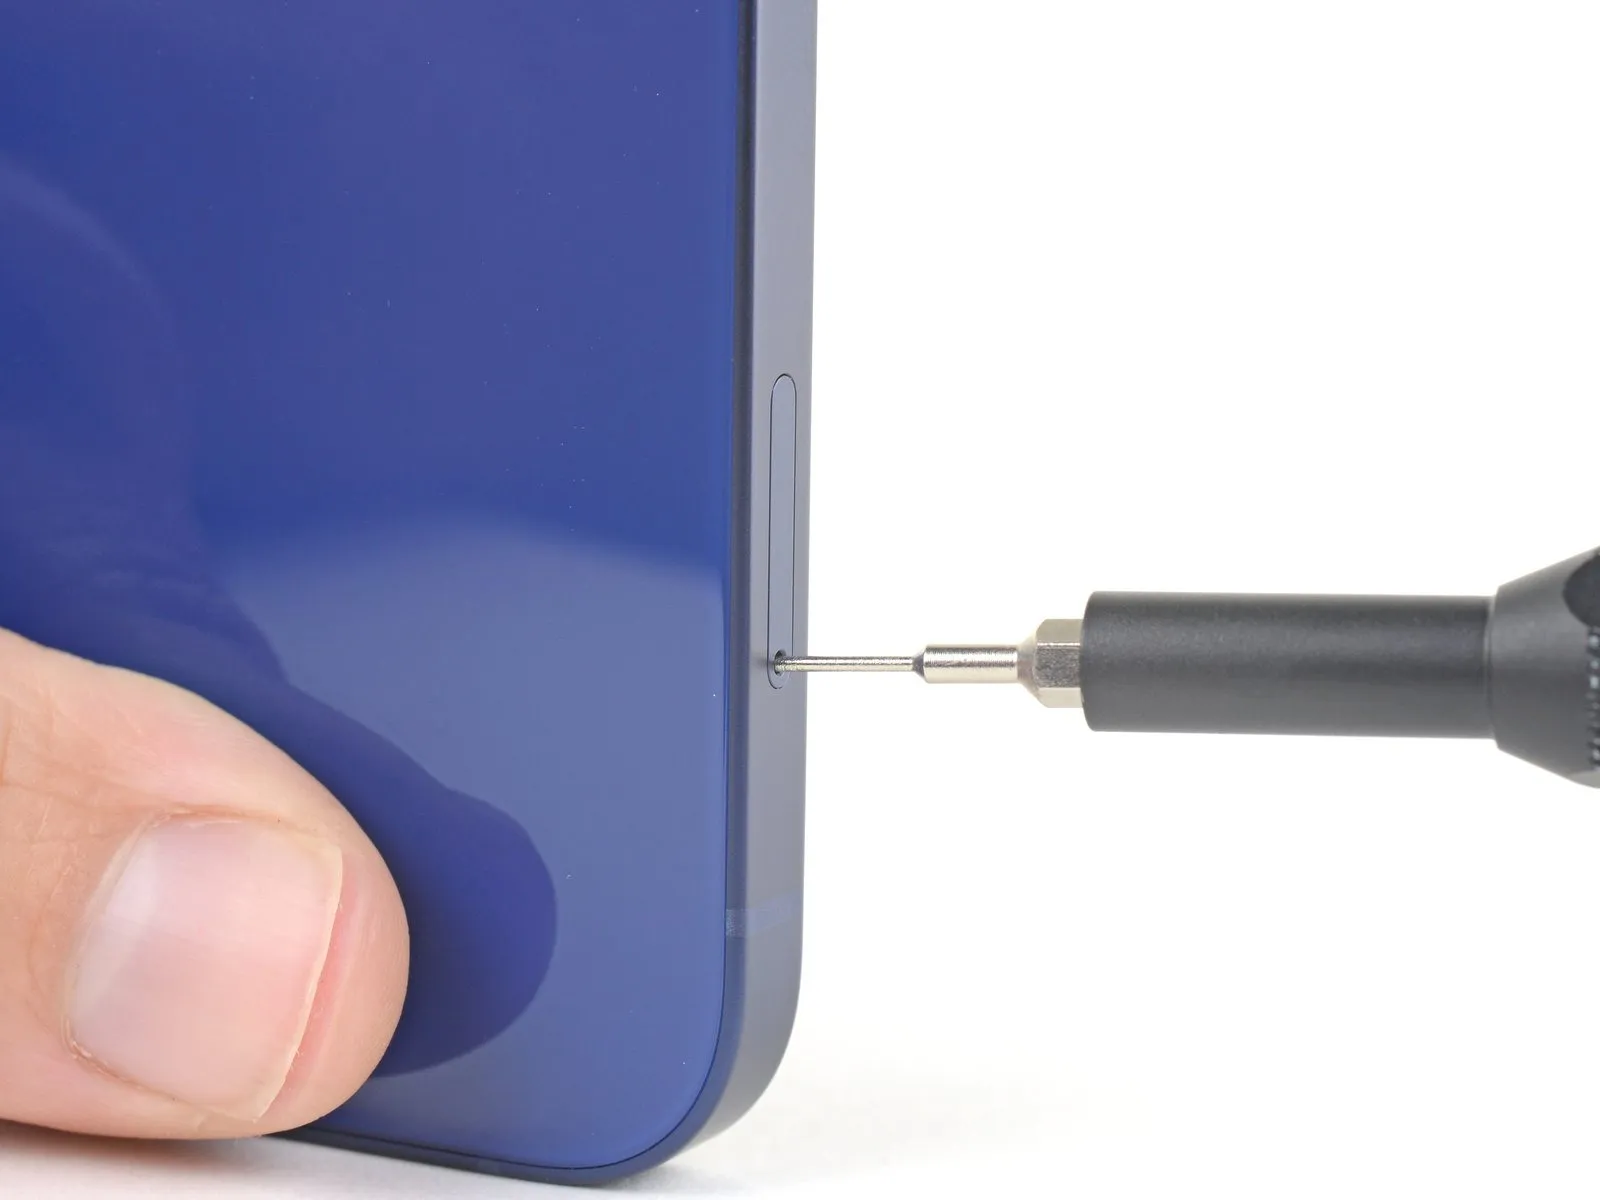
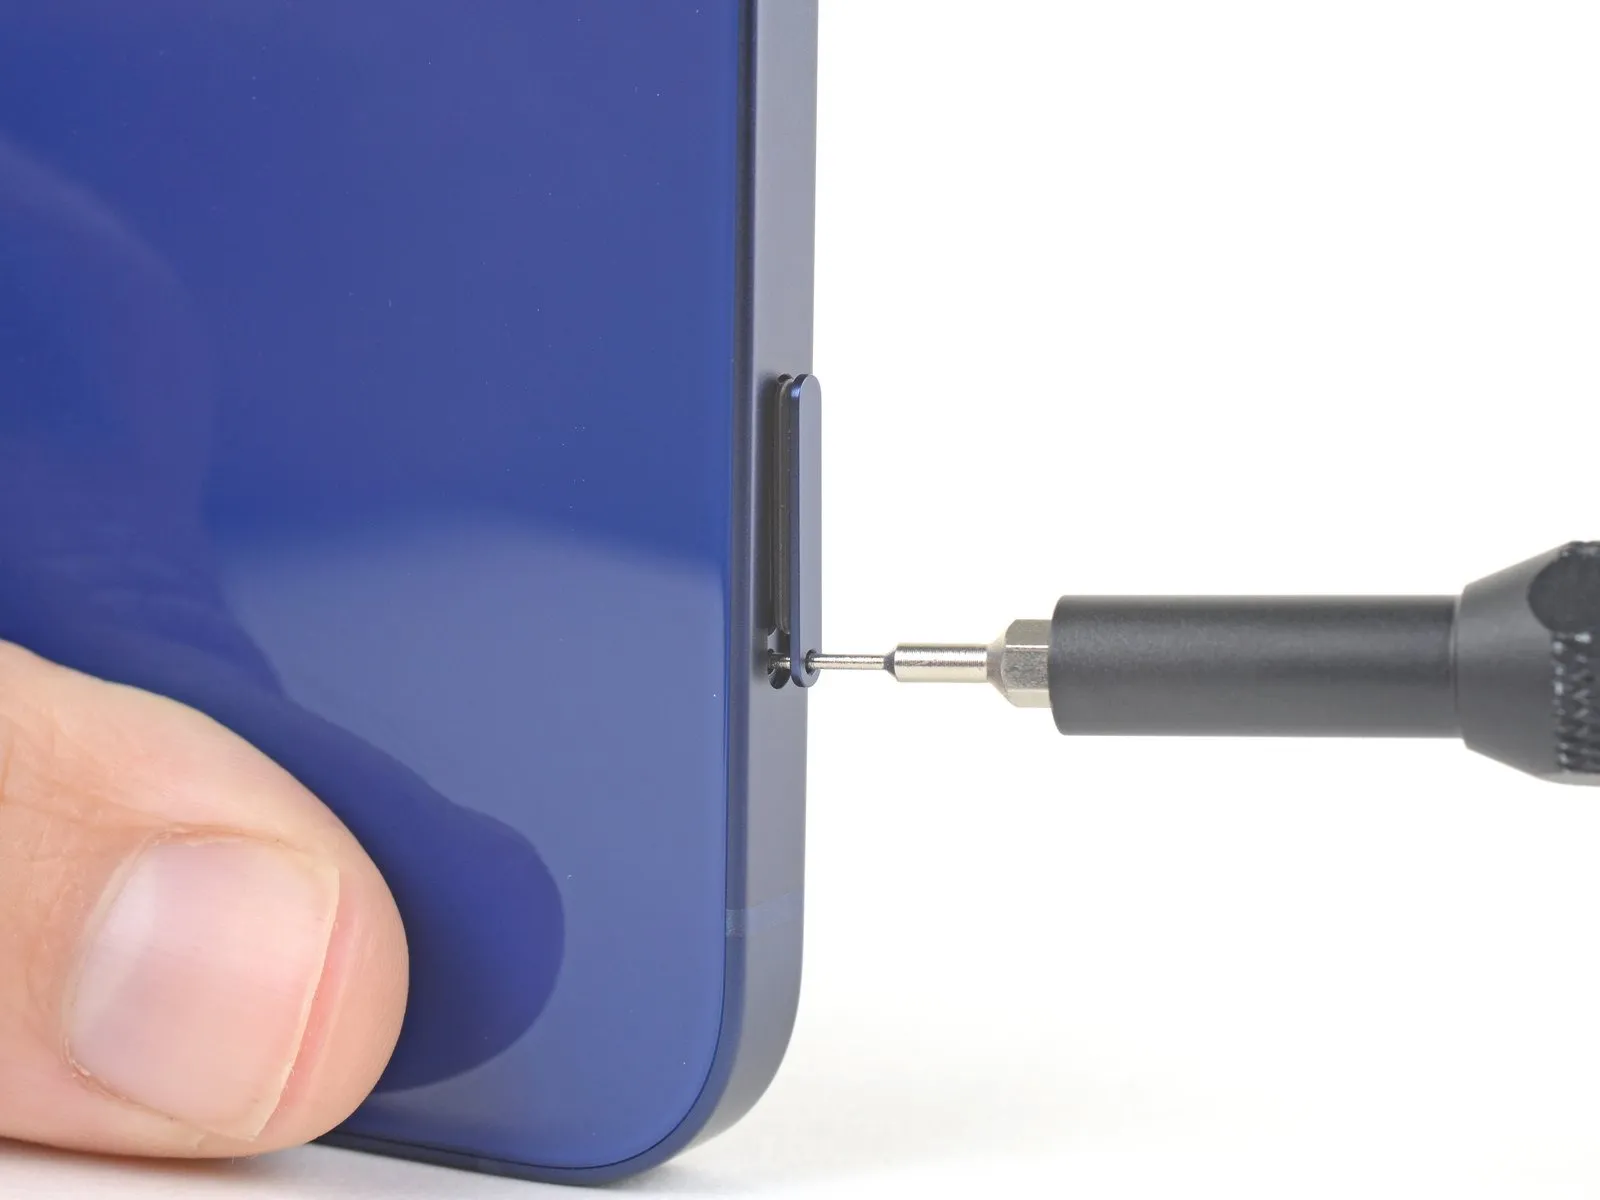
Begin the process by utilizing a SIM card eject tool, or a straightened paperclip, to access the SIM card tray.The SIM card tray is situated on the iPhone's side, near the volume buttons, and features a small aperture designed for this purpose.Apply consistent pressure to the tool inserted into the aperture to release the tray's locking mechanism.This action will cause the SIM card tray to extend outward from the device's chassis.
- Ensure the tray is fully ejected before proceeding to the next repair stage.
Step 2 | Remove the SIM card tray
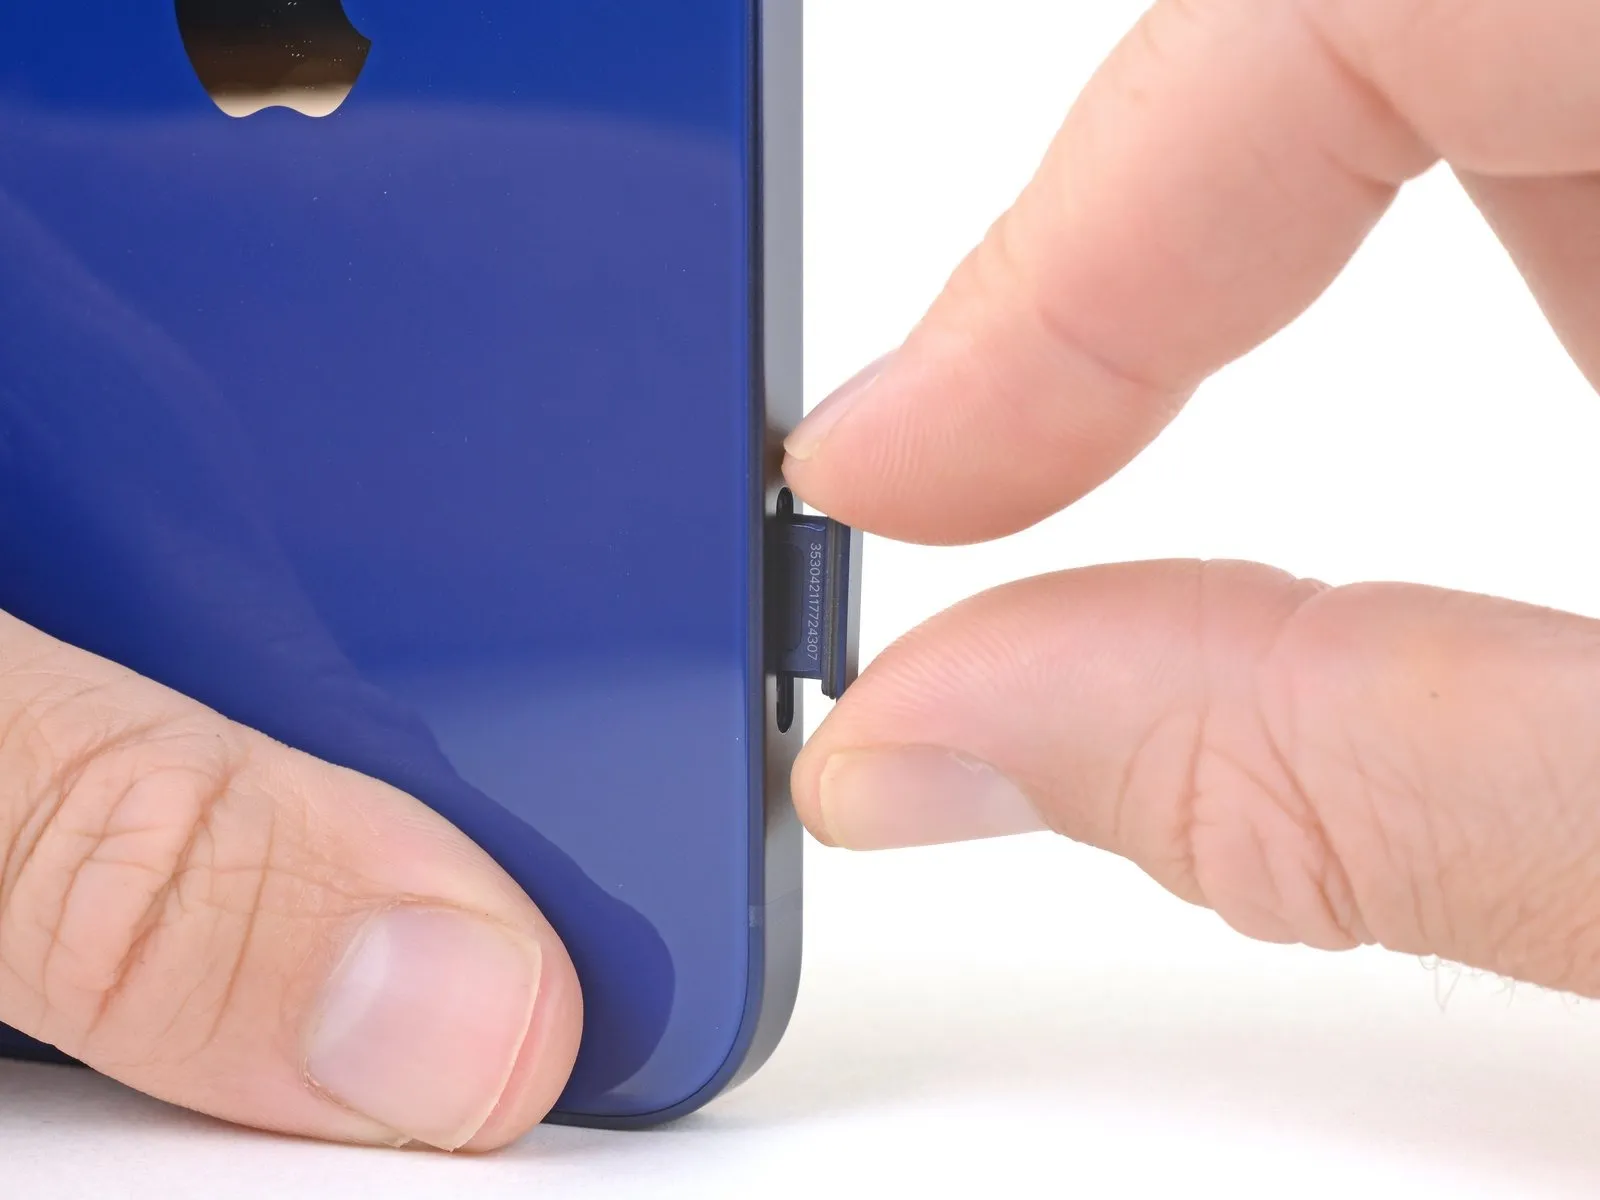
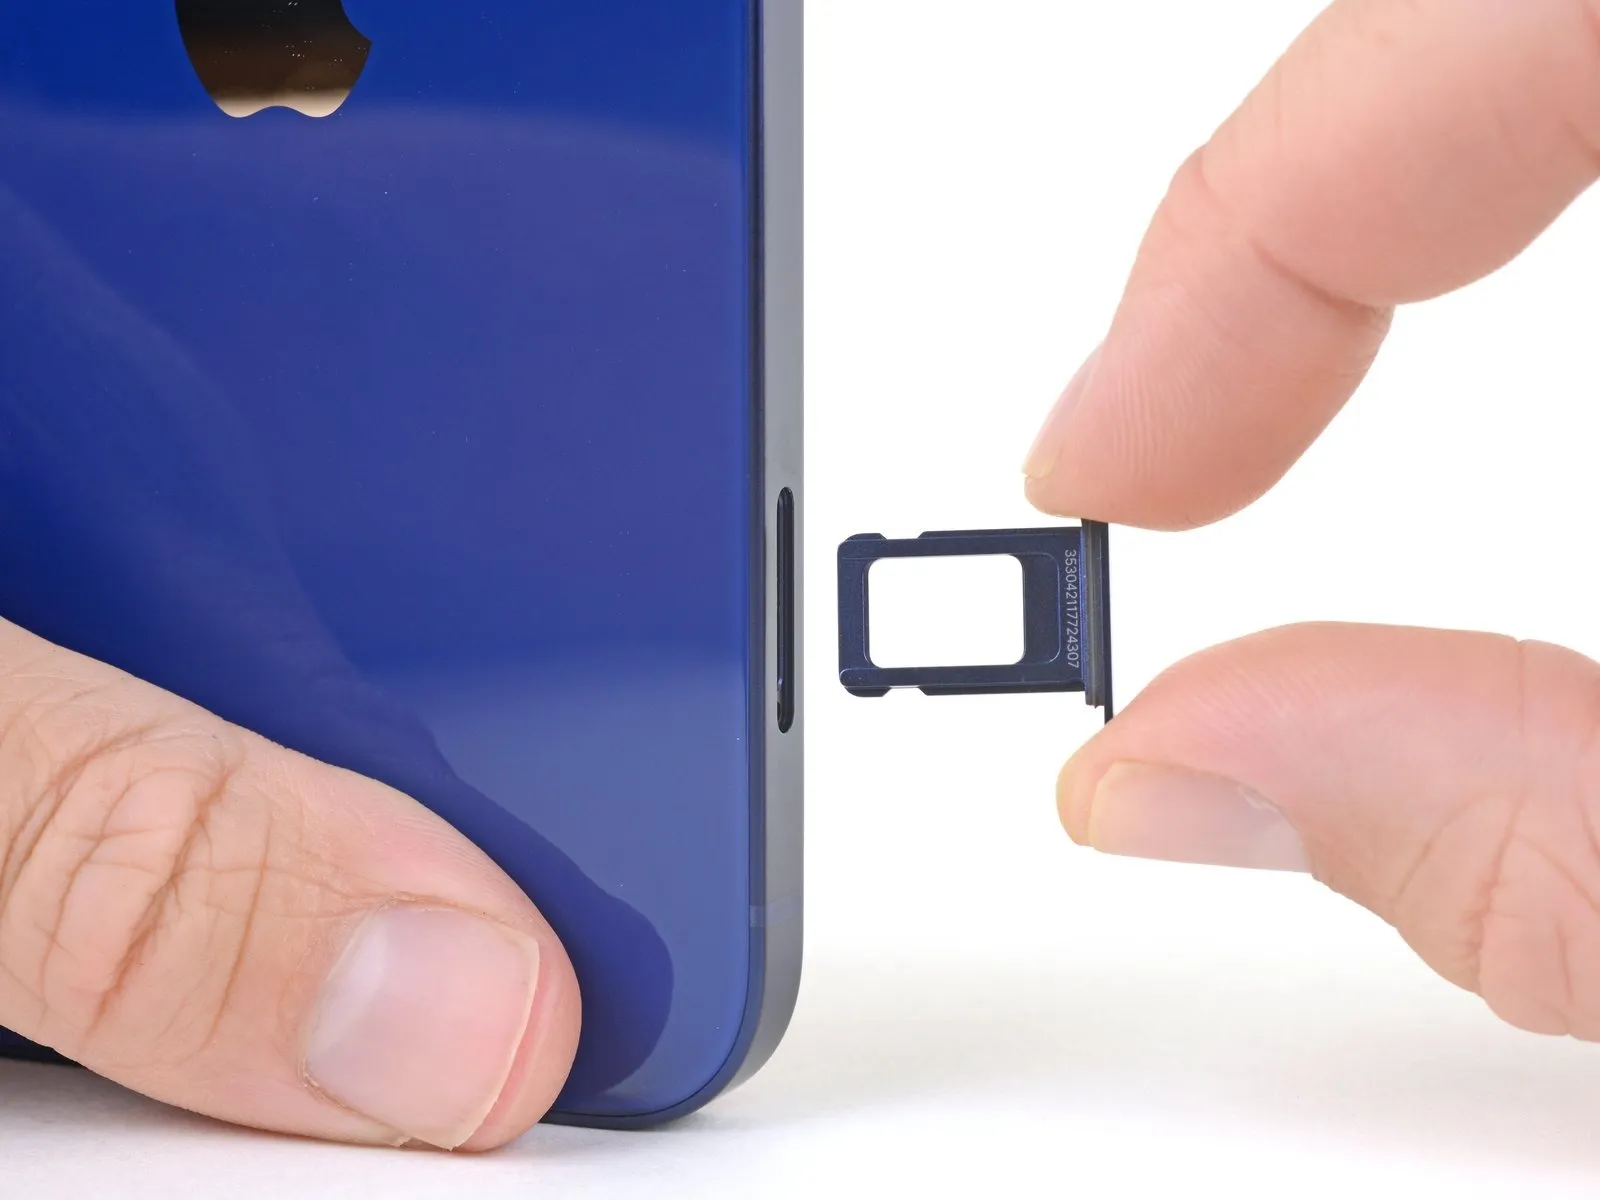
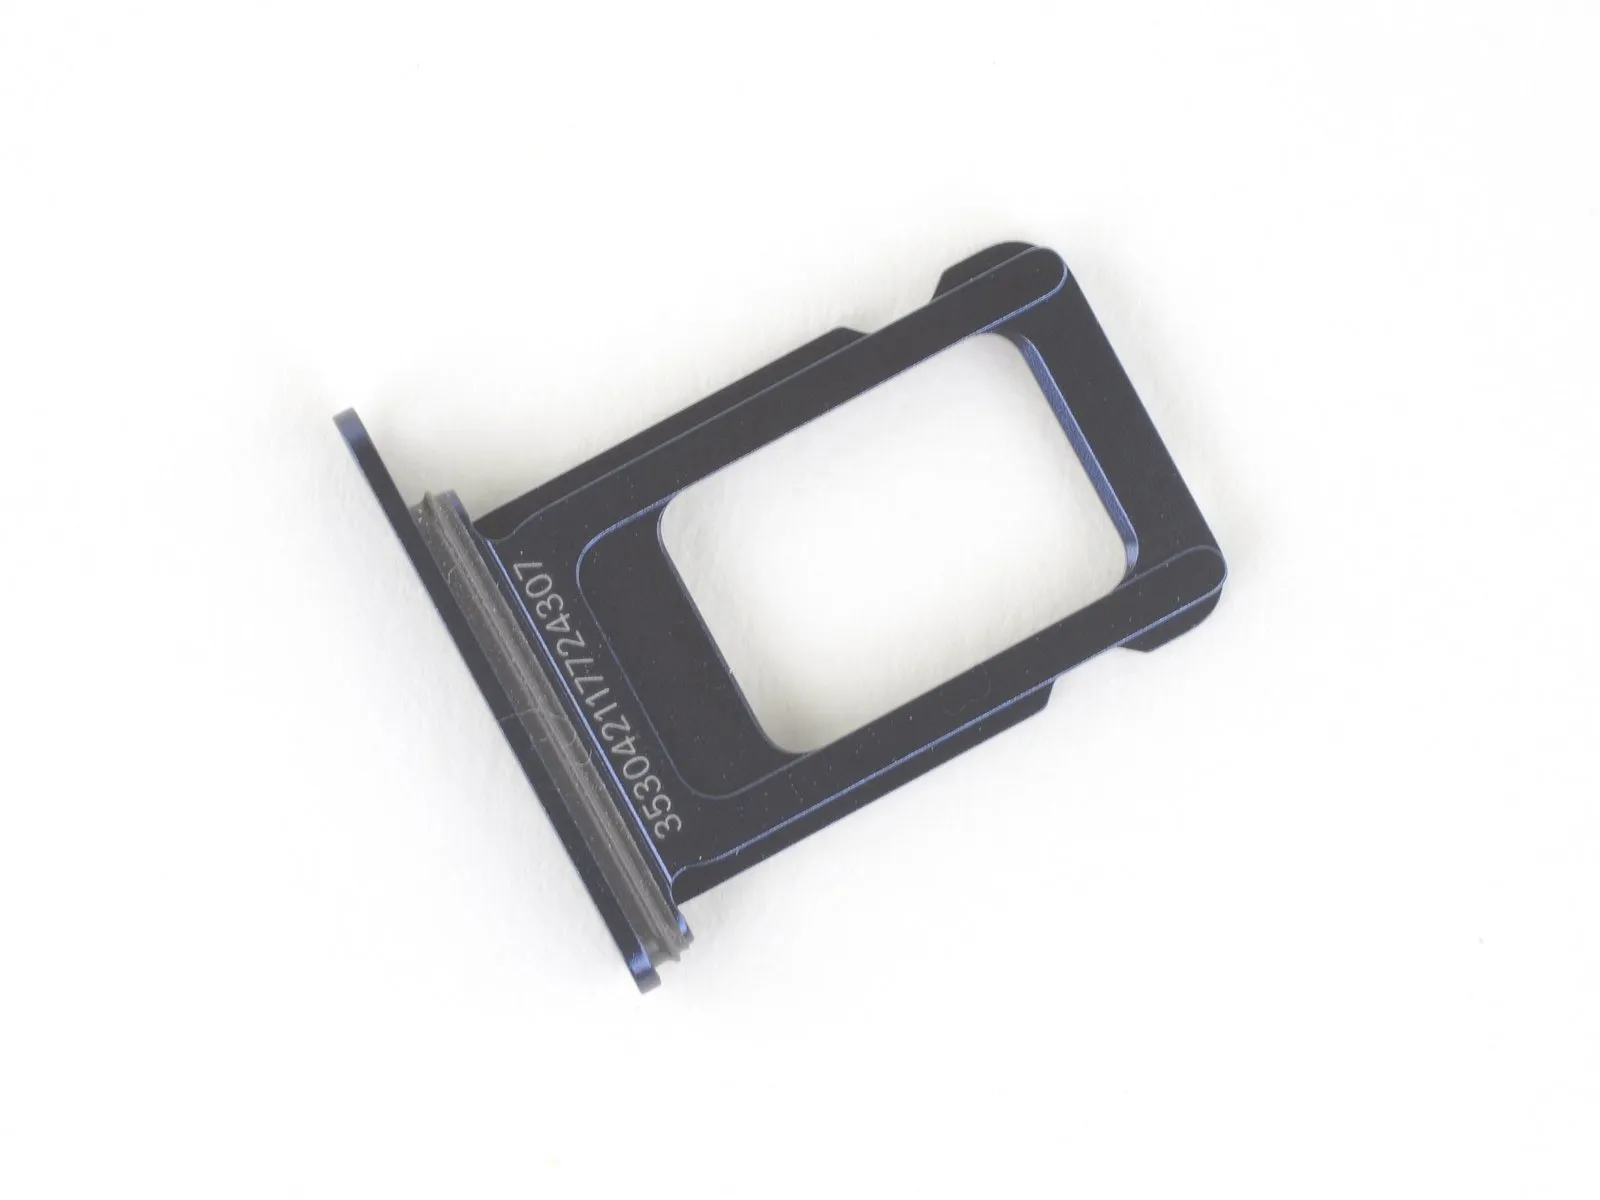
Proceed to step 2 by extracting the SIM card tray.The SIM card will readily disengage from its holder.Ensure correct alignment of the SIM card within the tray during reinsertion.A pliable rubber seal encircles the SIM tray, offering defense against water and particulate matter.
Should this seal become compromised or absent, substitute it or the entire SIM tray to safeguard the iPhone's internal electronics.
Damage or loss of the gasket can expose the iPhone's internal components to environmental hazards.
Replacement of the SIM tray gasket or the entire tray is crucial for maintaining the iPhone's water and dust resistance.
Should this seal become compromised or absent, substitute it or the entire SIM tray to safeguard the iPhone's internal electronics.
Damage or loss of the gasket can expose the iPhone's internal components to environmental hazards.
Replacement of the SIM tray gasket or the entire tray is crucial for maintaining the iPhone's water and dust resistance.
Step 3 | Remove the pentalobe screws
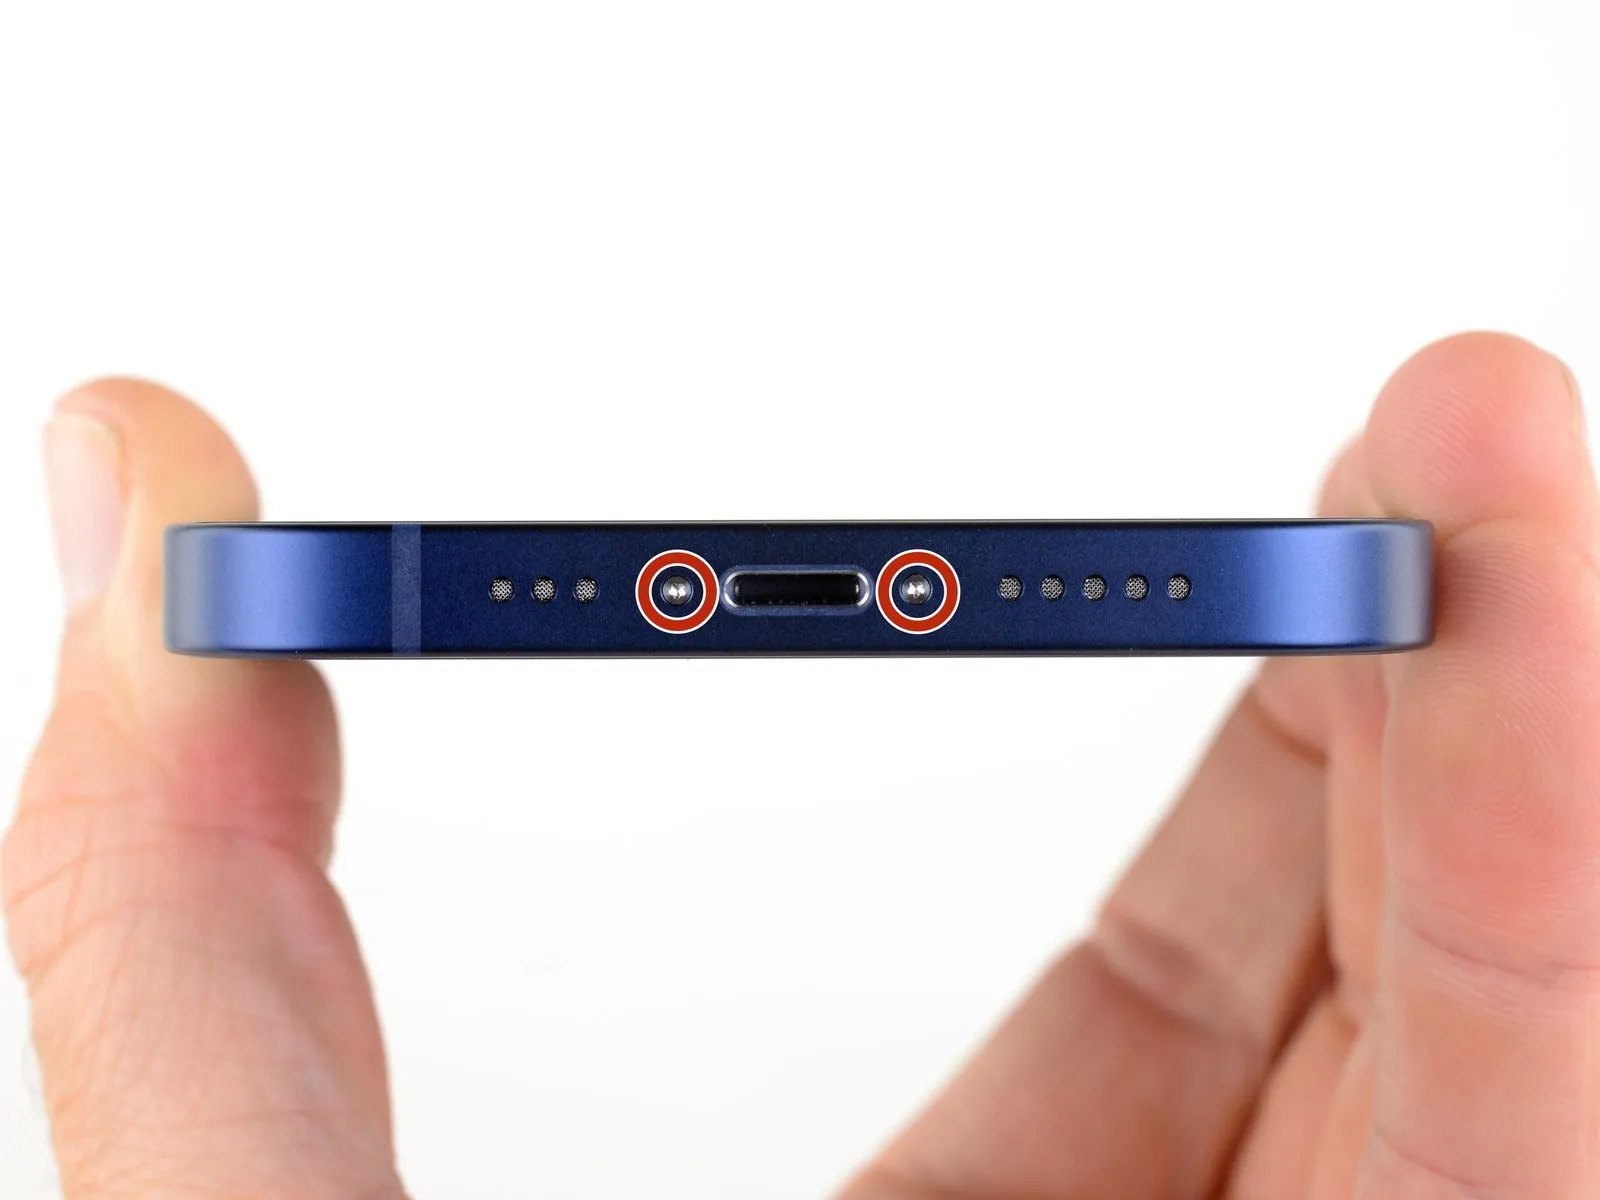
The third stage of the repair process commences now. Exercise extreme care: a fully charged lithium-ion battery presents a fire or explosion hazard if damaged.Ensure the iPhone is completely powered down prior to initiating the disassembly procedure.
Begin by eliminating the two pentalobe screws, each measuring 6.75 millimeters in length, located along the device's lower perimeter.
Separating the display assembly will irreversibly damage the iPhone's water resistance capabilities.Procure replacement waterproof seals beforehand, or meticulously prevent moisture contact during reassembly if new seals are not used.The risk of battery ignition or detonation is significantly elevated when attempting repairs on a battery with a charge level exceeding 25 percent.
Disassembly should not commence until the battery's charge has been reduced to below 25% capacity.
Begin by eliminating the two pentalobe screws, each measuring 6.75 millimeters in length, located along the device's lower perimeter.
Separating the display assembly will irreversibly damage the iPhone's water resistance capabilities.Procure replacement waterproof seals beforehand, or meticulously prevent moisture contact during reassembly if new seals are not used.The risk of battery ignition or detonation is significantly elevated when attempting repairs on a battery with a charge level exceeding 25 percent.
Disassembly should not commence until the battery's charge has been reduced to below 25% capacity.
Step 4 | Mark your opening picks


Proceed to step 4.Excessive insertion of a separation tool carries the risk of device impairment; therefore, a marking procedure is essential to mitigate potential harm.
- Using a measuring tool, determine a distance of precisely 3 millimeters.Employ a permanent marker to create a visible indication on the separation tool at the calculated 3 mm point.For enhanced precision, consider marking additional corners of the tool with varying measurement values.
- As an alternative method, affix a coin to the separation tool, ensuring the coin's edge is positioned 3 millimeters from the tool's tip.
- This marking serves as a visual guide to control the insertion depth and prevent overreach.
Step 5 | Tape over any cracks


Proceeding to step five requires addressing any existing screen damage.To mitigate additional cracking and potential injury, secure a fractured iPhone display with adhesive tape.
- Apply multiple layers of transparent packing tape across the entire screen surface, ensuring complete coverage.
- Always utilize eye protection, such as safety glasses, to guard against dislodged glass fragments.
- Should the suction cup fail to maintain adhesion, create a lifting handle by folding a durable tape, like duct tape.
- As a last resort, consider using super glue to temporarily affix the suction cup to the screen for improved grip.
Step 6 | Anti-Clamp instructions


The following three procedures illustrate the operation of the Anti-Clamp, a custom-designed tool intended to simplify the initial separation process; if this tool is unavailable, proceed to the subsequent three steps for an alternative approach.
- Detailed instructions regarding the Anti-Clamp's usage are available in a separate, dedicated guide.
- To release the Anti-Clamp's gripping arms, retract the blue handle towards the rear.
- Position the arms across either the left or right side of the iPhone's frame.
- Place the suction cups adjacent to the lower edge of the iPhone, ensuring one is situated on the front surface and the other on the rear.
- Apply a compressive force to the cups to establish a secure suction hold on the intended location.
- Should the iPhone's surface prove excessively smooth, hindering the Anti-Clamp's ability to maintain adhesion, applying adhesive tape can enhance grip.
Step 7


Advance the blue handle to secure the clamping arms in their engaged position.
- Rotate the handle a full 360-degree circle, or continue until the suction cups exhibit signs of deformation.
- Maintain the parallel orientation of the suction cups; should misalignment occur, slightly reduce the suction force and reposition the arms.
Step 8


Ensure the iPhone is stabilized on a firm surface, like a hardback book, to maintain a hands-free, level position during the subsequent repair procedures.
- Employ a hair dryer to apply warmth along the iPhone's lower edge, ensuring the surface temperature reaches a point where it feels uncomfortably warm to the touch.
- Refer to a dedicated guide for detailed instructions on the safe and effective operation of a hair dryer.
- Allow a sixty-second period to elapse, enabling the adhesive to soften and create a discernible separation.
- Introduce an opening pick into the space between the screen and the plastic bezel, utilizing the Anti-Clamp to establish a noticeable gap.
- Should the Anti-Clamp fail to generate an adequate separation, increase the heat application and rotate the handle incrementally by ninety degrees.
- Limit handle rotations to ninety-degree increments, and incorporate a sixty-second pause between each rotation, allowing the Anti-Clamp and time to facilitate the separation process.
Step 9 | Heat the bottom edge

- Employ a hair dryer or heat gun to apply warmth to the lower perimeter of the iPhone.Continue heating the iPhone's bottom edge until its surface temperature reaches a point of slight discomfort upon touch.
- Avoid prolonged, concentrated heat application from the hair dryer to prevent localized overheating.This precaution is essential to maintain the integrity of the device's components.
Step 10 | Apply a suction cup
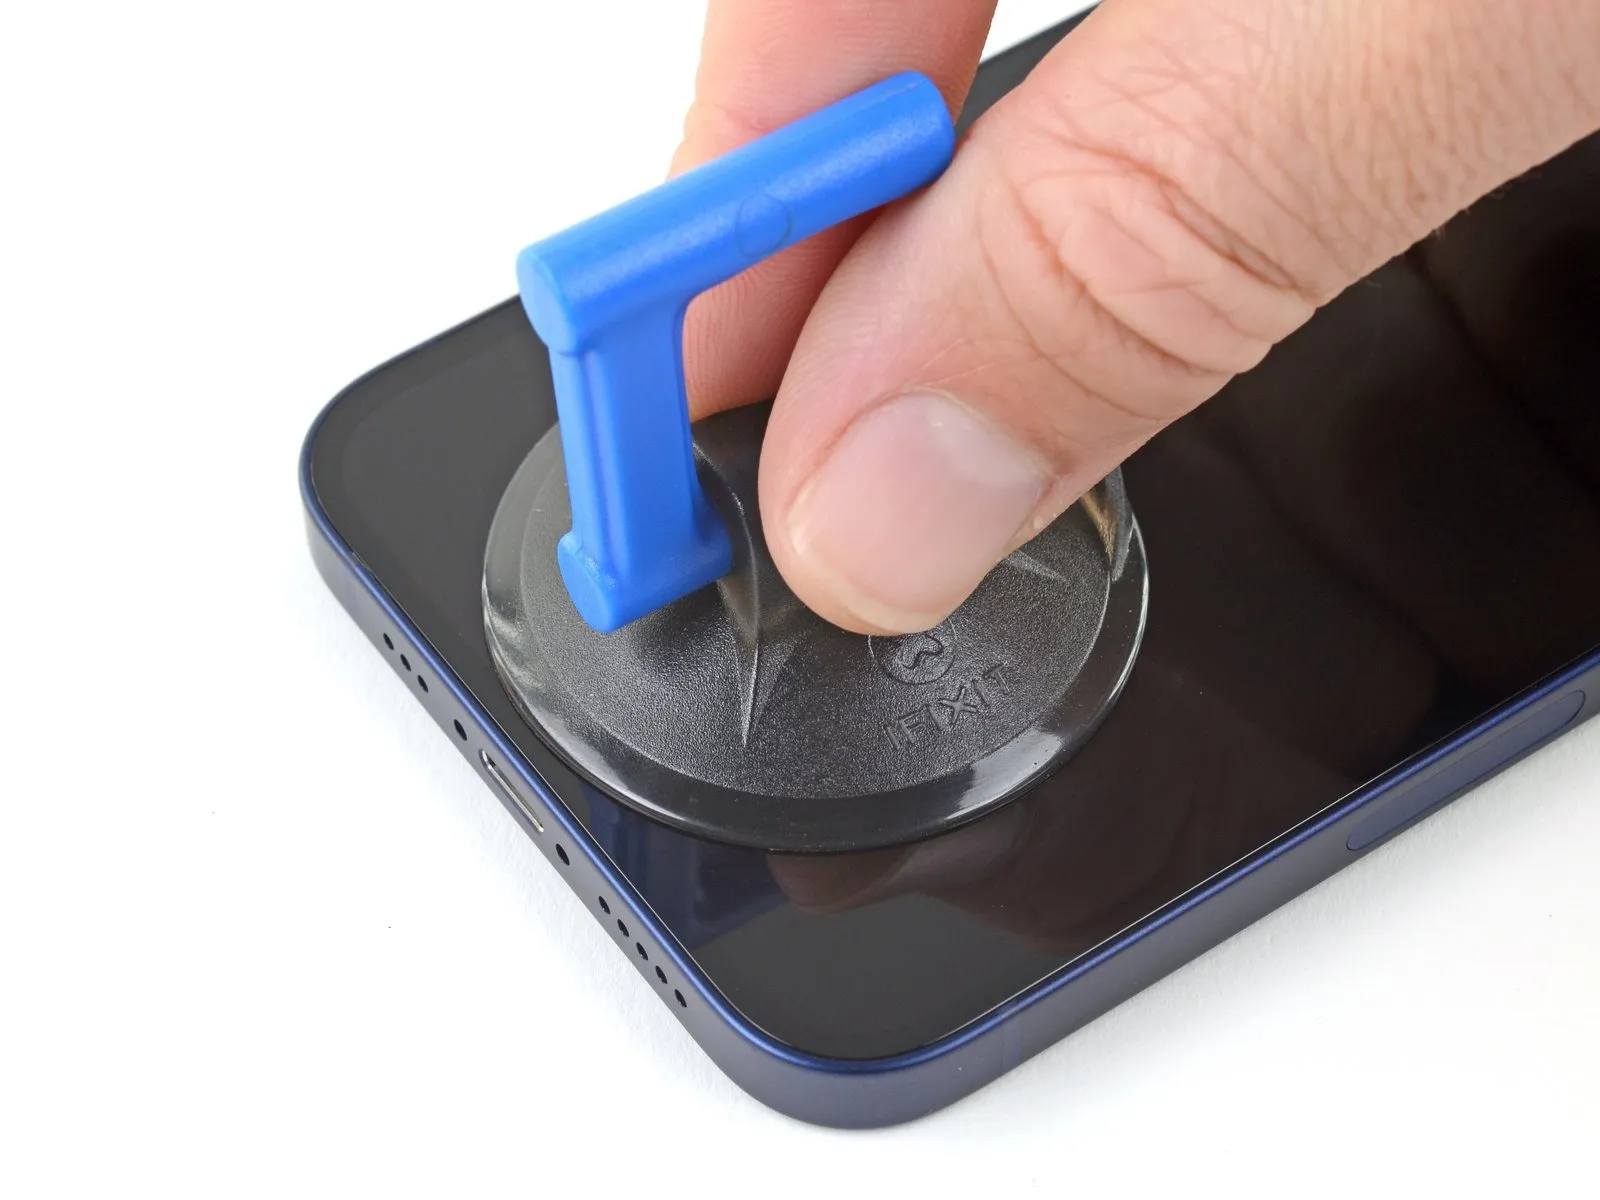
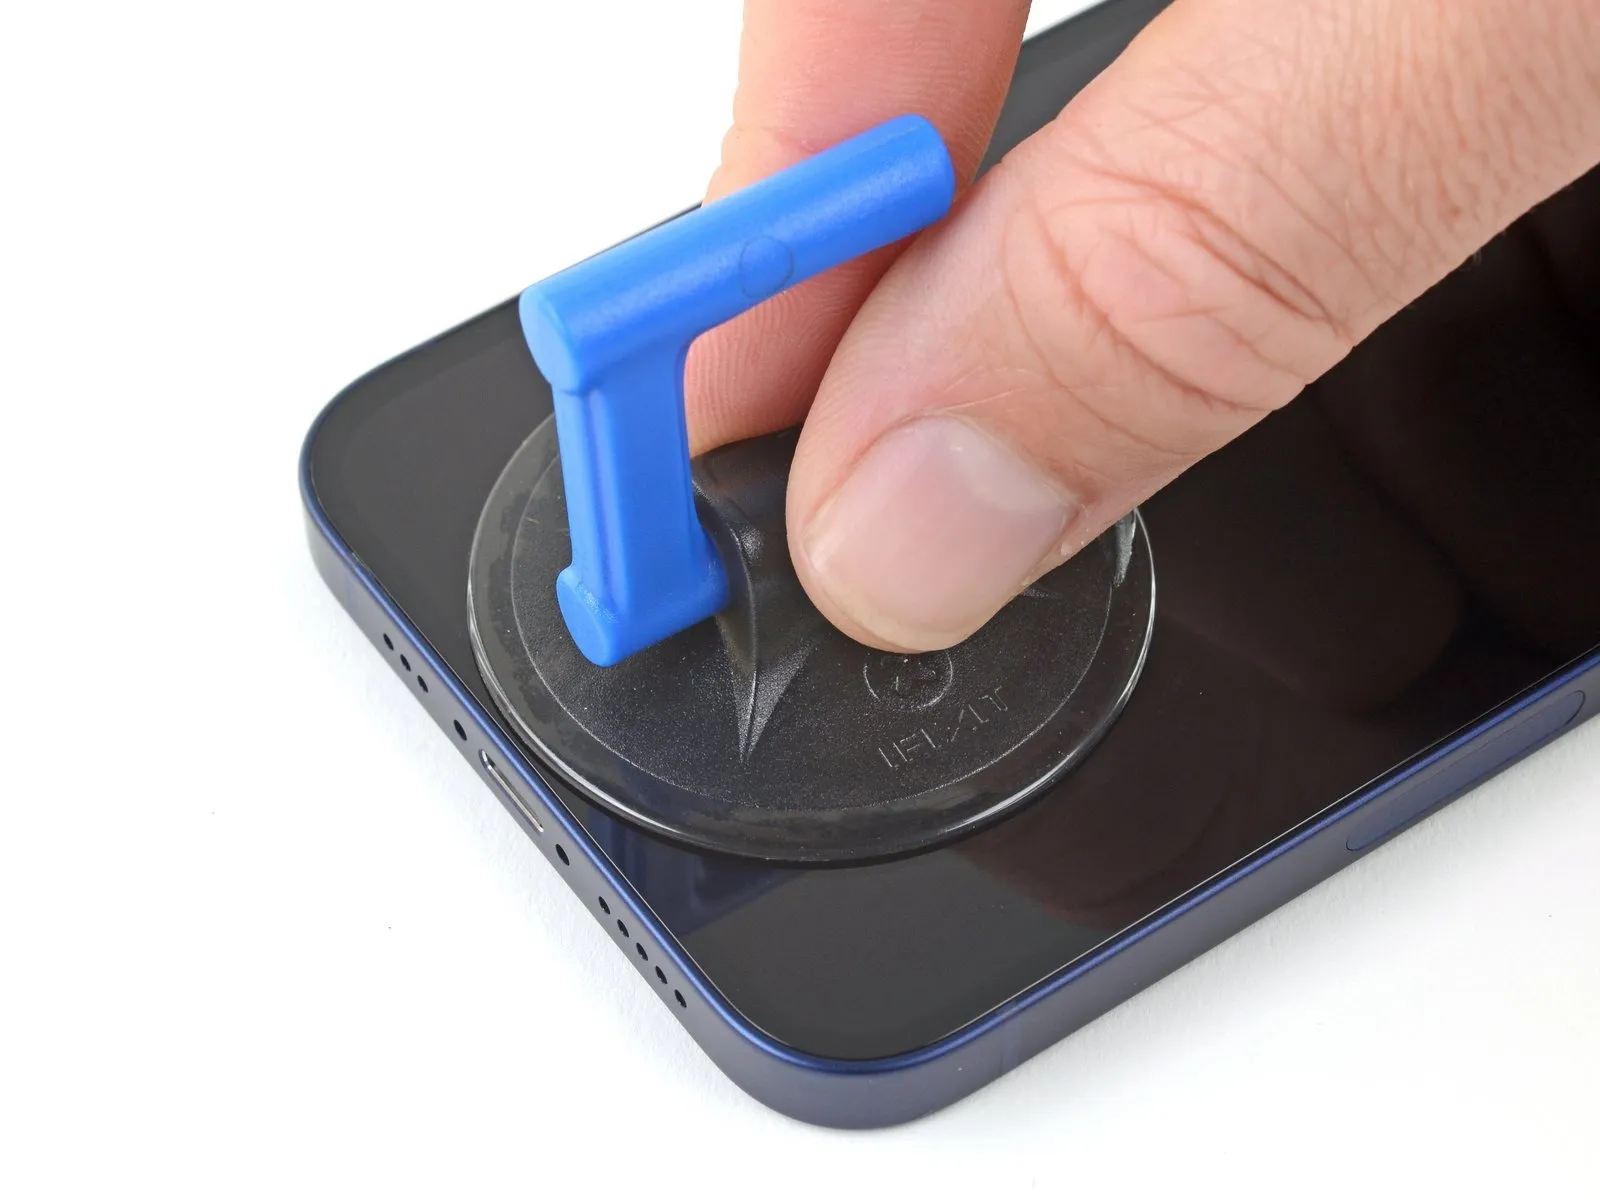
- When employing a solitary suction handle, position it against the phone's lower border, ensuring a distance from the glass perimeter.To prevent damage, maintain clearance from the extreme outer rim of the glass surface during suction handle application.
Step 11 | Lift the screen slightly
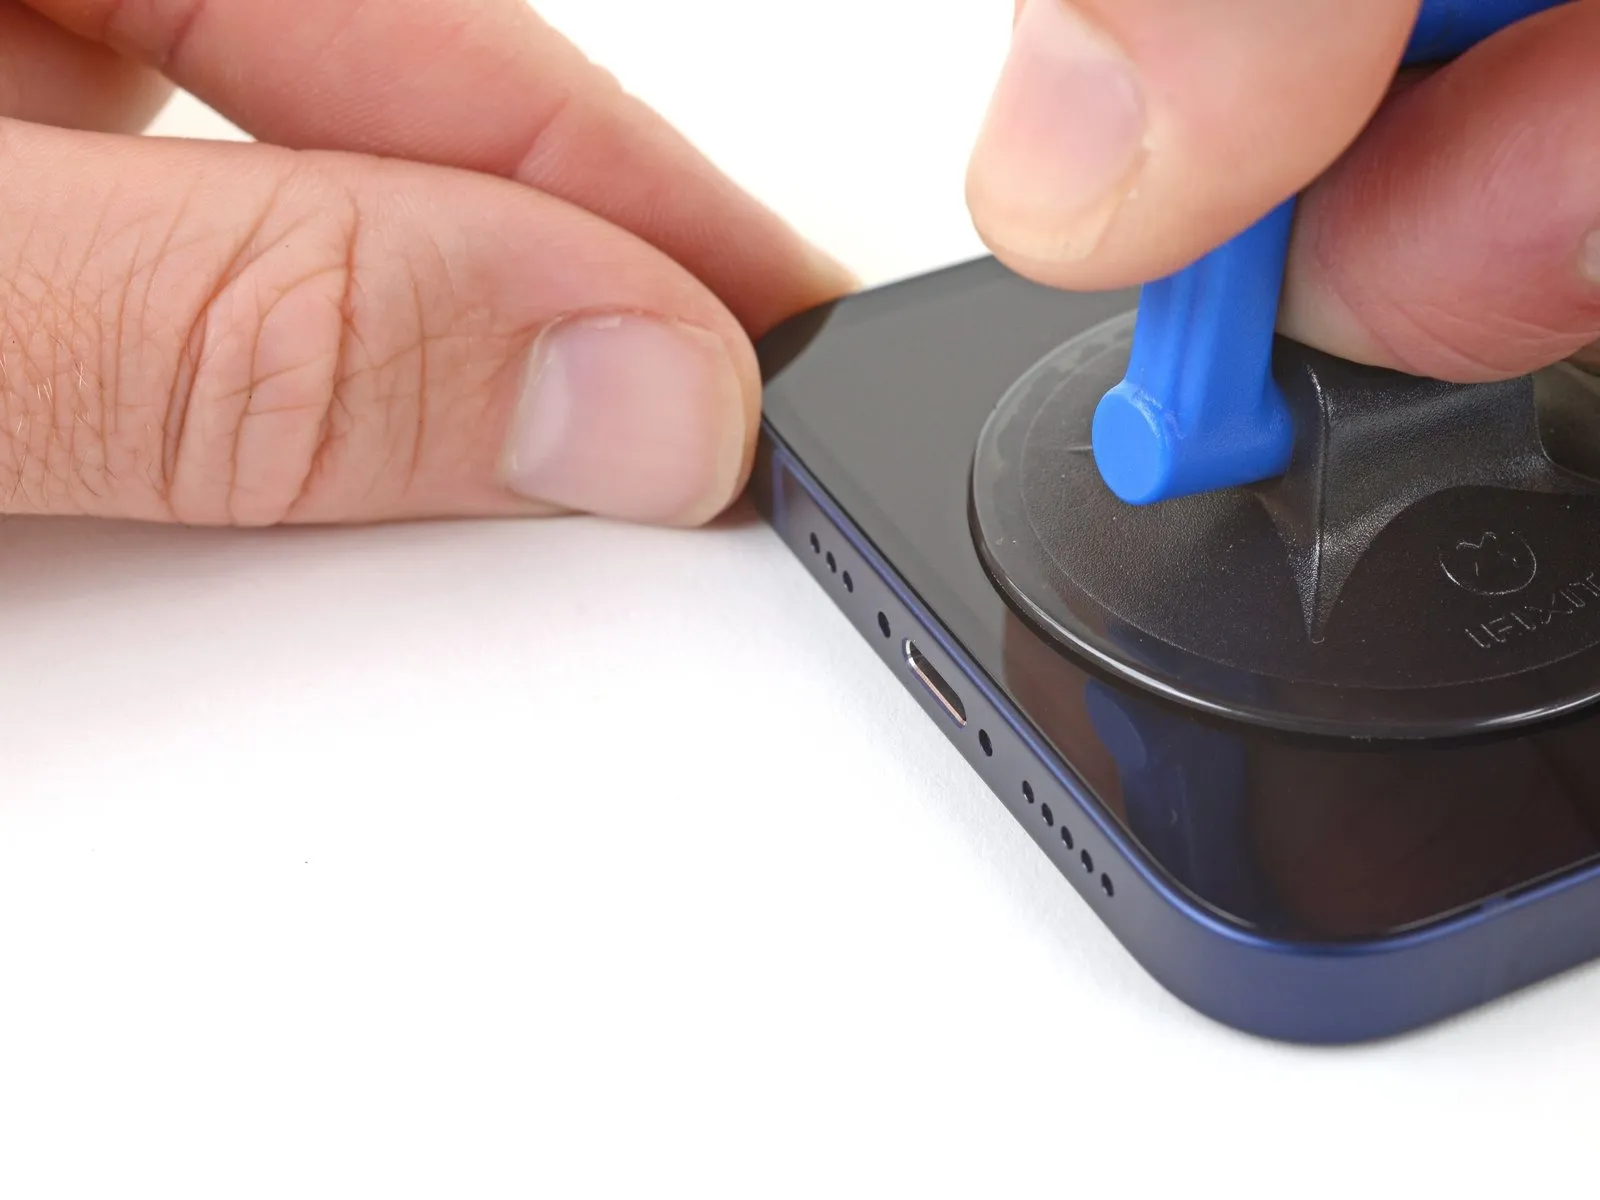
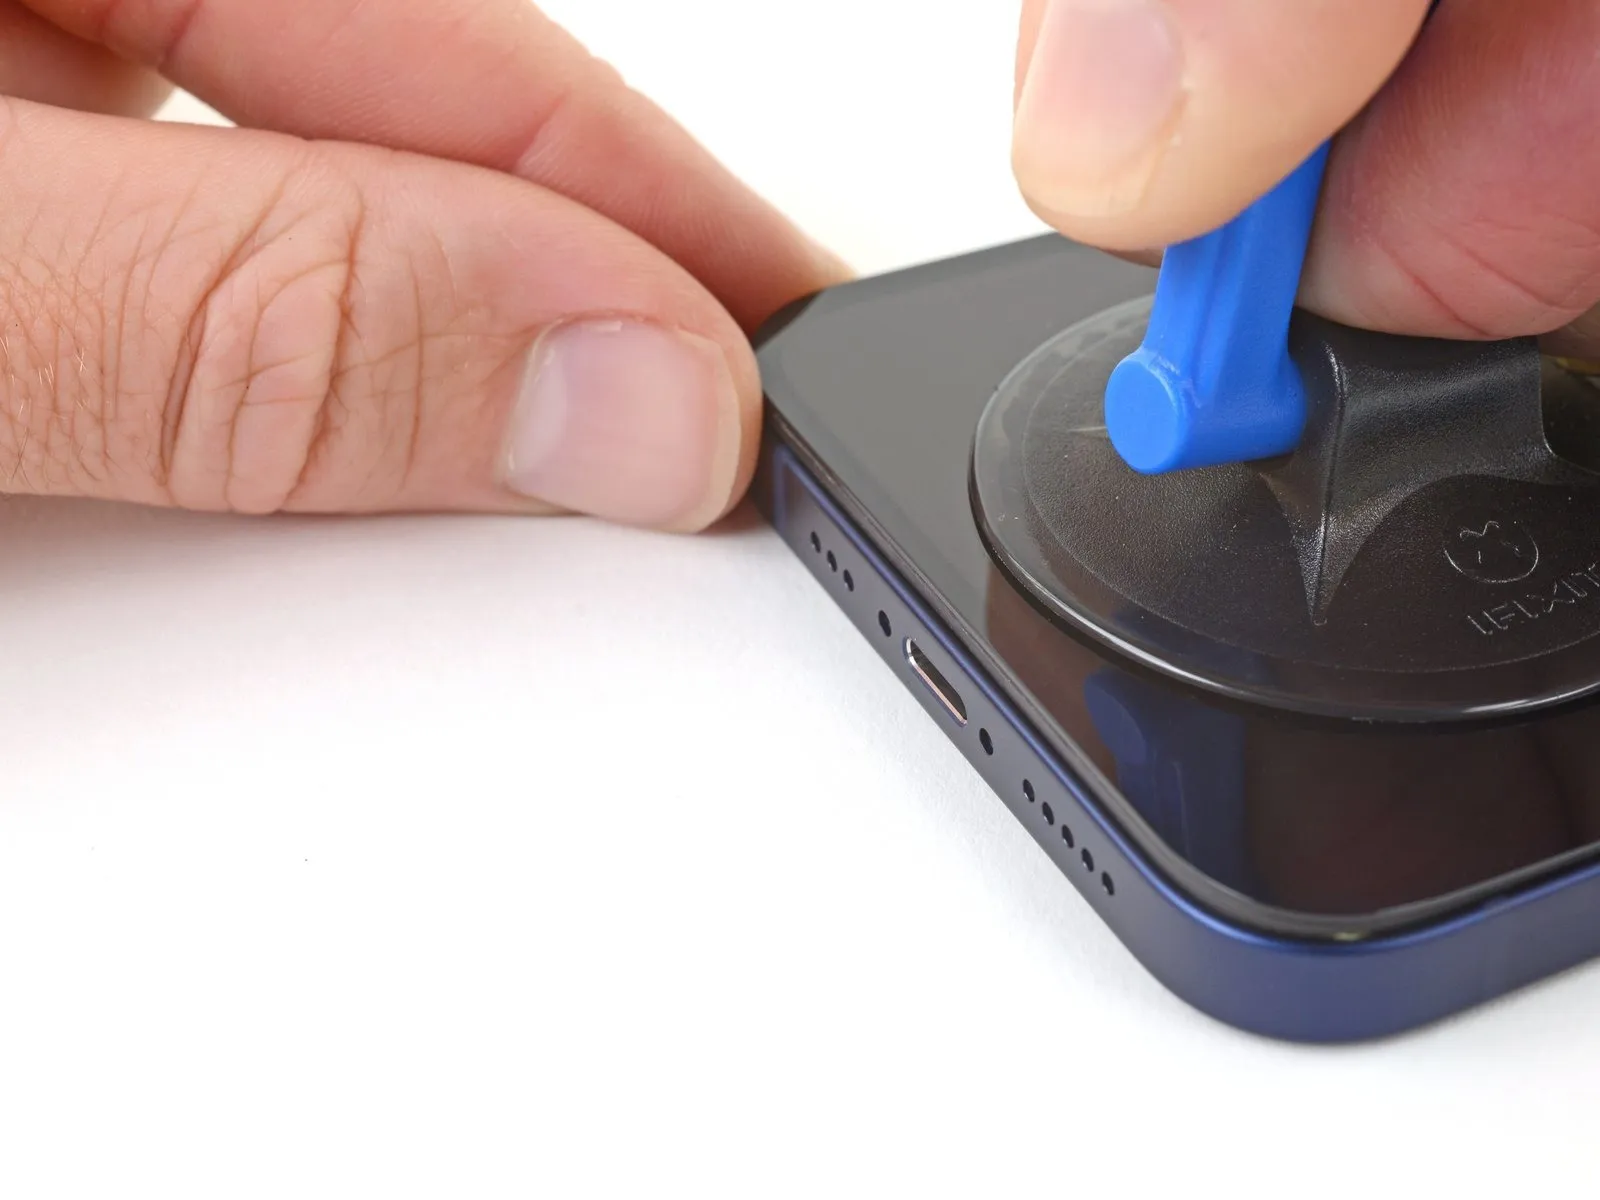
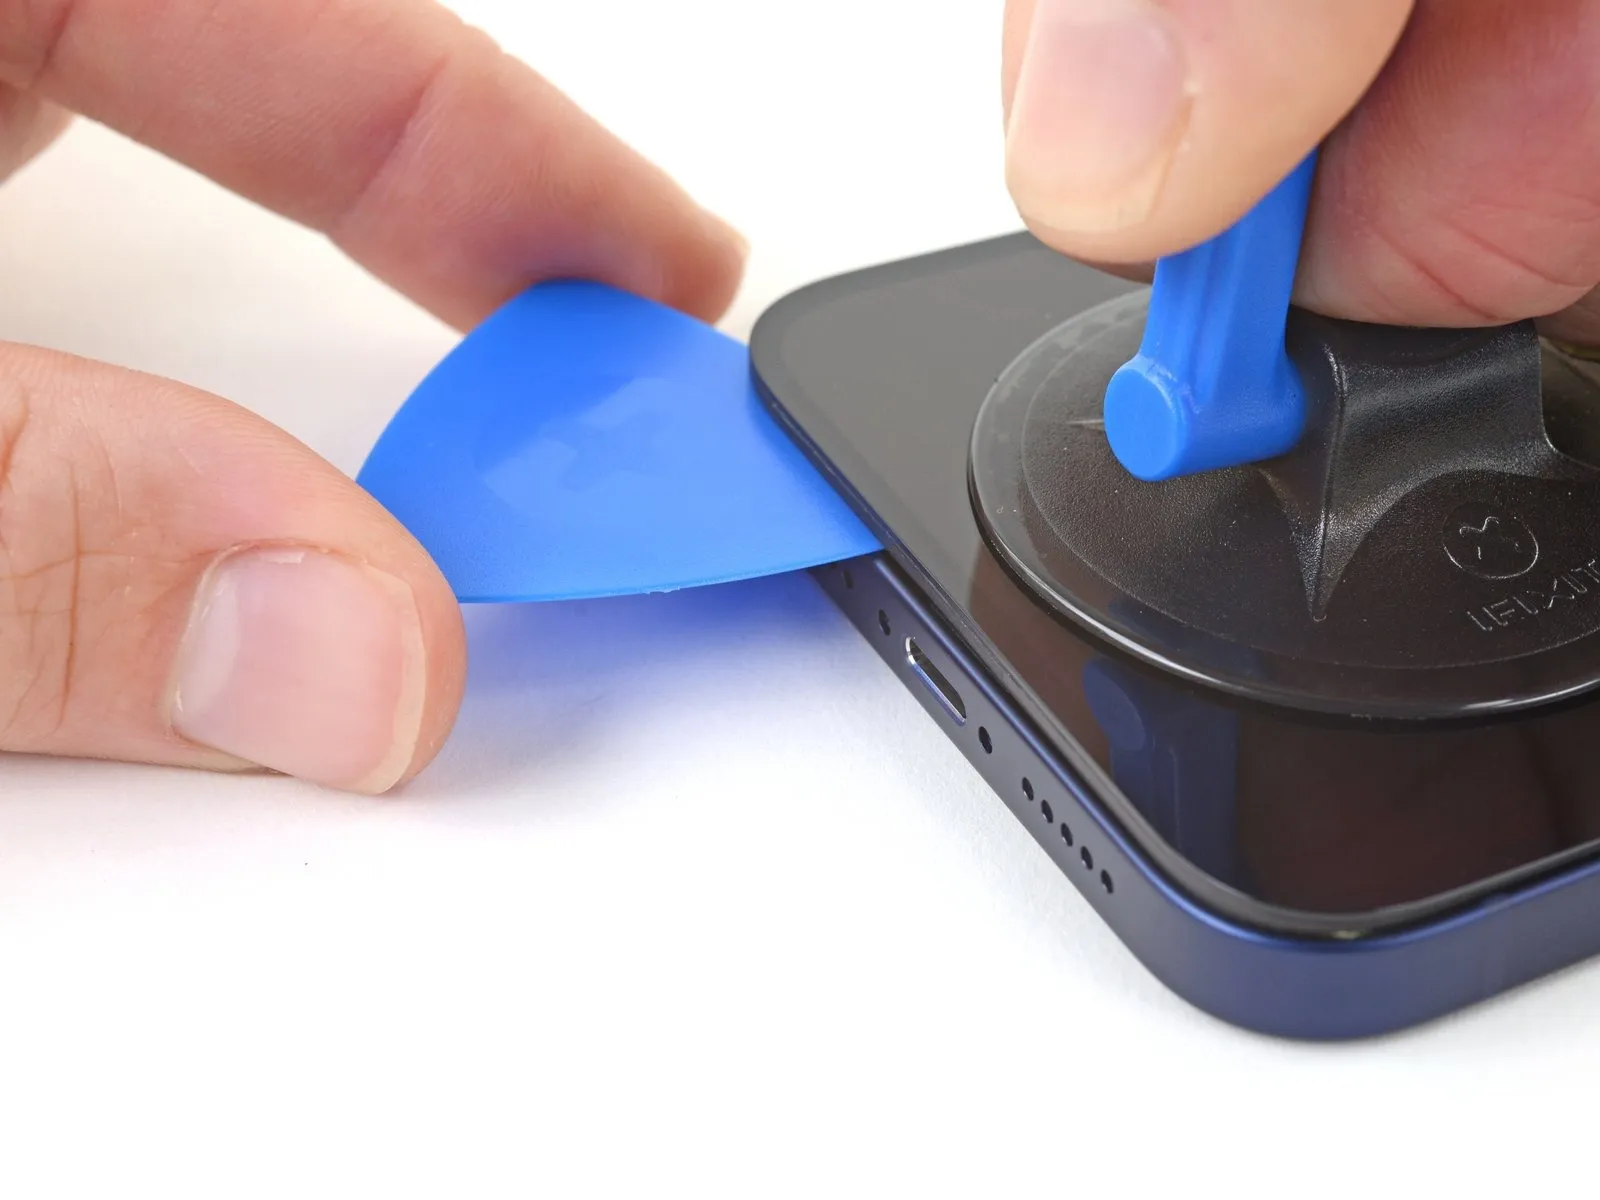
- Begin by applying steady, consistent force to the suction cup to generate a small separation between the display assembly and the device's surrounding structure.
- Carefully introduce an opening tool into the newly formed space situated between the display and the protective plastic border, ensuring it does not contact the display surface.
- Prioritize placement of the opening tool beneath the substantial plastic border to mitigate potential damage to the display panel; a visible separation should be apparent, and the tool should move freely without obstruction.
- Should difficulty arise in establishing this initial separation, increasing localized heat and gently oscillating the display upward can assist in weakening the robust waterproof adhesive bond.
- The screen's retention is achieved through a powerful, watertight adhesive seal, therefore, a considerable amount of force may be required to initially overcome this bond.
Step 12 | Separate the bottom edge adhesive


- During this phase, ensure the initial insertion of your opening tool does not exceed a depth of 3 millimeters from the lower border.
- Employ a reciprocating motion, moving your tool back and forth along the lower edge, to effectively break the adhesive bond.
- Maintain the tool's position within the lower-right corner to inhibit the adhesive from reforming a seal.
- To avoid re-adhesion, keep the opening pick situated in the lower right corner.
Step 13 | Heat the right edge


To facilitate separation, apply warmth to the right-hand perimeter of the iPhone, specifically the area adjacent to the power button, utilizing a hair dryer until the surface temperature reaches a point where it is noticeably uncomfortable to touch.
- The purpose of this heating process is to soften the adhesive securing the display assembly, enabling subsequent separation.
Step 14 | Separate the right adhesive
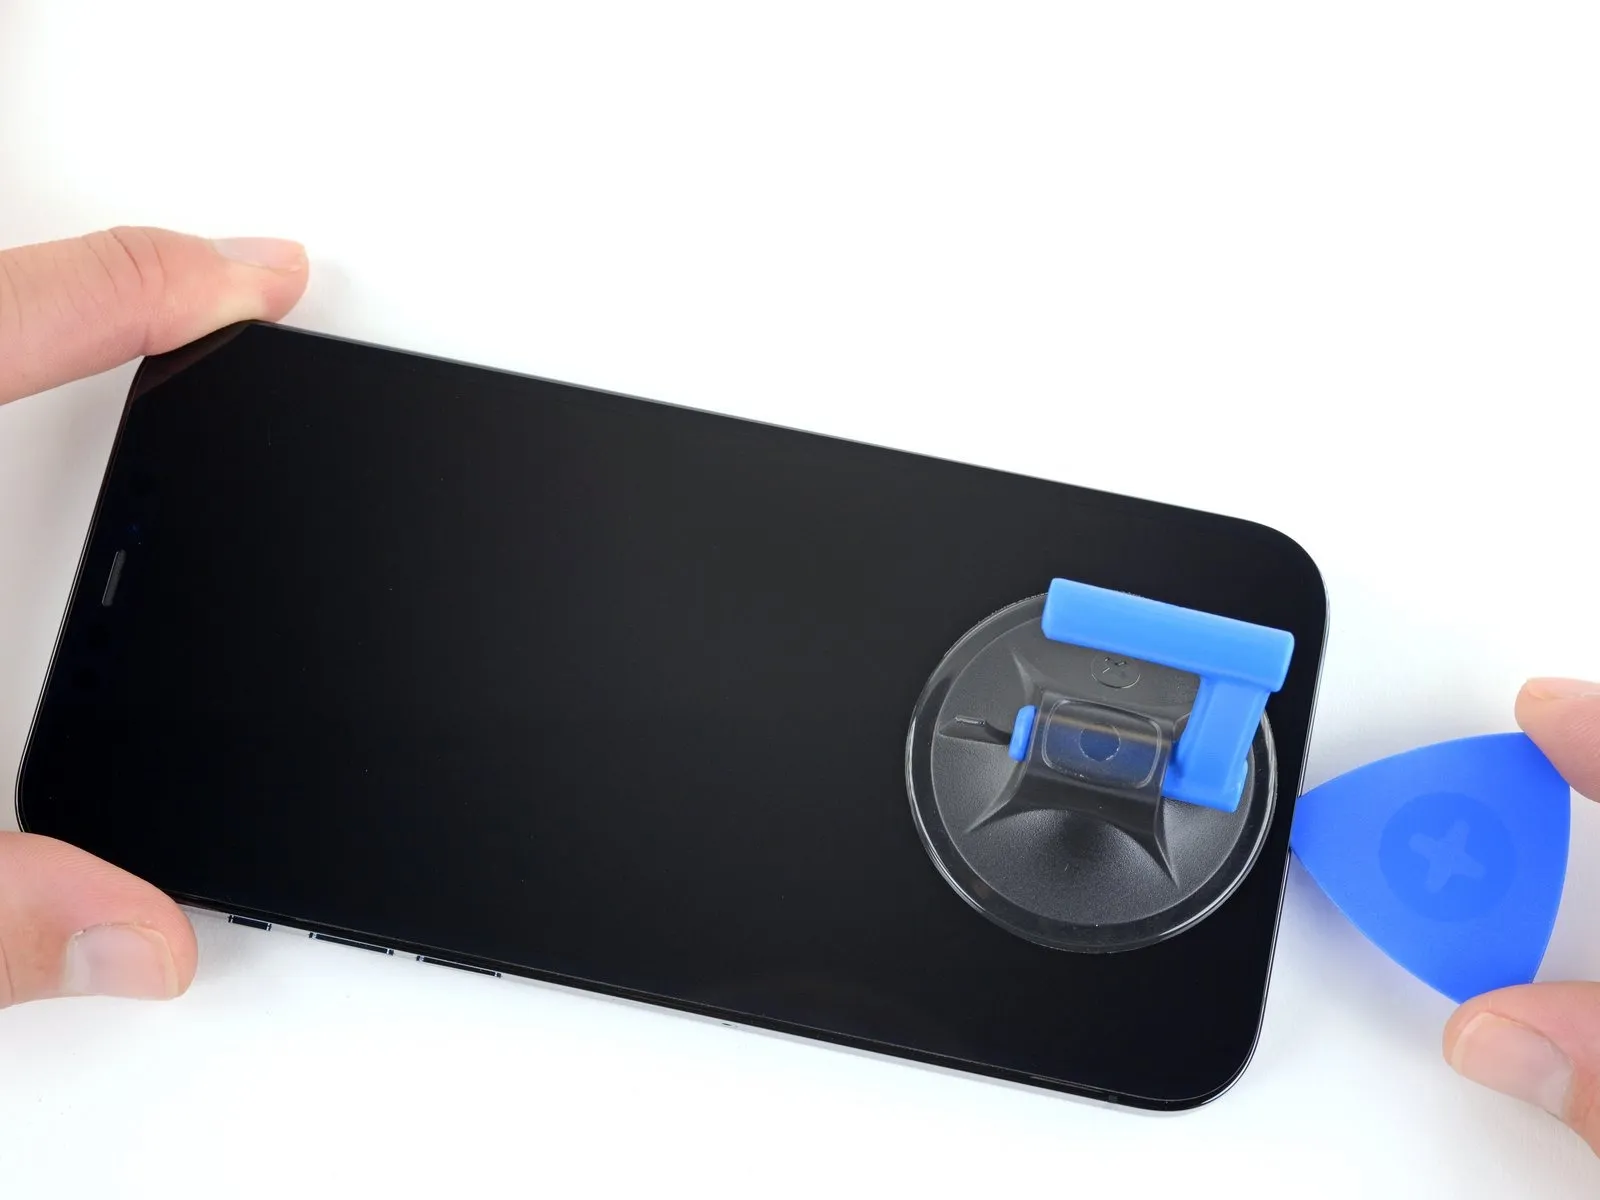


Begin the separation process by positioning a prying tool at the lower-right periphery of the iPhone’s enclosure.
- Advance the tool along the right-hand side of the device, moving upwards, until the upper-right corner is reached.
- To prevent potential harm to delicate internal parts, ensure the tool’s insertion depth remains below 3 millimeters.
- Maintain the position of the prying tool at the top-right corner of the iPhone before proceeding with subsequent steps.
- The adhesive bond between the iPhone’s components is released by carefully maneuvering the opening tool.
Step 15 | Heat the top edge

Employ a hair dryer, directing heat toward the iPhone's upper perimeter, until the screen's temperature reaches a point of slight discomfort upon contact.
- The application of heat via a hair dryer should be focused on the iPhone's top edge, raising the screen's temperature to a level just beyond comfortable touch.
Step 16 | Separate the top adhesive


- Utilize a prying tool to release the adhesive securing the iPhone's upper-right edge by carefully sliding it into the seam.
- To prevent potential harm to the proximity and other sensors located at the top of the device, ensure the tool's insertion depth remains below 3 millimeters.
- Maintain the opening tool's position within the top-left corner of the iPhone's enclosure as you proceed with the repair process.
Step 17 | Heat the left edge


Apply warmth to the left side of the iPhone's display utilizing a hair dryer, continuing until the surface reaches a temperature just beyond comfortable touch.
Step 18 | Separate the left adhesive
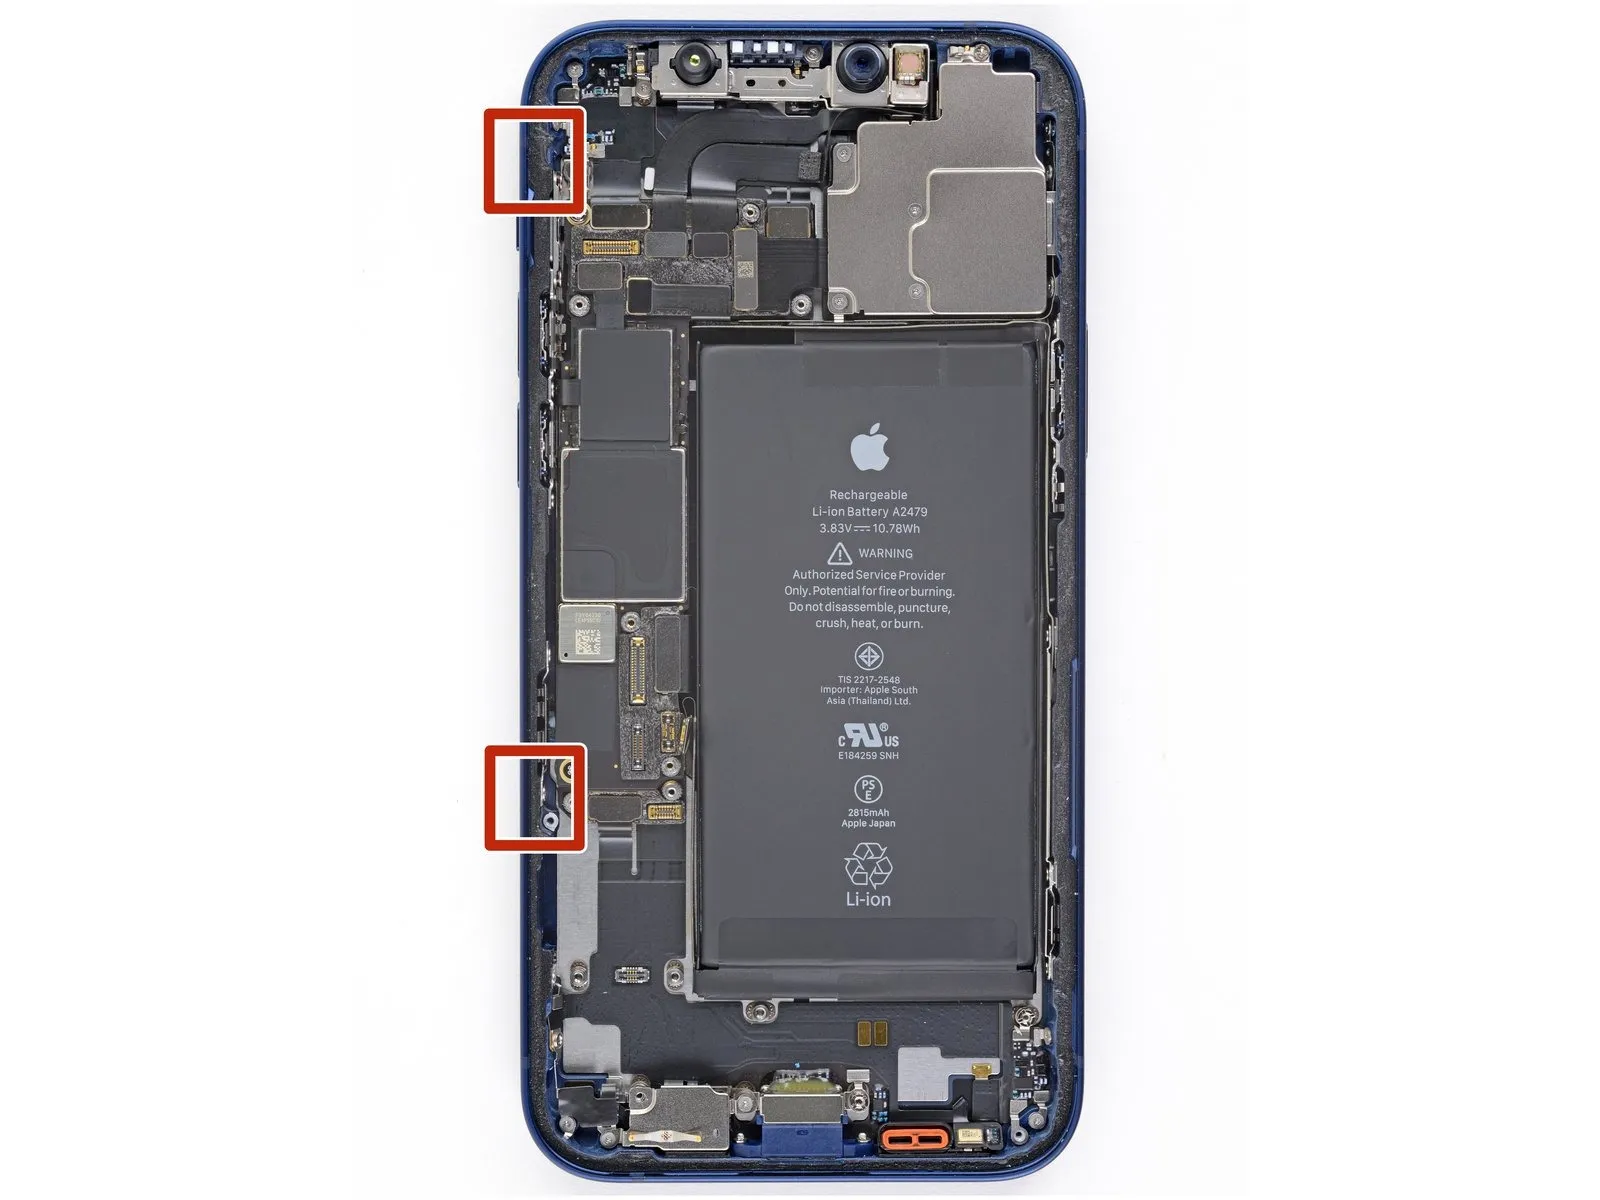


- To prevent harm to the two screen-to-phone cables, ensure your opening tool does not penetrate beyond a depth of 2 millimeters along the left side.Employ a rotating motion with your tool, focusing on the upper-left corner of the display assembly.Advance your opening tool along the left edge to release the adhesive securing the screen.
- Should adhesive separation prove difficult, apply heat to the left edge to soften the bond.
- The two cables linking the display to the device's mainboard are vulnerable to damage; exercise caution.
- Movement of the opening tool should be a sliding action, working downwards along the left screen perimeter to break the adhesive seal.
Step 19 | Open the iPhone
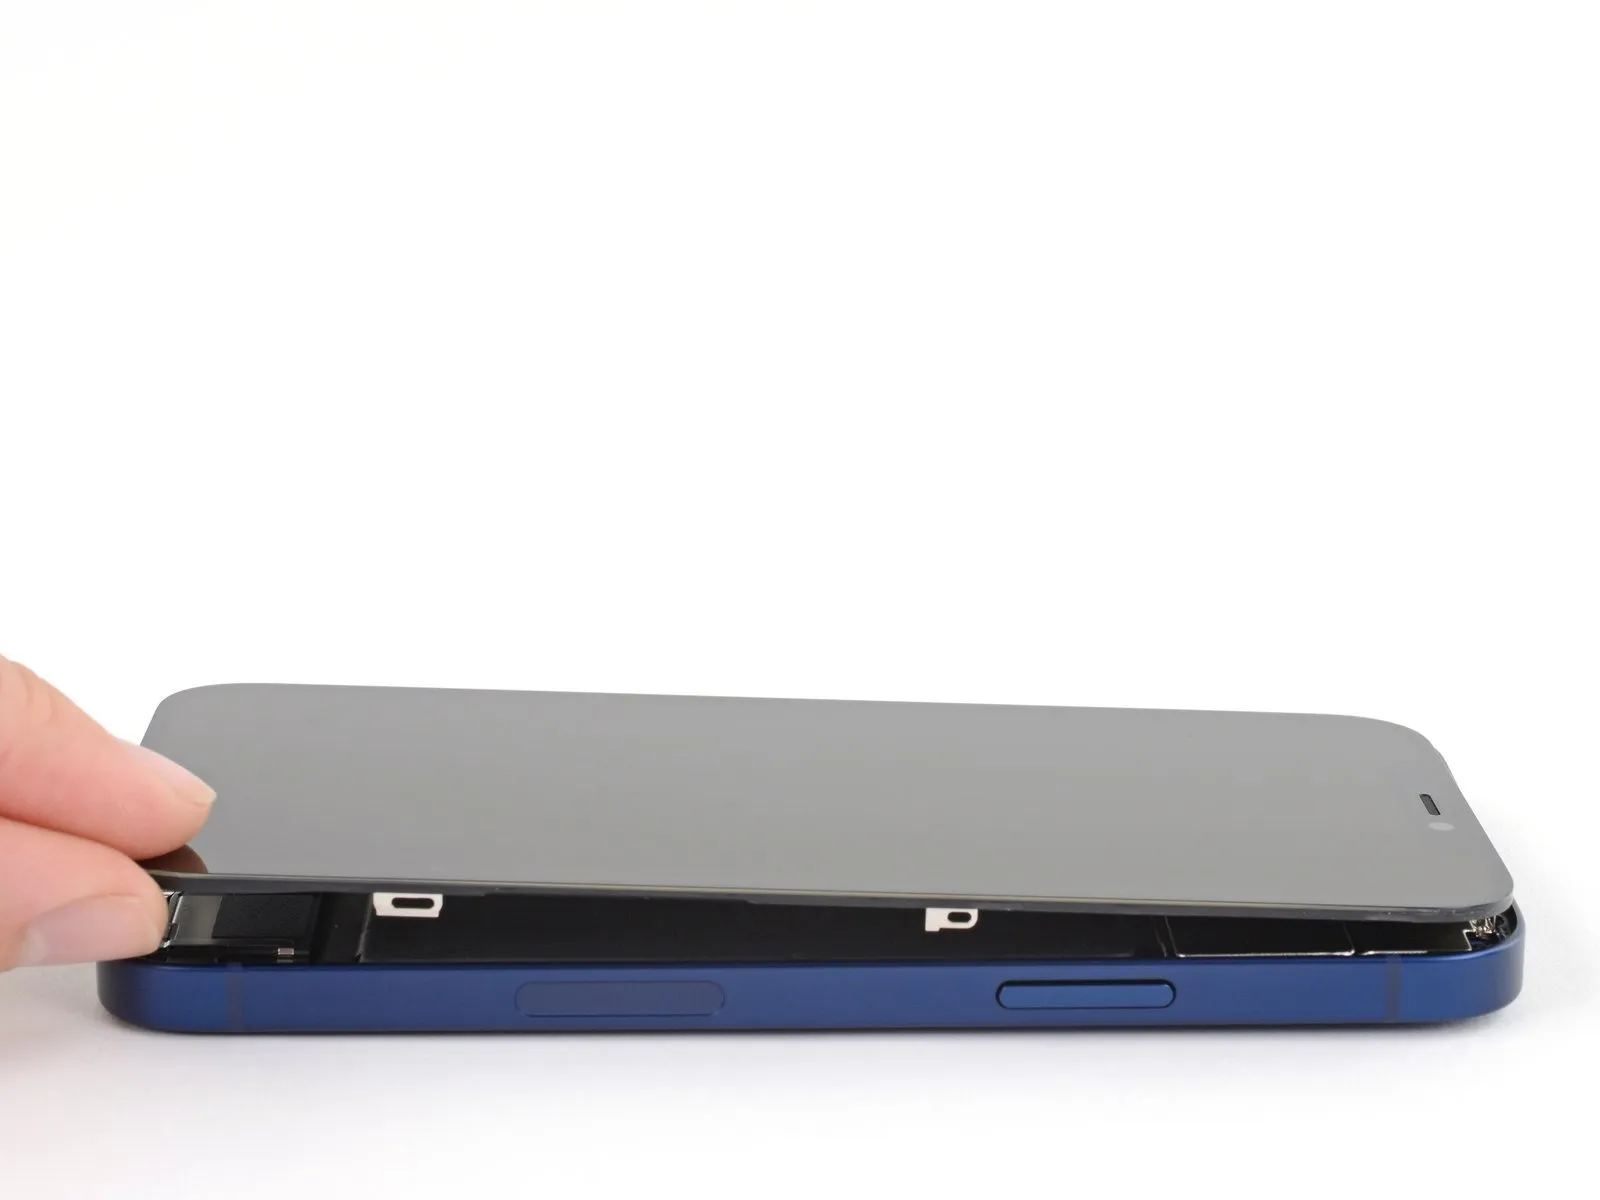
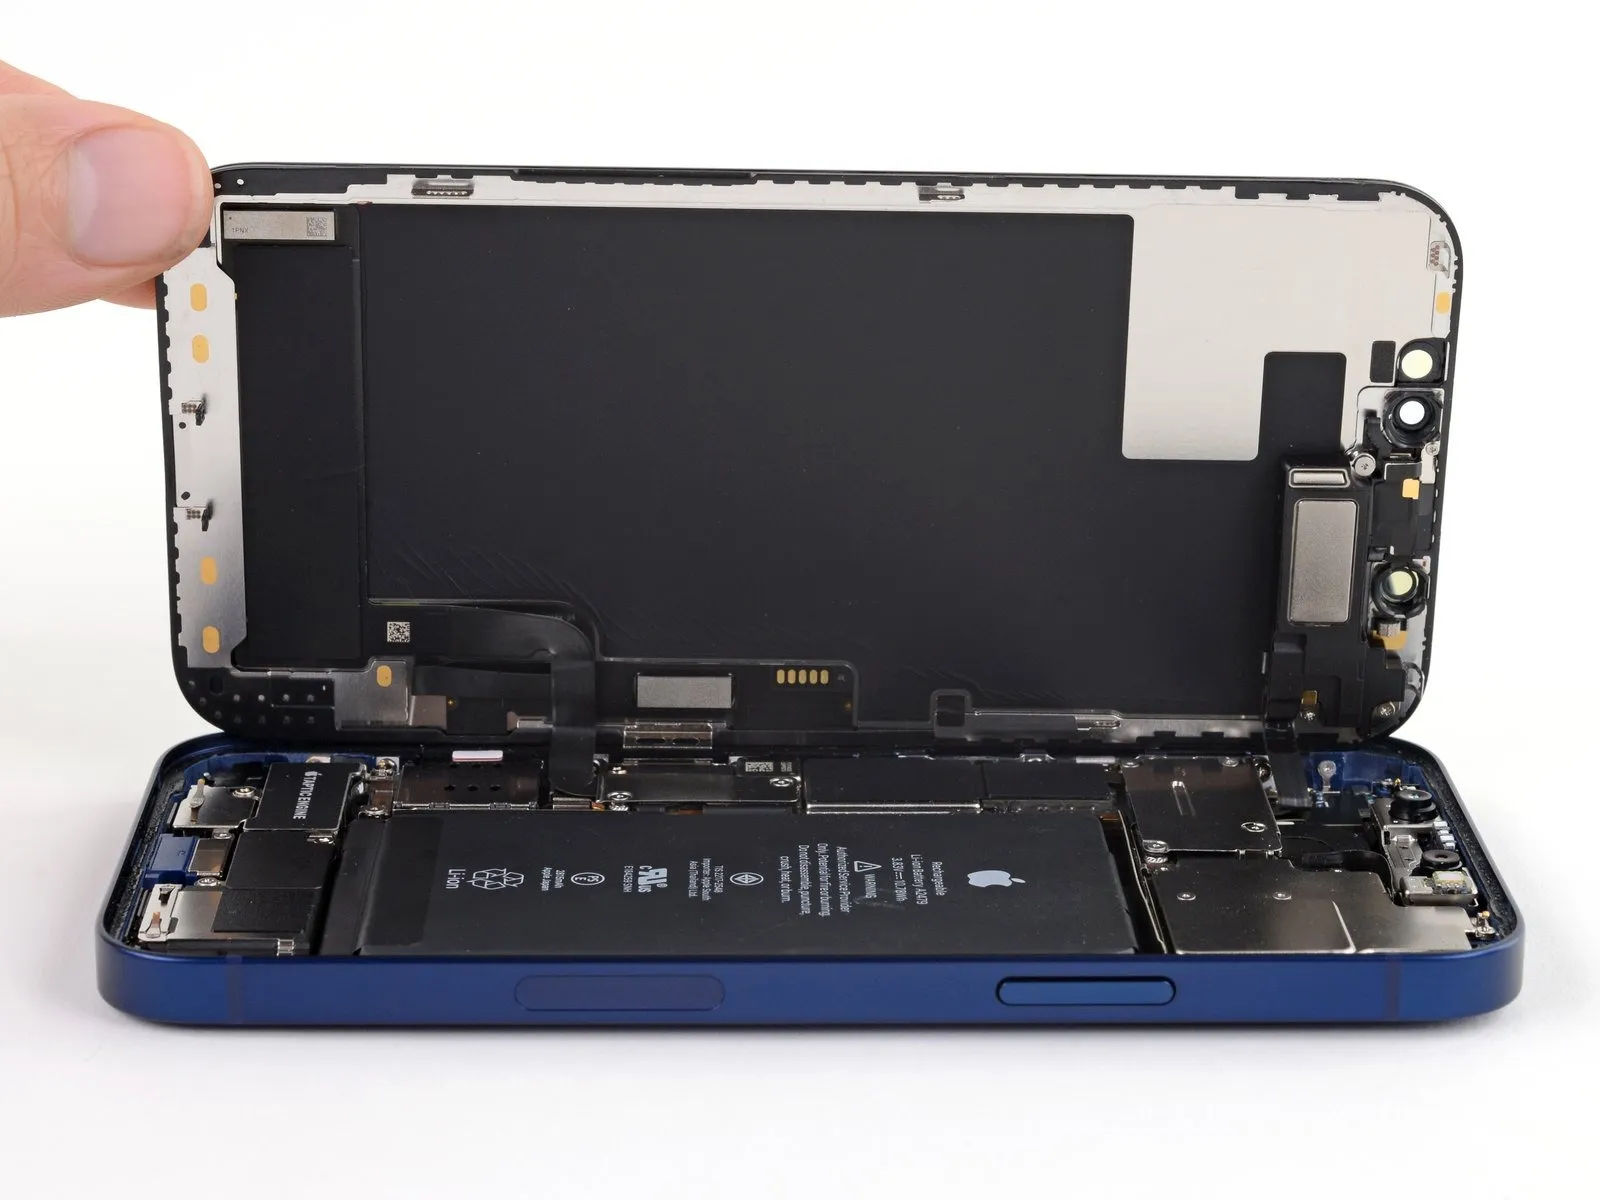
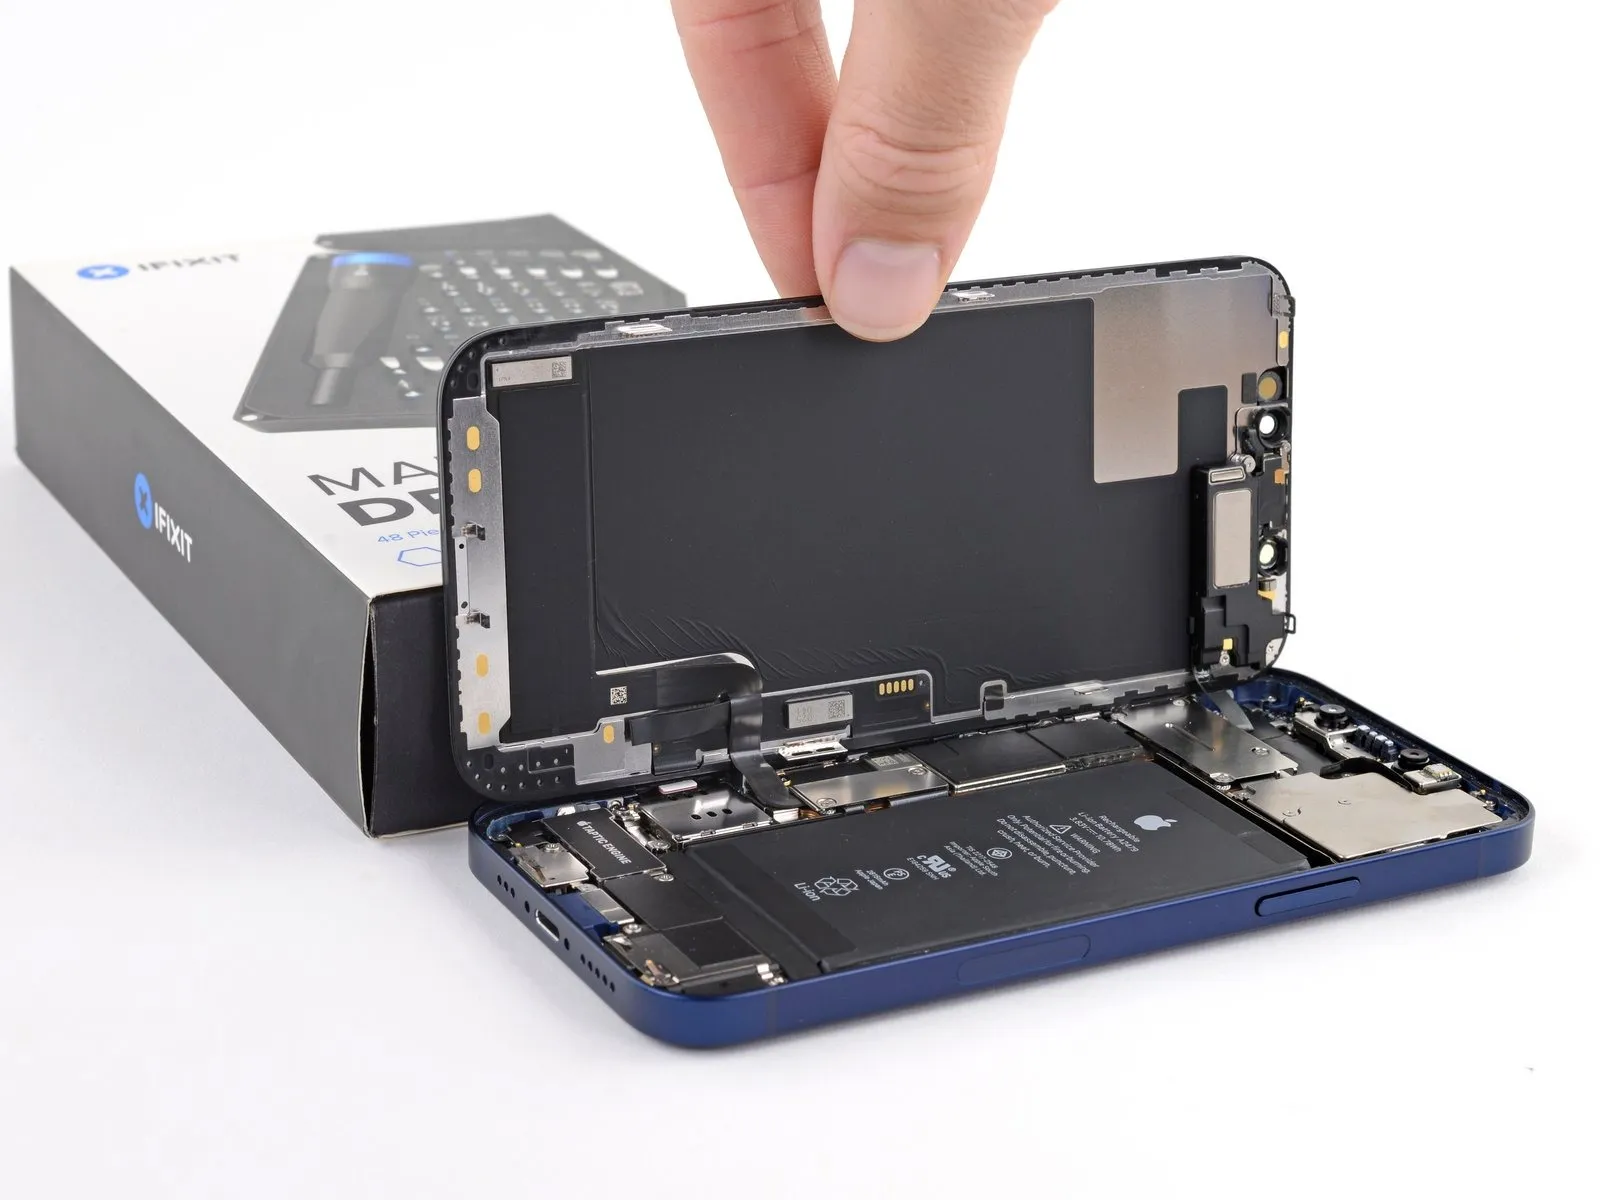
- Orient the iPhone, positioning the right-hand side towards you for better access.
- Initiate the display opening process by pivoting the screen upwards from the right side, mimicking the action of opening a book's cover.
- Refrain from completely disconnecting the display at this stage, because delicate ribbon cables remain attached to the logic board.
- Secure the lifted display in an upright position using a support to free your hands during the repair.
- When reassembling, position the display, ensure the top edge clips are correctly aligned, and gently apply pressure to the top edge before fully securing the display; if resistance is encountered, inspect the display's perimeter clips for any deformation.
Step 20 | Unscrew the battery and display connector cover
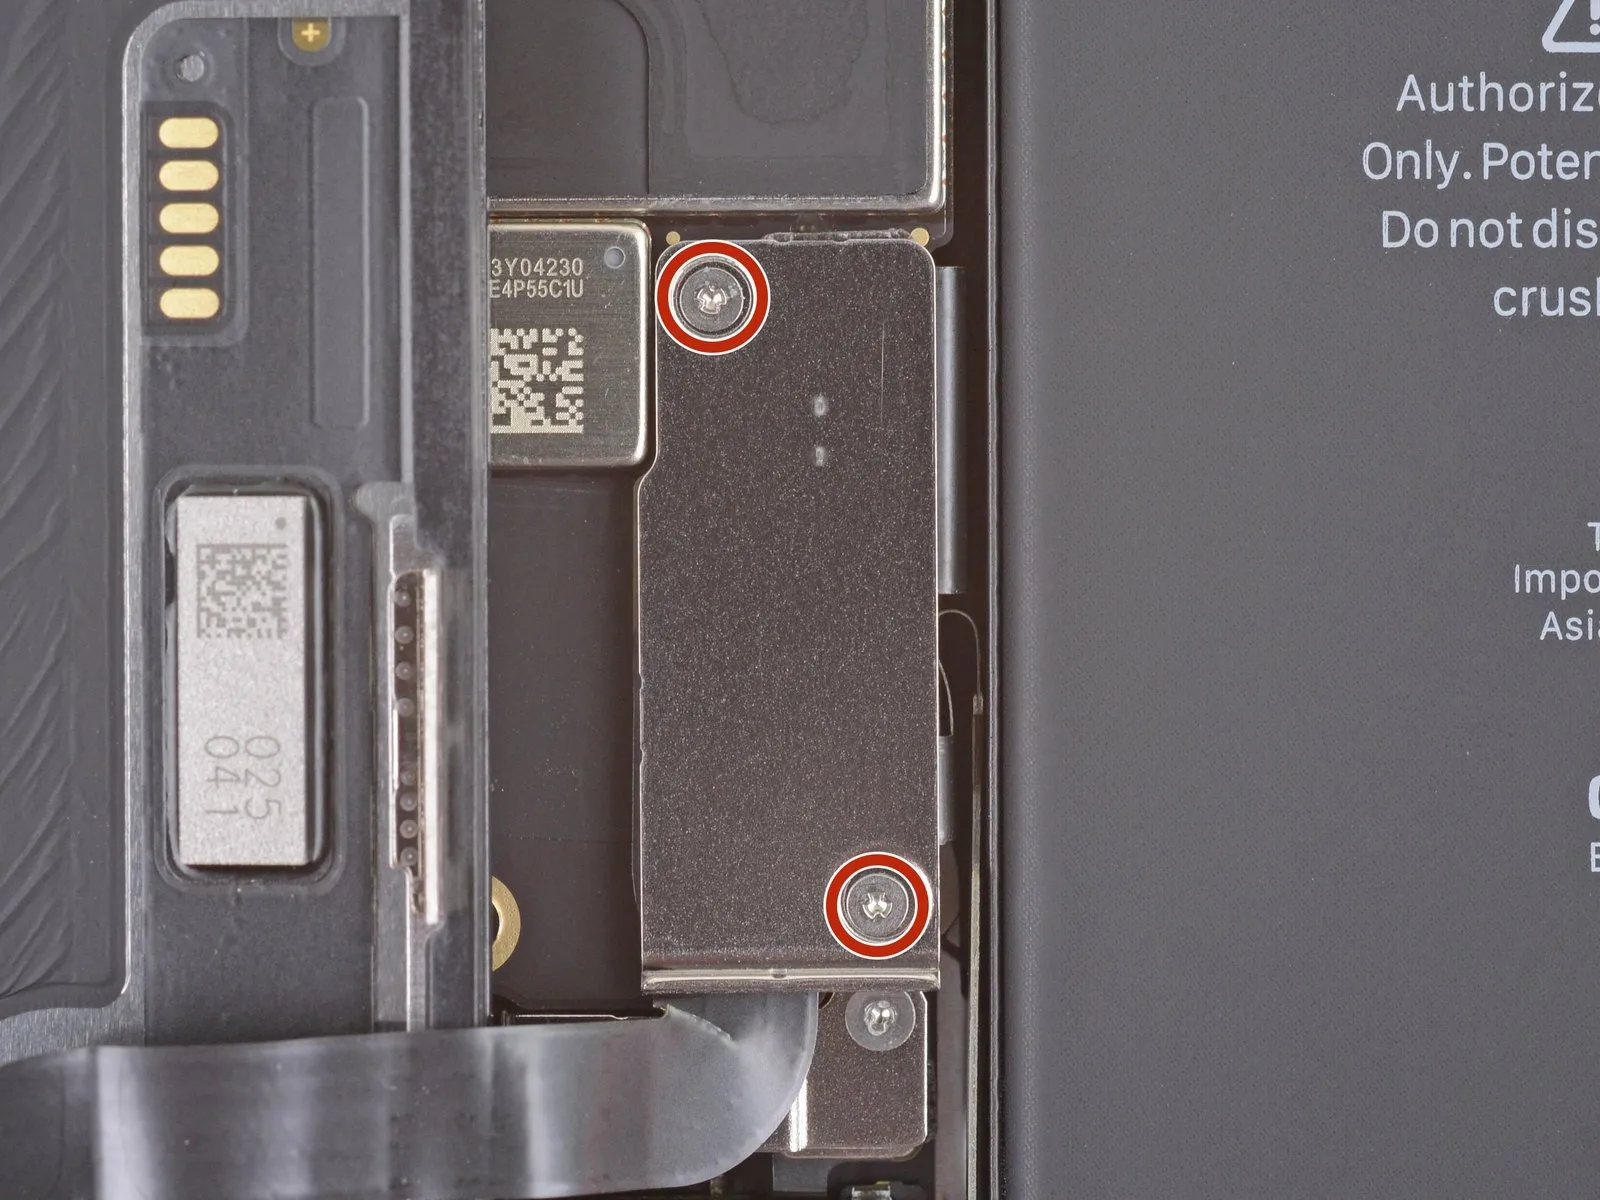
- Detach the battery and display connector cover by unscrewing two Y000 screws, each measuring 1.1 mm in length.Carefully organize and document the location of every screw during disassembly to ensure correct placement during reassembly, preventing potential damage to the iPhone.Prior to permanently securing the display, it's advisable to briefly activate the iPhone and verify all features are operating correctly.
- Completely de-energize the iPhone by powering it down before proceeding with the remaining steps in the reassembly process.
- Proper screw management is crucial; returning each screw to its original position mitigates the risk of internal component damage.
Step 21 | Remove the battery and display connector cover
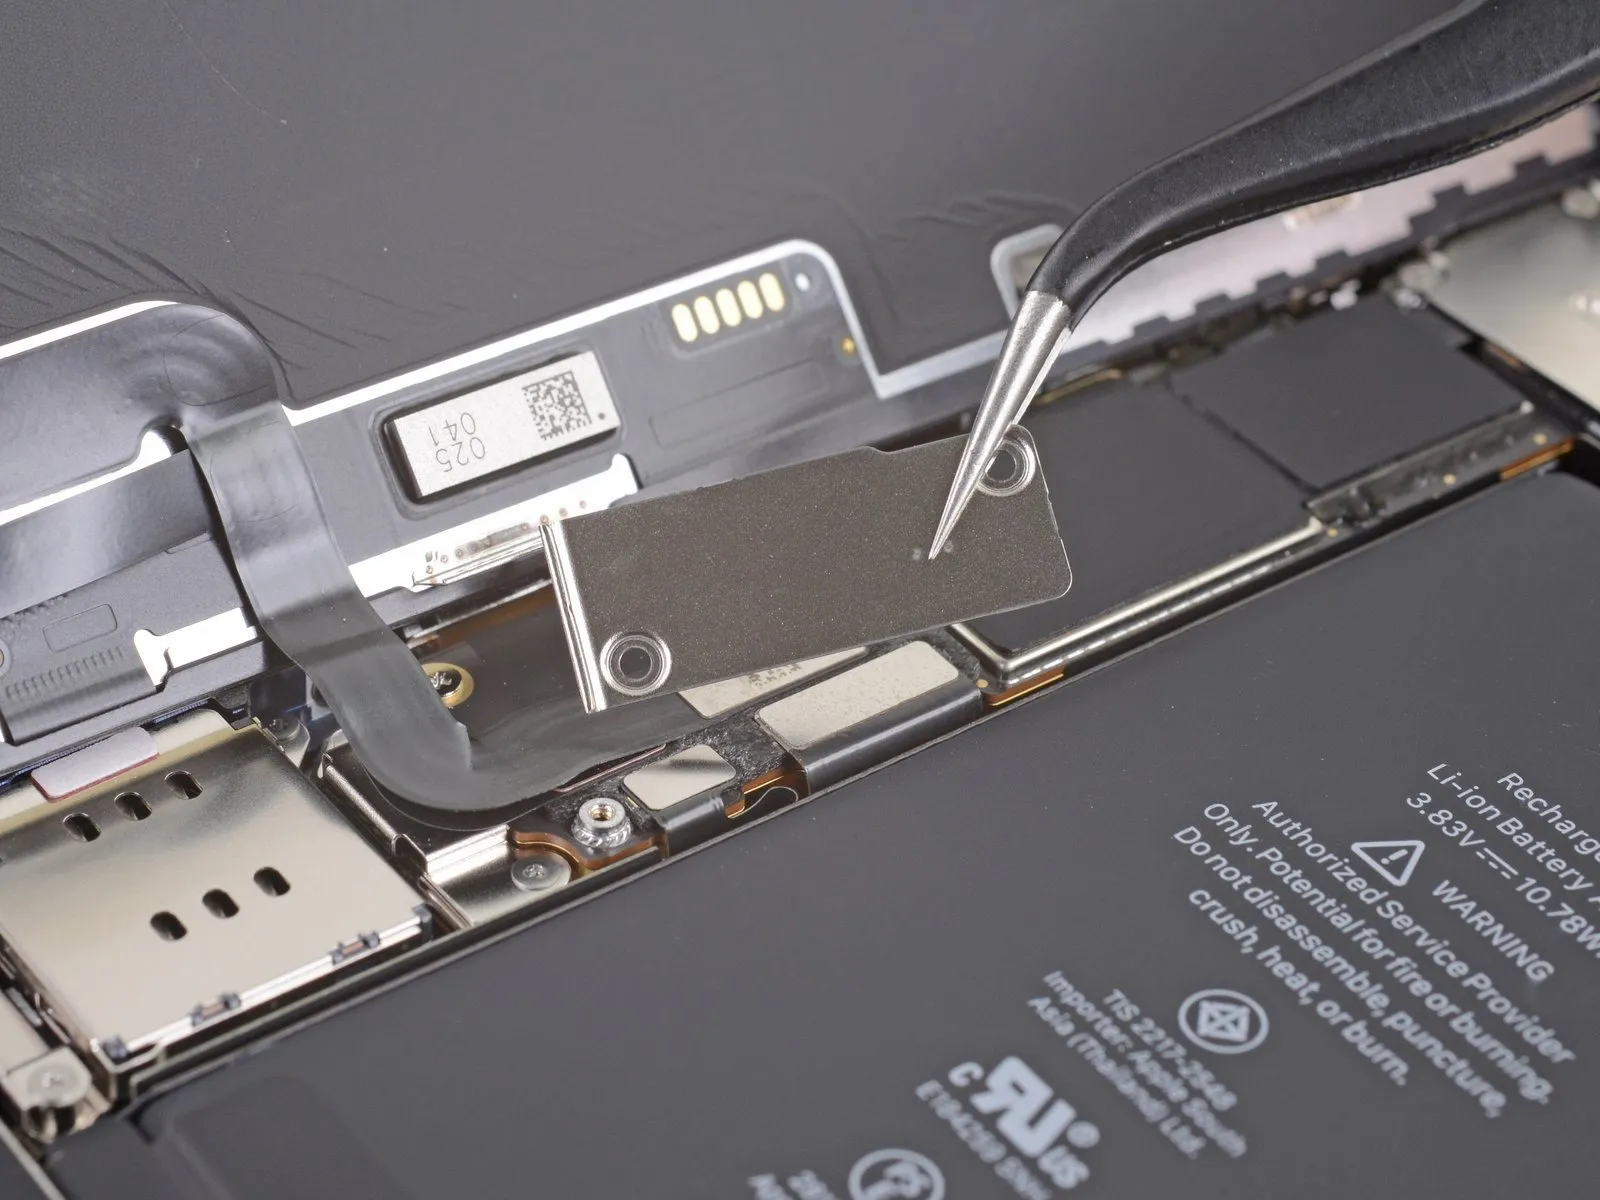
Detach the protective enclosure.
Step 22 | Disconnect the battery
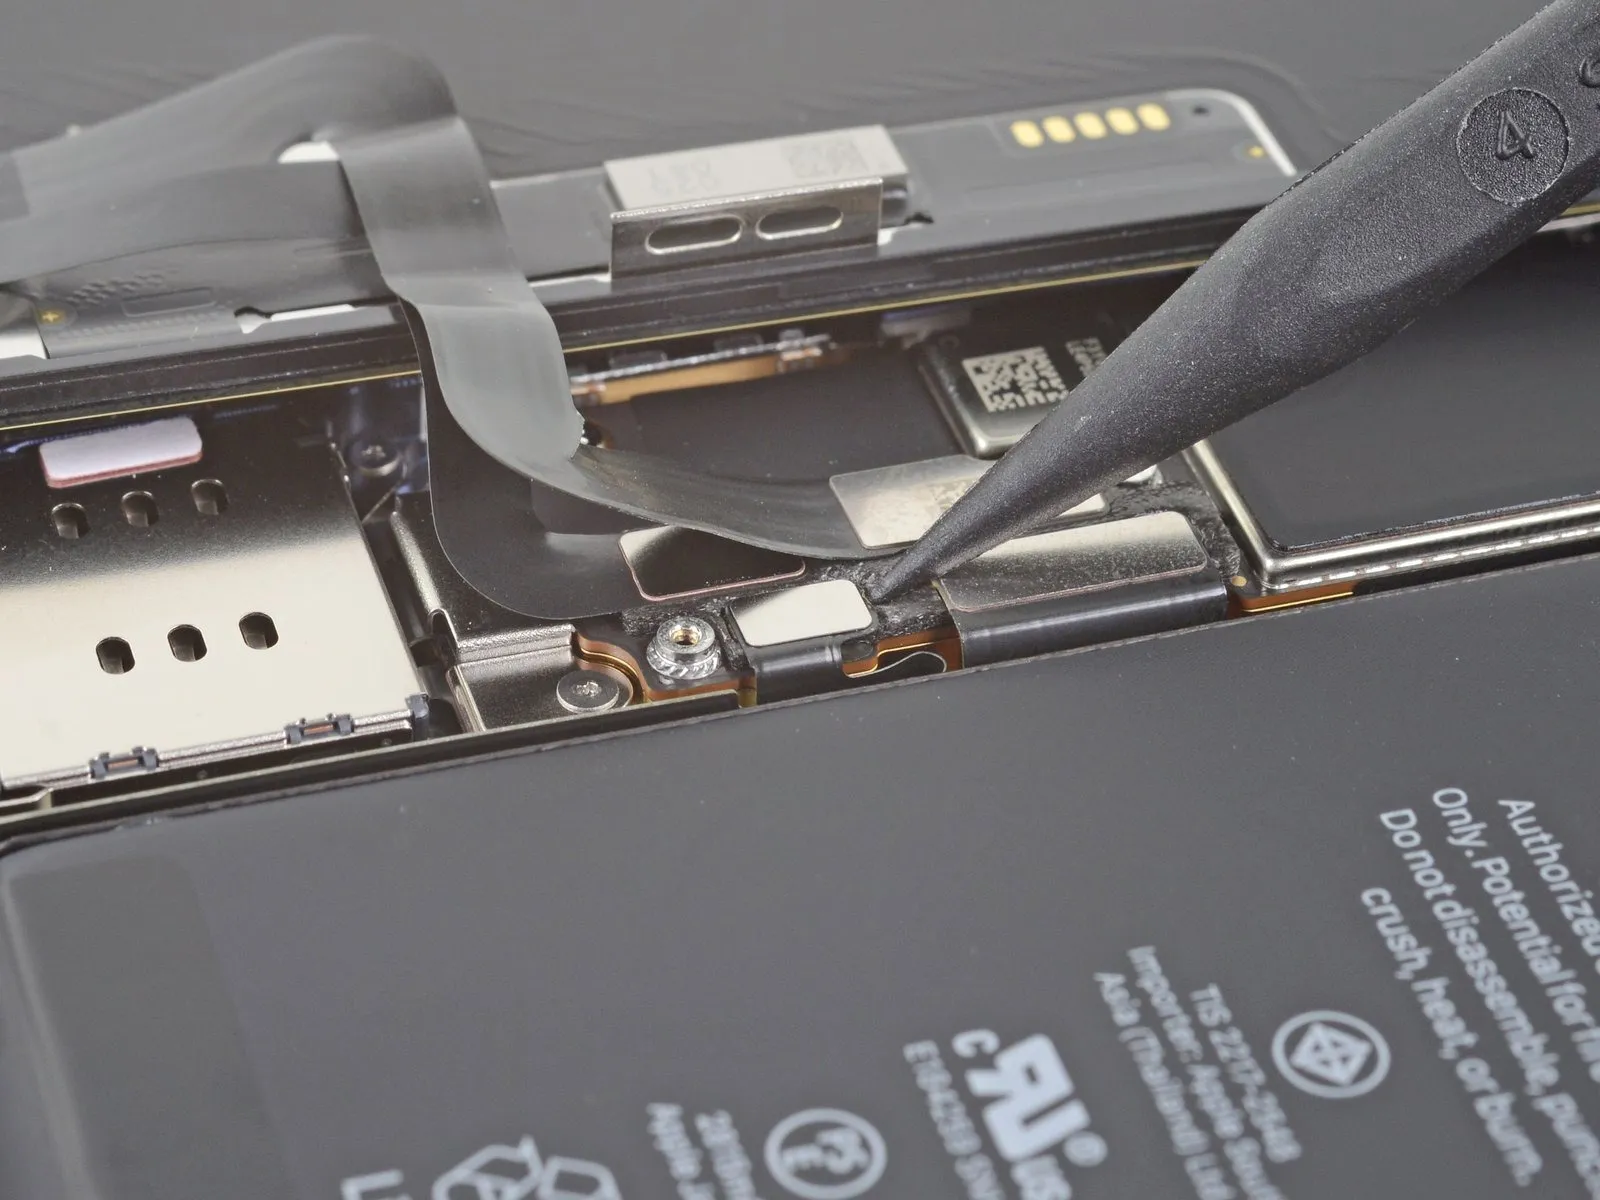
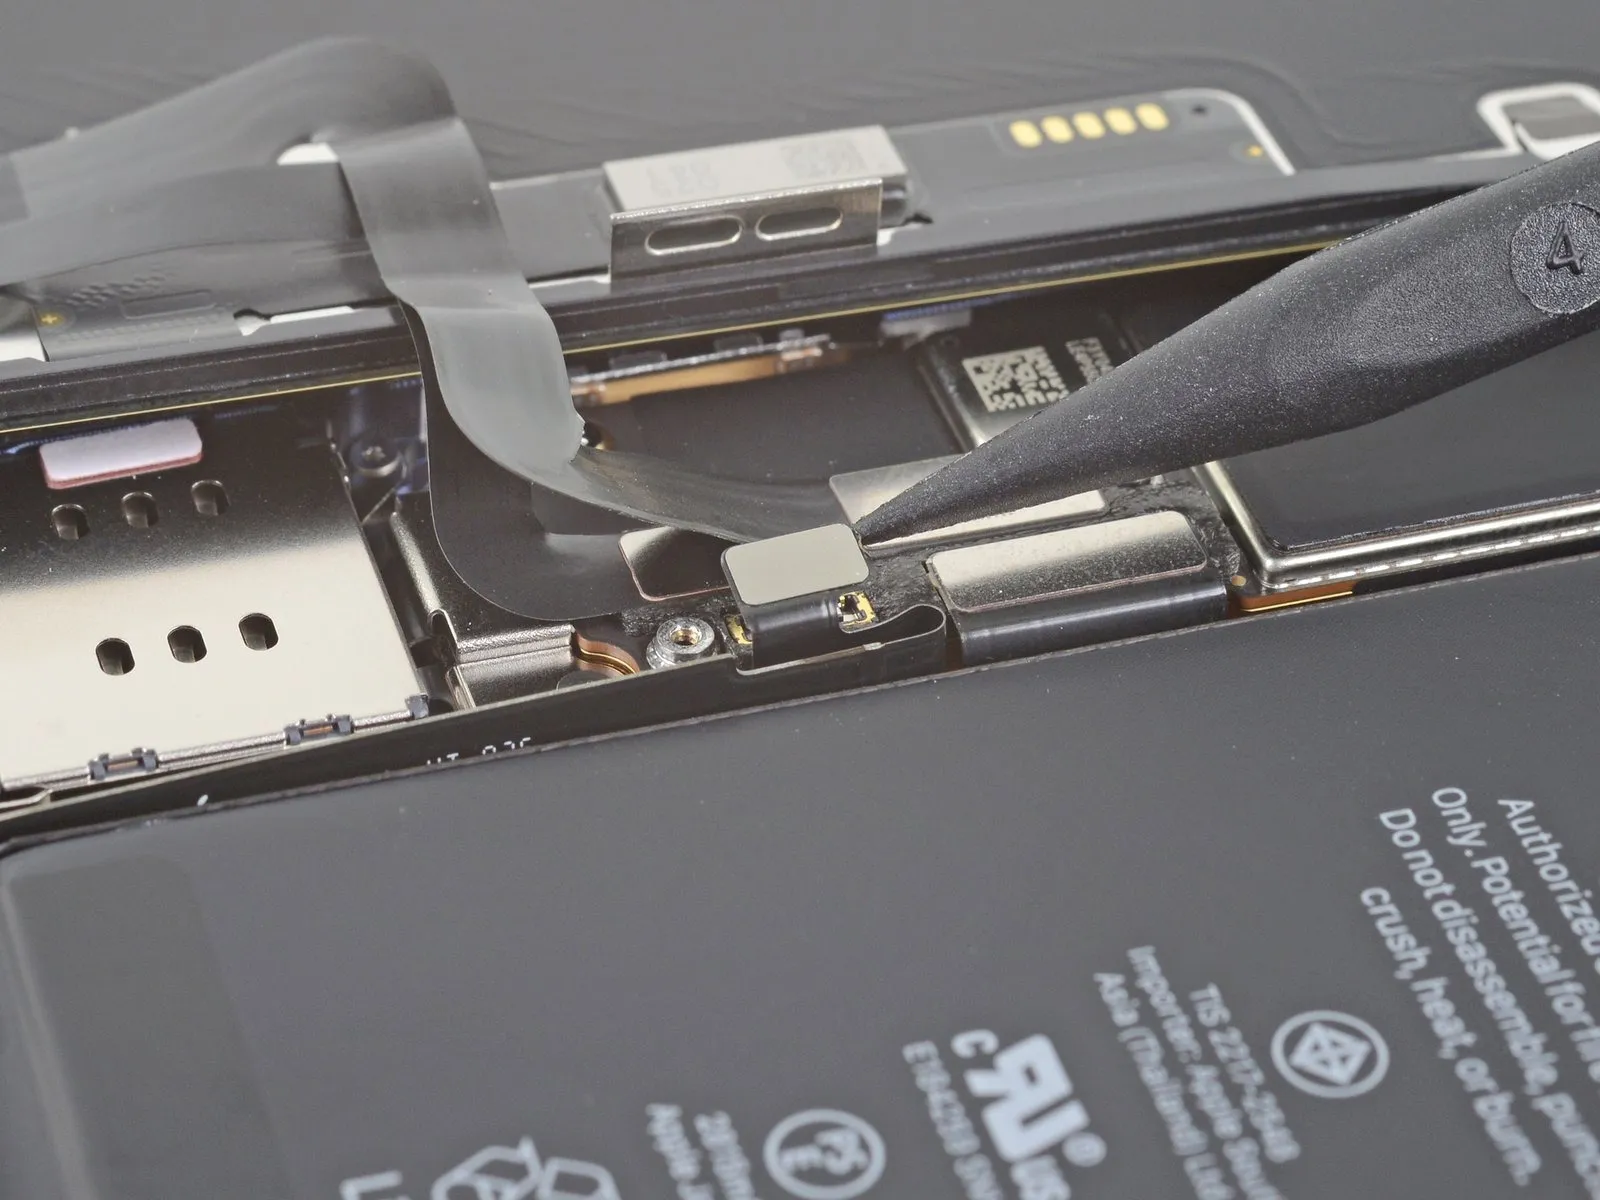
- Employ a spudger tool, or a similarly non-marring object like a clean fingernail, to lift the battery connector's retaining clip from its corresponding receptacle on the logic board.Exercise caution to avoid harming the black silicone sealant that encases this connector and others, as it is critical for safeguarding against water and particulate contamination.To ensure the connector does not inadvertently establish an electrical connection and energize the device, gently deflect it away from the logic board’s surface.
- The silicone seals are vital components, offering an additional layer of protection against ingress of both water and dust particles.
- Prevent accidental power delivery to the phone by slightly angling the connector away from the socket during the repair procedure.
Step 23 | Disconnect the display cable
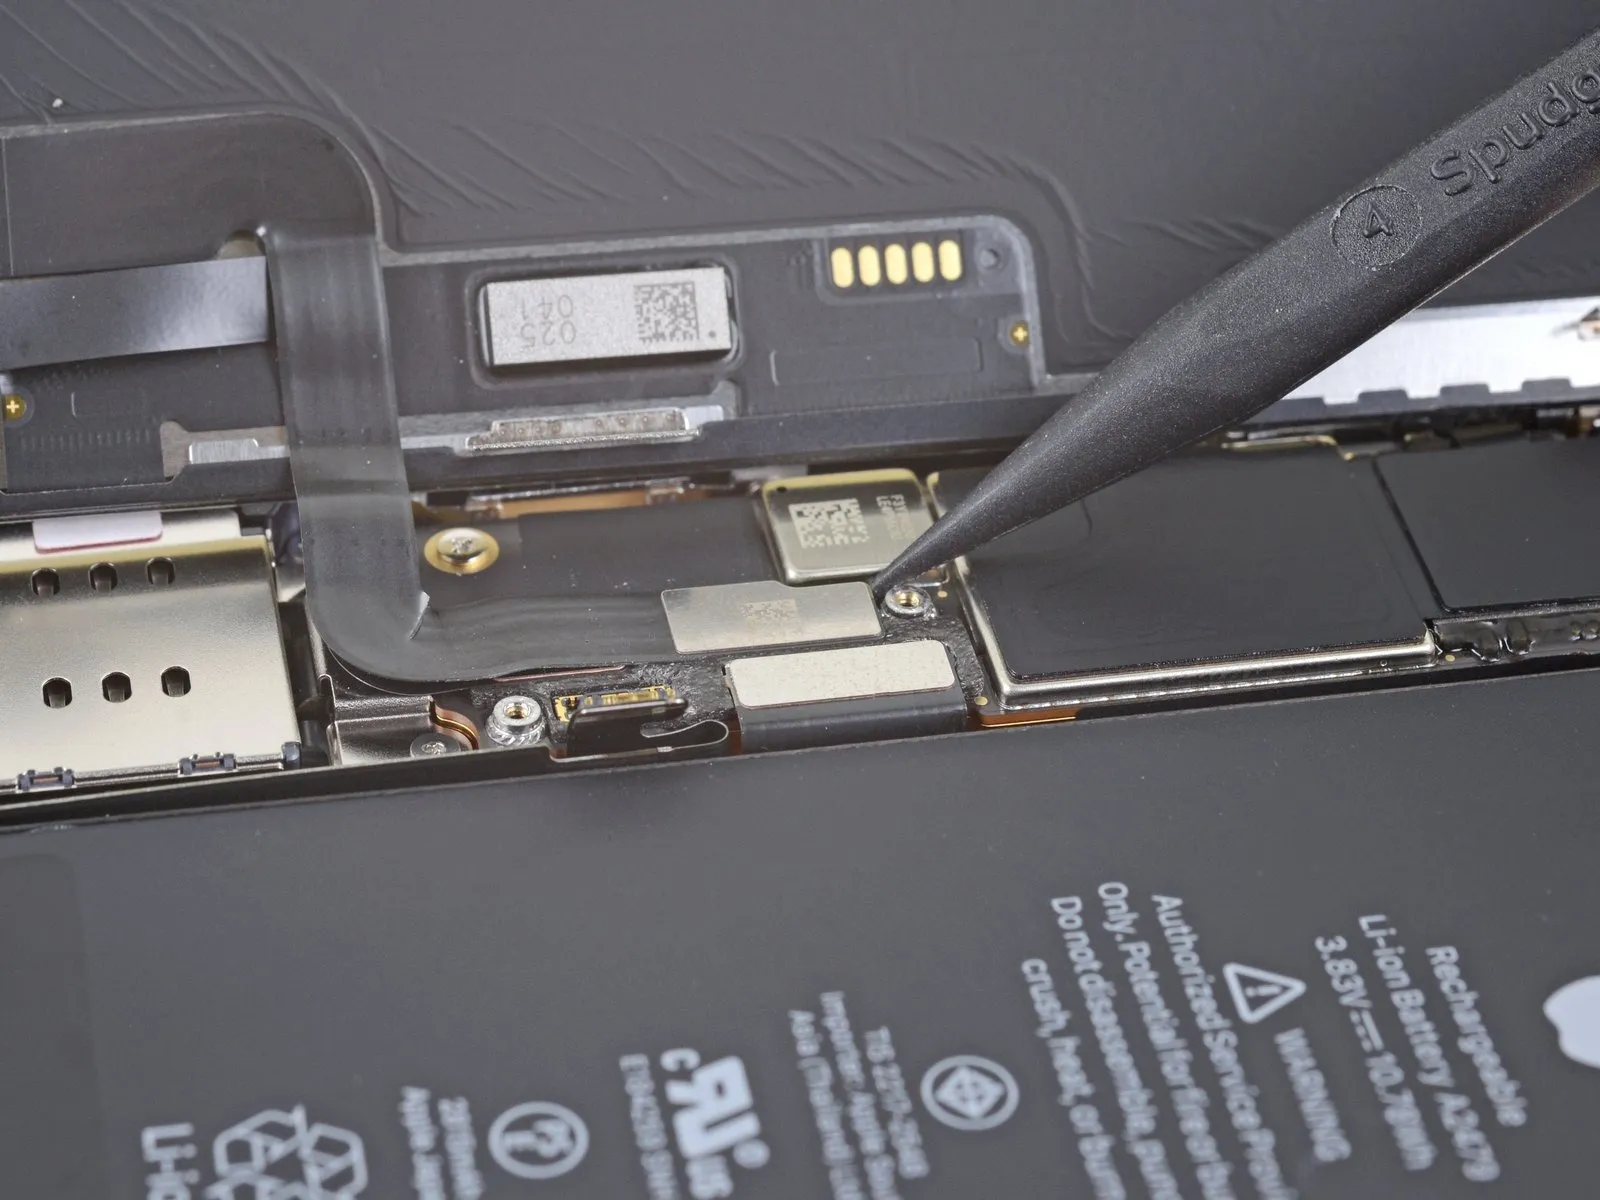
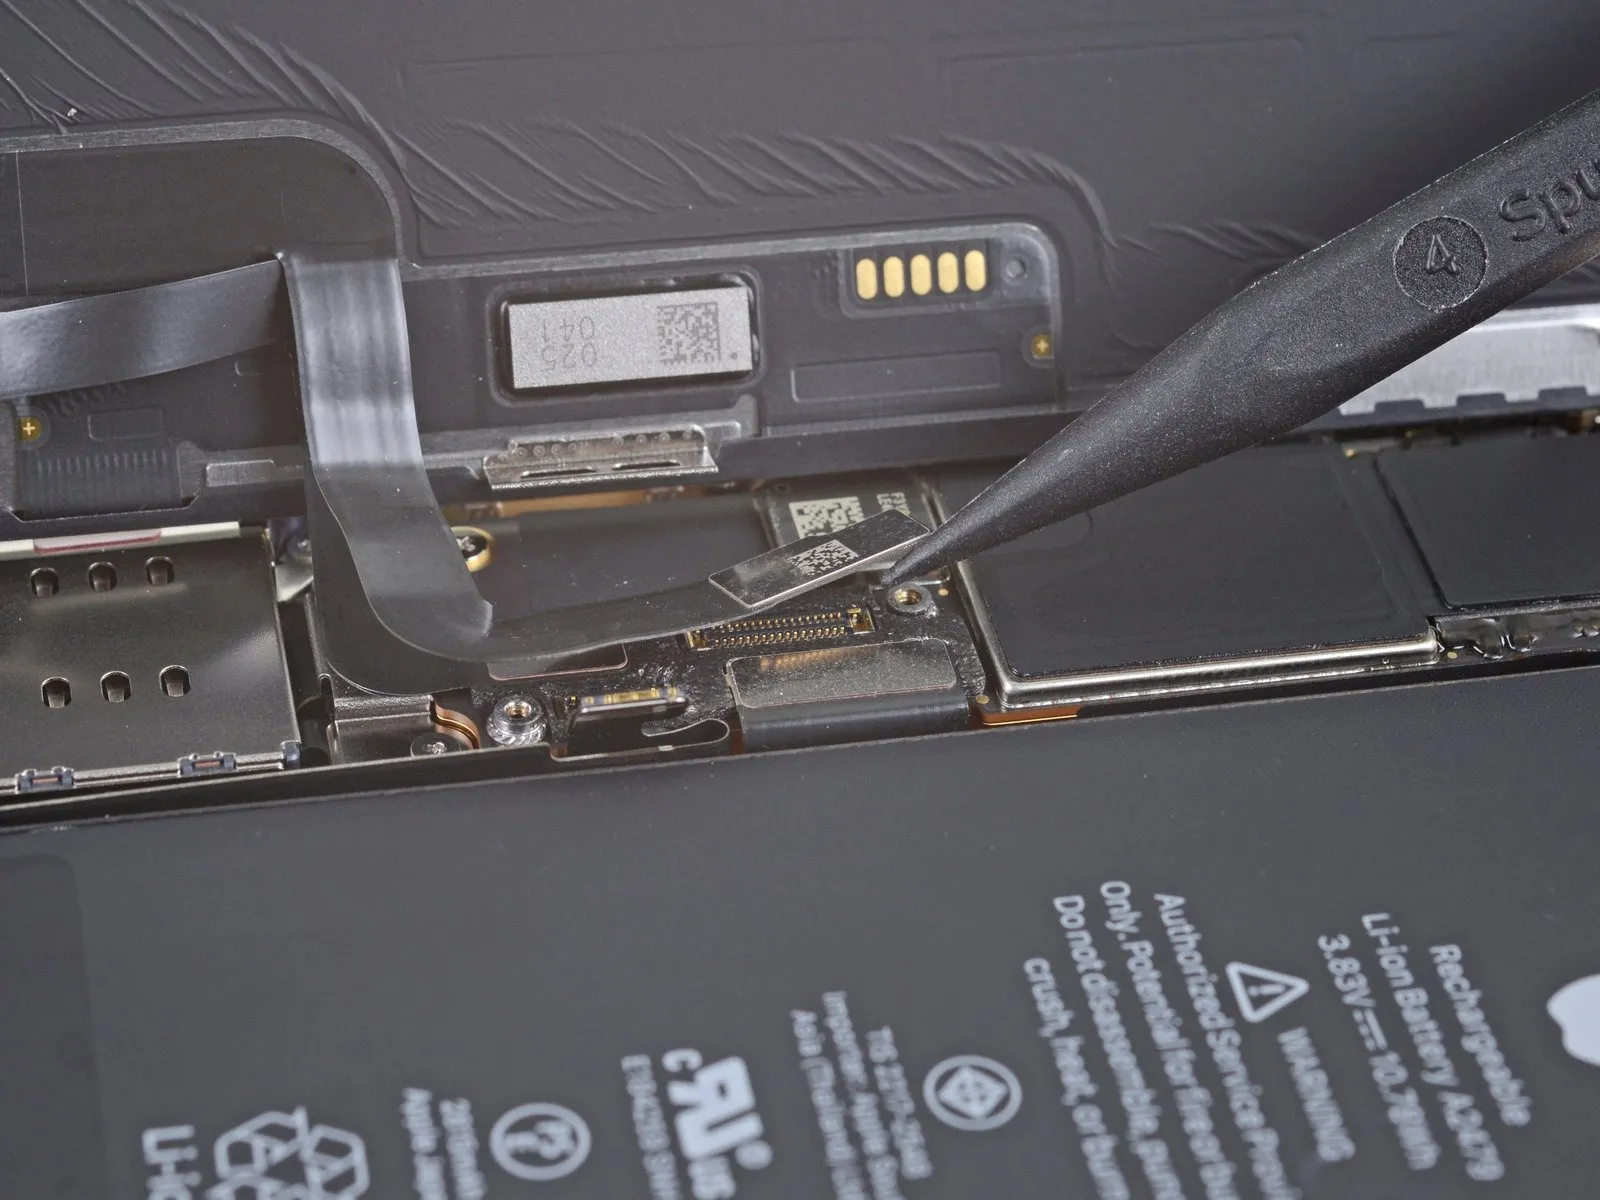
- Employ a spudger tool, or a fingernail, to separate the display cable connector.For re-attachment, meticulously align the connectors, initiating the connection by applying pressure to one side until a distinct click is heard, and subsequently repeating this process on the opposing side.Avoid applying pressure to the central portion of the connector during re-attachment.
- Misalignment of the connector may result in pin deformation, potentially leading to irreversible component failure.
Step 24 | Disconnect the digitizer cable
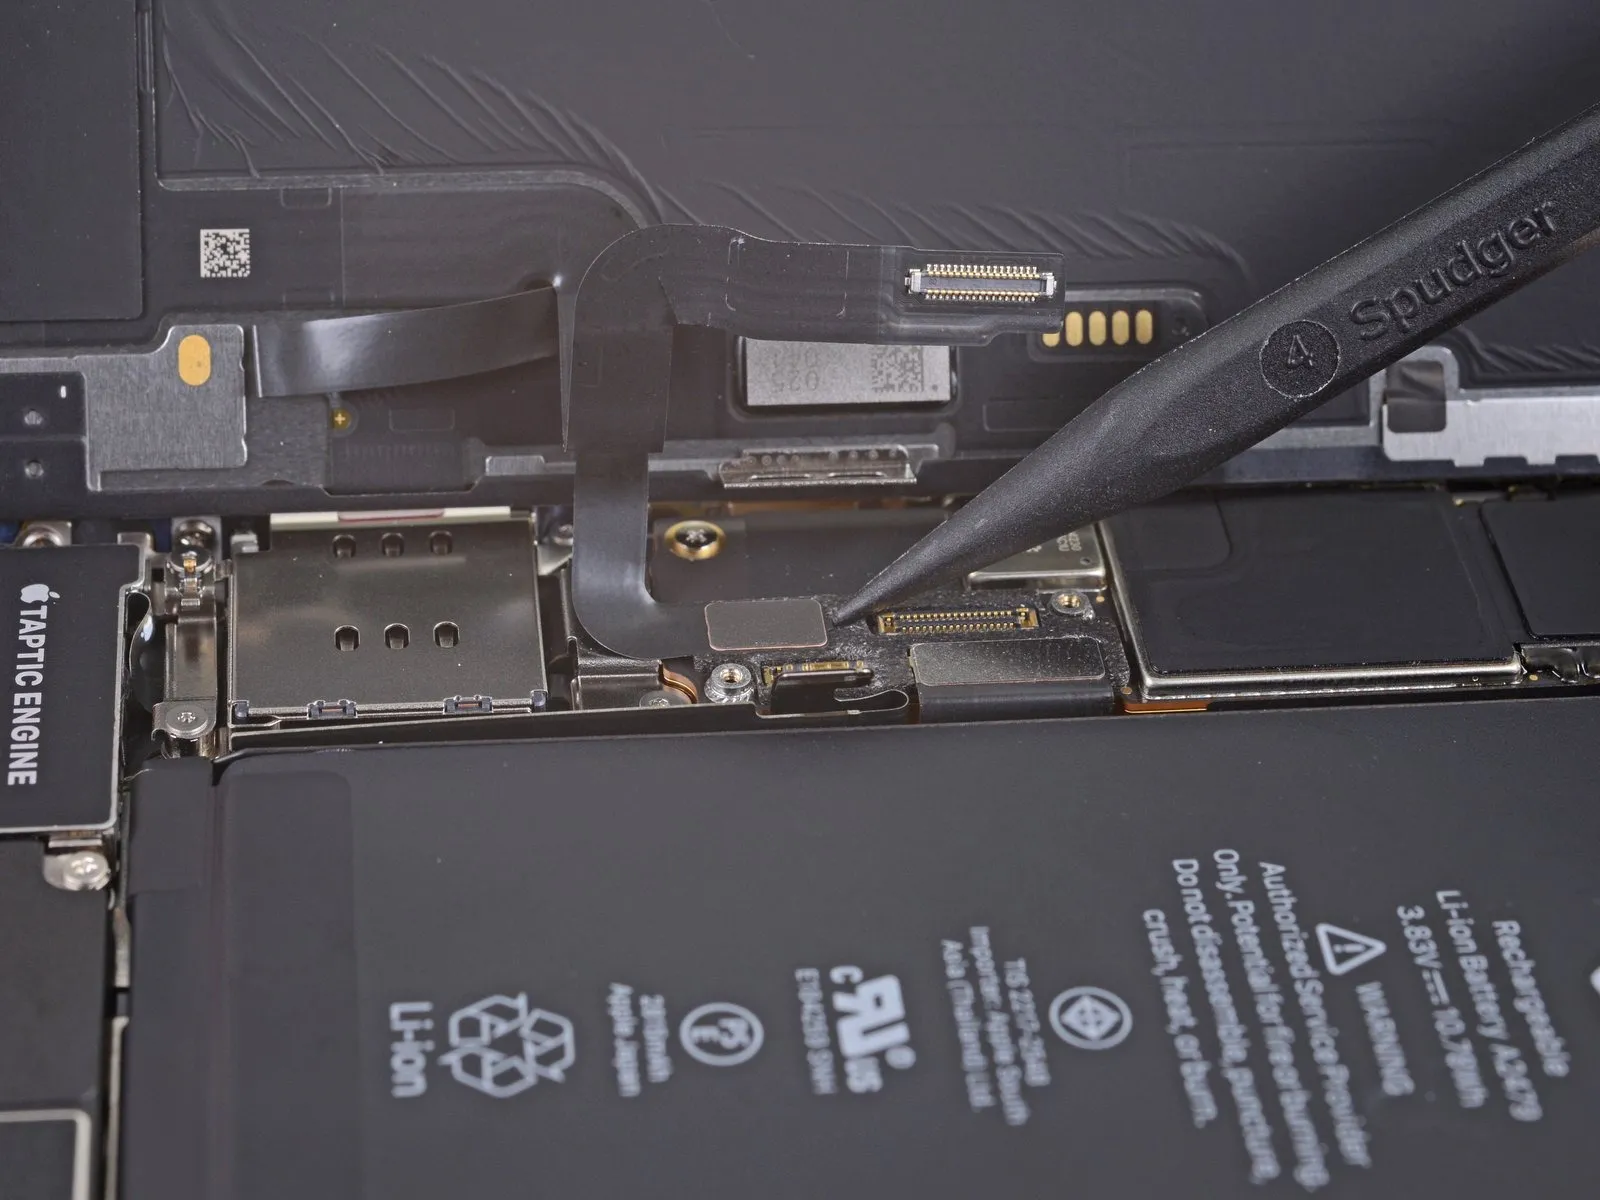
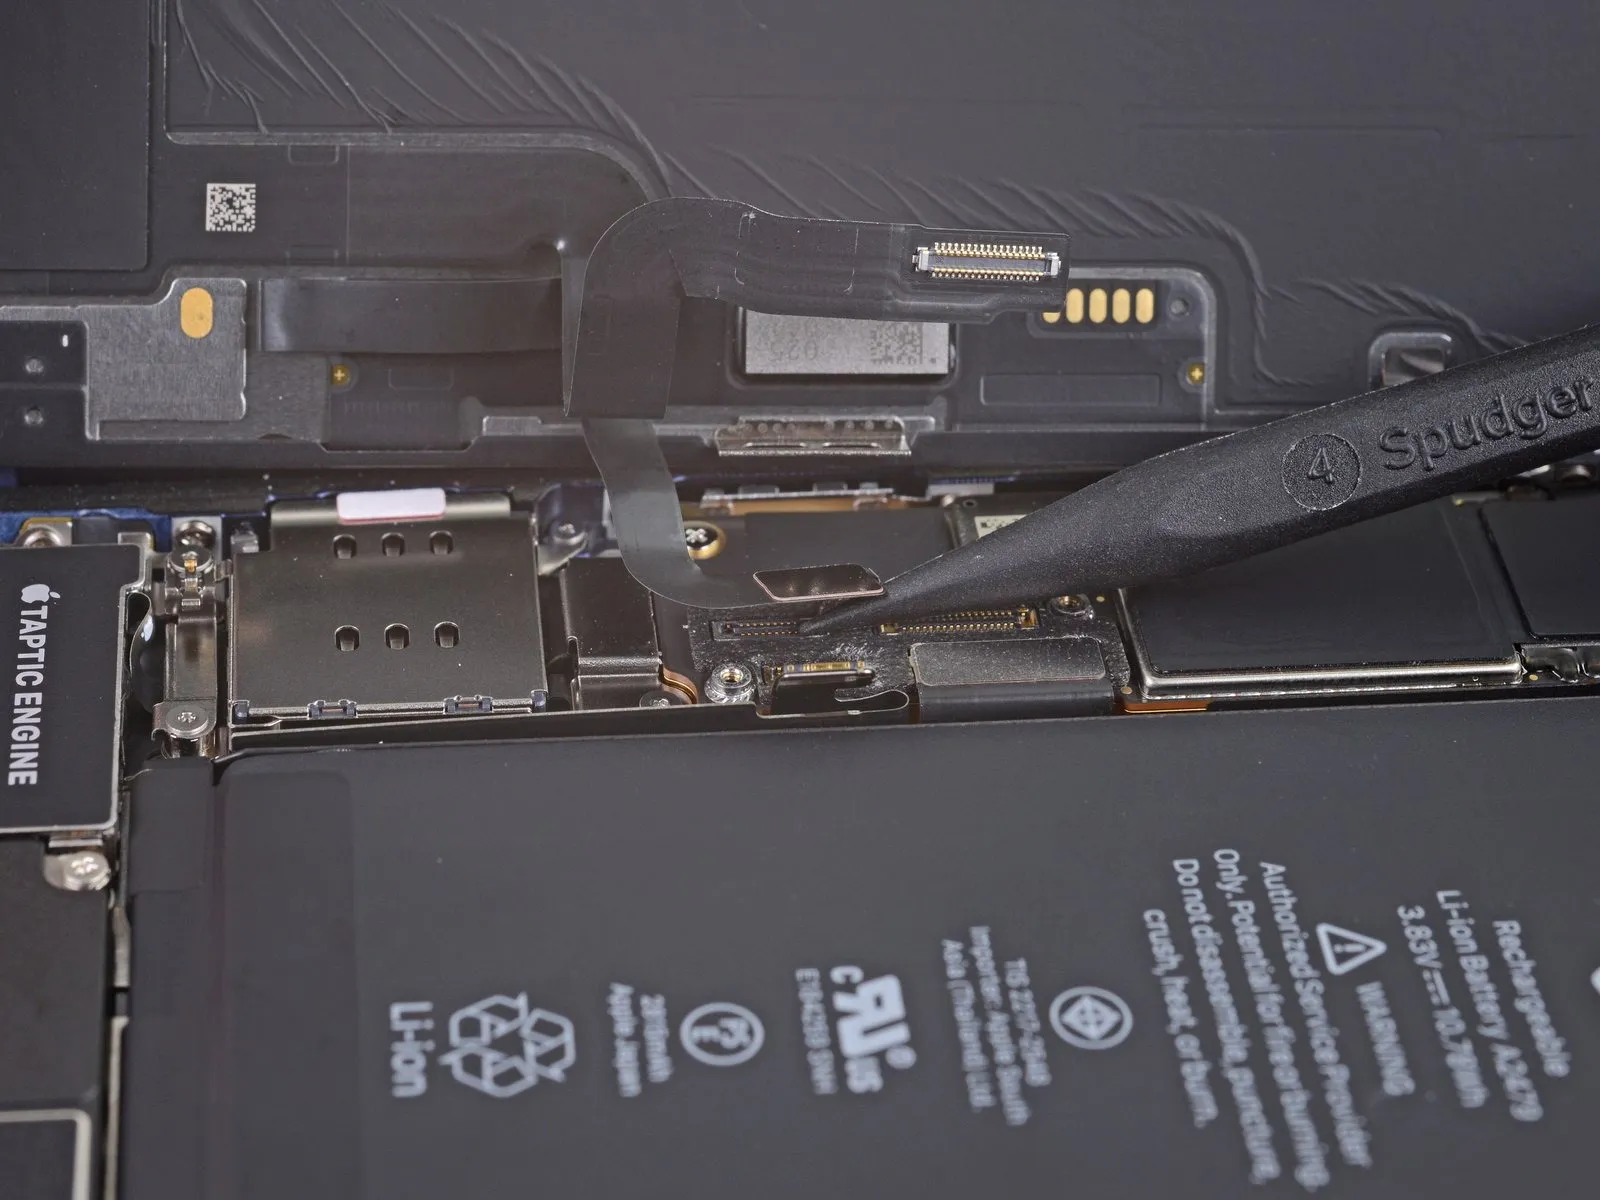
- Employing a spudger or fingernail, carefully separate the digitizer cable connector.To detach the connector, apply gentle force with a spudger or fingernail.Should the screen exhibit unresponsive touch areas following the repair procedure, remove the battery and then reconnect the digitizer cable connector, ensuring a secure, audible click and a clean socket.
- Re-seating the connector, after a non-responsive screen, requires verification of a full latch and the absence of particulate contamination within the receptacle.
Step 25 | Unscrew the front sensor connector cover
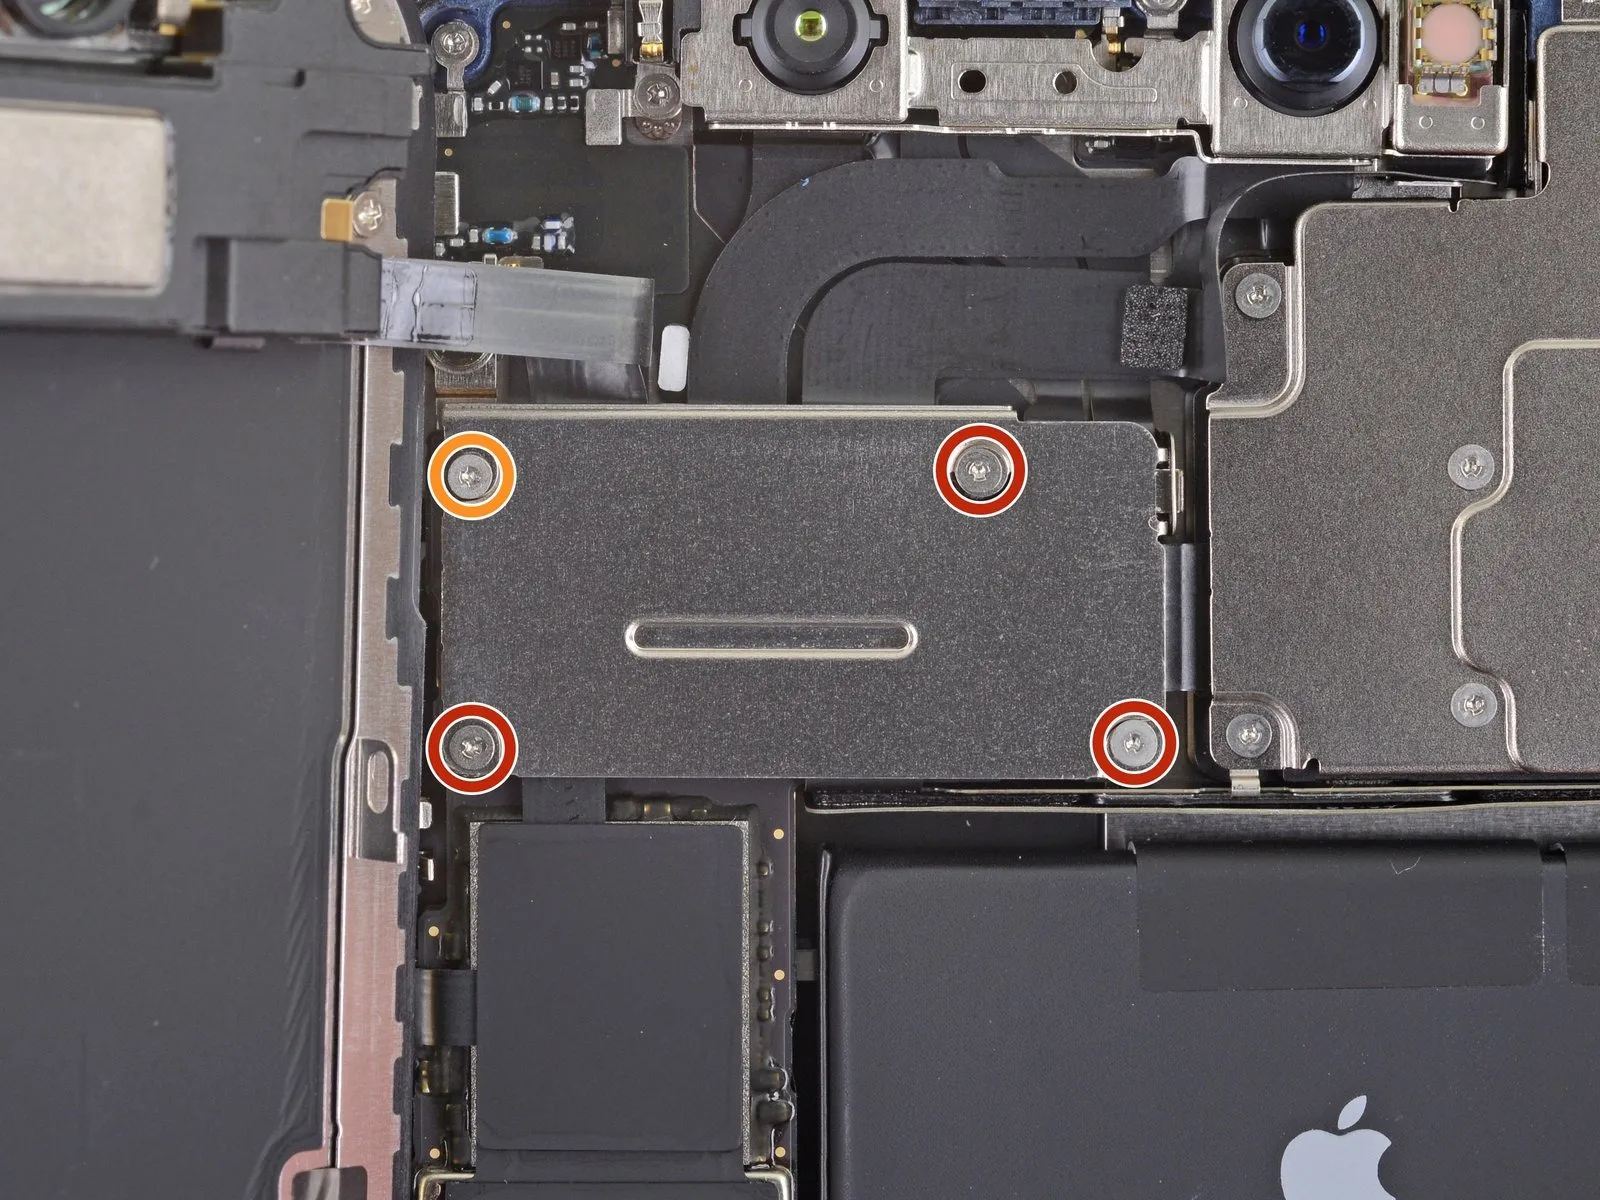
- Employ a Y000 driver to detach the four screws that hold the front sensor connector cover in place.The front sensor connector cover is fastened with four screws, requiring a Y000 driver for removal.Specifically, three screws, each measuring 1.1 millimeters in length, are used to secure the cover.
- In addition to the three shorter screws, a single screw with a length of 1.4 millimeters is also present.To access the front sensor connector, the cover must first be detached using a Y000 driver.
- The four screws fixing the front sensor connector cover can be released with the appropriate Y000 driver.A Y000 driver is necessary for the disassembly of the front sensor connector cover, which is held by three 1.1 mm screws and one 1.4 mm screw.
Step 26 | Remove the front sensor connector cover
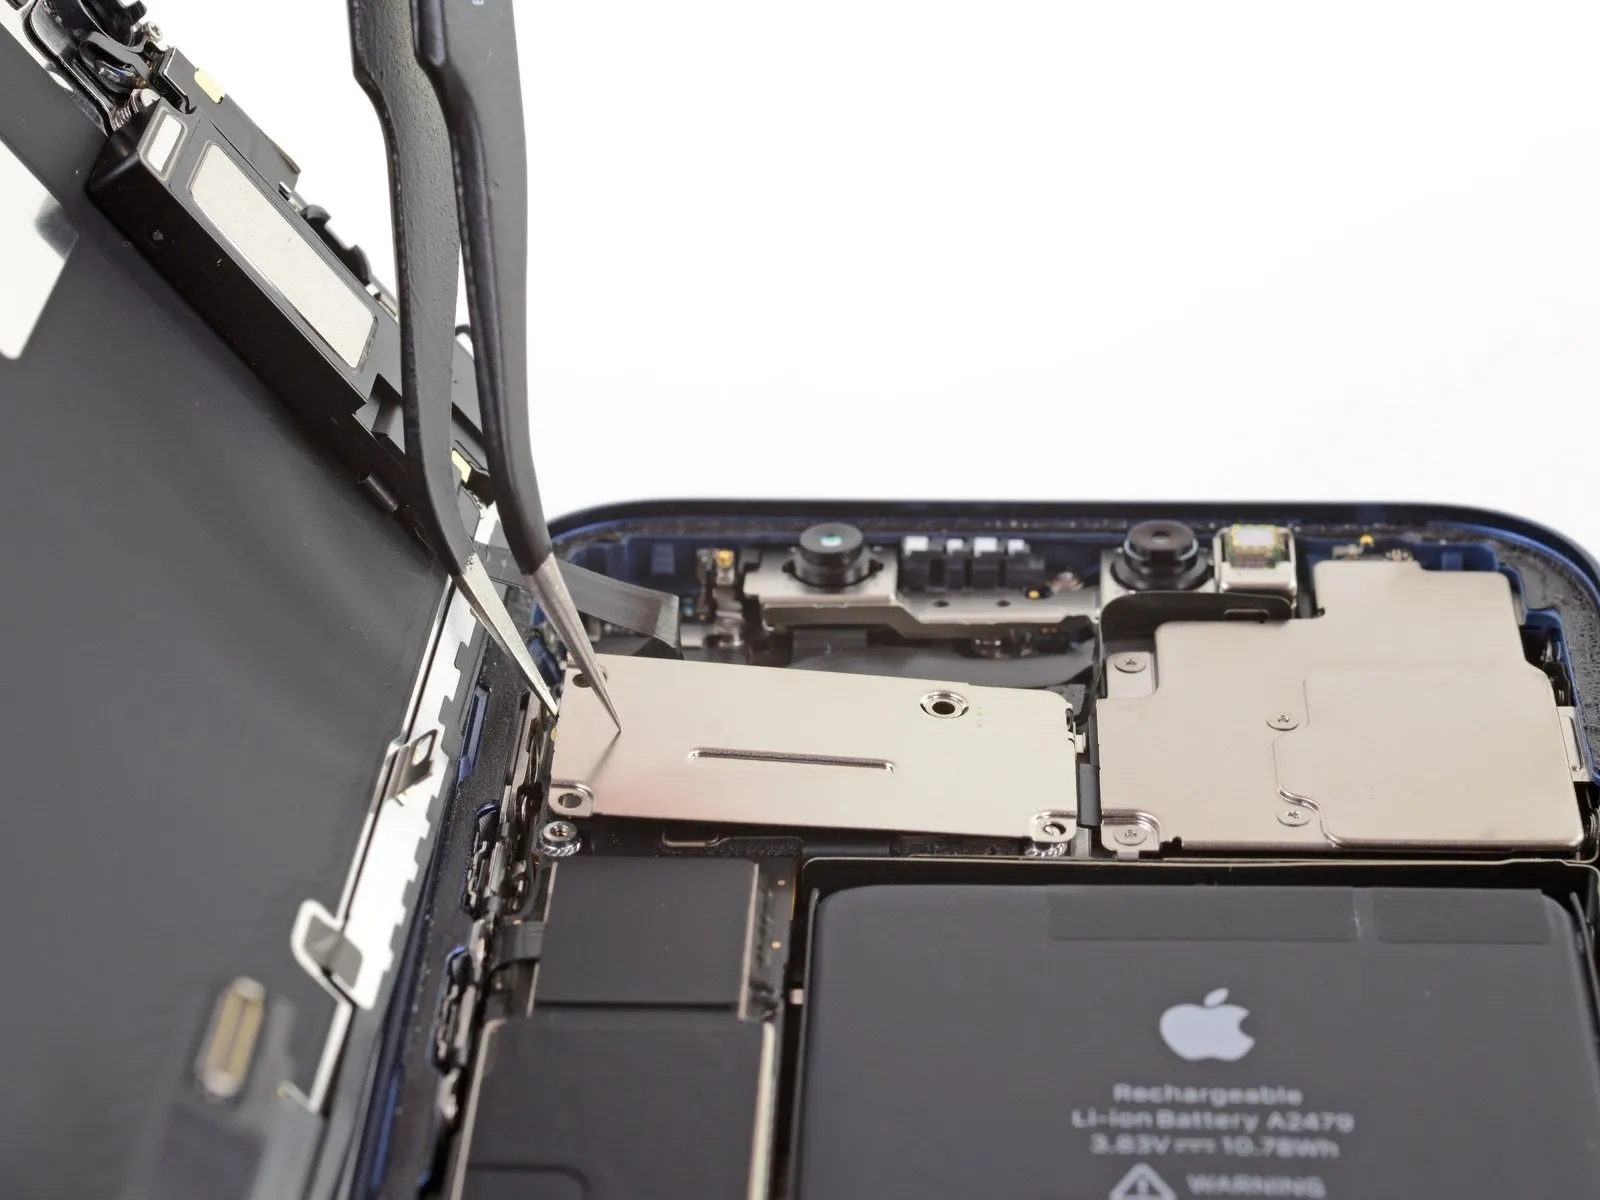
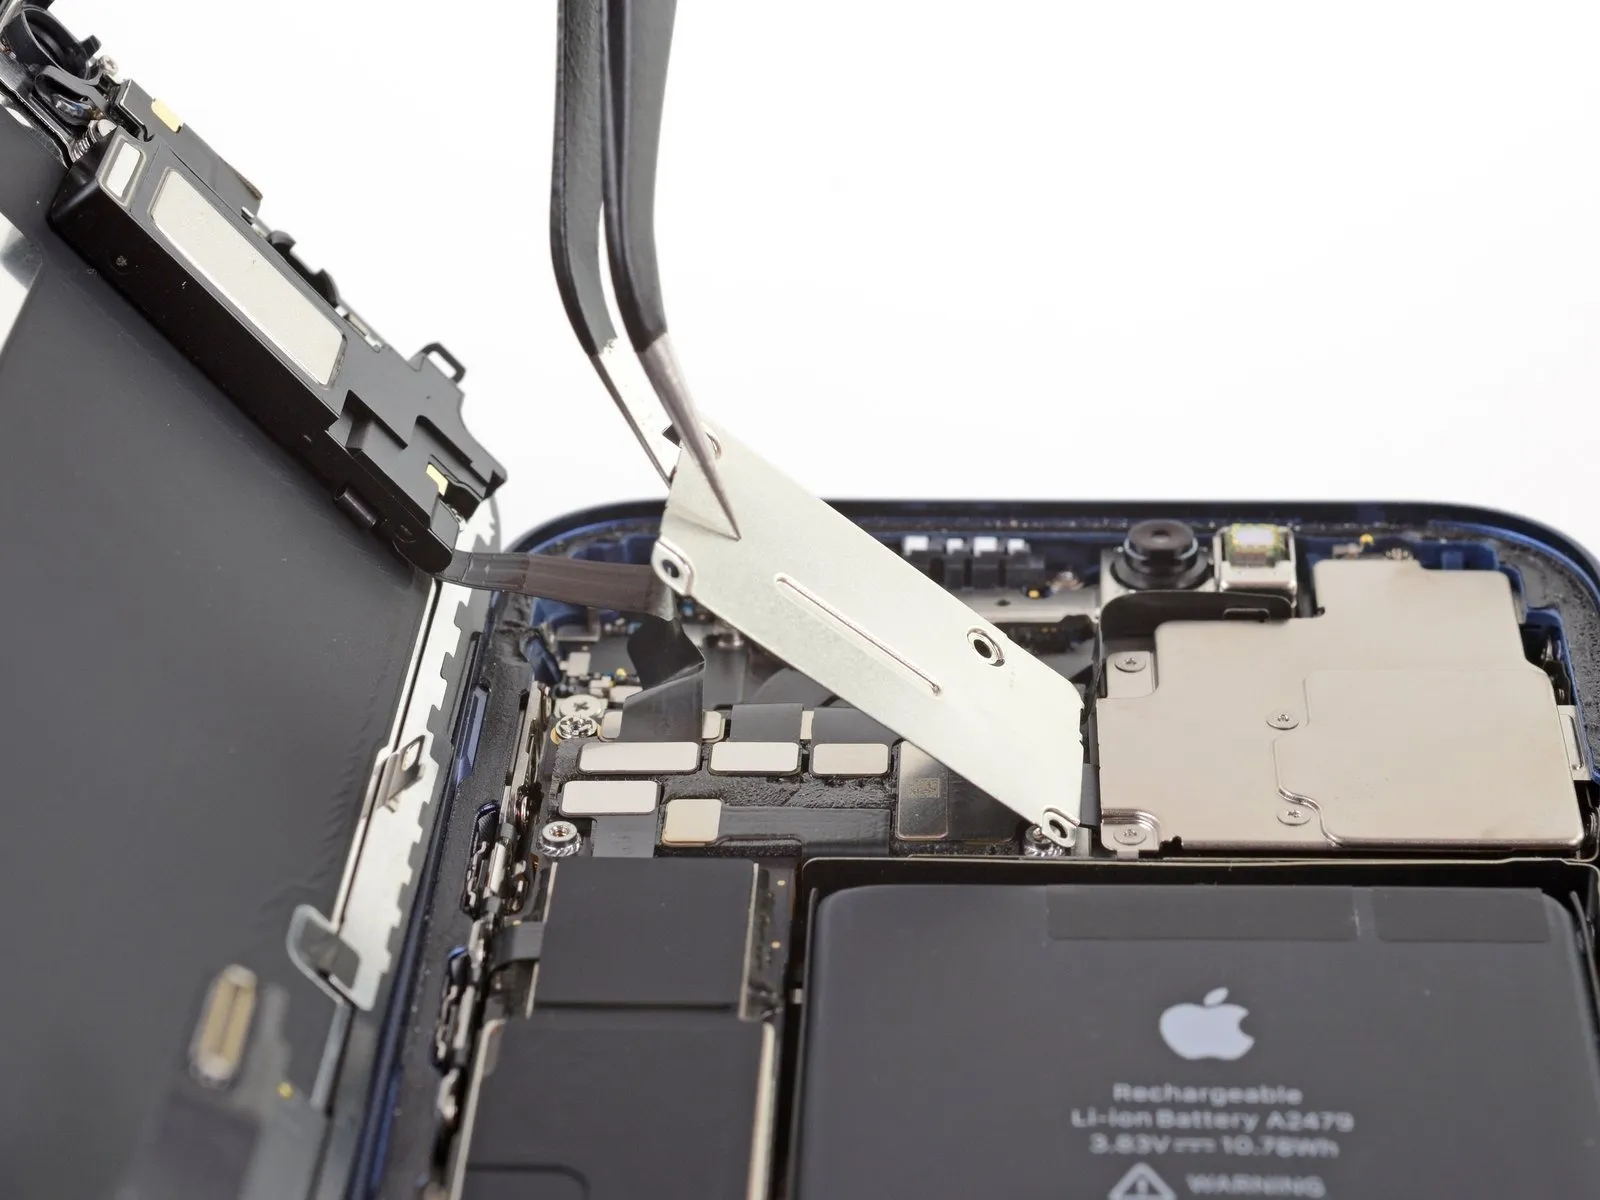
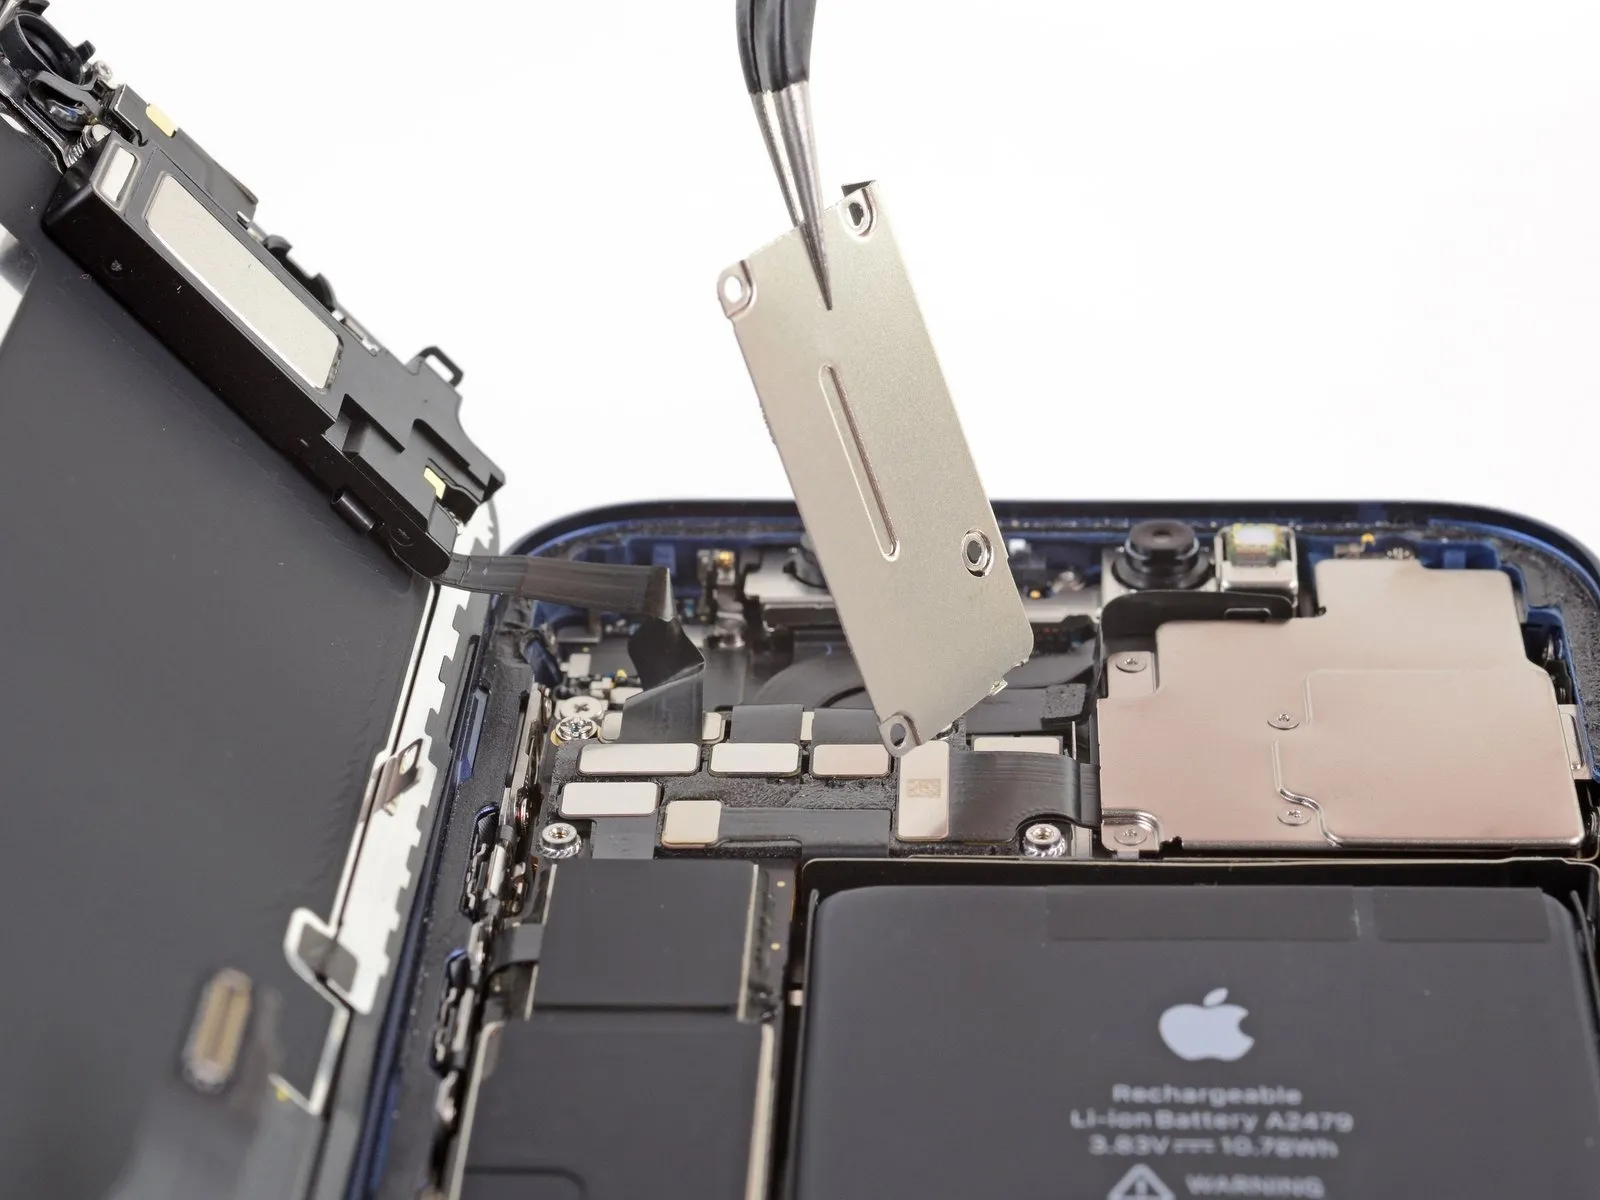
- Move the cover upwards, originating from the left side, to release the small clip located on the right.
- Detach the cover from the device.
- When reattaching, initially position the right-side clip into its designated slot, subsequently pivoting the remainder of the cover into its final position.
Step 27 | Disconnect the front sensors
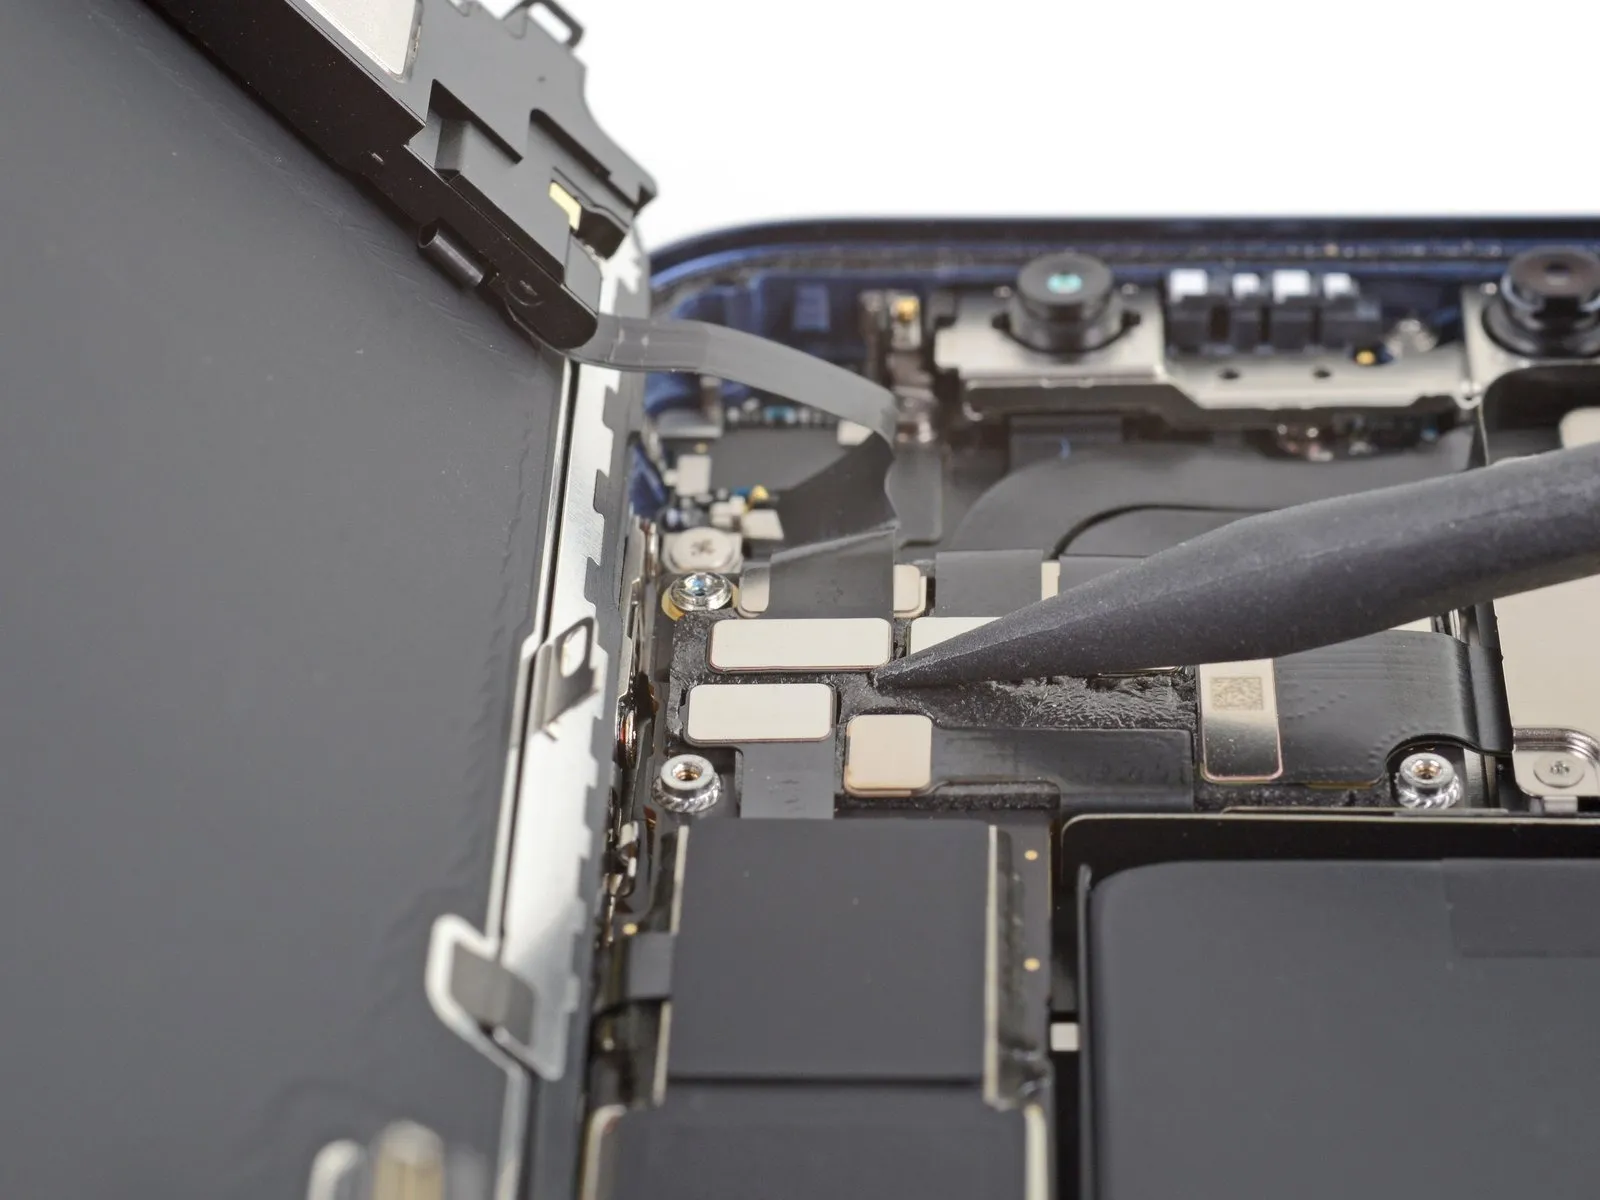
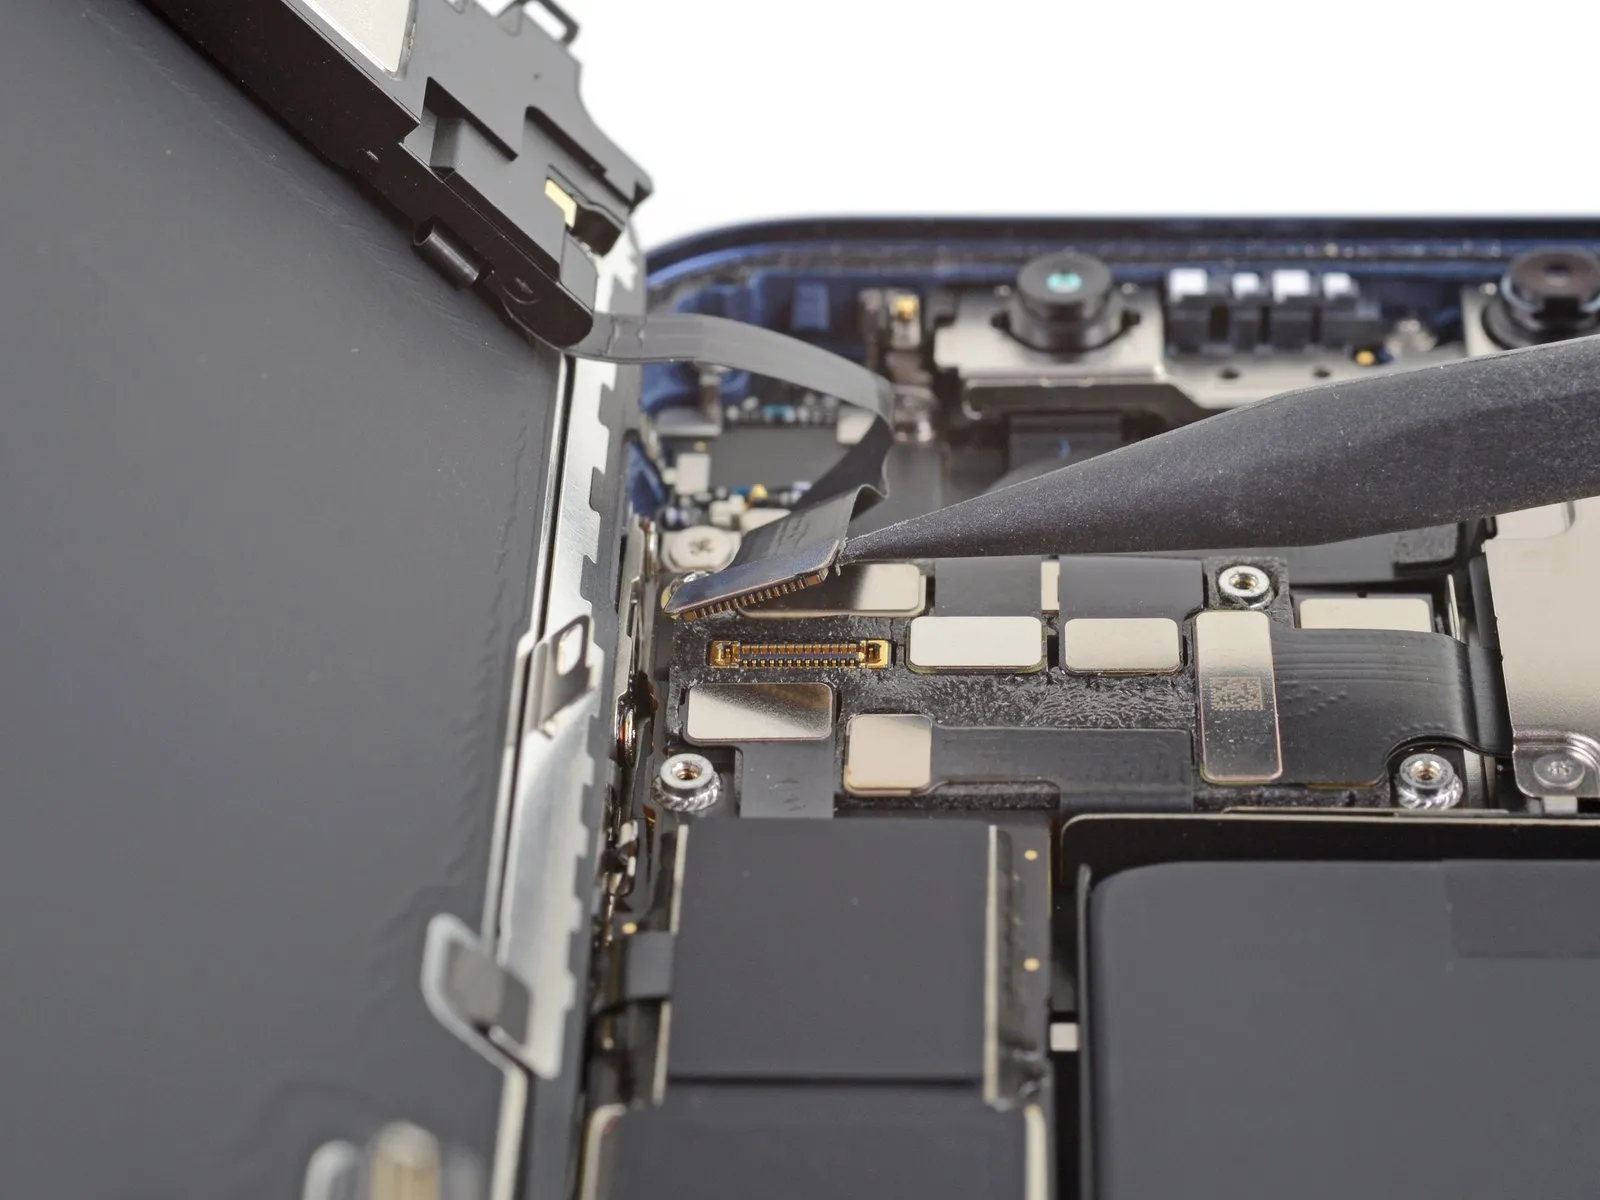
- Employing a spudger tool, or carefully using a fingernail, facilitates the separation of the front sensor assembly's cable connector.The connector securing the front sensor assembly cable necessitates disconnection via a spudger or a fingernail.To release the front sensor assembly cable connector, a spudger is suitable, or a fingernail can be utilized with caution.A spudger or fingernail serves as appropriate implements for detaching the connector of the front sensor assembly cable.For the purpose of disconnecting the front sensor assembly cable connector, a spudger or fingernail provides a viable method.
Step 28 | Remove the display assembly
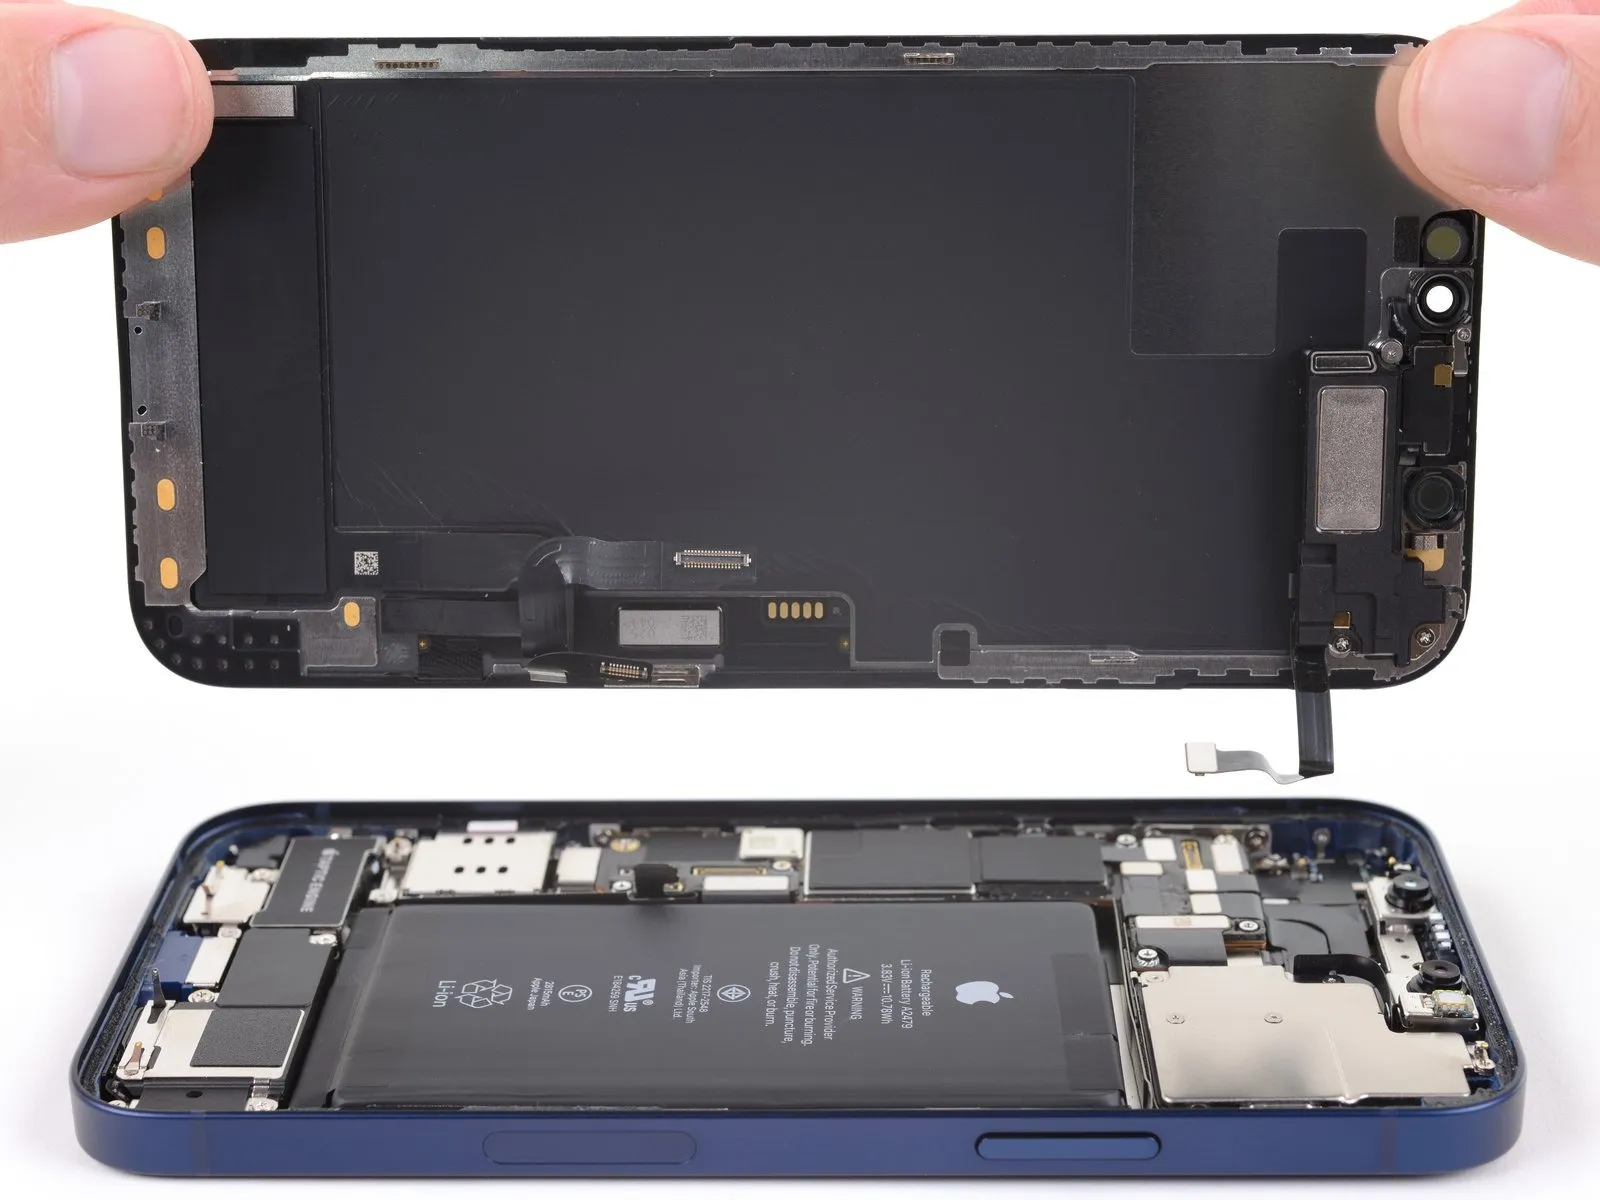
- Detach the display unit from the device.
- If a replacement of the waterproof adhesive is desired during the reassembly process, halt at this stage.The waterproof adhesive is located around the perimeter of the display.This adhesive serves to maintain a watertight seal for the display assembly.
Step 29 | Unscrew the SIM card reader connector cover
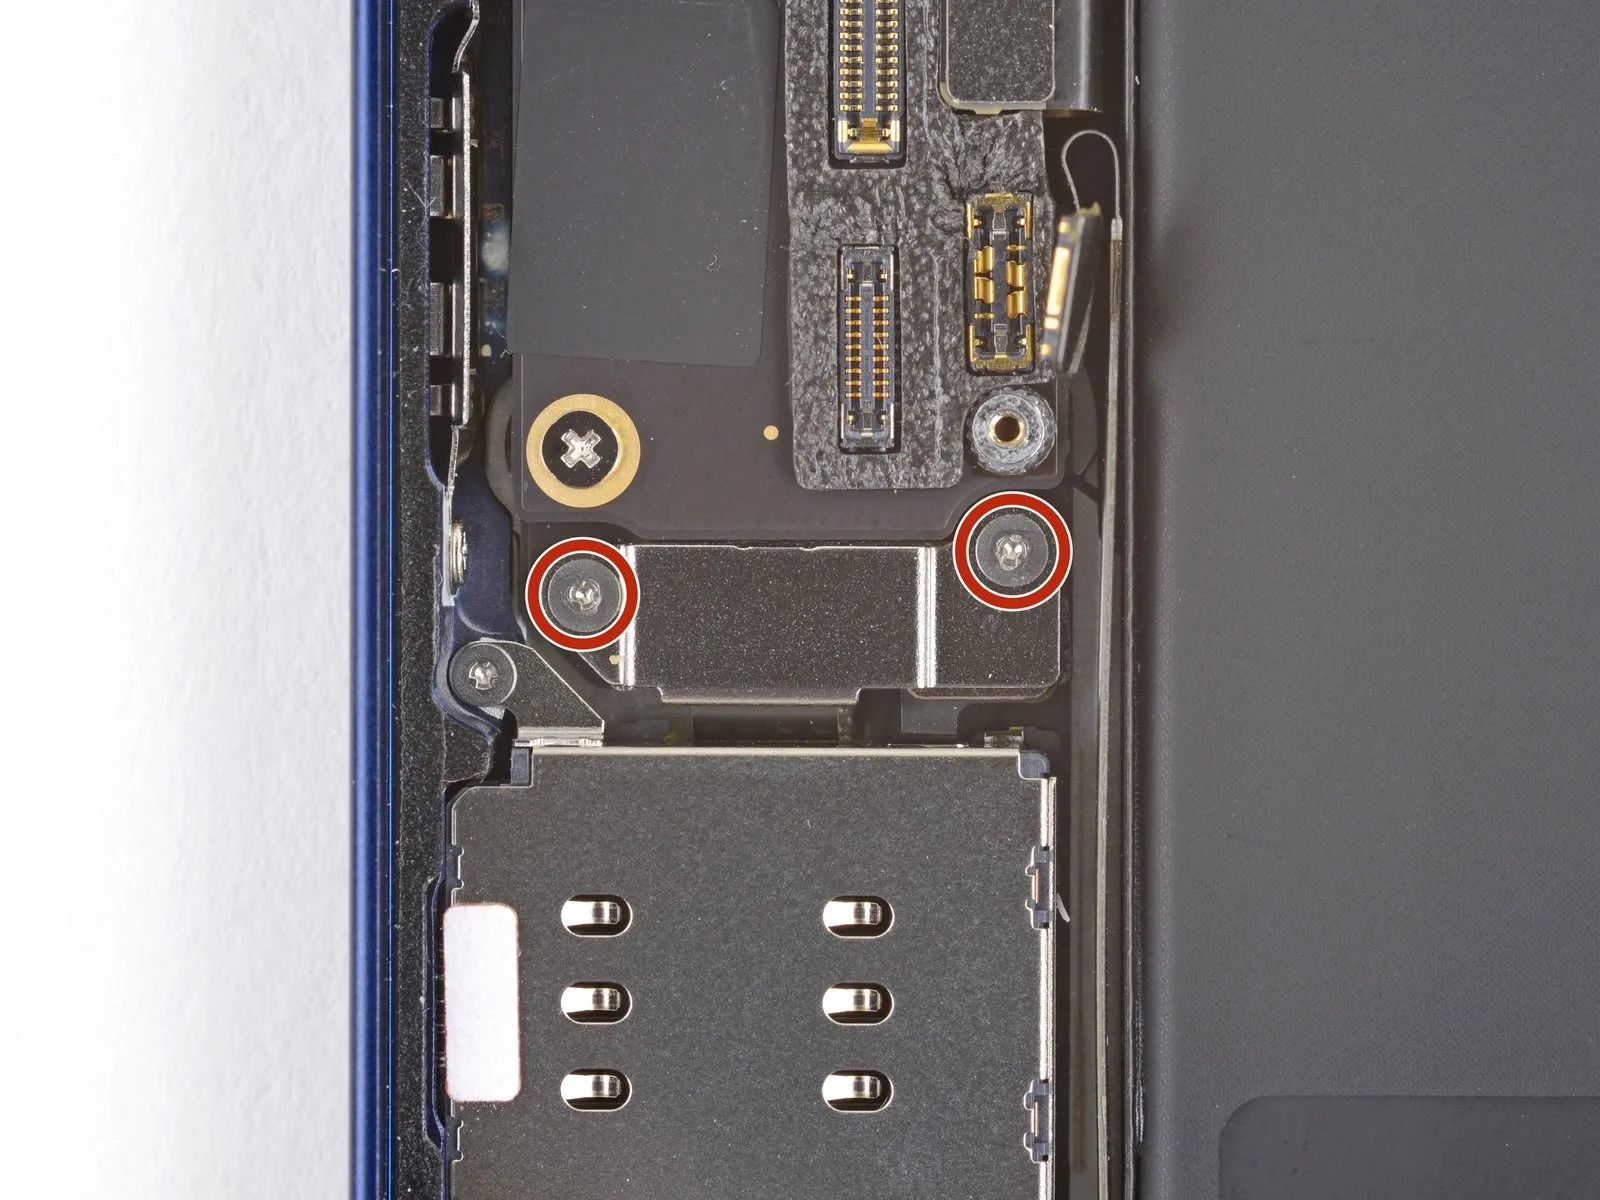
- Employ a Y000 driver for the removal process of the SIM card reader connector cover's fasteners.The screws, each measuring 1.4 millimeters in length, must be detached using the appropriate driver.Securely hold the SIM card reader connector cover while unscrewing the fasteners.A Y000 driver is specifically required to avoid damage to the screw heads during disassembly.Ensure the screws are completely removed to free the SIM card reader connector cover.
Step 30 | Remove the SIM card reader cable connector cover
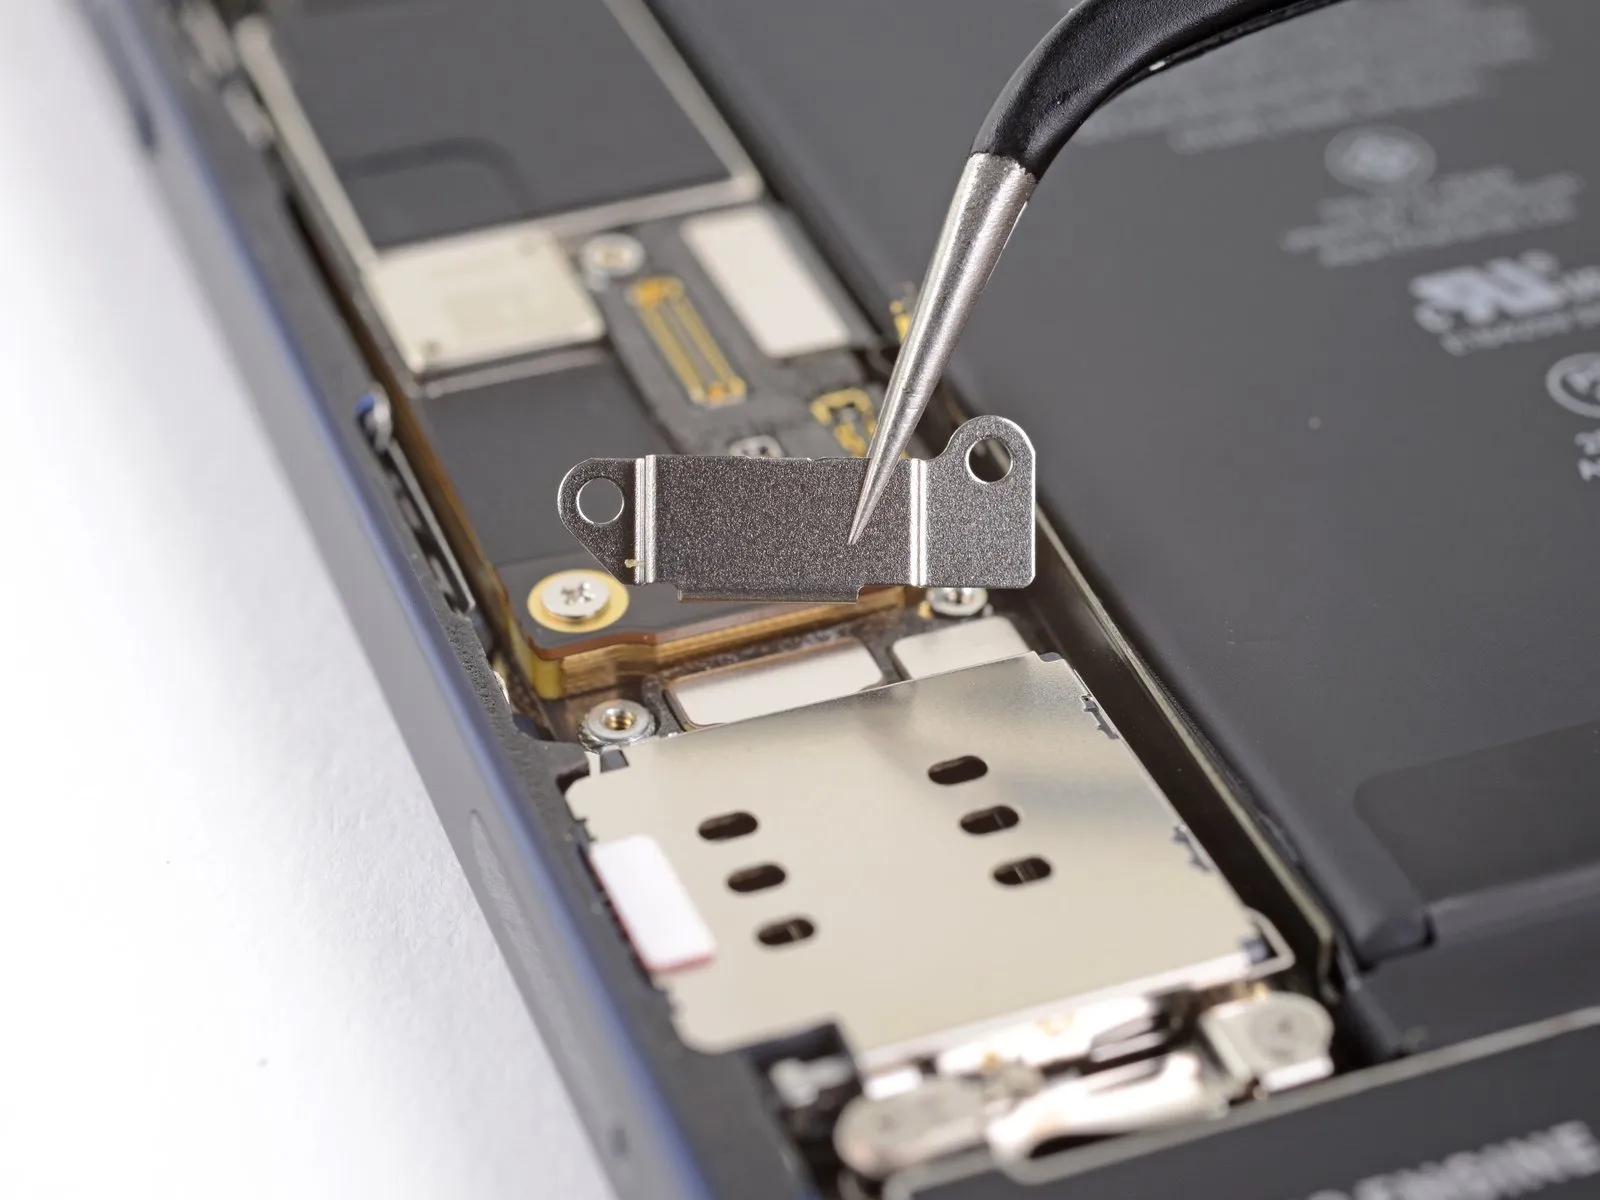
- To access the SIM card reader cable connector, detach the protective cover.
Step 31 | Disconnect the SIM card reader
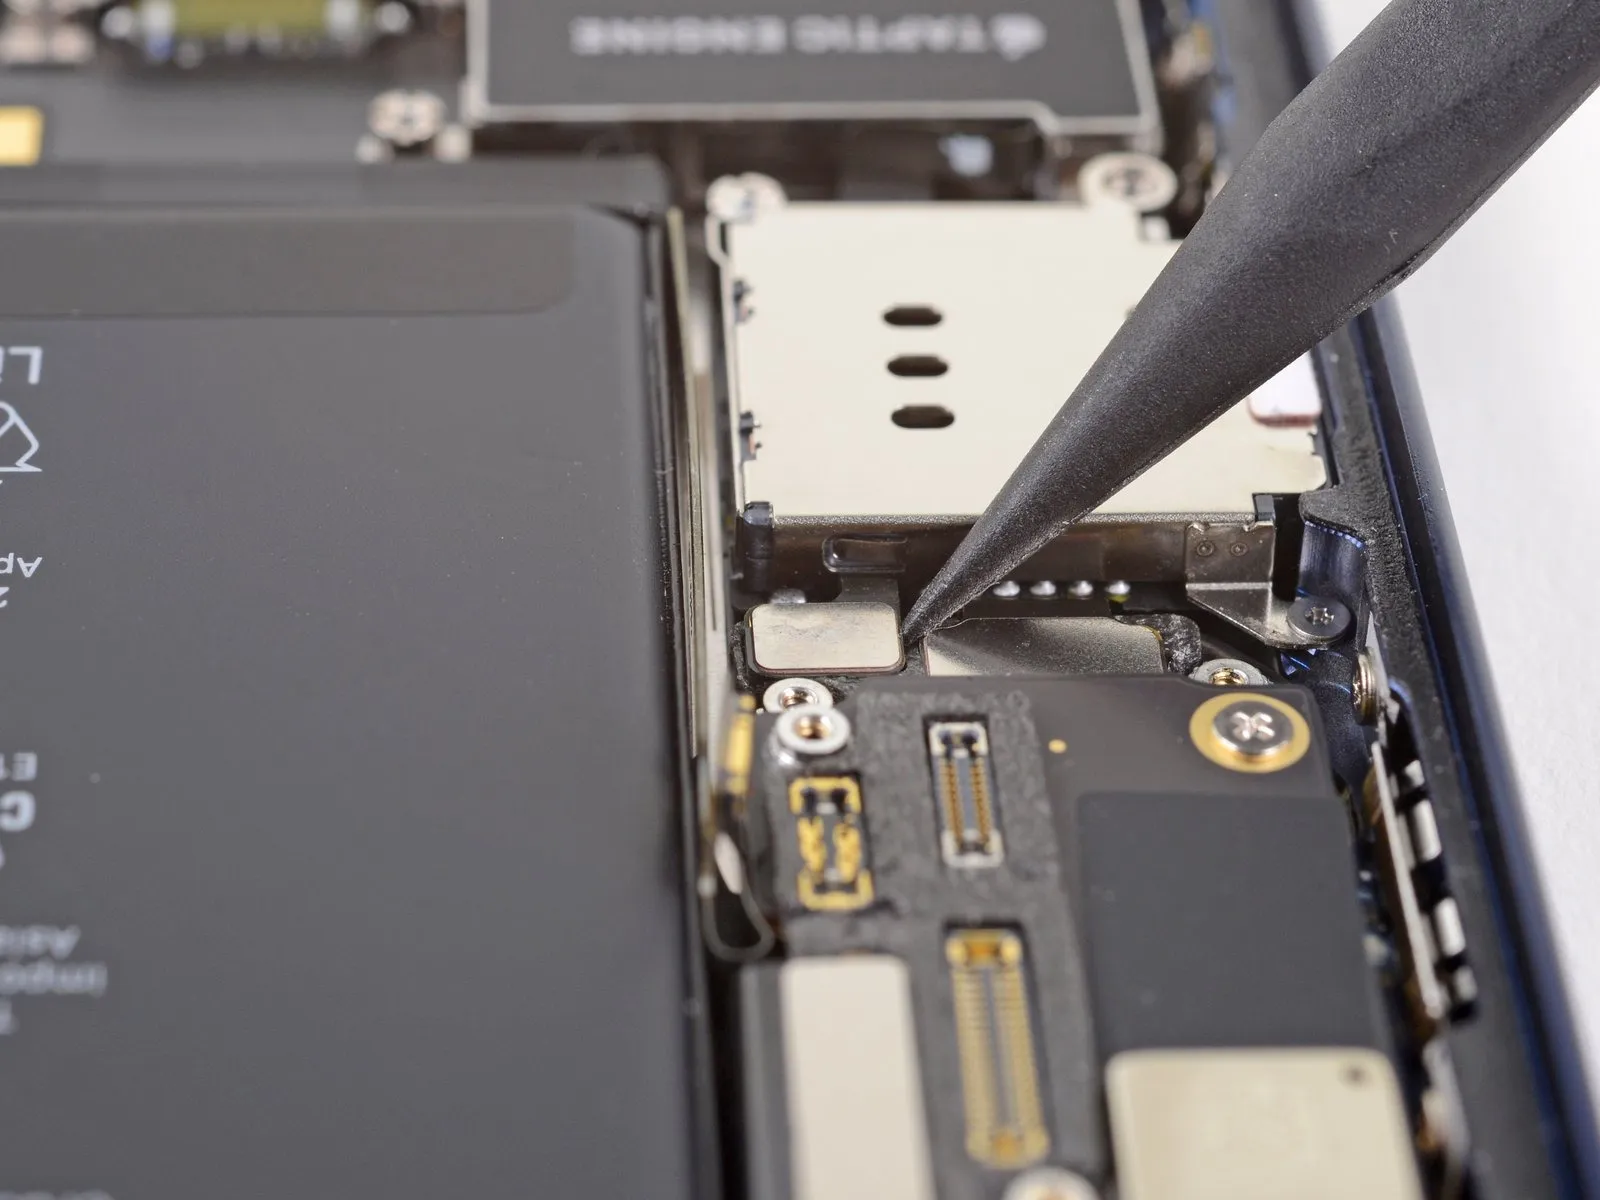
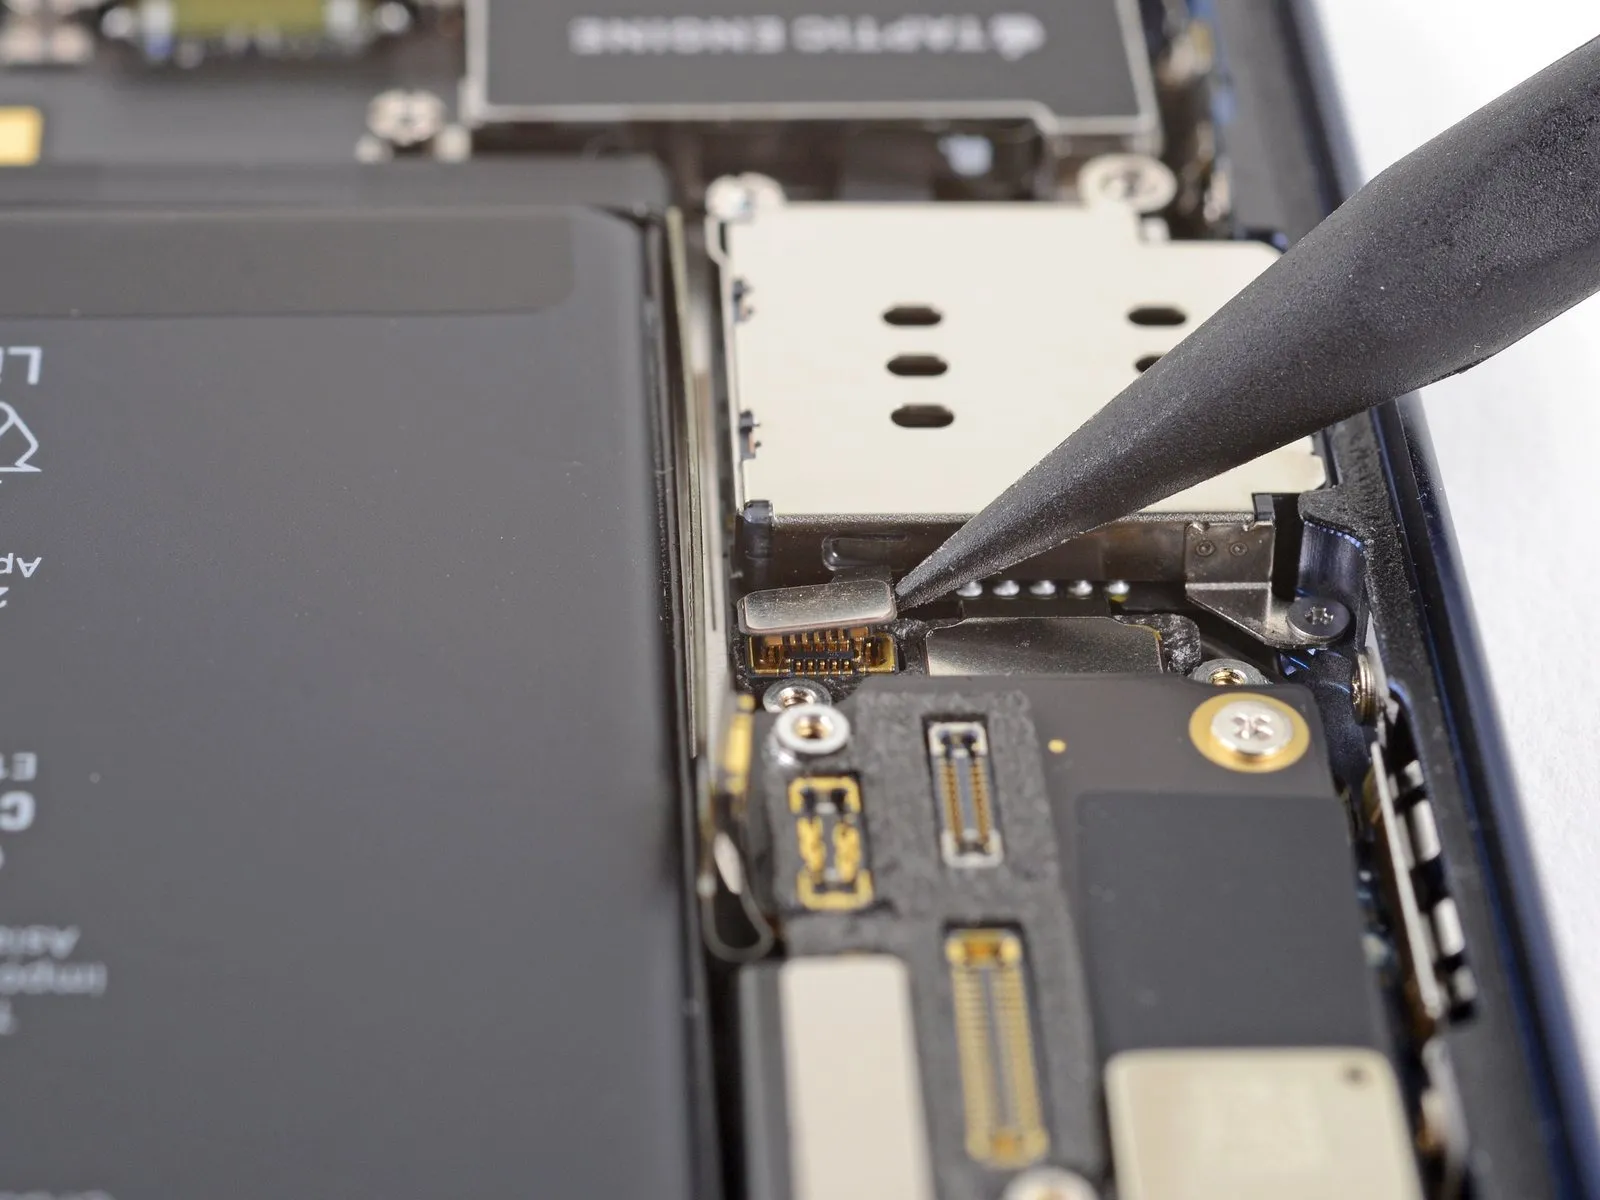
Employing the tip of a spudger, carefully lift the SIM card reader cable connector vertically from its connection on the logic board.The SIM card reader cable connector must be disengaged from its socket on the logic board with a spudger's pointed end.To detach the SIM card reader cable connector, utilize a spudger and apply upward pressure to extract it from its socket on the logic board.
Step 32 | Unscrew the SIM card reader
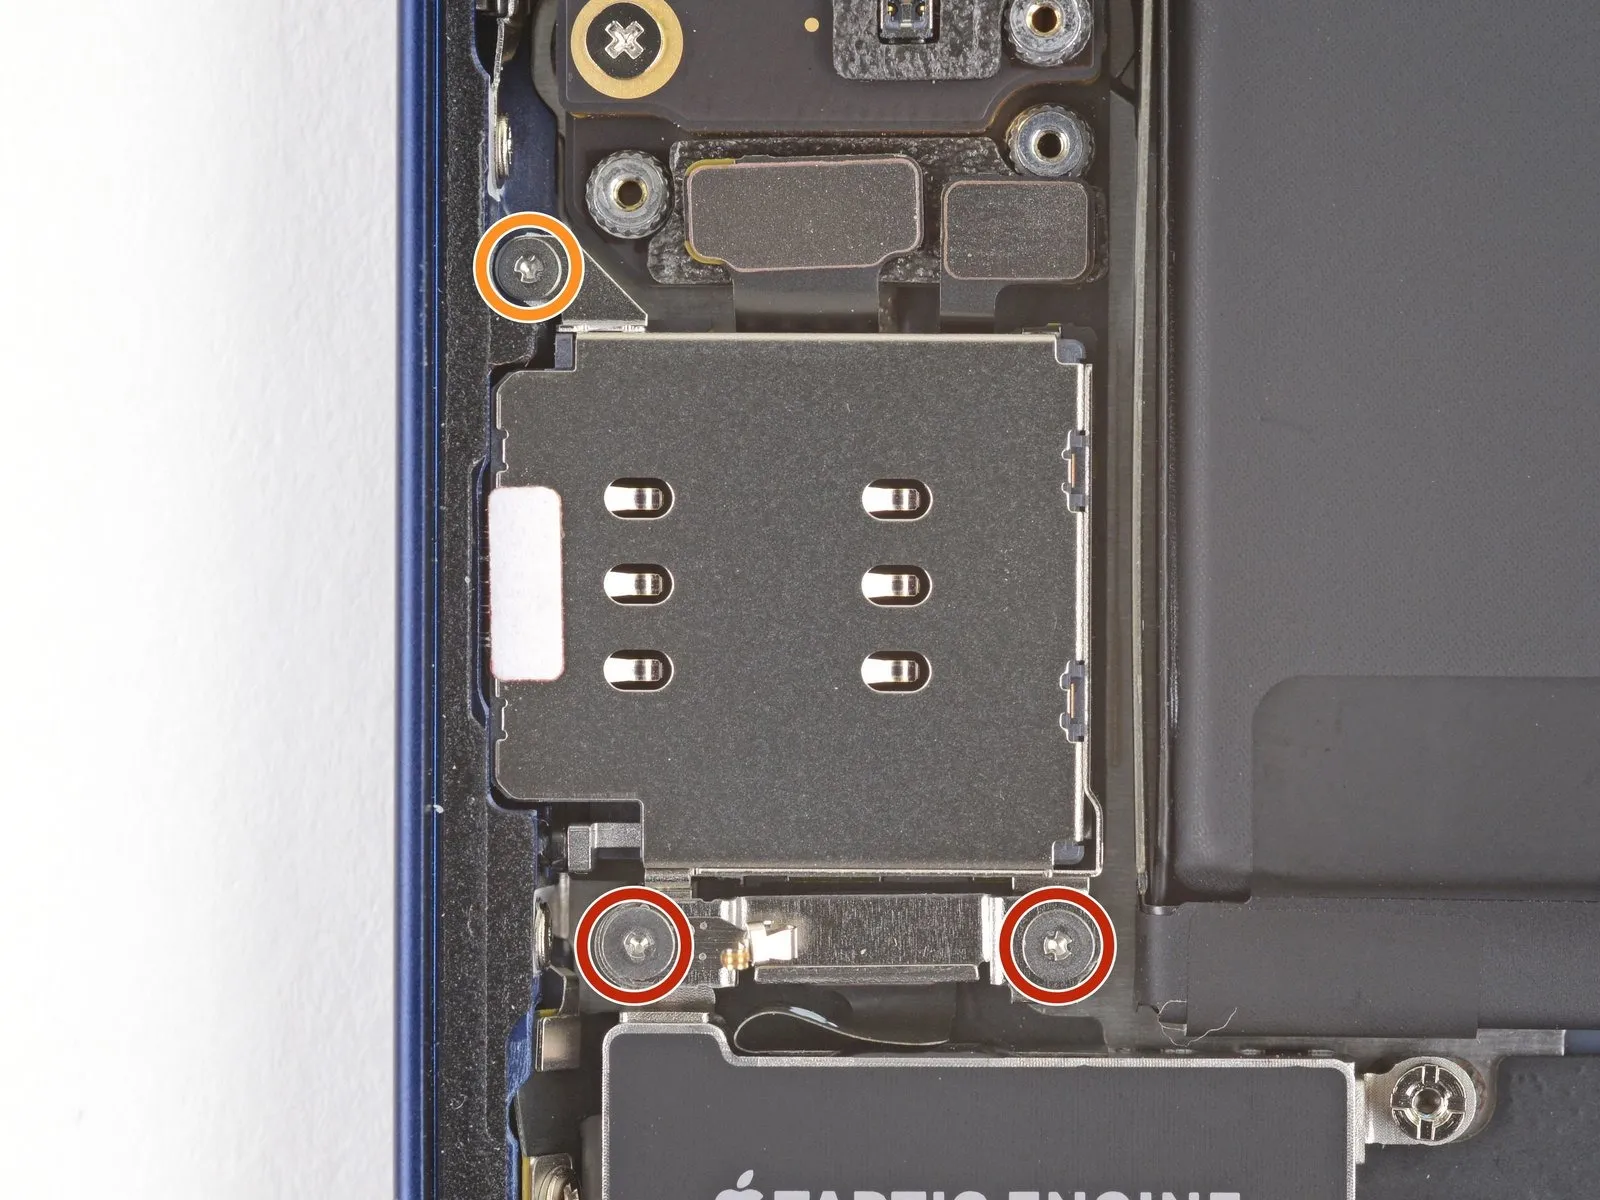
- Employ a Y000 driver for the disassembly of the three screws that retain the SIM card reader.Three screws, each measuring 1.4 millimeters in diameter, are used to secure the SIM card reader.A single screw with a 1.1-millimeter diameter is also part of the SIM card reader's fastening mechanism.
The SIM card reader is held in place by a trio of fasteners.To detach the SIM card reader, the three screws must be removed using a Y000 driver.
Fasteners of 1.4 mm and 1.1 mm diameter are involved in the SIM card reader's attachment.Utilize a Y000 driver to loosen and extract the screws that hold the SIM card reader in position.
Step 33 | Remove the Taptic Engine cable connector bracket
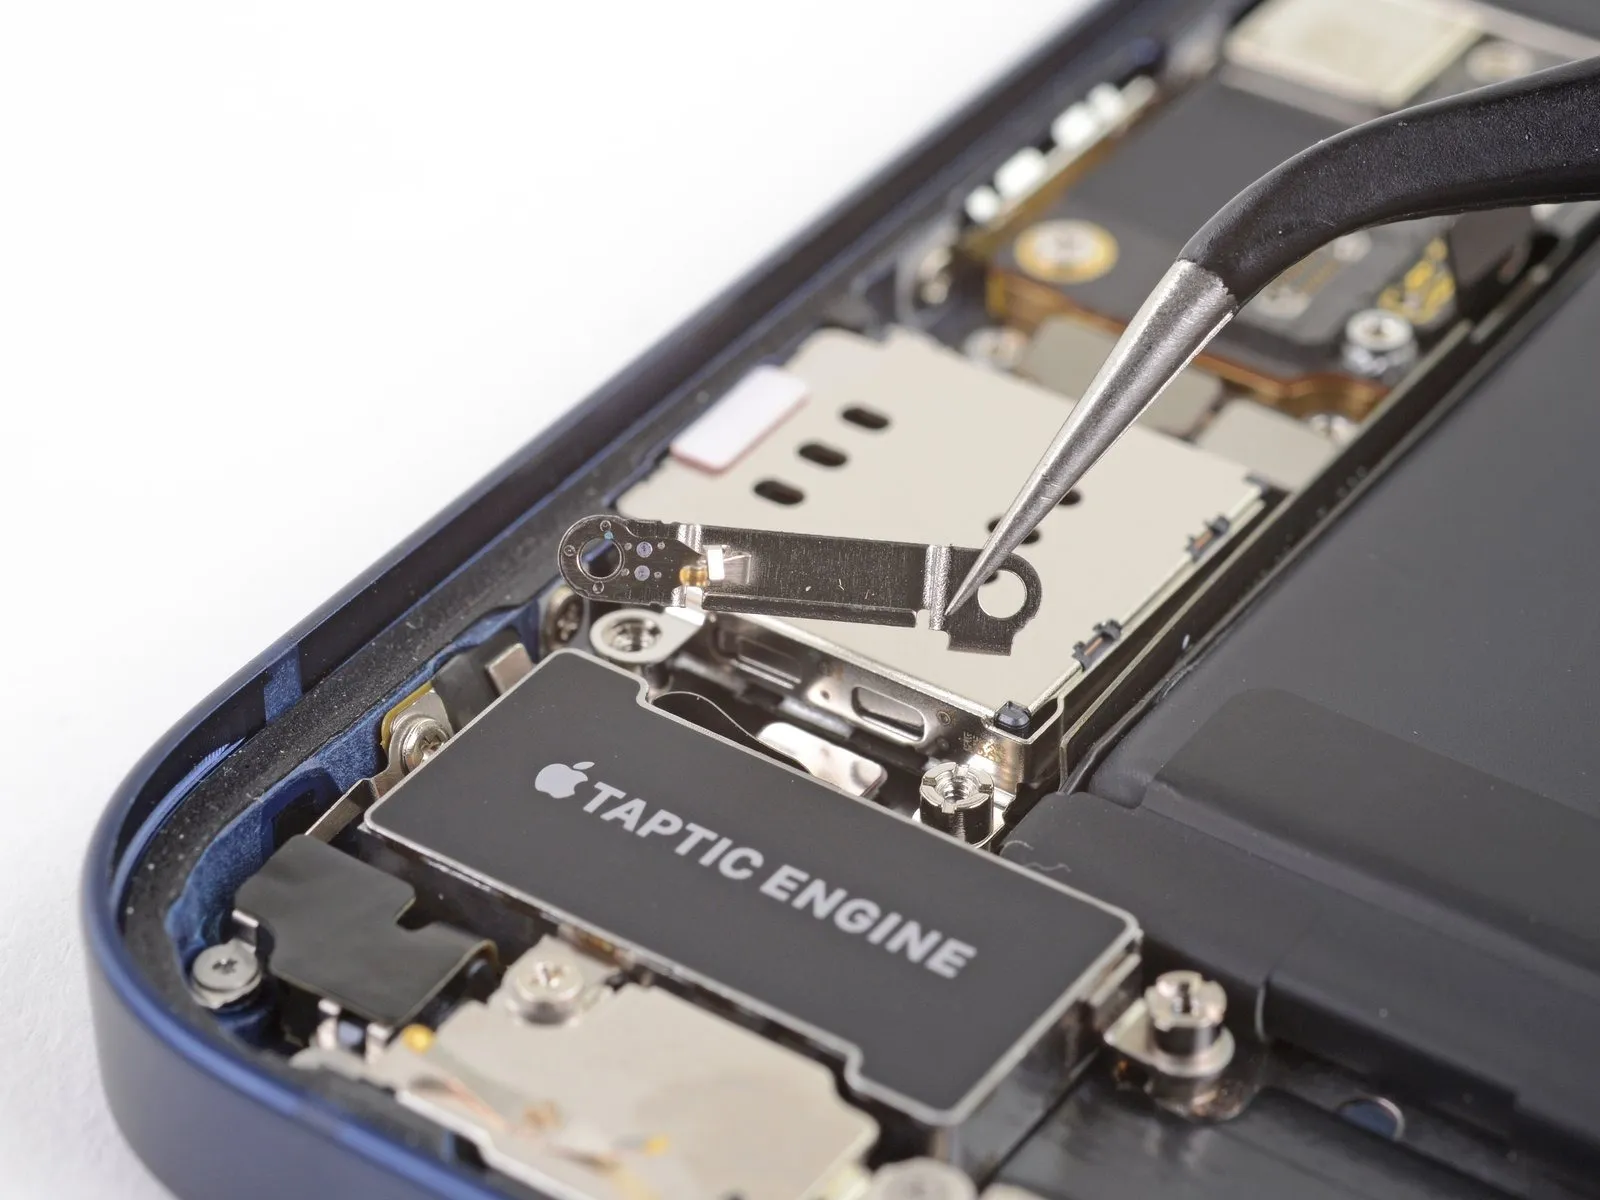
Detach the securing bracket that holds the Taptic Engine cable connector in place.
Step 34 | Unscrew the SIM card reader
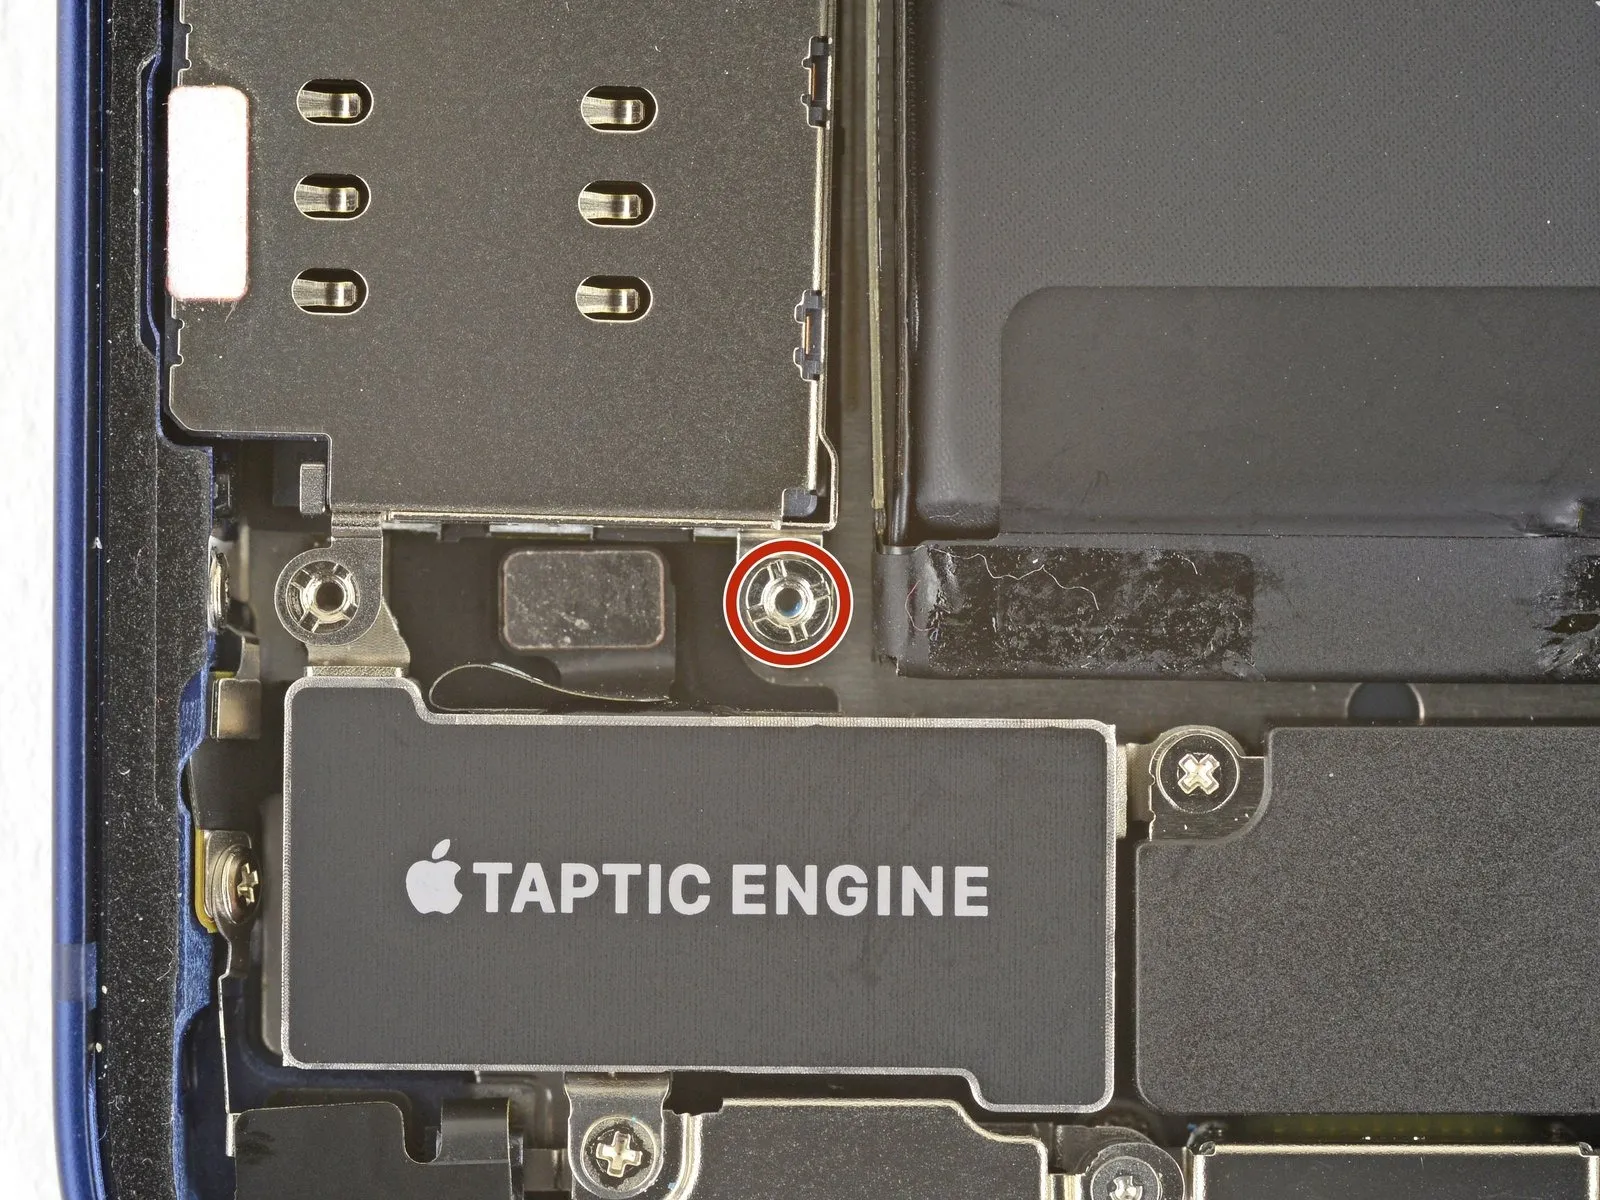
- Employing either a standoff screwdriver or a diminutive flathead driver is necessary for extracting the standoff screw that holds the SIM card reader in place.The standoff screw's length measures precisely 2.82 mm.For optimal results when removing standoff screws, a dedicated standoff screwdriver or bit is recommended.
- Should a standoff screwdriver not be available, a small flathead screwdriver can be utilized; however, exercise heightened care to prevent slippage and potential harm to nearby parts.
- Damage to adjacent components can occur if the flathead screwdriver slips during screw removal, so meticulous control is essential.
Step 35 | Remove the SIM card reader
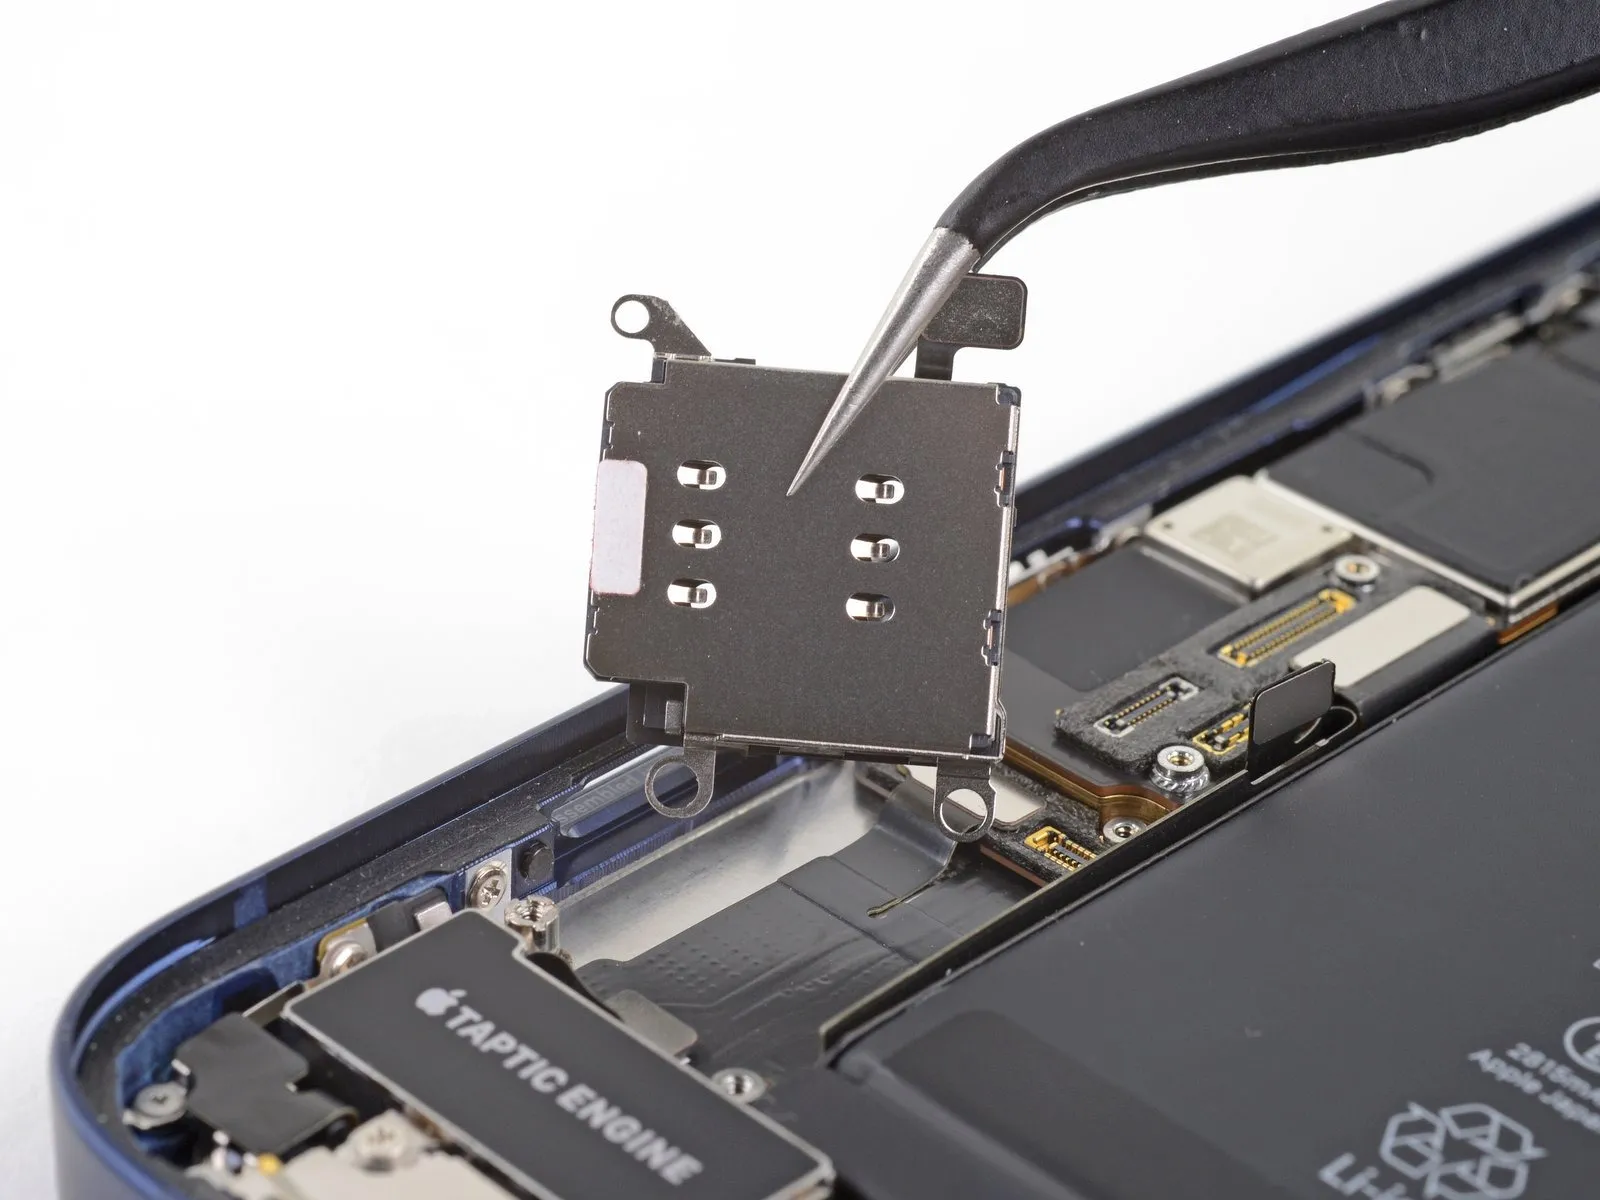
- Detach the SIM card reader assembly.
- Prior to reassembly, confirm that the SIM eject plunger is fully depressed against the device's side.The SIM eject plunger is a small component used to release the SIM tray.Ensuring the SIM eject plunger is properly positioned prevents damage during the reinstallation process.