iPhone 12 mini Taptic Engine Replacement
The iPhone 12 mini utilizes a Taptic Engine to generate both vibration alerts and nuanced haptic feedback sensations, and this document details the procedure for its removal and/or replacement.
- To ensure proper reattachment and sealing during reassembly, securing new adhesive is essential for all components.
Step 1 | Remove the pentalobe screws
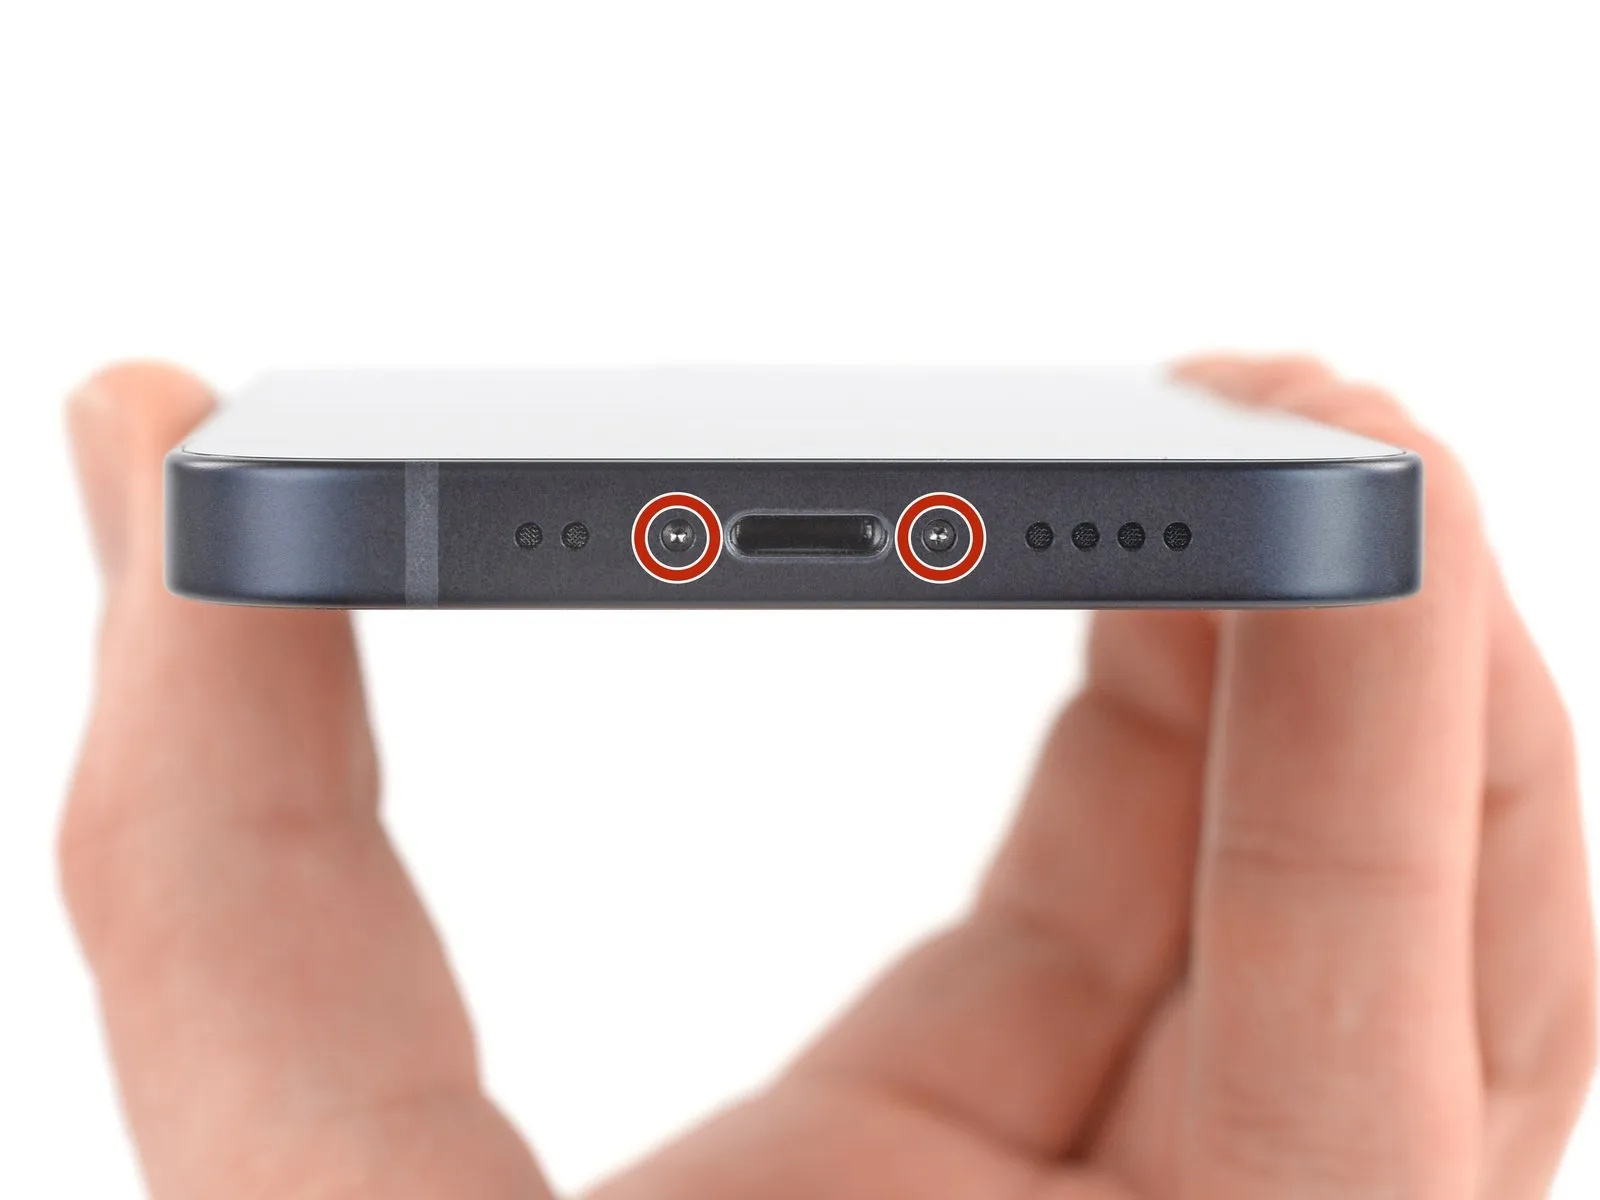

- Deactivate the iPhone's power supply to prevent any electrical issues during the disassembly procedure.
- Utilize a screwdriver to extract the pair of 6.7 mm pentalobe fasteners located along the iPhone's lower border.
Step 2 | Mark your opening picks


- Employing a permanent marker, create a visible indication precisely 3 millimeters from the pick's distal end.
- For enhanced positional awareness, consider marking the pick's other corners with varying measurements.
- As an alternative method, affix a coin to the pick's tip using adhesive tape, ensuring a 3-millimeter separation.
Step 3 | Tape over any cracks


- Completely cover the iPhone's display surface by applying successive layers of transparent packing tape, ensuring full coverage.
- Protect your vision by utilizing safety eyewear, as shards of glass may become dislodged during the repair process.
- Should the suction cup fail to maintain adhesion, utilize a folded, robust adhesive strip, like duct tape, to create a handle for screen lifting.
- As a last resort, employing superglue to affix the suction cup to the display surface may provide sufficient grip.
Step 4 | Anti-Clamp instructions


- Position the device's arms across either the left or right side of the iPhone's casing.
- Place the suction cups close to the iPhone's lower border, ensuring one is against the front and one against the rear.
- Apply pressure to the cups to create a secure bond with the intended surface.
- Should the iPhone's surface prove excessively smooth, hindering the Anti-Clamp's grip, applying adhesive tape can improve adhesion.
- The addition of tape can provide a more textured interface for the Anti-Clamp to secure to the iPhone's exterior.
Step 5


- Secure the arm assemblies in their locked positions.
- Advance the blue handle towards the front to engage the arm locking mechanism.
- Rotate the handle a full 360-degree circle, or continue until the suction cups exhibit signs of deformation.
- Confirm that the suction cups maintain parallel alignment; should misalignment occur, slightly release the suction cups and readjust the arm positioning.
Step 6


- To facilitate subsequent procedures, stabilize the iPhone on a firm surface, like a hardback book, ensuring it remains level and free from your hands.
- Employ a hair dryer to apply warmth along the iPhone’s lower border; the display surface should reach a temperature just beyond comfortable touch.
Allow a sixty-second interval to permit the adhesive to soften and generate a discernible separation. - Introduce an opening tool beneath the screen's plastic trim where the Anti-Clamp has established a substantial space.
Proper positioning of the opening tool is crucial, ensuring it remains situated between the plastic trim and the device’s frame to prevent screen damage. - Should the Anti-Clamp fail to create an adequate separation, increase heat application to the area and incrementally rotate the handle by ninety degrees.
Avoid rotations exceeding ninety degrees, and incorporate a sixty-second pause between each adjustment, allowing the Anti-Clamp and time to facilitate separation. - Proceed past the subsequent three procedural instructions.
Step 7 | Heat the bottom half of the phone

- Disassembly of the iPhone’s display assembly will irreversibly damage its water resistance, necessitating replacement of the waterproof seals to prevent liquid ingress, or meticulous avoidance of moisture during reassembly.
- Applying heat to the lower portion of the iPhone’s chassis facilitates the release of the display’s adhesive bond, reducing the force required for separation.
Employ a hair dryer or heat gun to warm the iPhone’s lower section until the display surface reaches a temperature that is slightly uncomfortable to touch.
Refer to this instructional guide for recommended techniques when utilizing a hair dryer to soften adhesive, and consult this separate guide for safety precautions regarding heat gun operation. - Consistent movement of the heat source is crucial to avoid localized overheating and potential damage to the iPhone’s display panel.
Should difficulties arise during the separation process, it is probable that the adhesive has re-solidified; reapplication of heat will restore its pliability.
Step 8 | Apply a suction handle


To utilize a solitary suction handle, position it against the phone's lower border, ensuring maximal proximity to the perimeter.
Severely fractured displays can sometimes permit suction cup adhesion if protected by a transparent layer of packaging tape; a robust adhesive tape can also substitute for the suction cup, and as a last resort, the suction cup can be secured to the damaged screen with superglue.
Step 9 | Lift the screen slightly


- Exert steady, substantial force on the suction cup to generate a minimal separation between the display and the device's metallic casing.A decorative frame, constructed from plastic, is affixed to the lower surface of the display assembly and must be raised concurrently with the display.Attempting to insert a tool between the bezel and the display will result in damage to the display panel.
- Position an opening tool within the space formed between the display and the plastic bezel, ensuring it does not contact the display surface directly.Confirm that the opening tool is positioned beneath the substantial plastic bezel to prevent screen damage.A visible separation should be apparent; the tool should move freely without obstruction. If a gap is not visible, further upward movement of the display is required.
- The screen is held in place by a robust, waterproof adhesive seal, necessitating considerable force to initially separate the components.Should difficulty arise in establishing this separation, applying additional heat and gently oscillating the screen will help to loosen the adhesive, allowing for tool insertion.Continue the rocking motion until a sufficient gap is achieved to facilitate tool placement.
Step 10 | Separate the bottom edge adhesive


Ensure the initial insertion of your opening tool does not exceed a depth of 3 millimeters from the lower border.Employ a reciprocating motion with your opening tool along the lower edge to sever the adhesive bond.Maintain the opening tool's position within the lower-right corner to inhibit the adhesive from reforming a seal.
Step 11 | Heat the right edge


Apply warm air from a hair dryer to the right-hand side of the iPhone’s casing, specifically the perimeter containing the power button, until the surface temperature reaches a point just beyond comfortable touch.The targeted heating should be focused on the right edge to facilitate adhesive separation.Ensure the screen’s temperature is elevated enough to loosen the adhesive, but avoid exceeding a level that could cause damage.
Step 12 | Separate the screen adhesive


Using a specialized opening tool, carefully maneuver it around the lower-right perimeter and along the right side of the iPhone to sever the adhesive securing the display assembly.Ensure the opening tool's insertion depth remains limited to a maximum of 3 millimeters to prevent potential harm to delicate internal components.Exceeding this 3-millimeter depth poses a risk of damage to the iPhone's internal components.
Step 13 | Heat the top half
Apply warmth to the upper portion of the iPhone's casing utilizing a hair dryer, continuing until the surface temperature reaches a point where it becomes uncomfortably warm upon contact.
Step 14
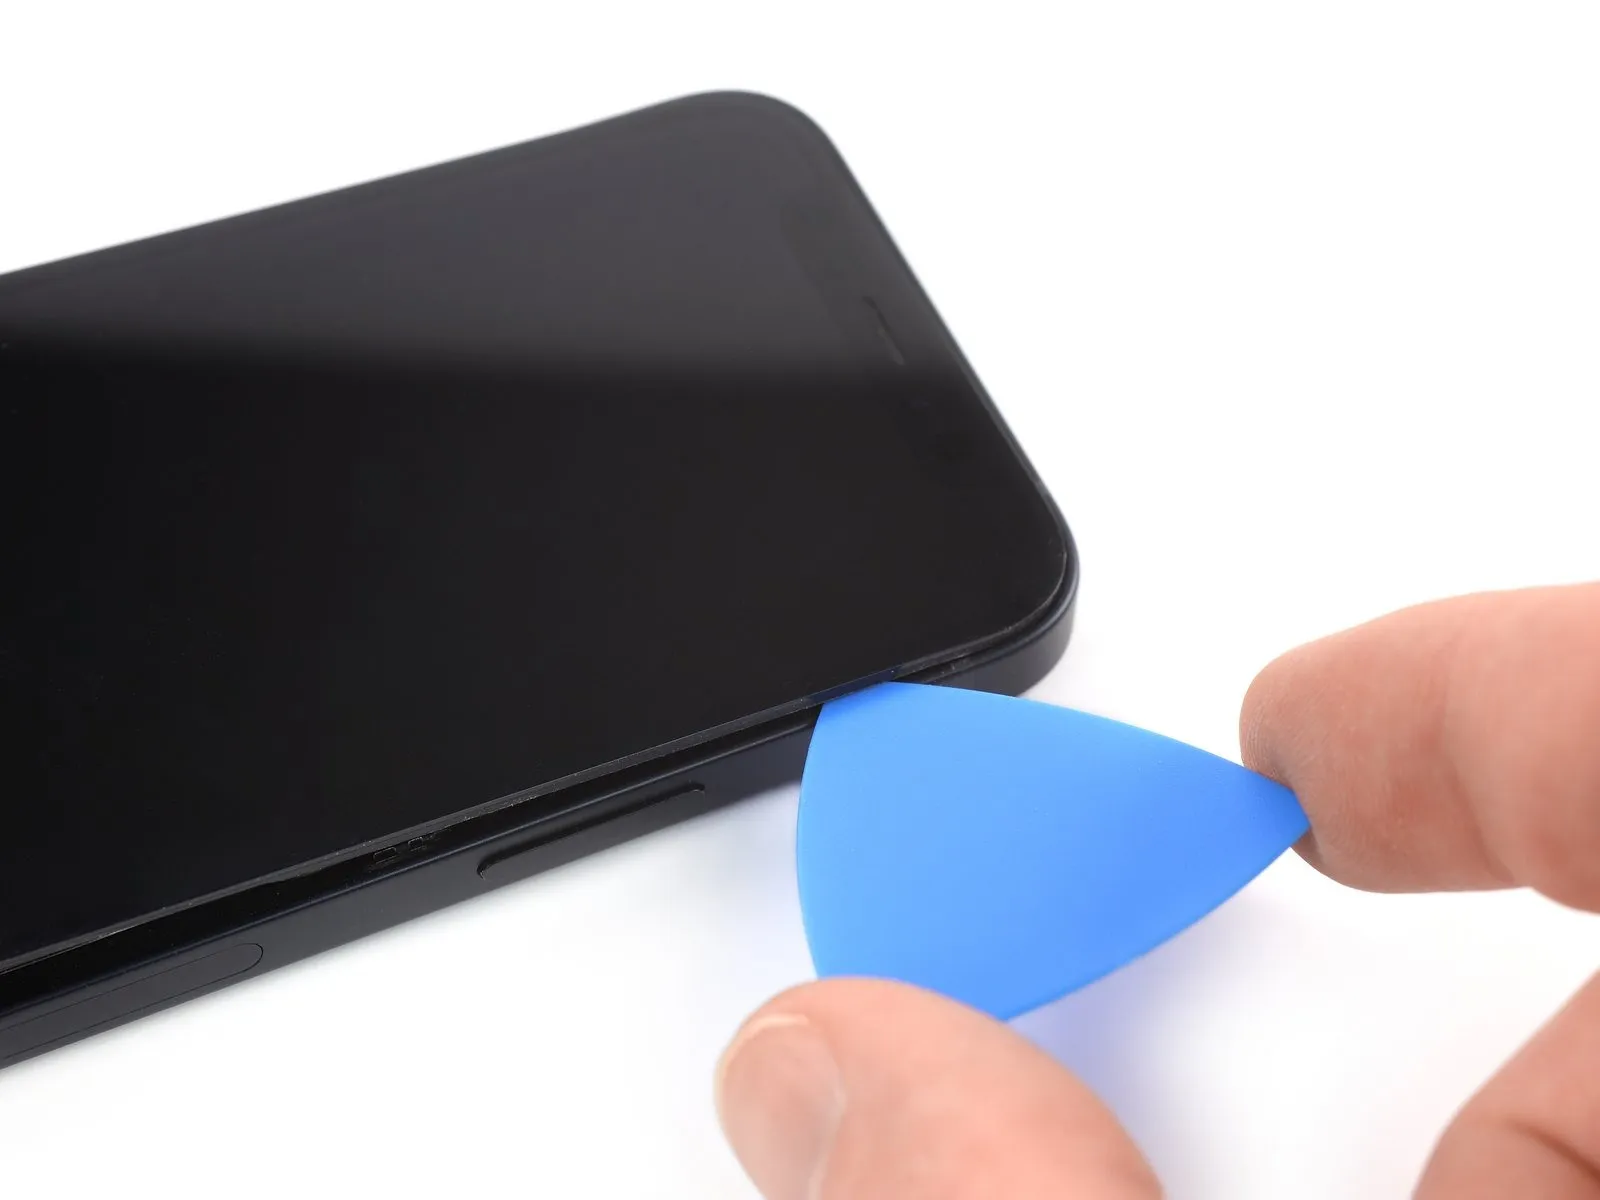


- Adhesive and retaining clips jointly fasten the display's uppermost boundary.
- Position a separating tool beneath the display panel's upper-rightmost corner.
- Moving the tool along the top right corner may present some opposition due to the presence of clips.
- Insertion depth of the separating tool must not exceed 3 millimeters to prevent potential damage to the front panel sensor array.
- Applying gentle traction to the front panel assembly toward the phone's lower edge can ease the separation process.
- Continue sliding the separating tool along the top edge to sever any residual adhesive holding the display in place.
Step 15 | Heat the left edge


To facilitate separation, apply warmth to the left lateral edge of the iPhone's enclosure utilizing a hair dryer, ensuring the screen surface reaches a temperature just beyond comfortable touch.
Step 16 | Separate the left edge adhesive
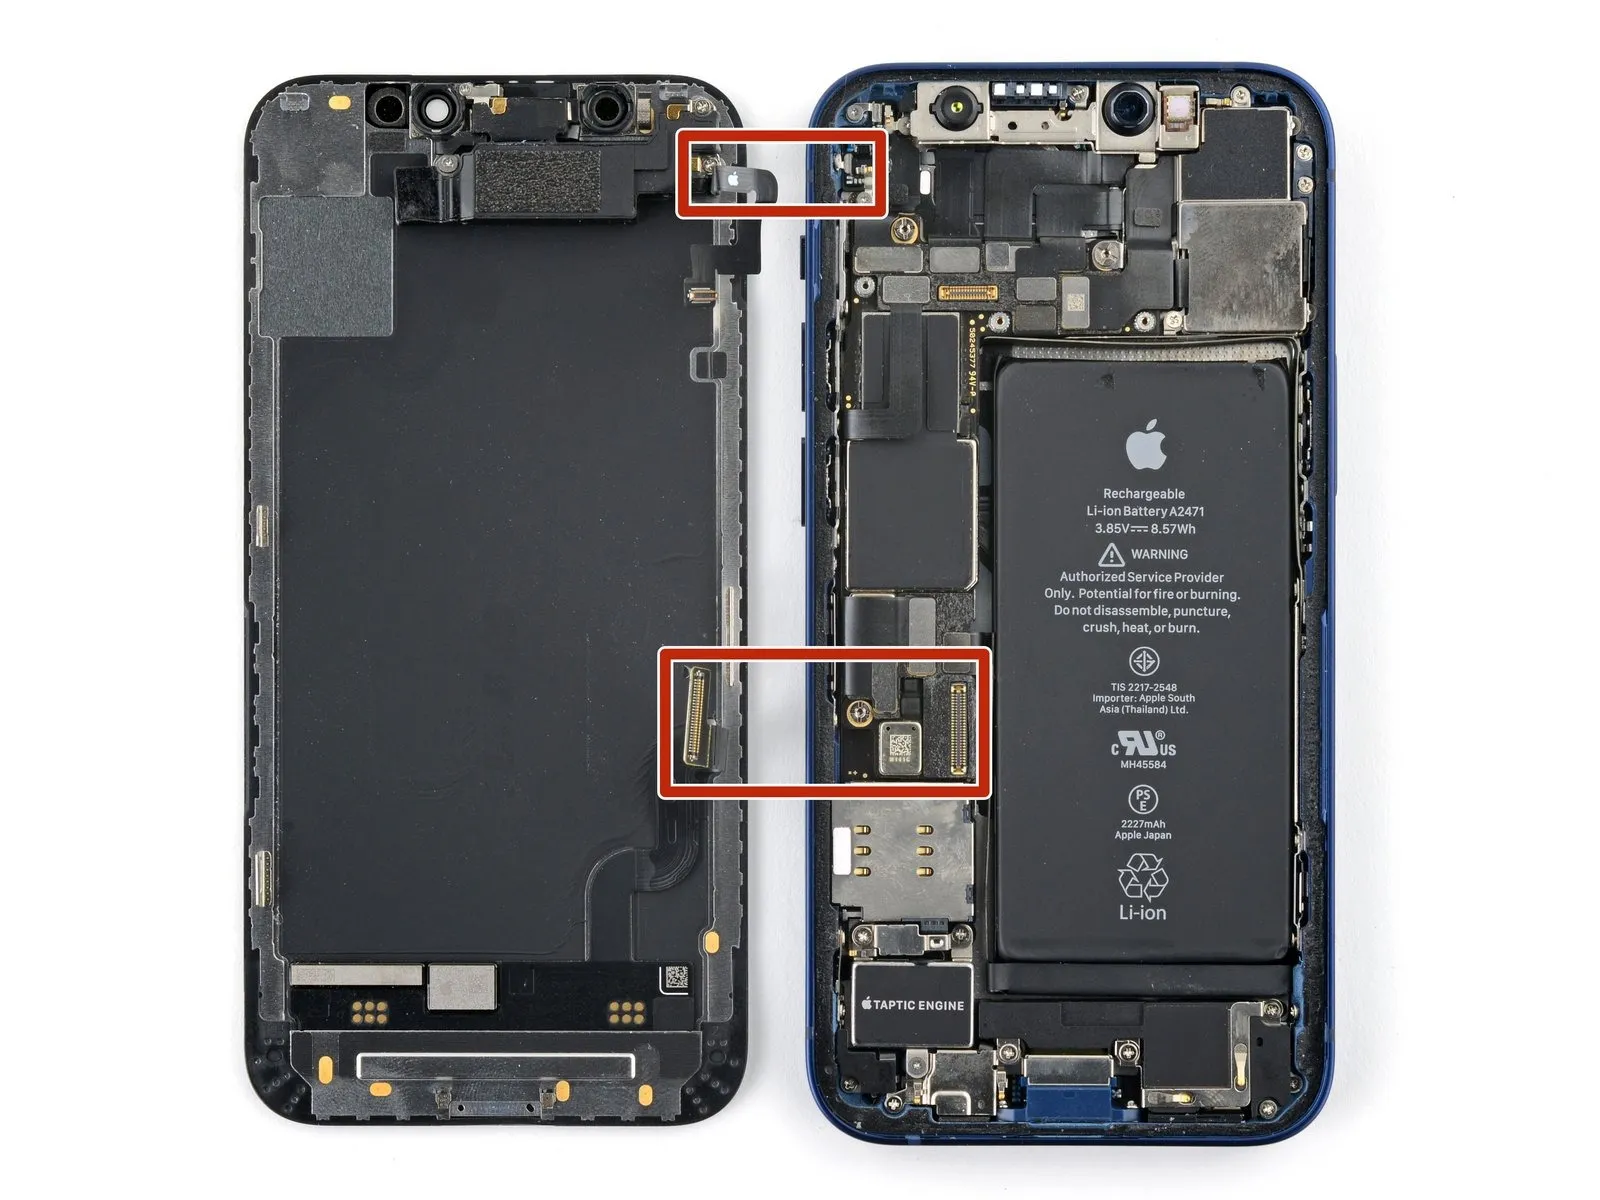


- To prevent damage to the two cables linking the display to the device's mainboard, ensure the prying tool does not penetrate beyond a depth of 2 millimeters along the left screen border.
- Employ a rotating motion with the prying tool focused on the upper-left corner of the screen's surface.
- Advance the prying tool downwards along the left screen edge to release the adhesive bond.
- Should adhesive separation prove difficult, apply localized heat to the left edge to soften the adhesive for easier detachment.
Step 17 | Open the iPhone


- Orient the iPhone so that its right-hand side is visible to you.
- Initiate the opening process by pivoting the screen upwards from the right-hand side, mimicking the action of opening a book's cover.
- Avoid complete separation of the display at this stage, because delicate ribbon cables remain connected to the logic board.
- Secure the display in an upright position using a support to maintain access to the internal components.
- When reassembling, position the display, ensure proper clip alignment along the top edge, and apply gentle pressure to the top edge before securing the remainder of the display; if resistance is encountered, inspect the display's perimeter clips for any deformation.
Step 18 | Unscrew the battery and display connector cover
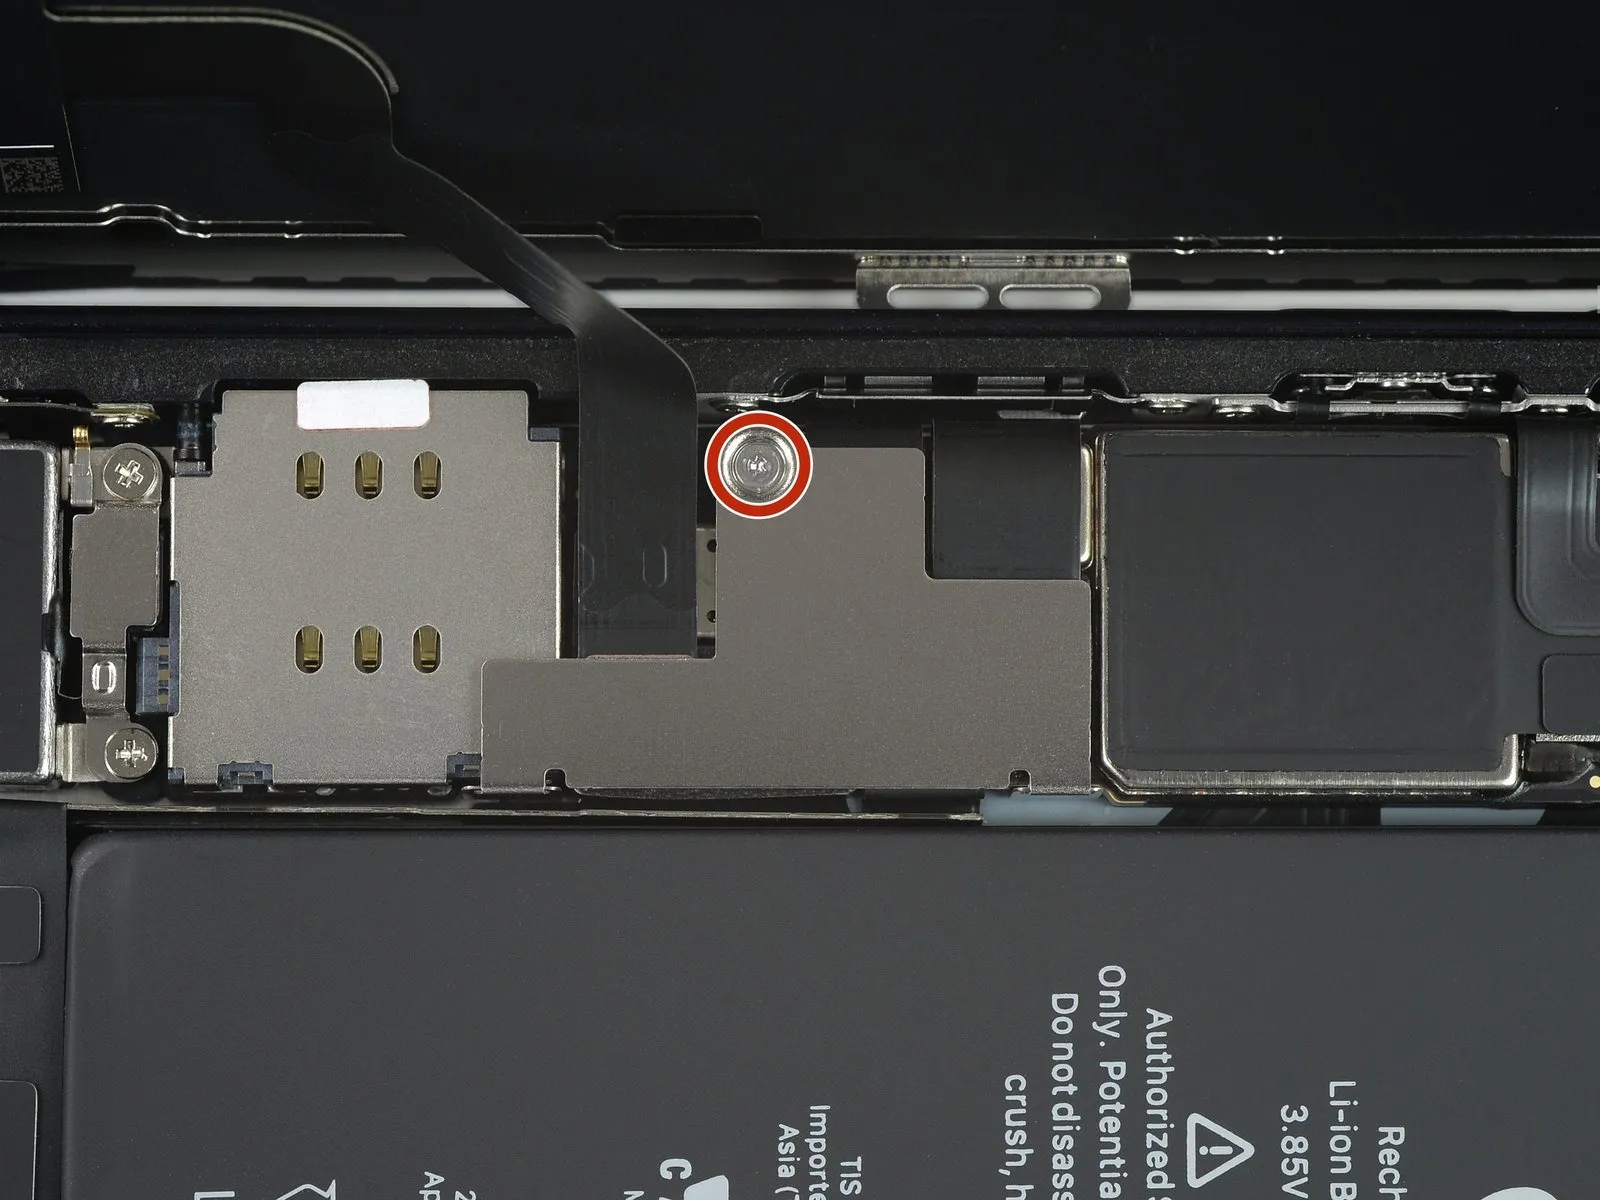

- Detach the Y000 screw, measuring 1.25 mm in length, which holds the bracket covering the battery and display connector.Meticulously organize all screws during disassembly, ensuring each is reinstalled in its original location to prevent potential damage to the iPhone’s internal components.A functional test of the iPhone, including all features, is recommended at this stage during reassembly, prior to permanently securing the display.
- To guarantee proper operation and avoid complications, fully deactivate the iPhone after the functional test and before proceeding with the remaining repair steps.
- The bracket cover is affixed with a Y000 screw that has a length of 1.25 mm, and its precise placement is critical for proper device function.
Step 19 | Remove the battery and display connector cover
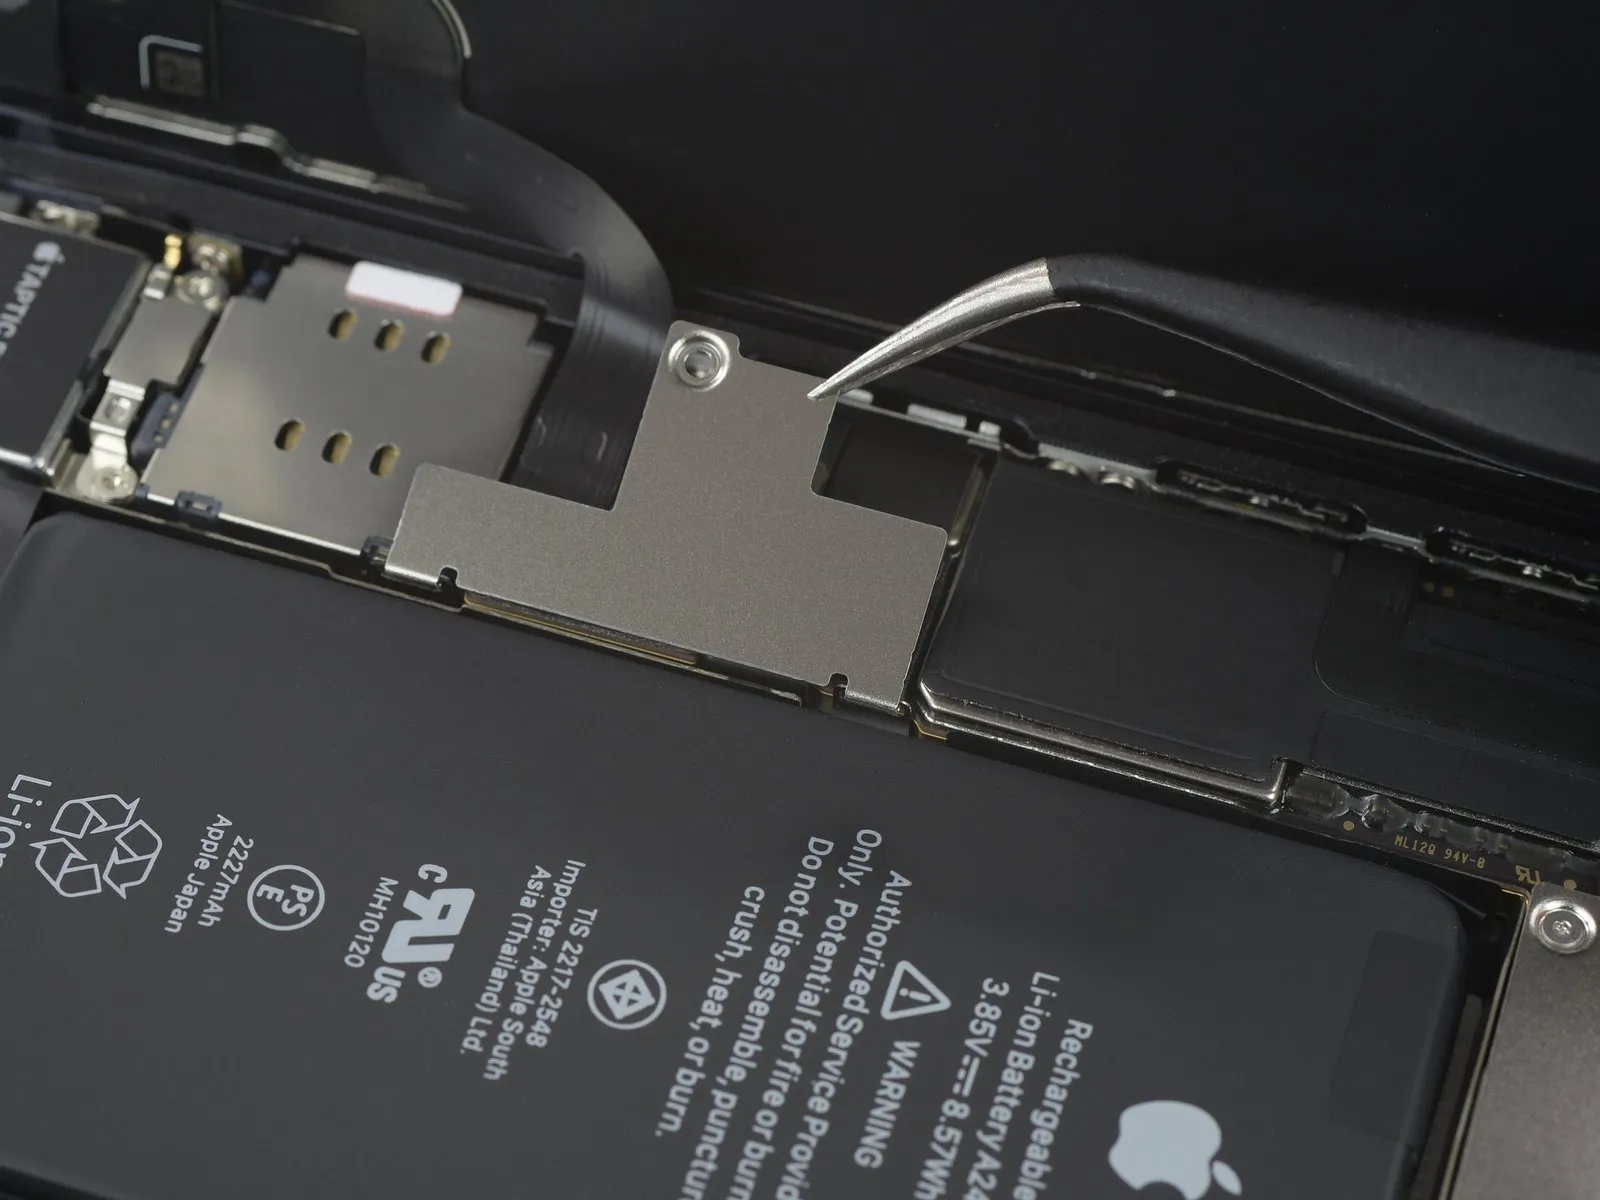

- Employing tweezers, detach the battery and display connector retaining bracket.
- The connector bracket incorporates two small hinges located on its right side; ensure proper alignment with their corresponding features when reattaching.
Step 20 | Disconnect the battery
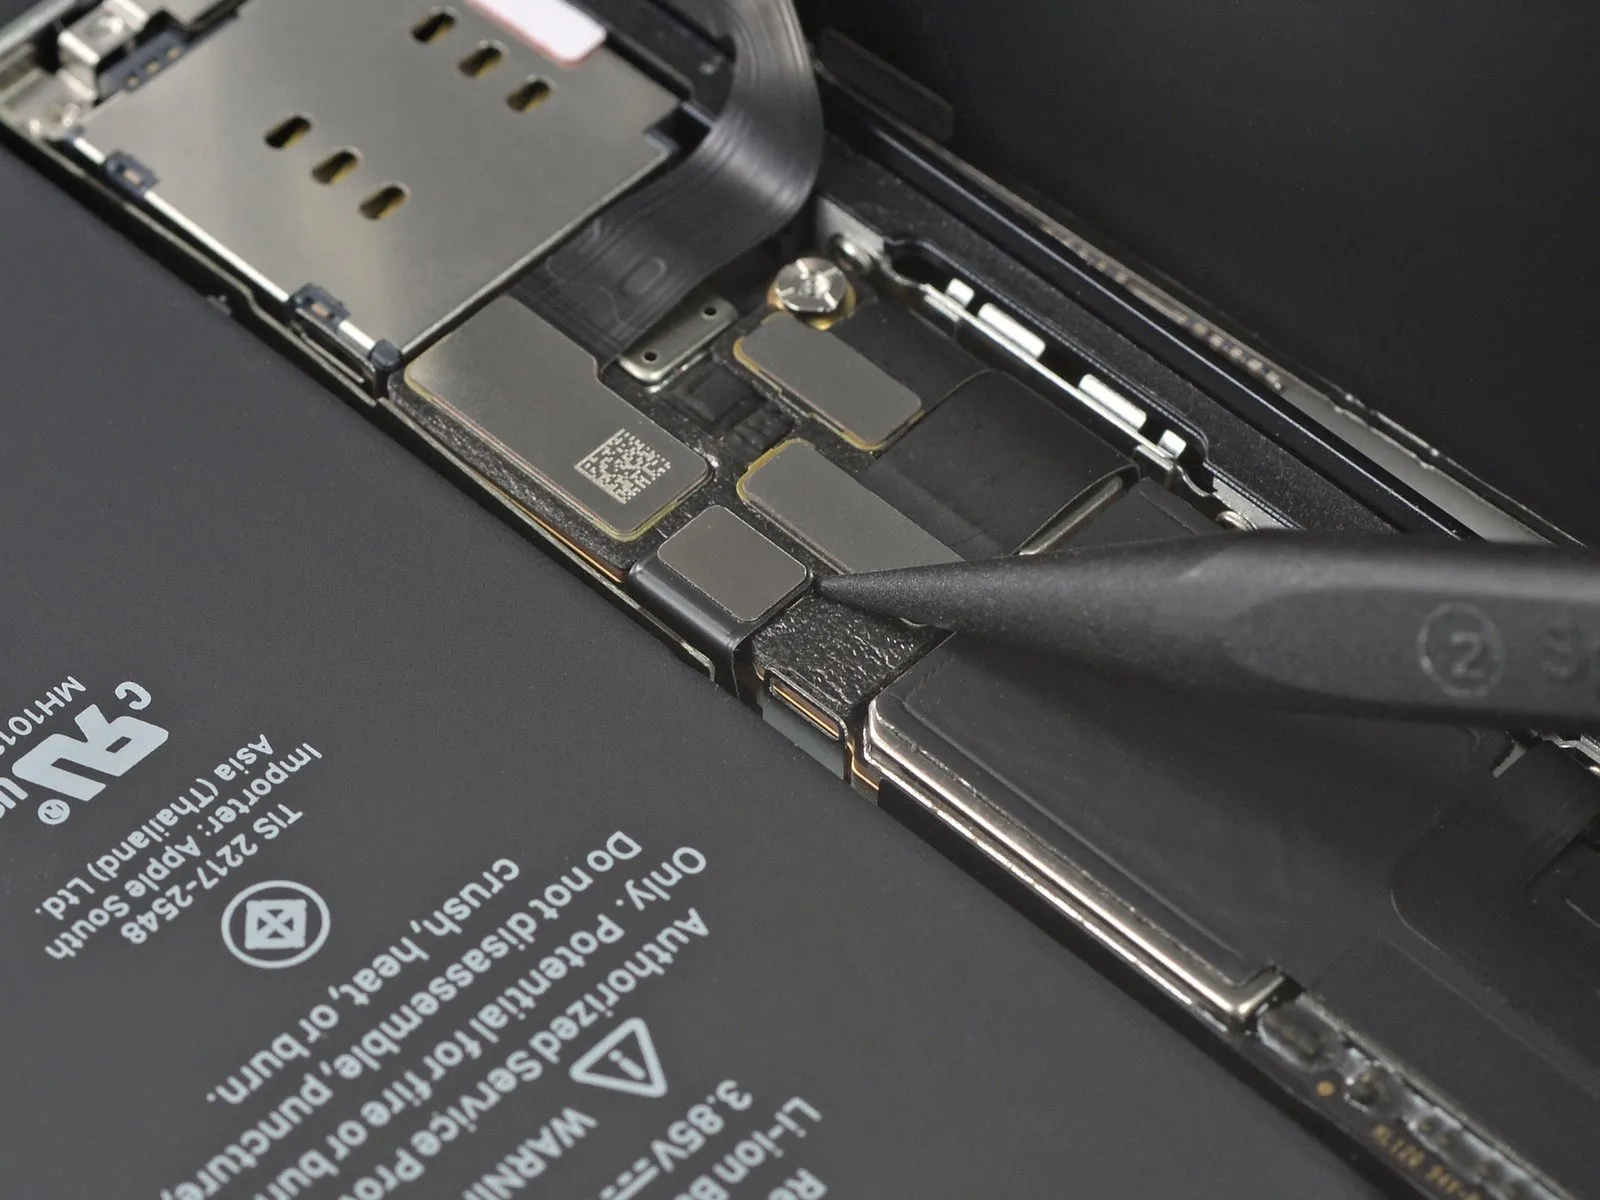

- Employ a spudger tool or a meticulously clean fingernail to elevate the battery connector from its corresponding receptacle on the logic board.
- Exercise caution to avoid compromising the integrity of the black silicone seals that encircle this connector and others, as they offer supplementary defense against water and particulate matter infiltration.
- Slightly deflect the connector away from the logic board's surface to preclude unintentional electrical contact with the socket, which could inadvertently supply power to the device during the repair process.
Step 21 | Disconnect the OLED display cable
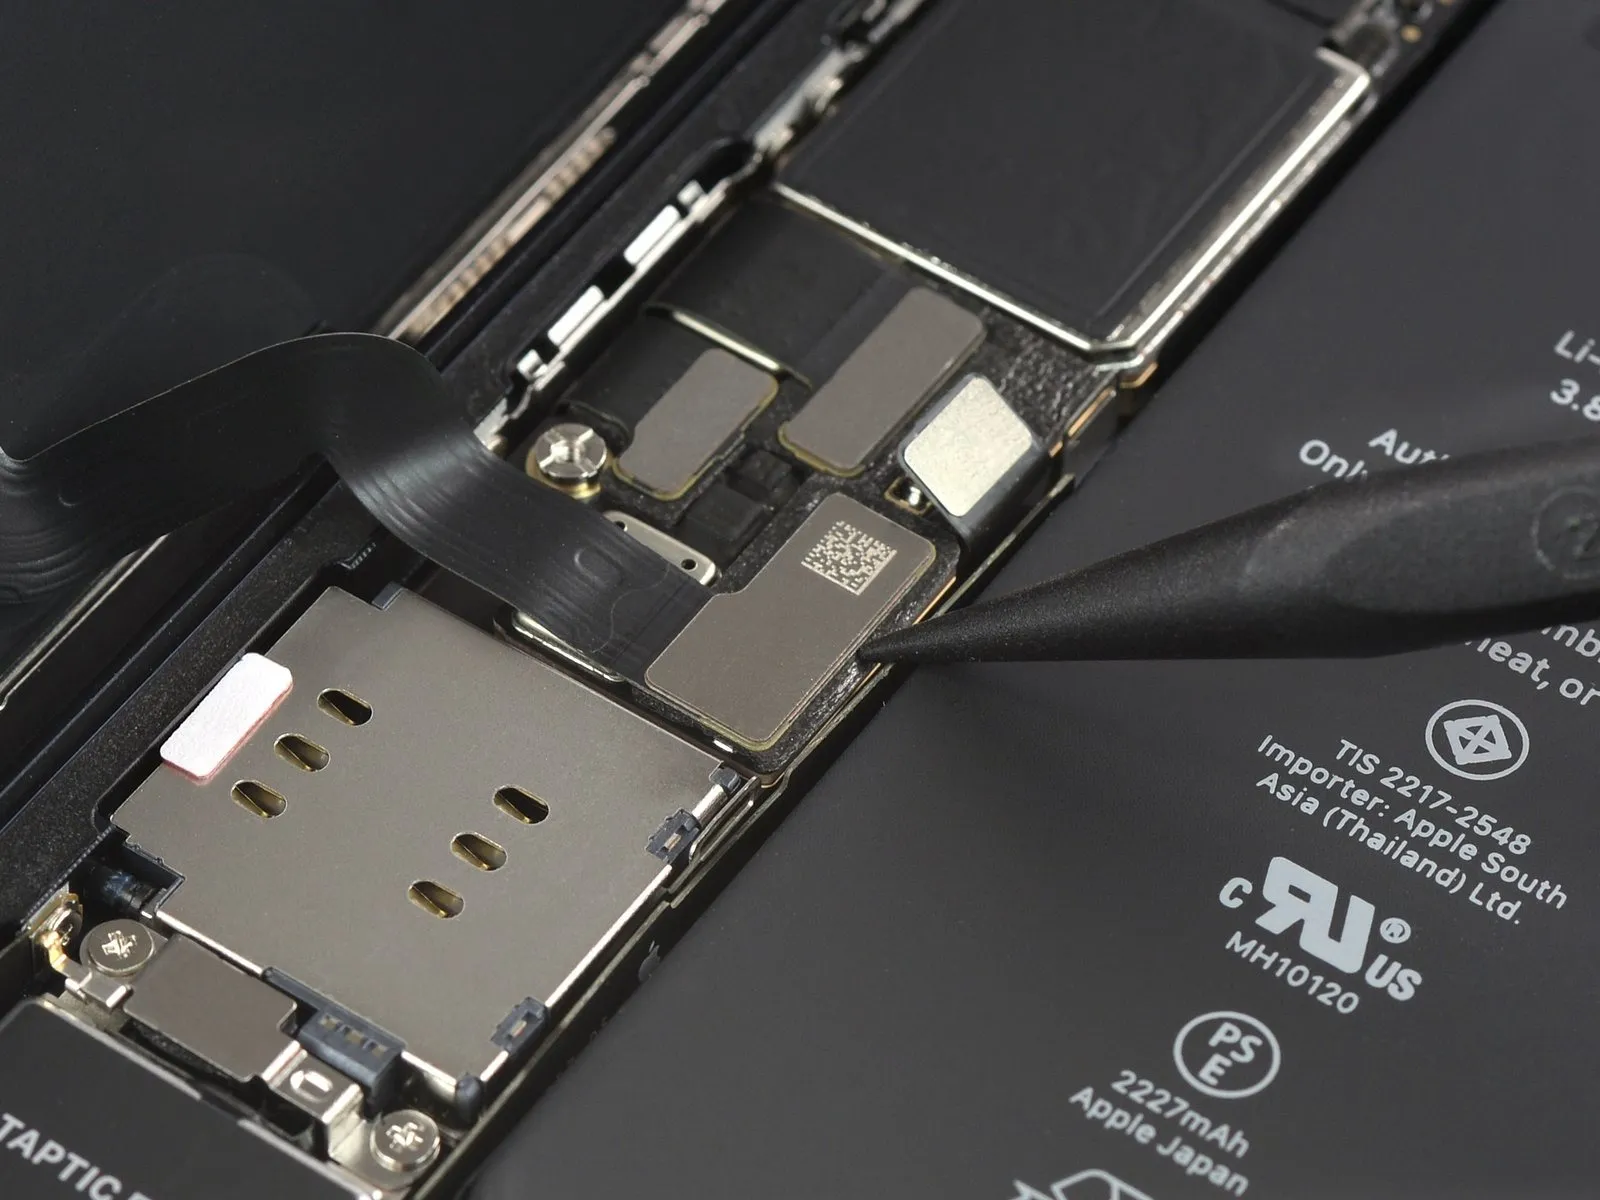

- Employing a spudger tool, or a similarly non-abrasive implement such as a clean fingernail, gently lift the OLED panel cable connector away from its corresponding receptacle on the logic board.To secure the connector once again, meticulously position it and apply pressure to the lateral edges until an audible click confirms proper engagement, repeating the process for both sides.Avoid applying pressure to the central portion of the connector during reattachment to prevent potential deformation.
- Connector misalignment can result in pin bending, which will lead to irreversible component failure.
Step 22 | Unscrew the front sensor assembly cover
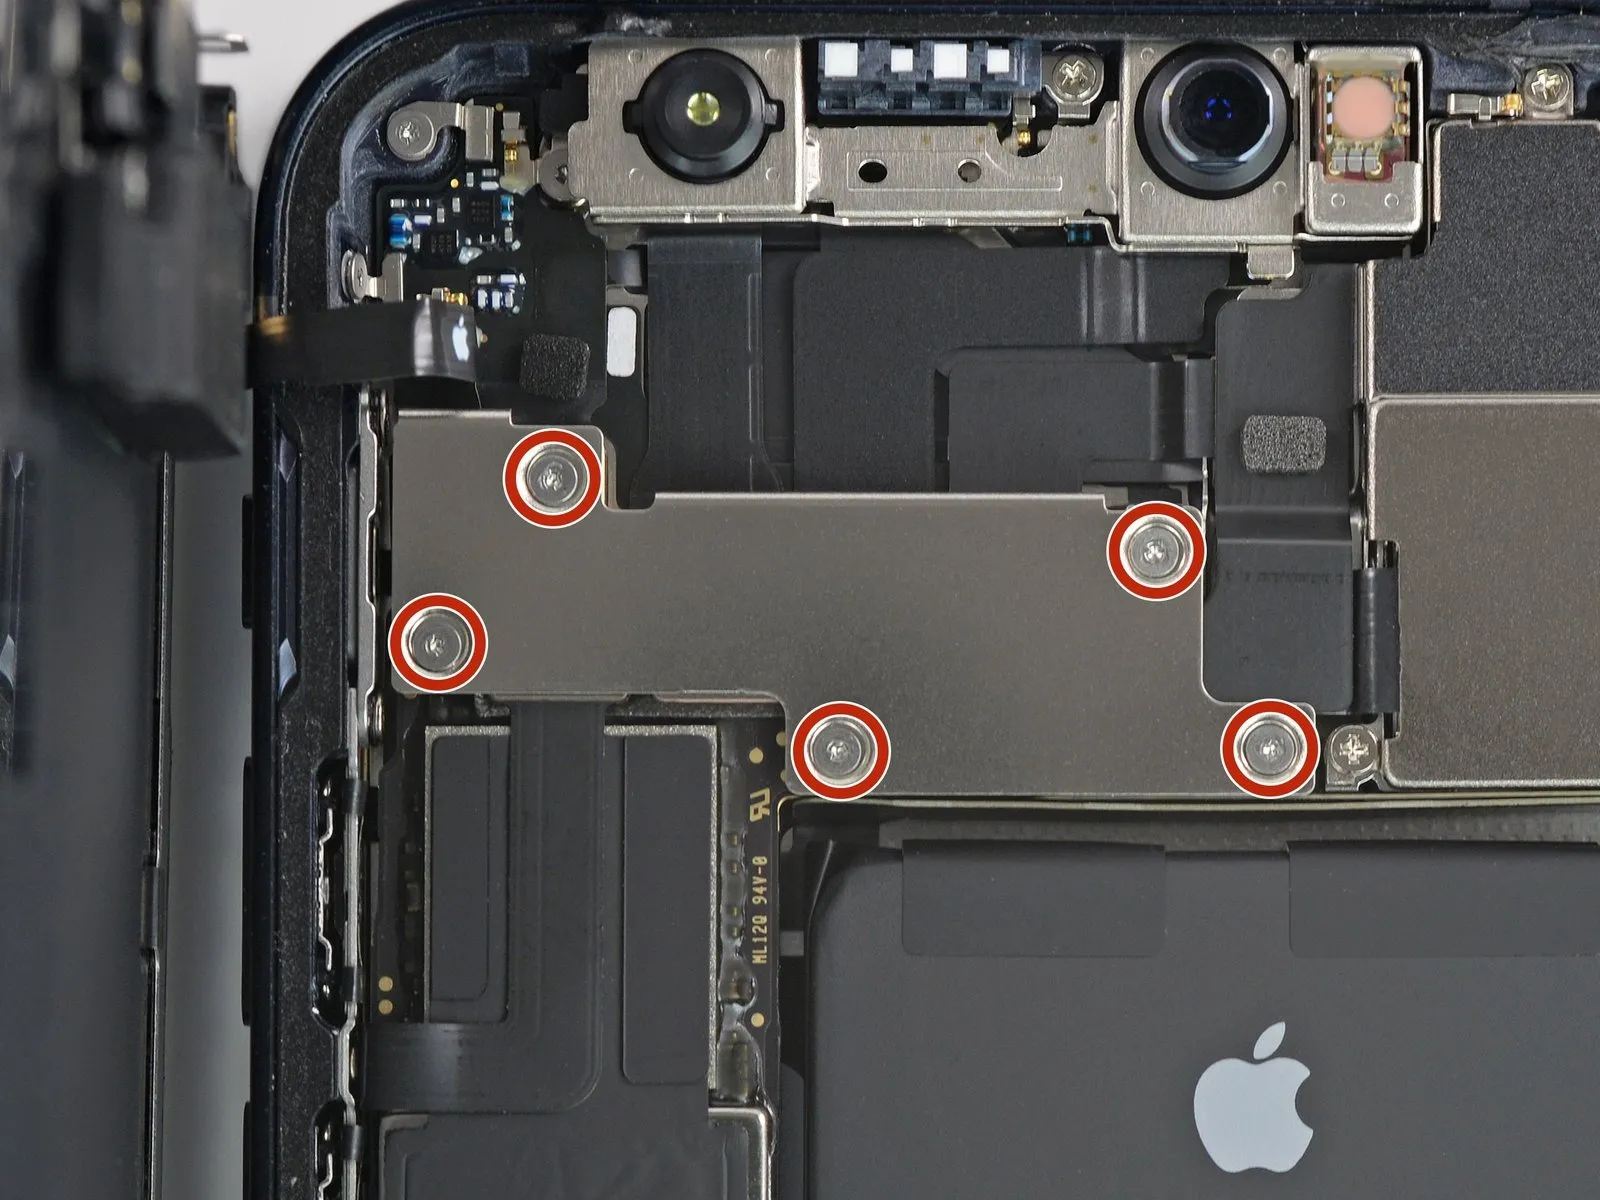

- To detach the front sensor assembly cover bracket, carefully extract the five screws, each measuring 1 millimeter in length.Utilize a Y000 screwdriver to loosen and remove the fasteners holding the cover bracket in place.These screws, with their diminutive 1 mm length, secure the bracket and must be removed to proceed with disassembly.
Step 23


- Employing tweezers, detach the bracket securing the front sensor assembly.
Step 24 | Disconnect the front sensors


- To release the front sensor assembly's cable connector, employ a spudger tool or a similarly non-marring object, such as a clean fingernail.The cable connector must be carefully separated from the front sensor assembly using a spudger or fingernail to avoid damage.A spudger or a clean fingernail is necessary to detach the connector of the front sensor assembly cable.
Step 25 | Remove the display assembly

- Detach the display unit from the device.
If a replacement of the waterproof adhesive bordering the display's perimeter is desired, halt the reassembly process at this juncture.The adhesive serves to maintain the device's water resistance.This step is crucial for ensuring the integrity of the display.
Step 26 | Unscrew the Taptic engine


- Detach the screw with a length of 1.3 millimeters, utilizing a Phillips #000 screwdriver.Employing a Phillips #000 screwdriver, extract the screw that measures 2.1 millimeters in length.A Y000 screwdriver should be used to dislodge the 1.6-millimeter screw.
- The screw, measuring 1.3 mm, must be removed with a Phillips #000 screwdriver.A Phillips #000 screwdriver is required to take out the 2.1 mm screw.Utilize a Y000 screwdriver to extract the screw, which has a length of 1.6 mm.
- For removal of the 1.3 mm screw, a Phillips #000 screwdriver is necessary.The 2.1 mm screw should be removed using a Phillips #000 screwdriver.A Y000 screwdriver is the appropriate tool for removing the 1.6 mm screw.
Step 27 | Remove the Taptic engine connector cover


Step 28 | Disconnect the Taptic engine


Step 29 | Remove the standoff screw


- Detach the standoff screw, which measures 3 millimeters in length.The fastener securing the standoff must be extracted.A 3-millimeter-long screw holds the standoff in place and requires removal.
Step 30 | Remove the Taptic engine

- Employing tweezers is necessary for the extraction of the component.The component in question is the Taptic engine.This procedure requires careful handling to avoid damage.