iPhone 13 Battery Replacement
iPhone batteries are designed to retain 80% of their original capacity after undergoing up to 500 complete charge cycles, typically providing approximately 18-24 months of use. Subsequently, increased charging frequency may be required, and iOS may indicate diminished performance, resulting in slower operation. This procedure details how to substitute your battery and return your iPhone to its original operational speed.
- Should your battery exhibit swollen characteristics, exercise necessary safety measures.
Please be aware that, within this guide, the loudspeaker is detached to minimize the possibility of a battery adhesive strip tearing. Although not essential, the battery can be replaced without this step.
Following the repair, devices running iOS 17.6 or earlier versions may display a message concerning the battery's "genuineness", even when utilizing authentic Apple components; if the device functions correctly, this message can be disregarded. Devices running iOS 18 or later require battery authentication via Apple's Repair Assistant.
To ensure peak battery efficiency, after completing this repair, perform a calibration: Initially, charge the battery to 100% and maintain charging for a minimum of two additional hours. Subsequently, deplete the battery entirely until the iPhone automatically powers down. Finally, recharge the device uninterrupted to 100% to finalize the calibration.
Step 1 | Remove the pentalobe screws
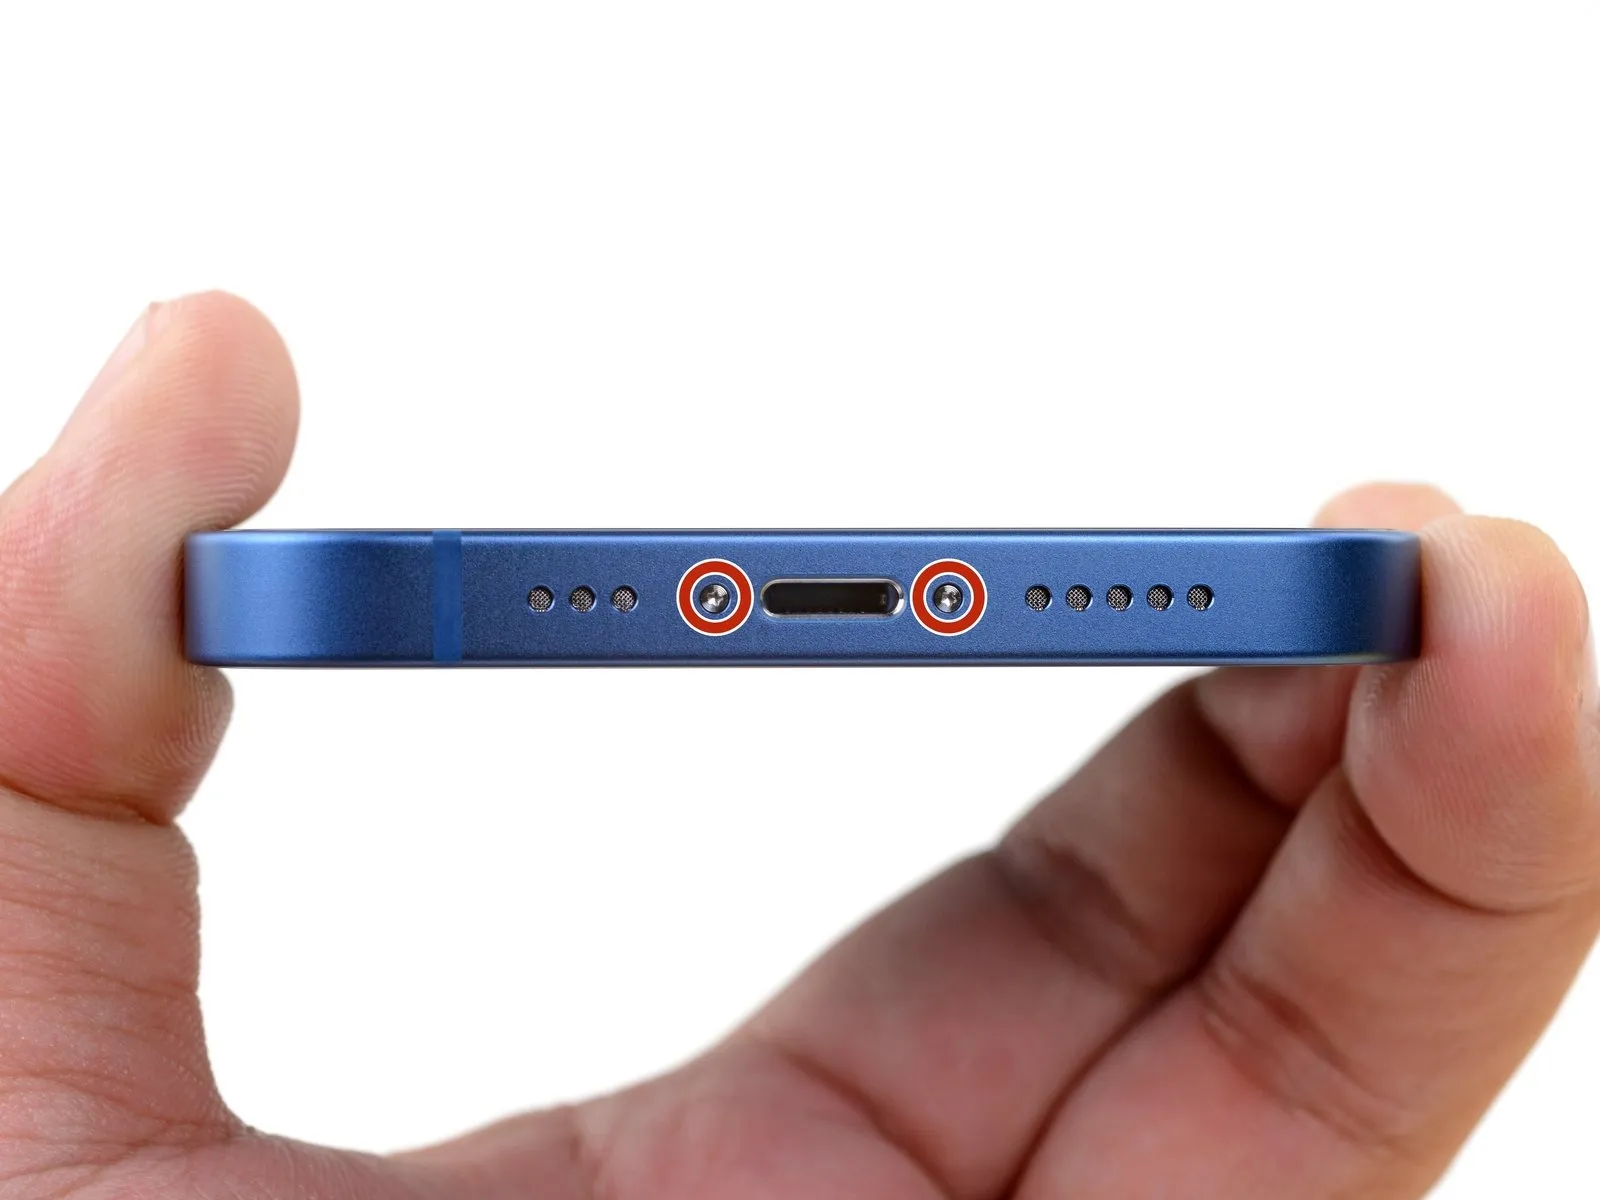
- Using a specialized screwdriver, unscrew and remove the pair of pentalobe P2 screws, each measuring 6.8 mm in length, which secure the lower edge of the device.
- Separating the iPhone's display assembly will irreversibly damage the integrated waterproof seals; therefore, acquire replacement seals beforehand or exercise extreme caution to prevent liquid ingress during reassembly if new seals are not used.
Step 2 | Mark your opening picks


- To prevent over-insertion, use a permanent marker to indicate a point 3 millimeters from the pick's tip.
- For enhanced precision, consider marking the pick's other corners with varying measurements.
- As an alternative method for ensuring accurate depth, affix a coin to the pick's tip, positioning it 3 millimeters from the end.
Step 3 | Tape over any cracks


- Apply multiple layers of transparent packing tape across the iPhone’s display surface, ensuring complete coverage.
- Should the suction cup fail to maintain adhesion during subsequent procedures, create a handle by folding a robust adhesive strip, like duct tape, and employ it to elevate the screen.
- As a last resort, secure the suction cup to the display surface using superglue.
Step 4 | Anti-Clamp instructions


- Detailed guidance concerning the operation of the Anti-Clamp is accessible via a separate instructional document.To disengage the Anti-Clamp's gripping mechanism, retract the blue handle towards the rear.
- Carefully position the tool's arms across either the left or right side of the iPhone's casing.
- Place the suction cups in close proximity to the iPhone's lower border, ensuring one is situated on the front surface and the other on the rear.
- Apply pressure by compressing the cups together, establishing a secure vacuum seal on the intended region.
- An additional consideration is highlighted below.
Step 5


- Rotate the handle a full 360 degrees, or continue until visual confirmation of cup deformation is observed.
Step 6


- Ensure the iPhone is stabilized on a firm surface, like a hardback book, to maintain a hands-free, level position during the subsequent repair procedures.
- Employ a hair dryer to apply warmth along the iPhone's lower edge, ensuring the surface temperature reaches a point where it feels slightly uncomfortable to touch.
- Allow a sixty-second interval to permit the adhesive to loosen and create a visible separation.
- Introduce an opening pick beneath the screen's plastic border when the Anti-Clamp device establishes a substantial gap.
- Avoid excessive rotation, limiting adjustments to ninety-degree increments, and observe a sixty-second pause between rotations, allowing the Anti-Clamp and time to facilitate the separation.
Step 7 | Heat the bottom edge

- Apply warmth to the iPhone's lower border utilizing a hair dryer or heat gun, ensuring the surface temperature reaches a point just beyond comfortable touch.
Step 8 | Apply a suction cup
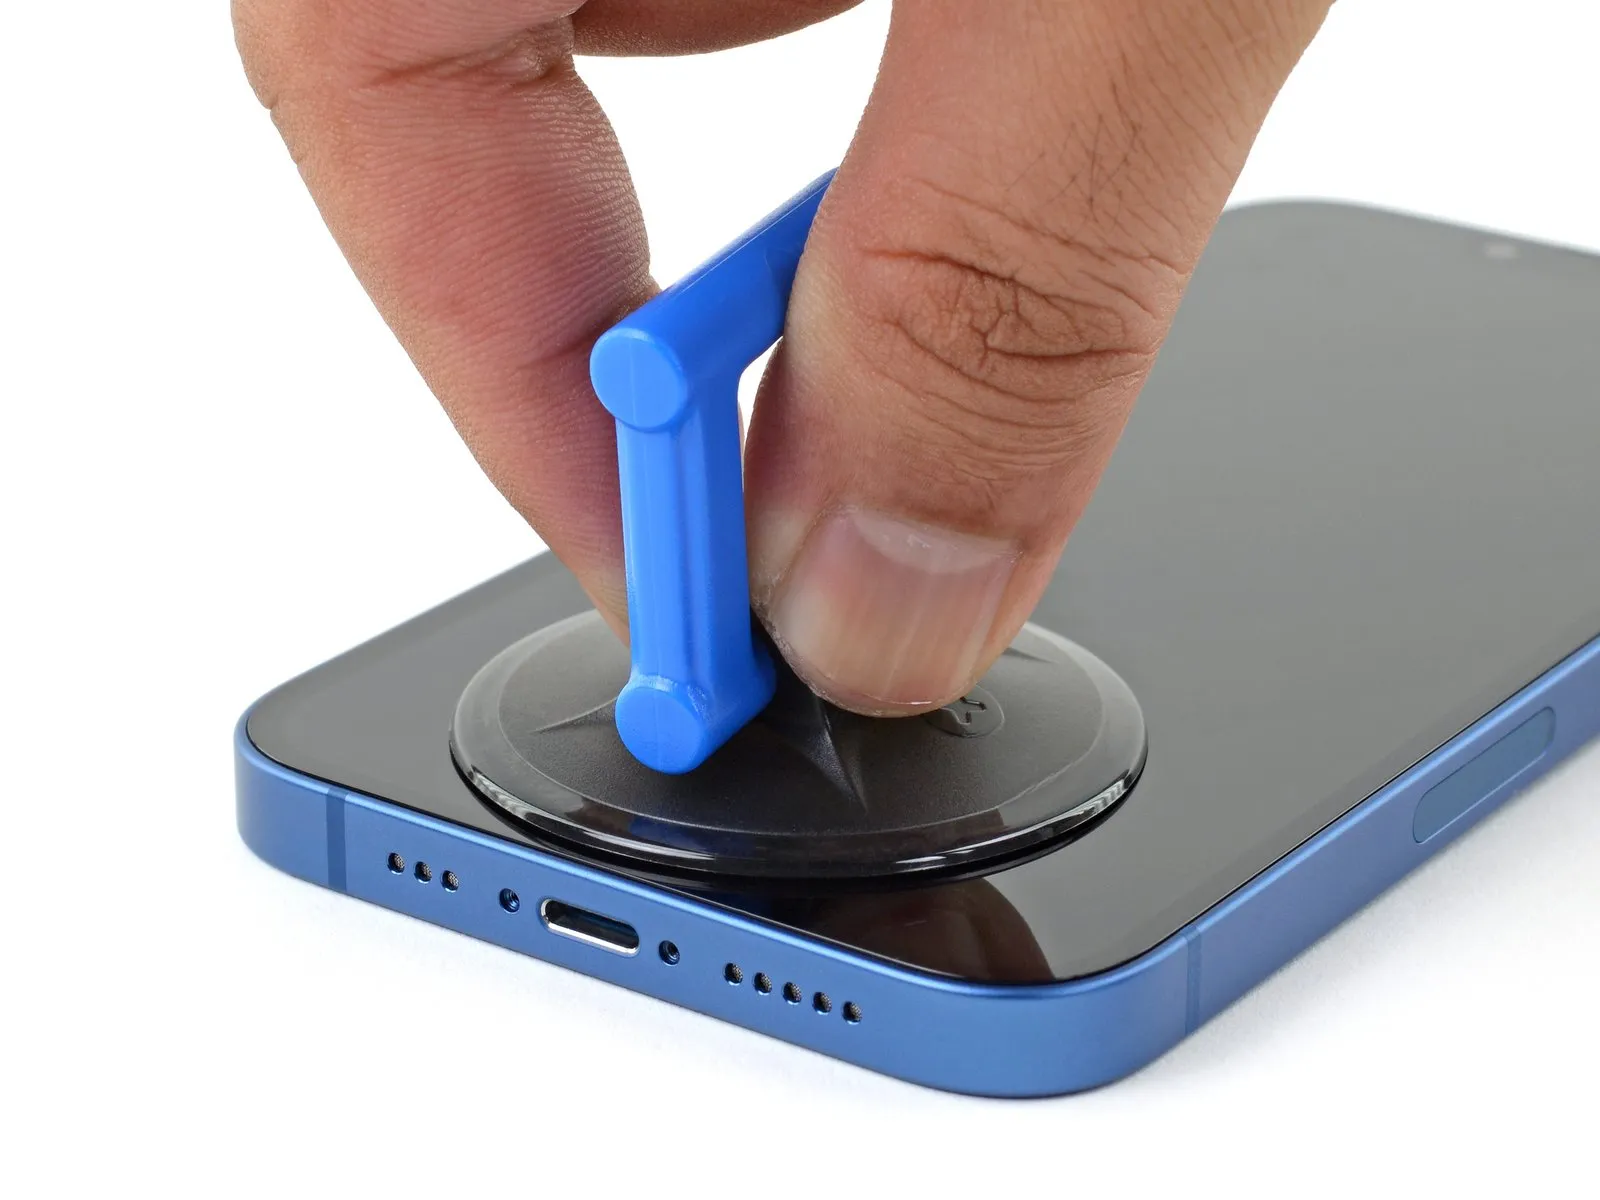
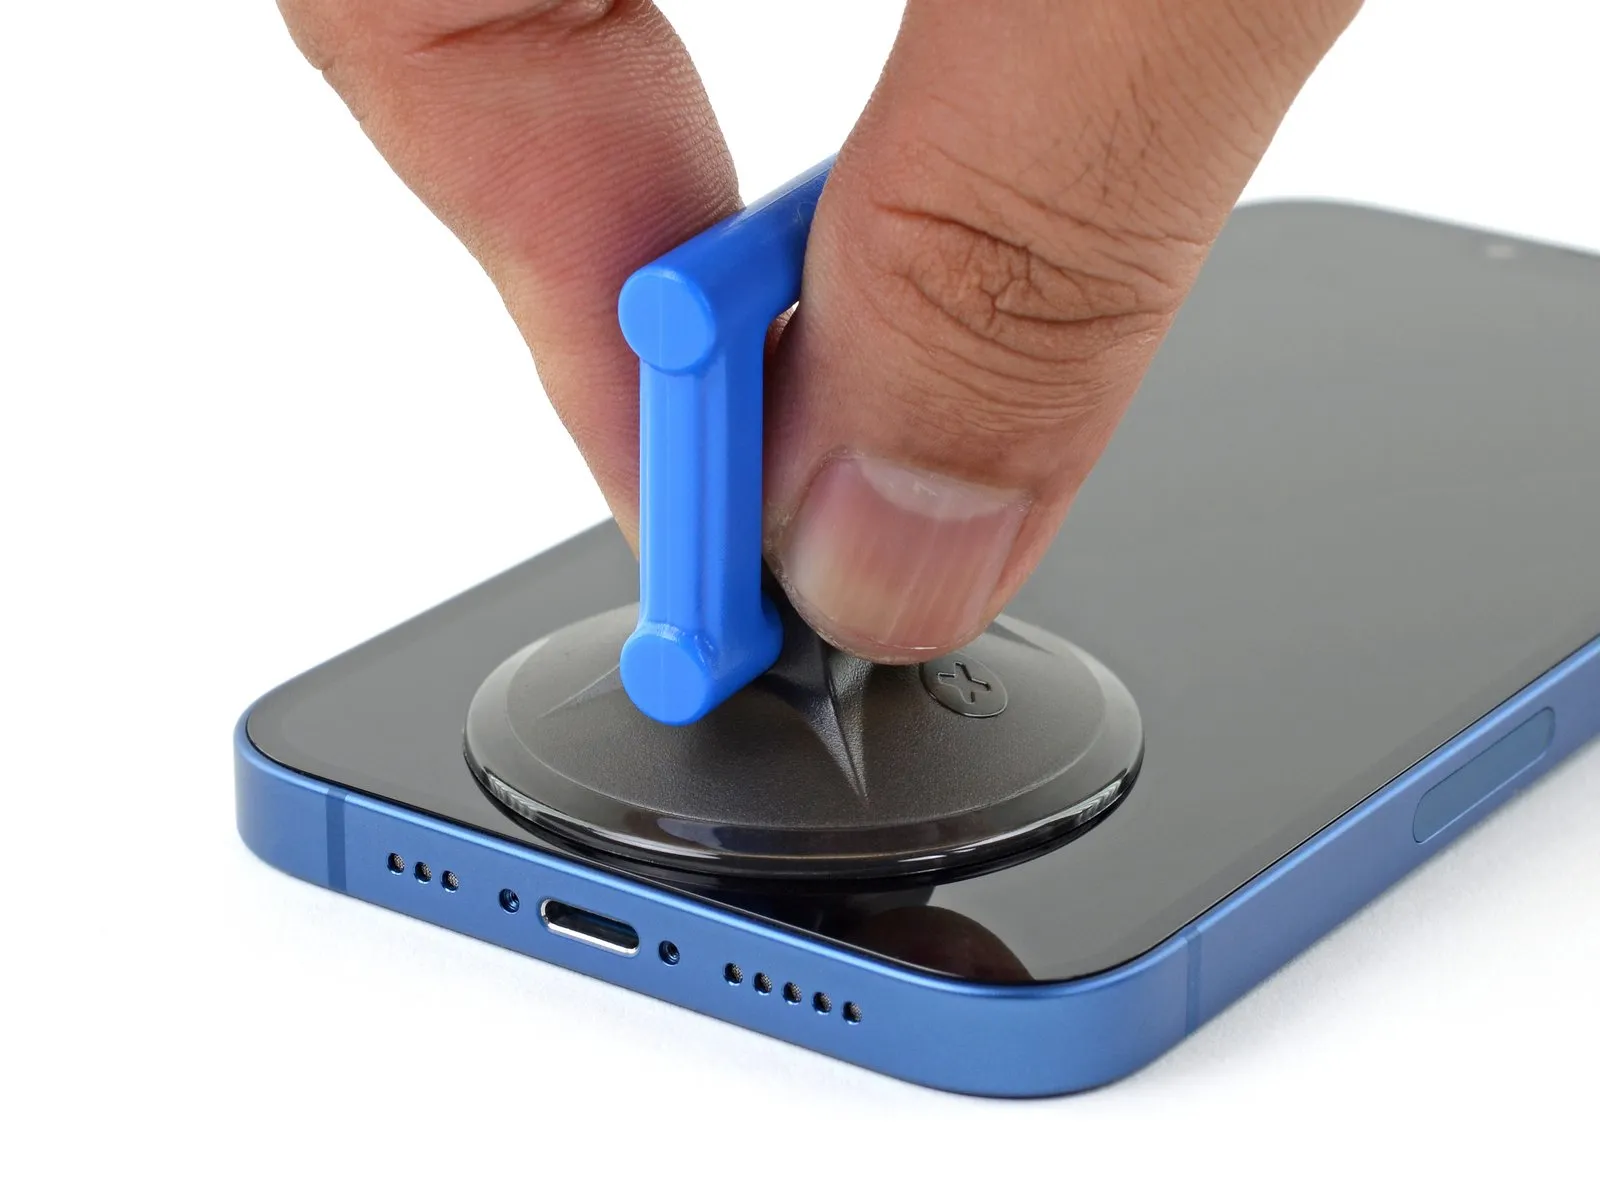
- When employing a solitary suction handle, position it against the lower perimeter of the device's display, ensuring a distance from the outermost glass boundary.
Step 9 | Lift the screen slightly
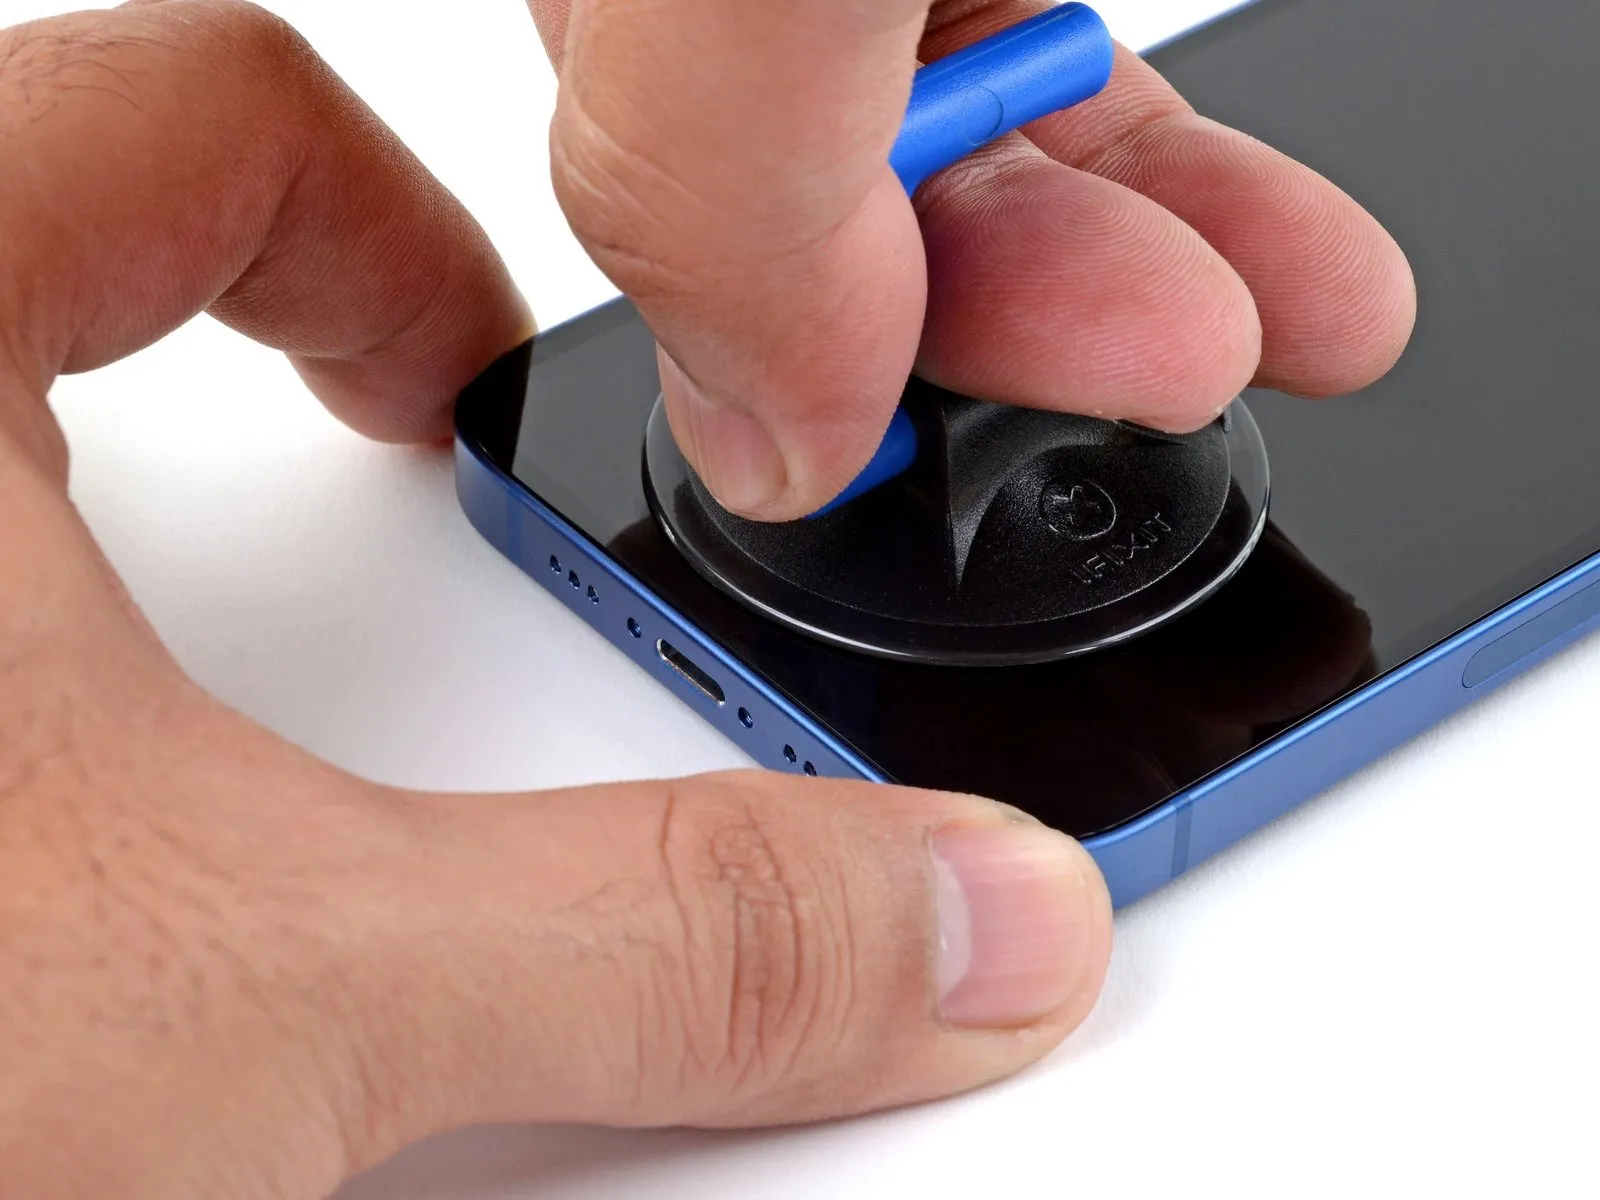
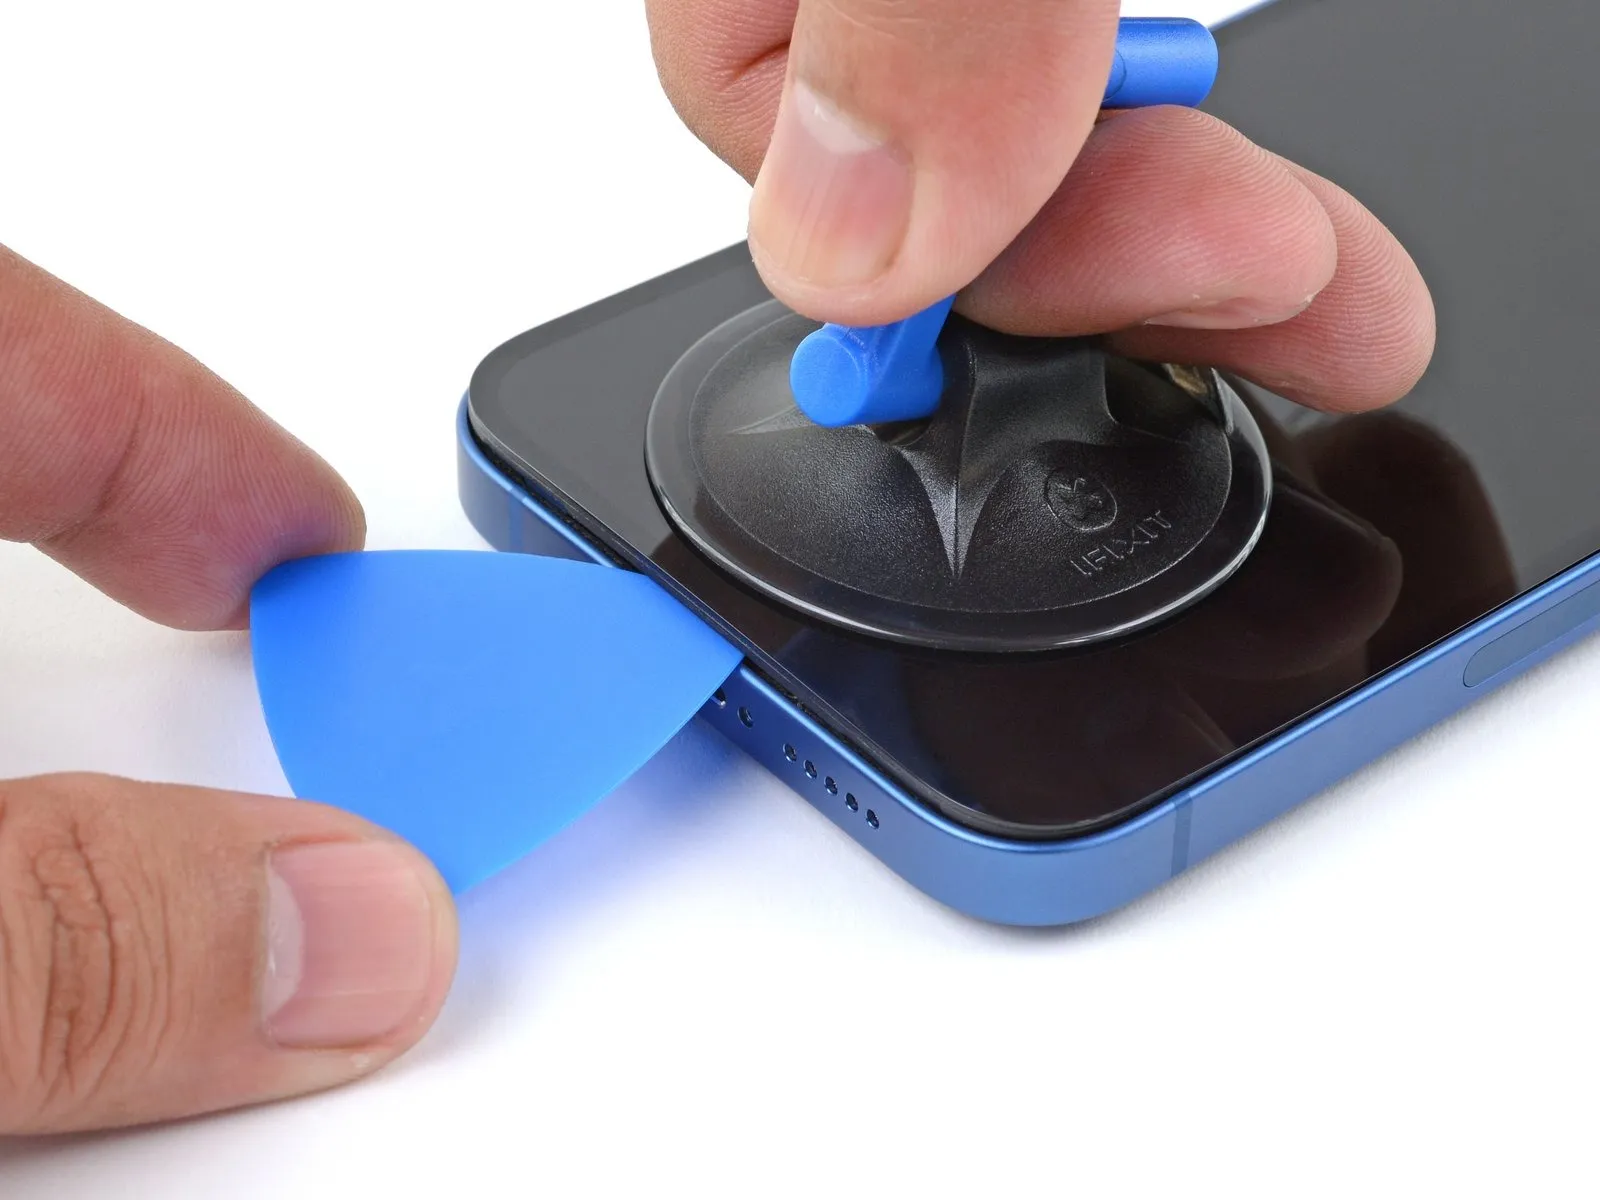
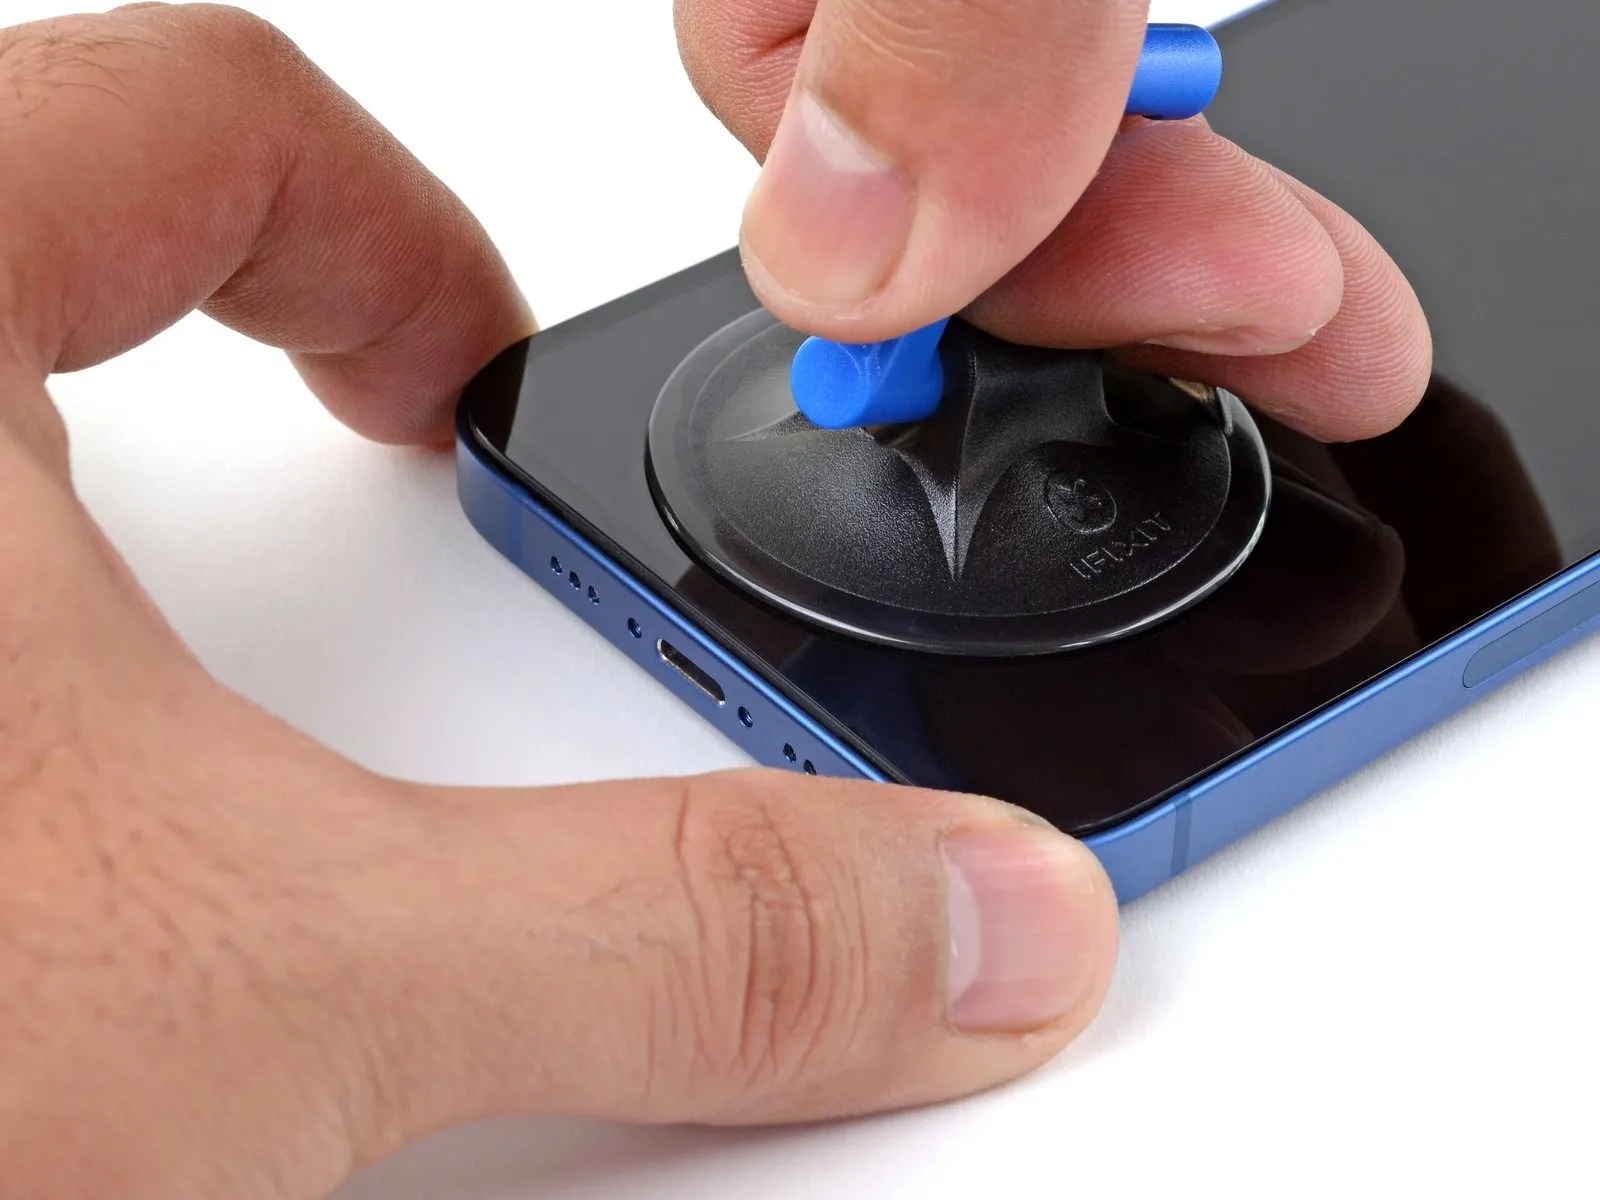
- Maintain consistent, forceful upward pressure on the suction cup to establish a minimal separation between the display assembly and the device's surrounding structure.
- Carefully slide a specialized opening tool into the newly formed space situated beneath the screen's decorative plastic trim.
- Due to the robust nature of the waterproof sealant securing the display, substantial force may be required to initially disengage the screen; if encountering difficulty, apply additional heat and gently oscillate the screen to reduce adhesive strength until a sufficient gap is achieved for tool insertion.
Step 10 | Heat the right edge


To facilitate separation, apply warmth to the right-hand side of the iPhone, specifically the area containing the power button, until the surface temperature reaches a level that is noticeably uncomfortable upon brief skin contact.
Step 11 | Separate the right adhesive
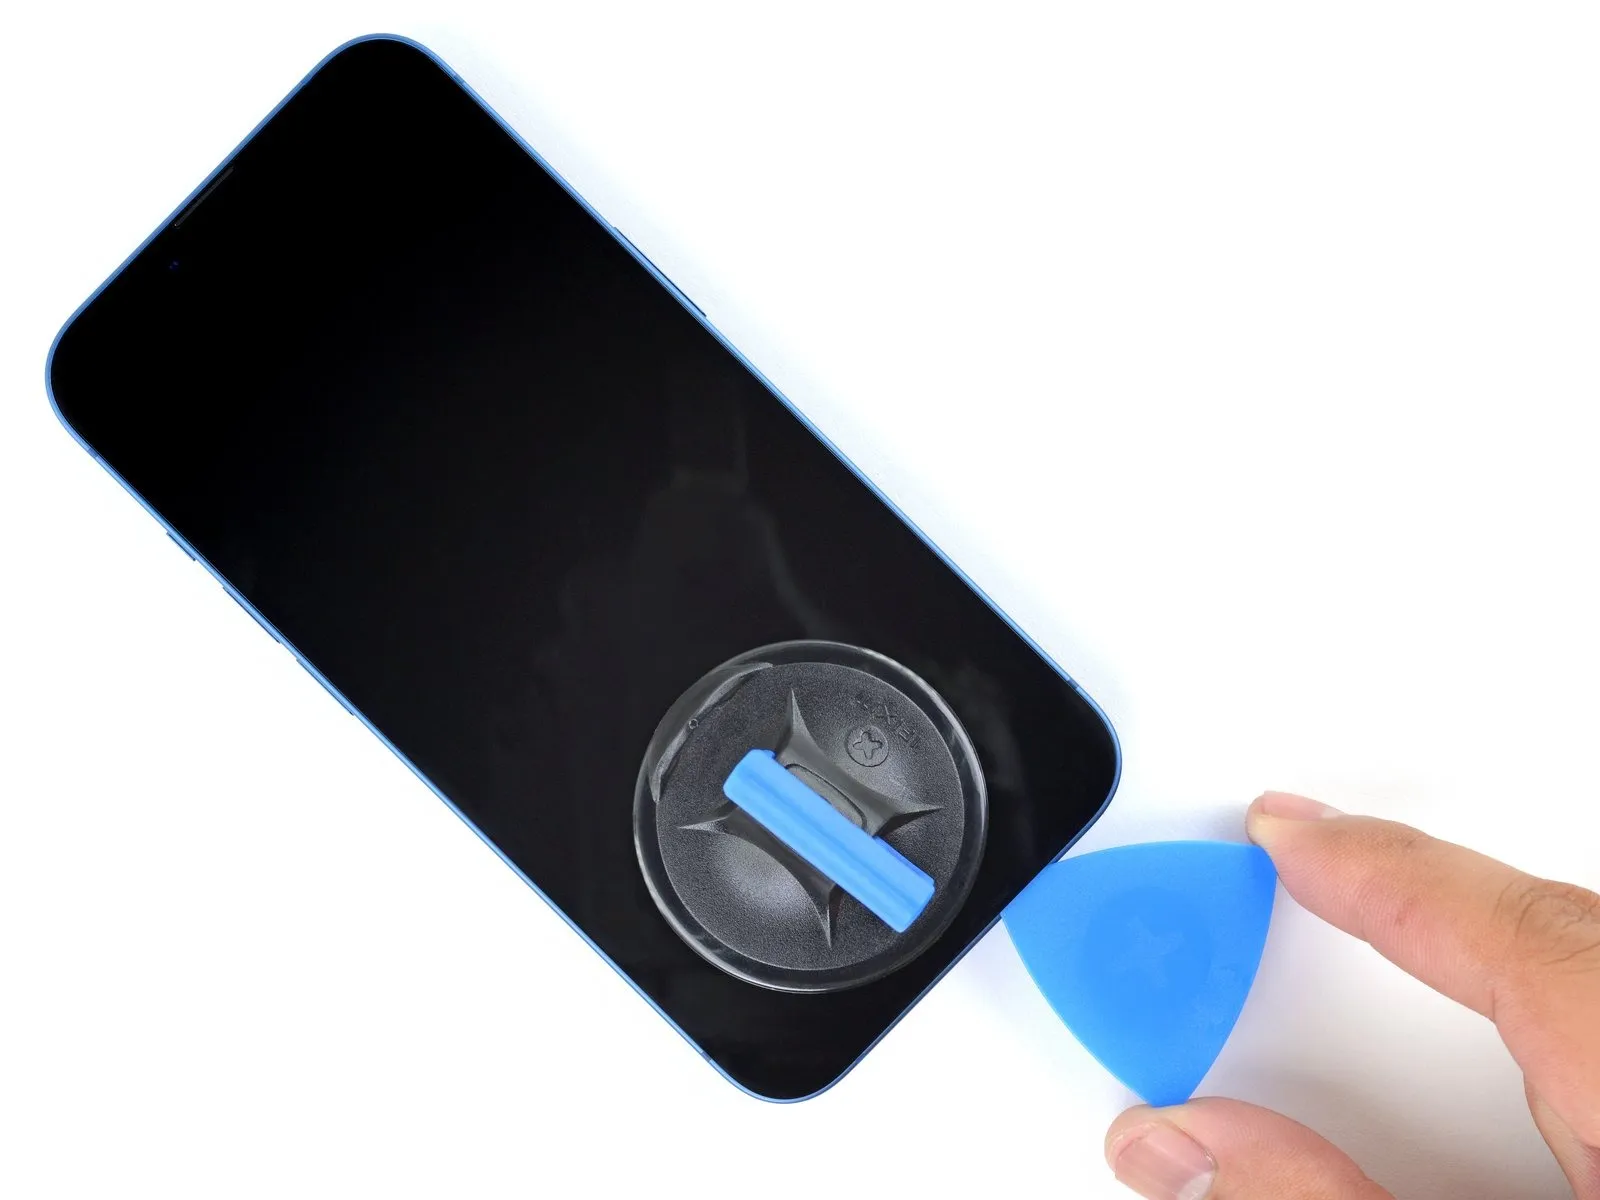
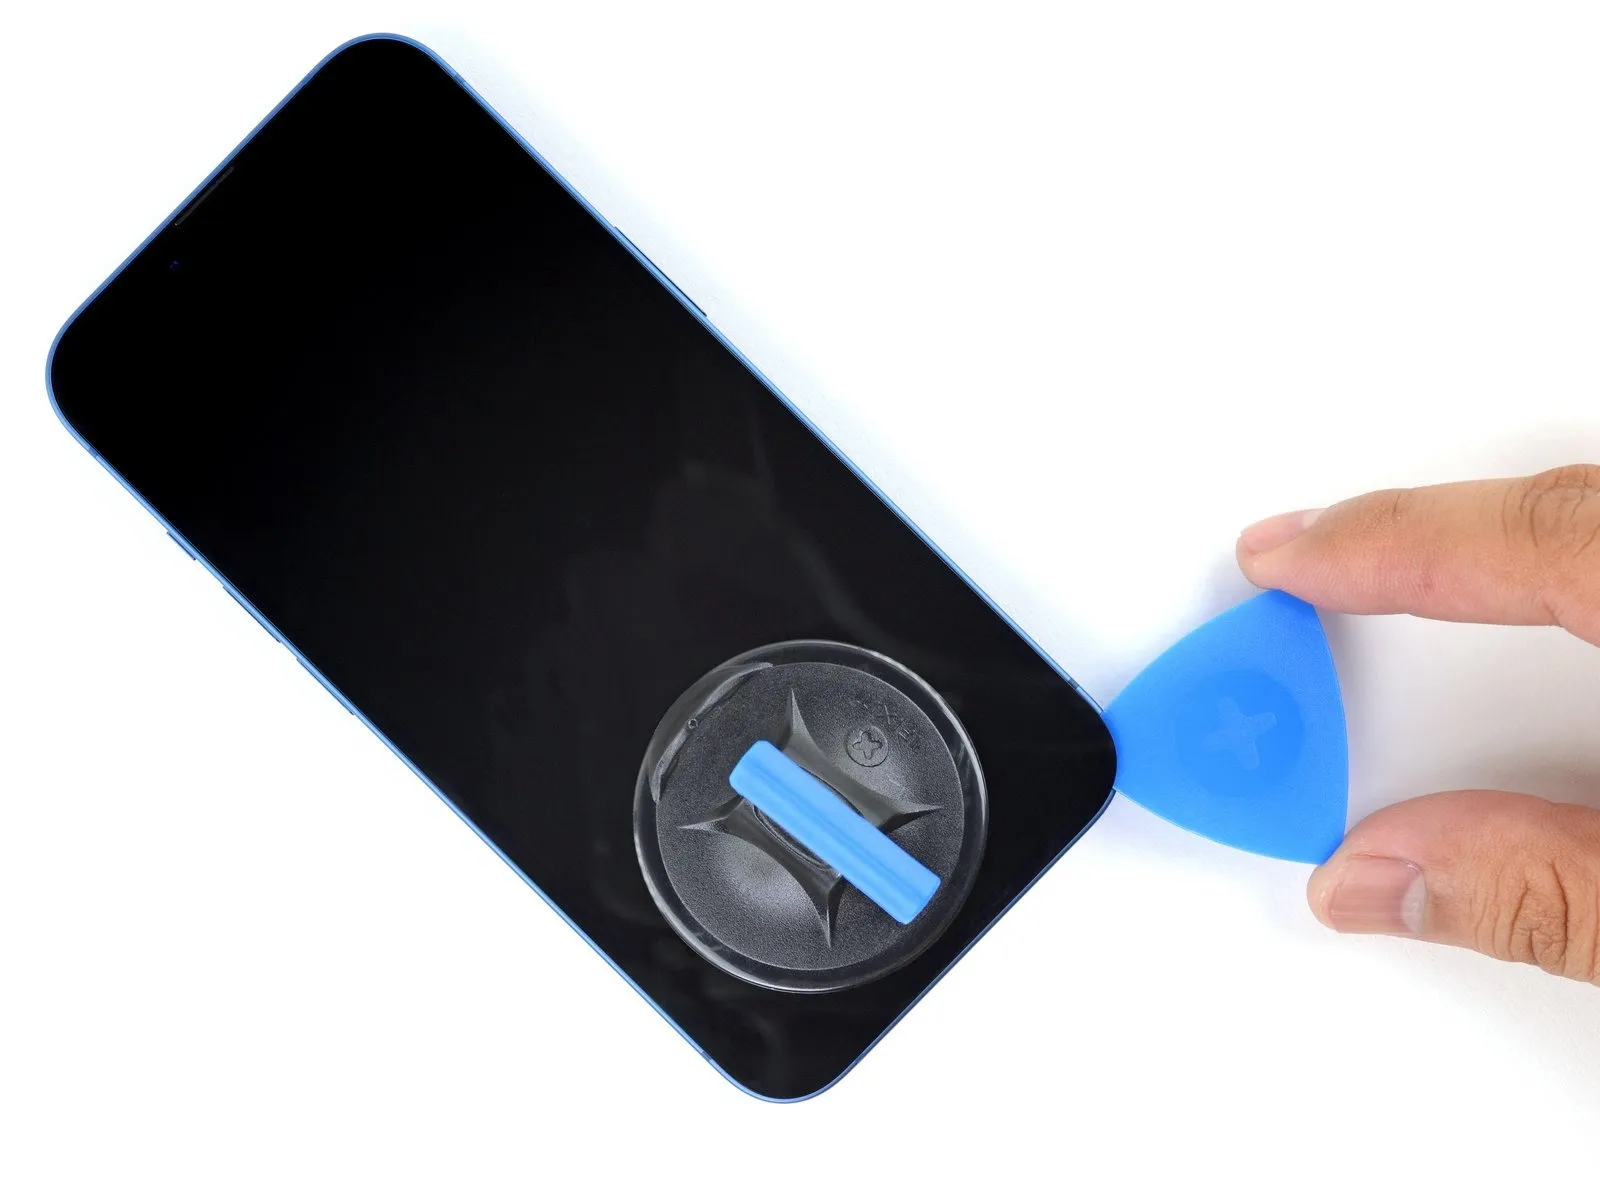
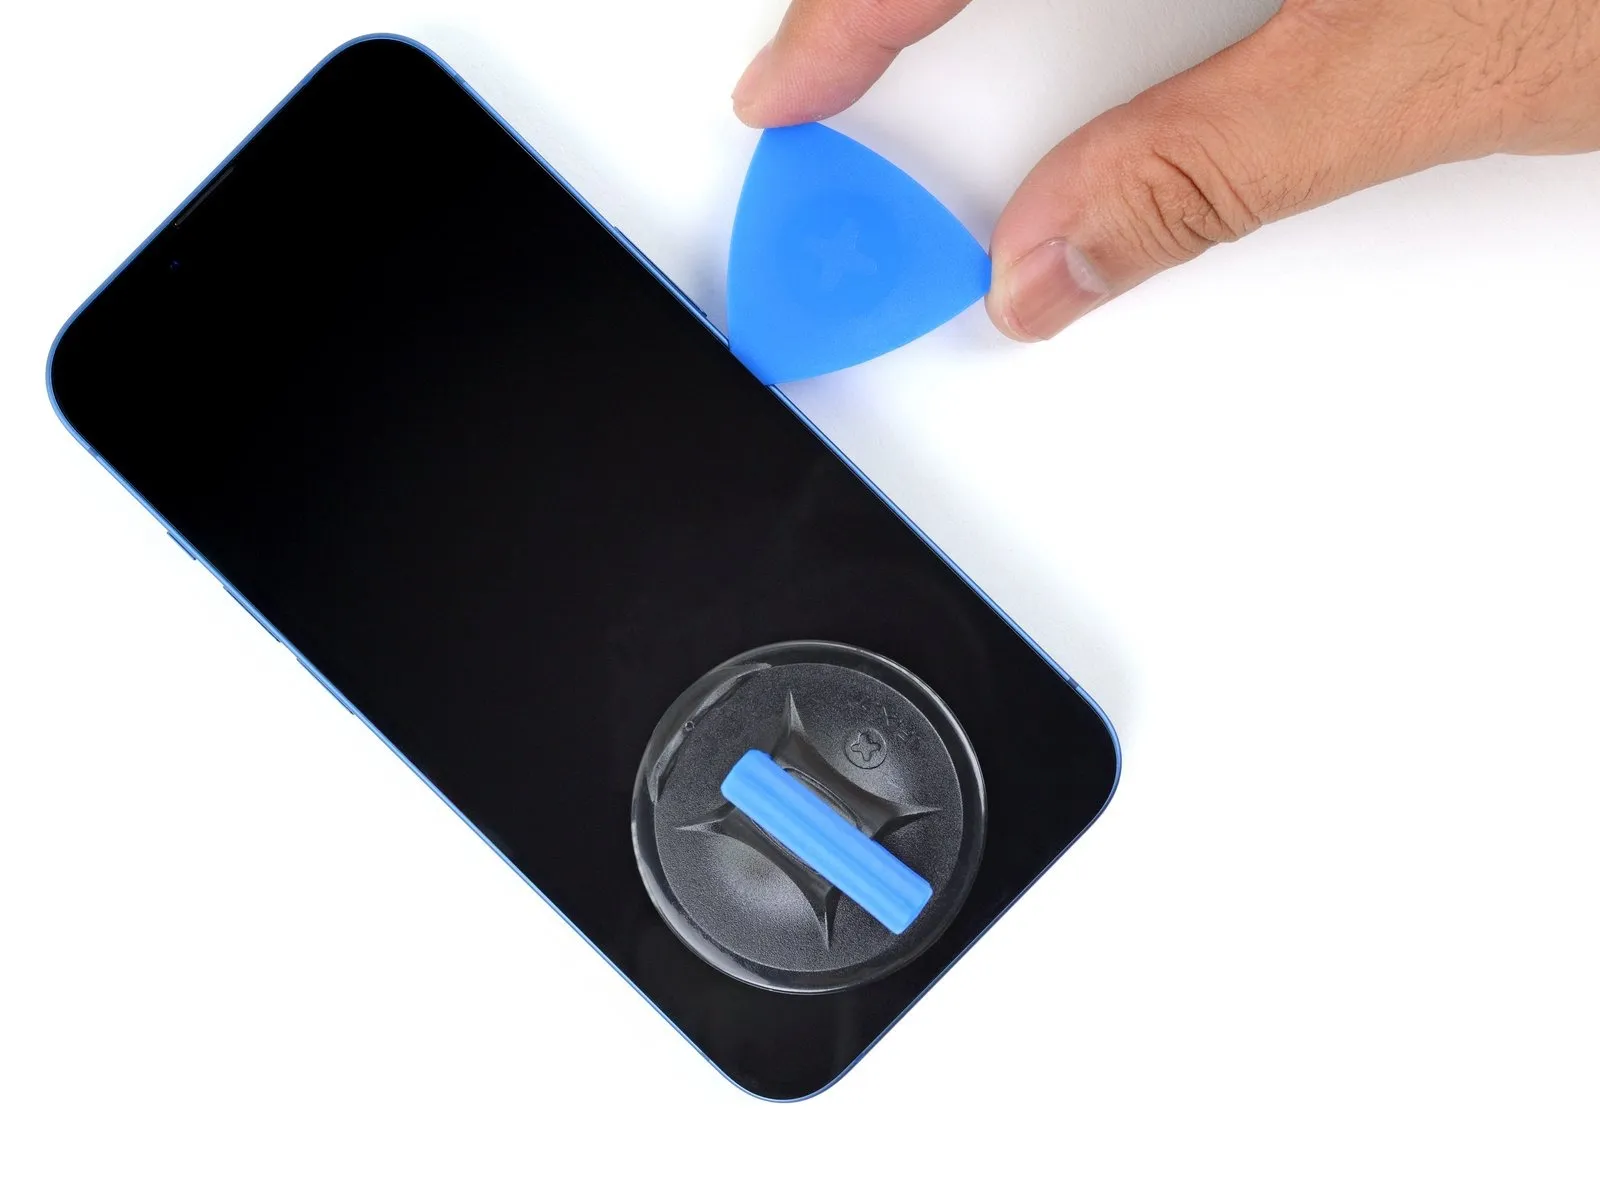
- Utilize a specialized opening pick and carefully maneuver it along the lower-right perimeter of the iPhone to release the adhesive bond.
Proceed by sliding the pick upwards along the right side of the iPhone's casing, advancing until you arrive at the upper-right corner.
A critical precaution: Limit the pick's insertion depth to a maximum of 3 millimeters to prevent potential harm to delicate internal parts.Maintain the pick's position within the top-right corner before proceeding with subsequent steps.To avoid damage to the iPhone's internal components, ensure the opening pick does not exceed a depth of 3 mm.
After separating the adhesive at the bottom right, advance the opening pick upwards along the right side of the iPhone's enclosure.
Step 12

To facilitate separation, apply heat to the iPhone’s upper perimeter until the display surface reaches a temperature just beyond comfortable touch.
Step 13
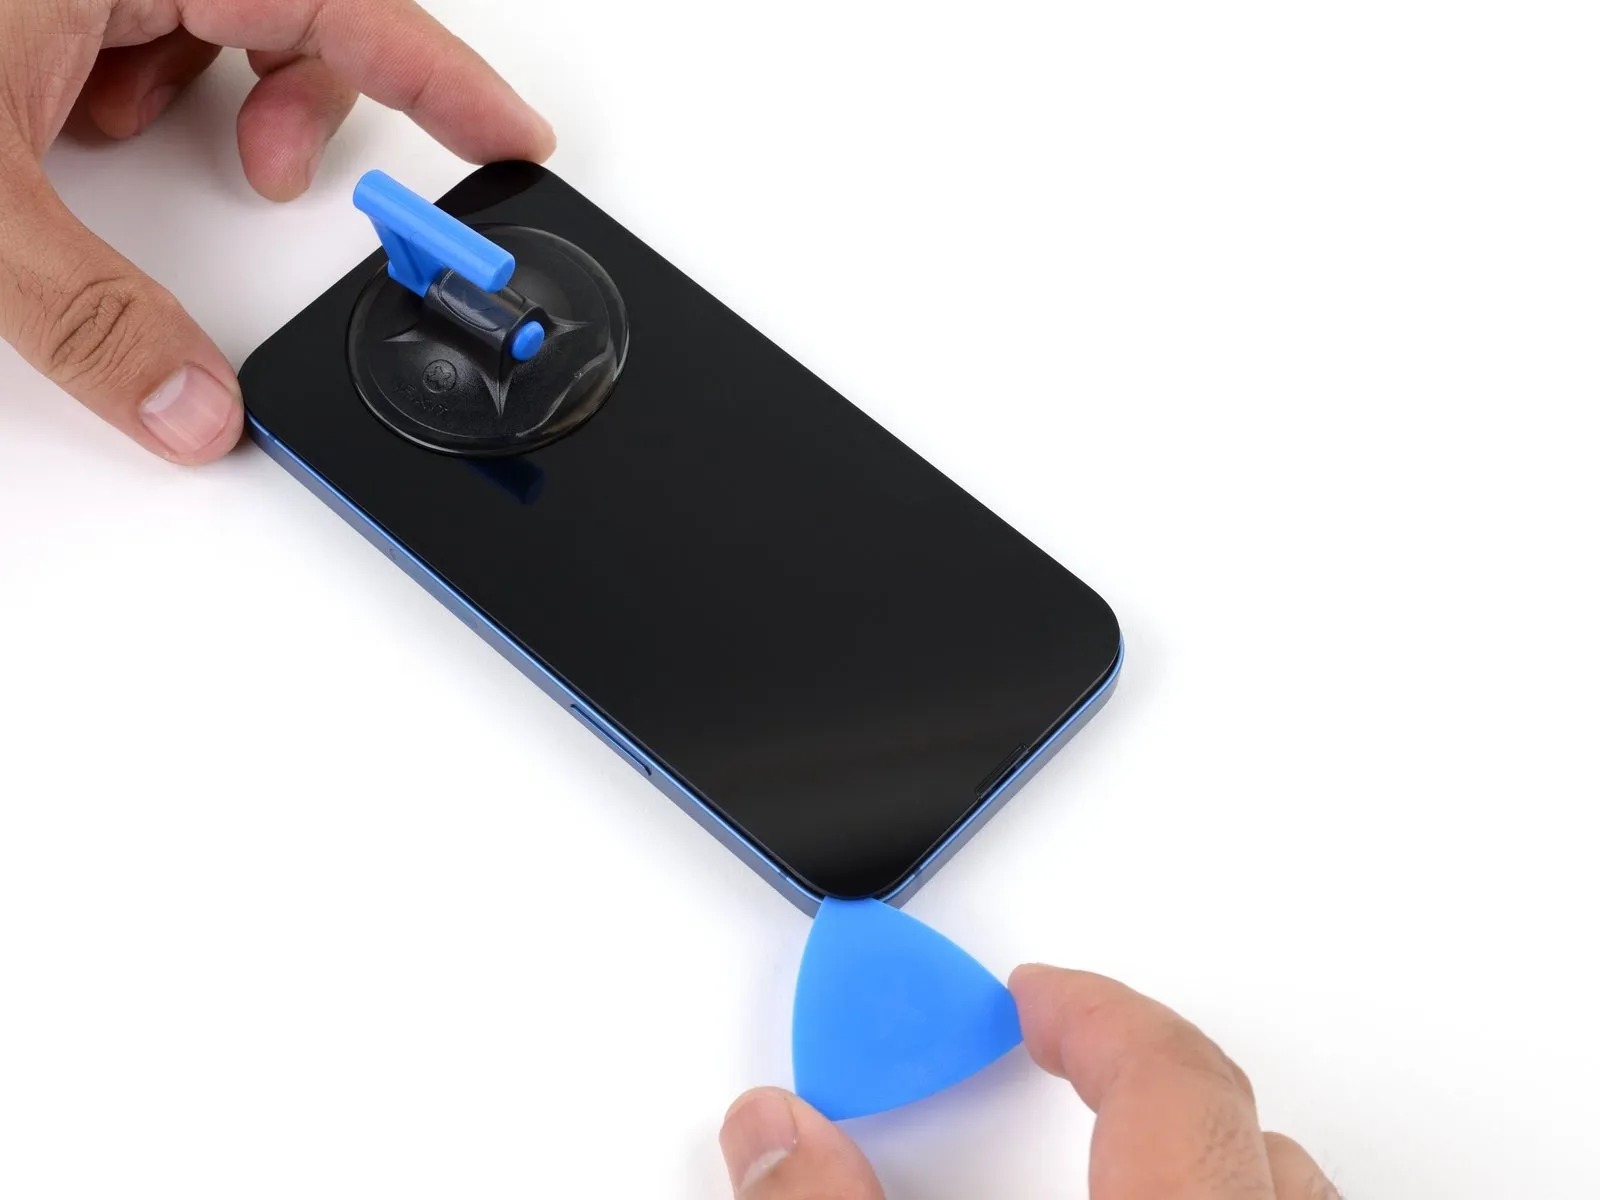
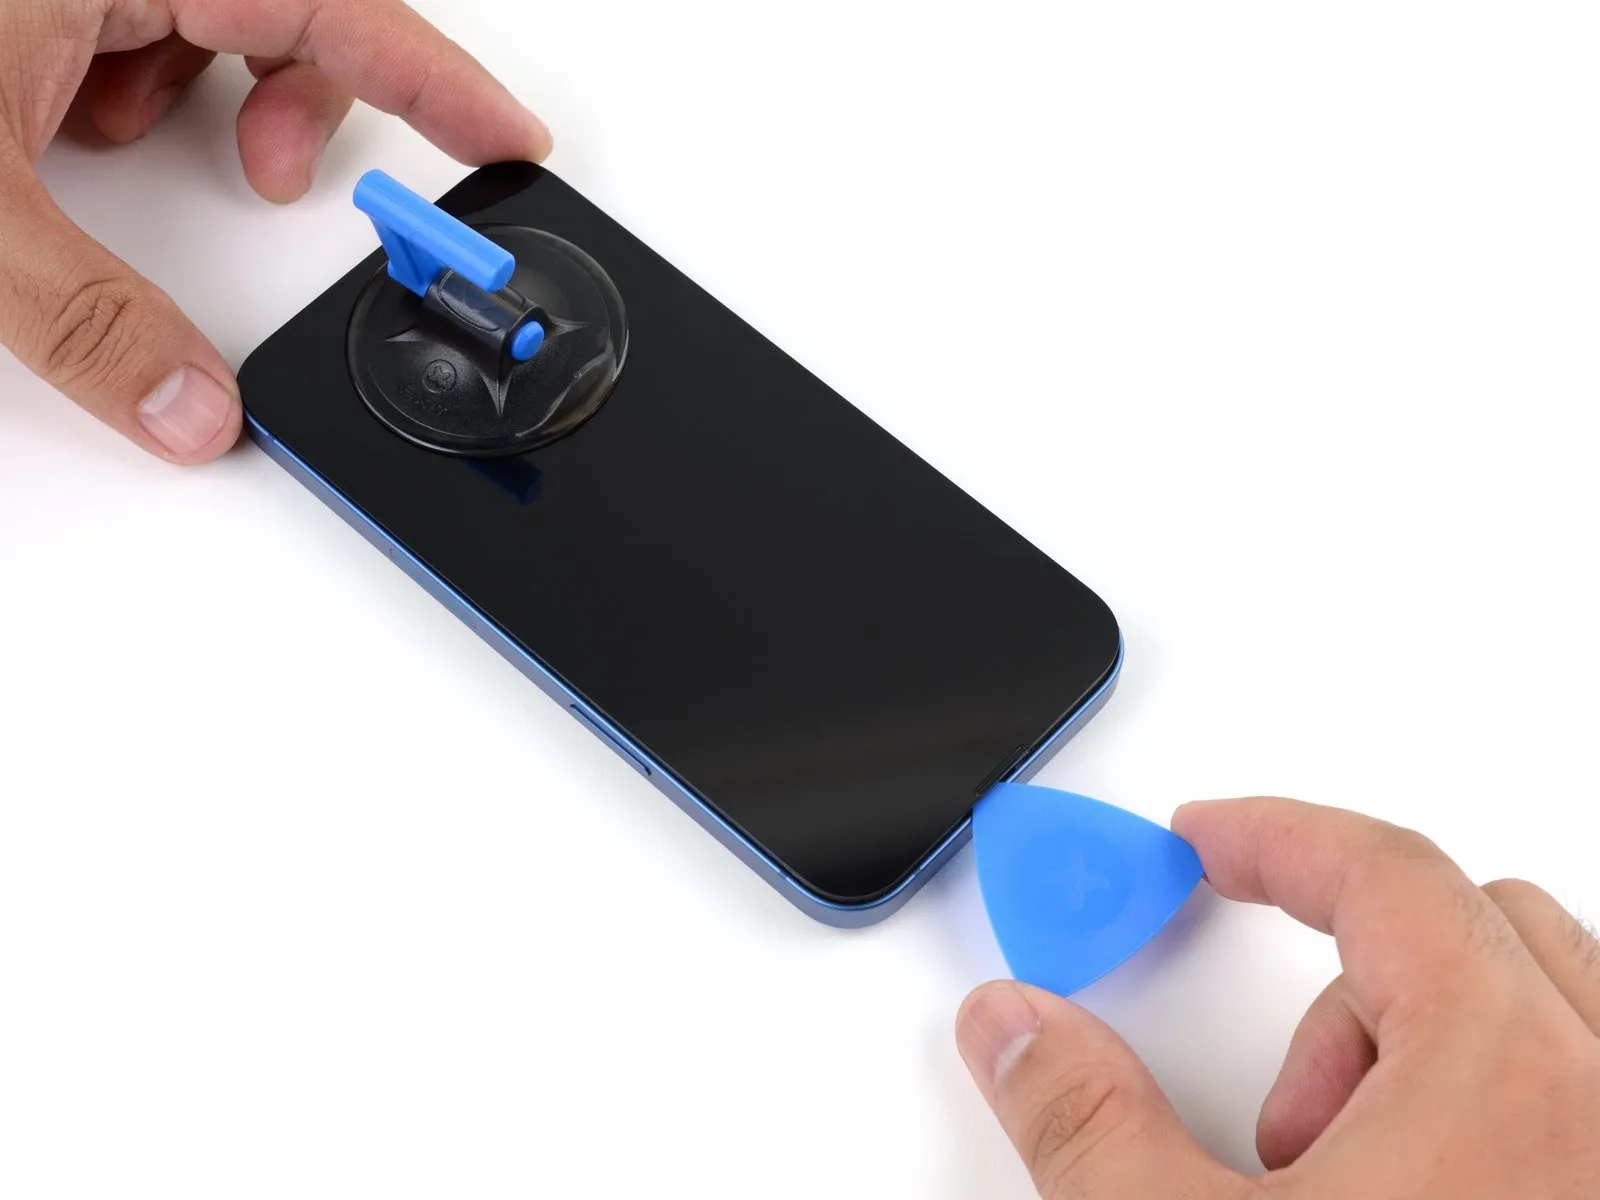
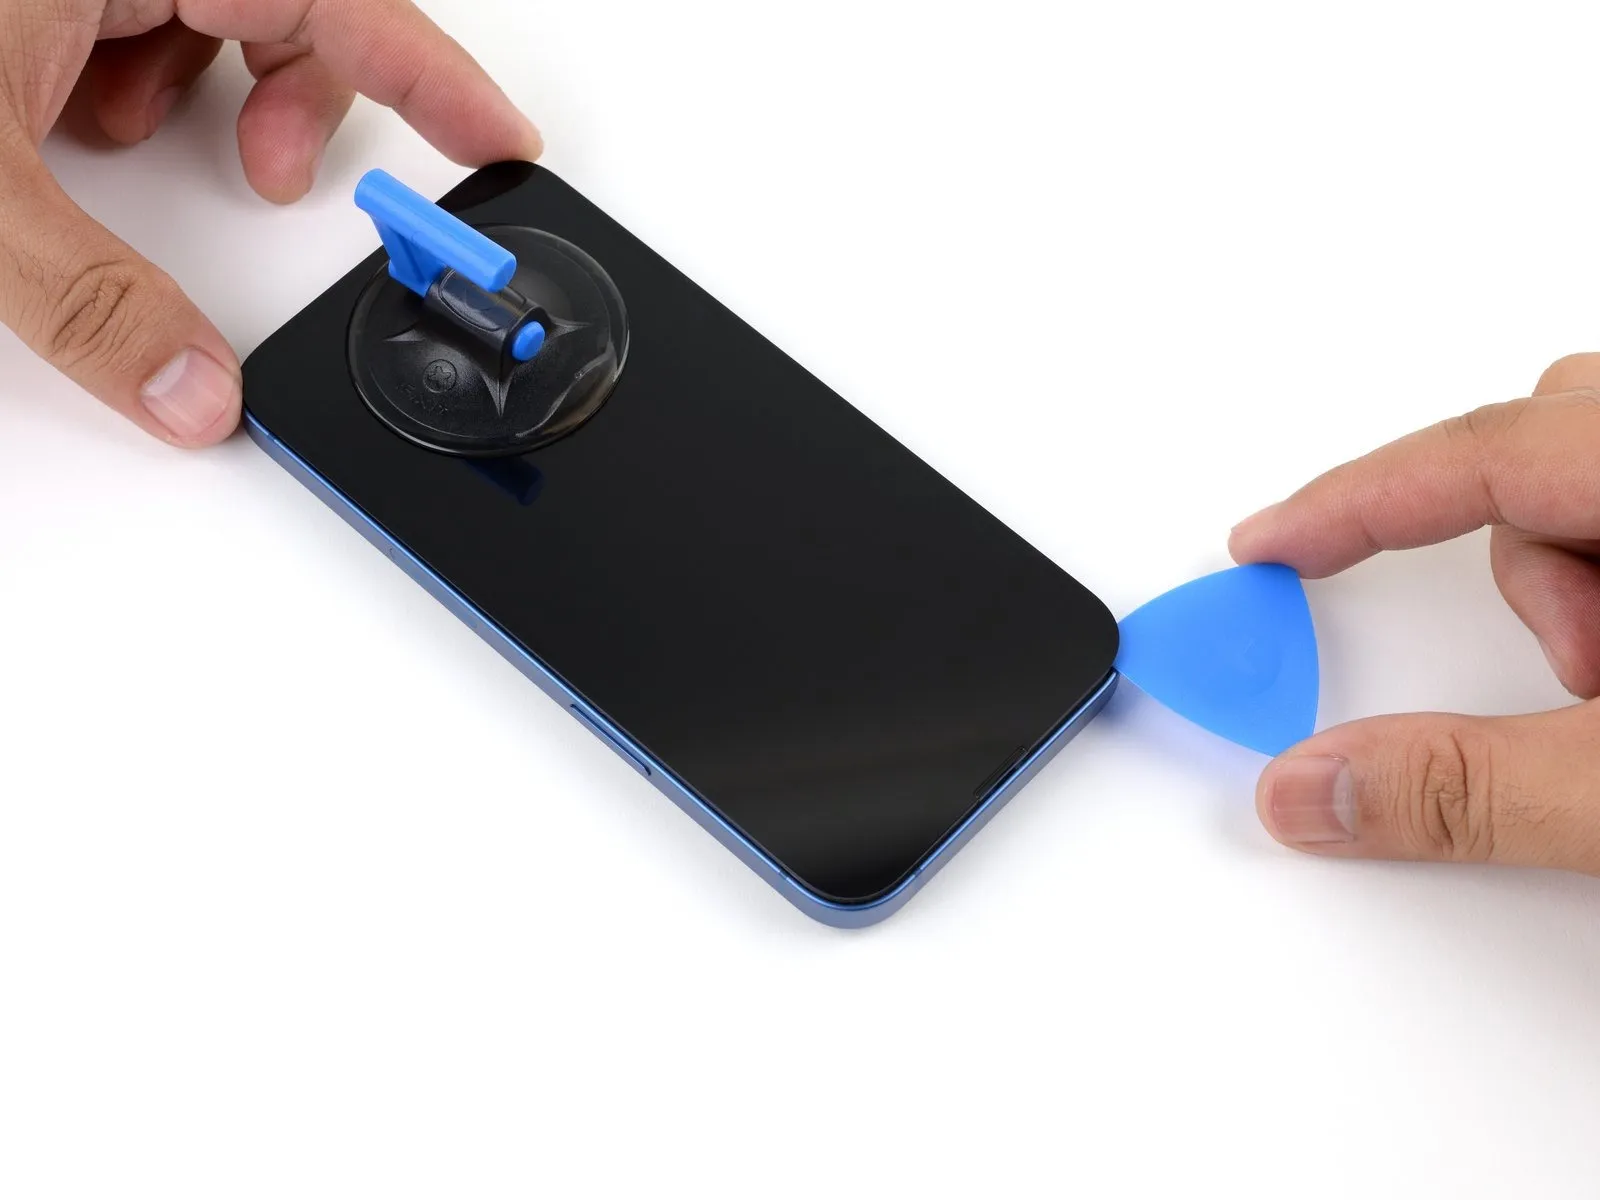
- Utilize a specialized opening pick to carefully disengage the adhesive securing the iPhone's top right edge.
- Exercise caution: The pick's insertion depth should not exceed 3 millimeters to prevent potential harm to the delicate top-mounted sensors.Maintain the pick's position within the top left corner of the device as you proceed with subsequent steps.Separation of the adhesive is achieved by maneuvering the opening pick along the perimeter of the top right corner.
- Exceeding the recommended 3 mm insertion depth carries a risk of compromising the functionality of the iPhone's upper sensors.
Step 14 | Heat the left edge


To facilitate separation, apply heat to the left side of the iPhone's enclosure, maintaining a temperature that is noticeably uncomfortable to the touch.
Step 15 | Separate the left adhesive
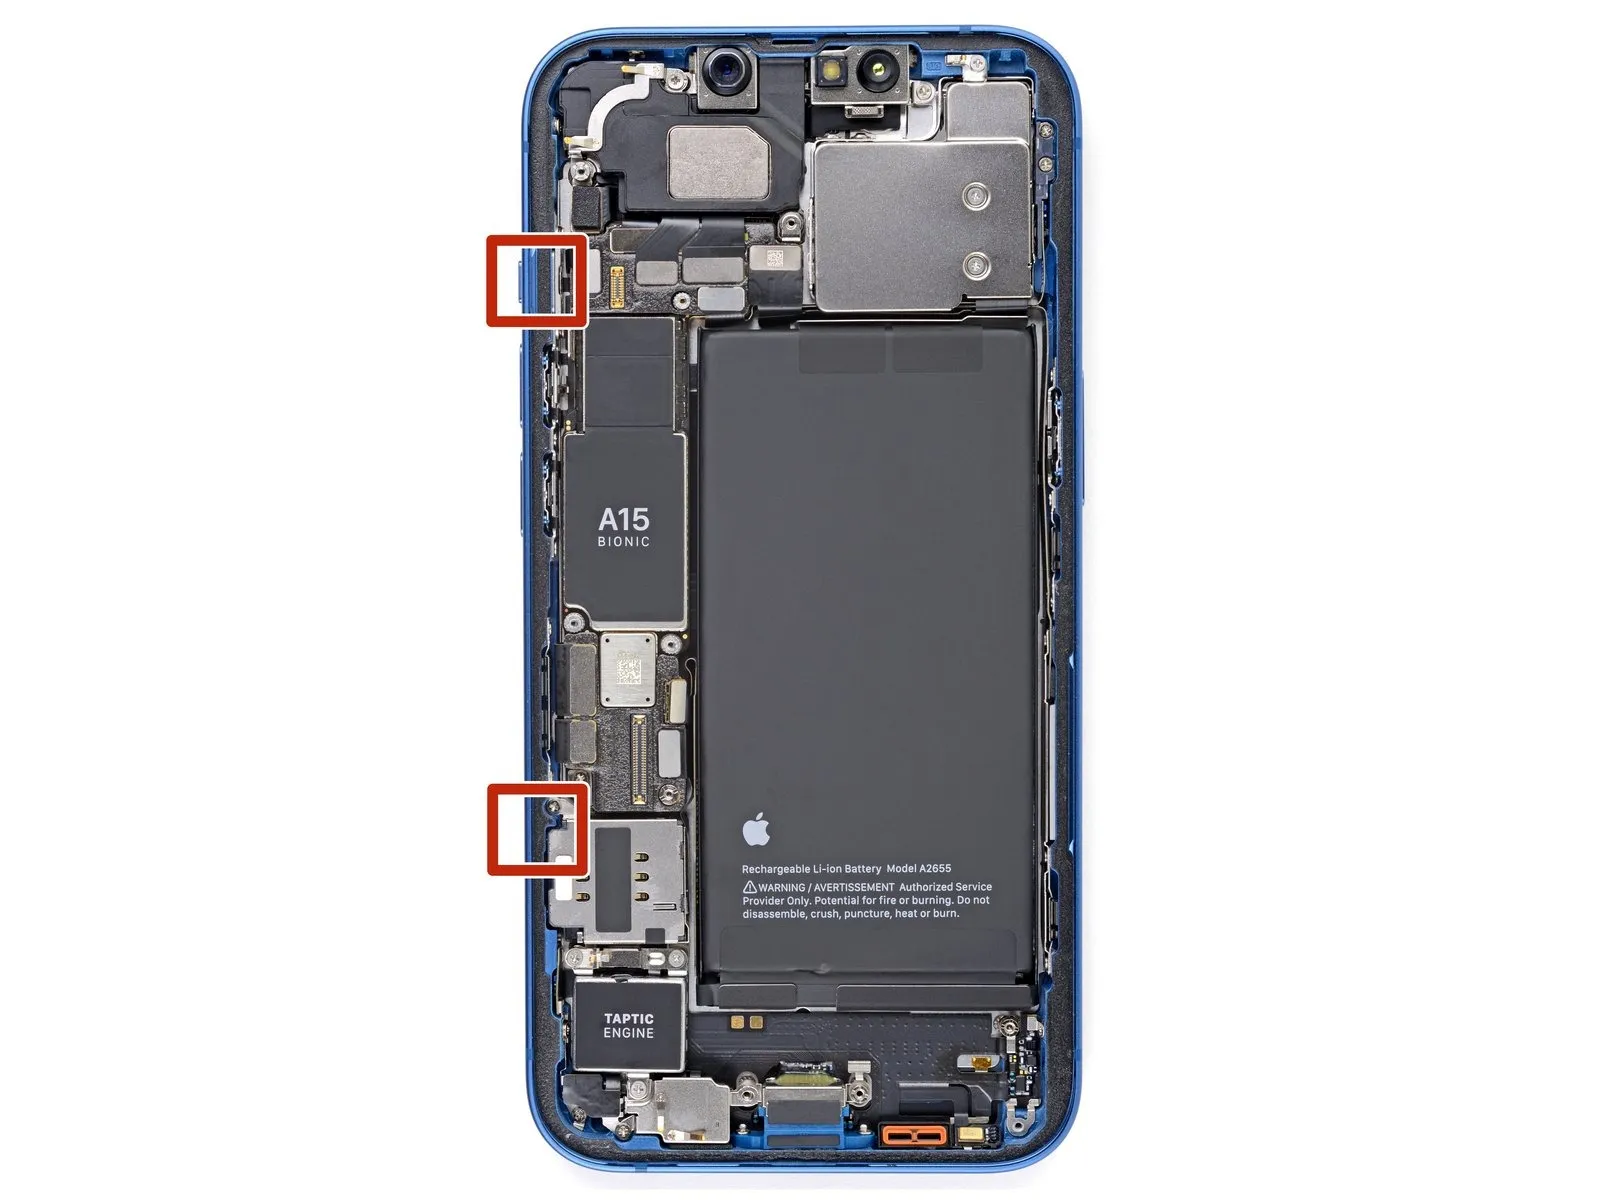


Fragile wiring is situated along the left side of the iPhone's frame; exercise caution.Insertion of the opening tool should not exceed a depth of 2 millimeters to prevent cable damage.Perform a rotational movement of the tool around the upper-left portion of the display.
- Advance the tool along the left edge, reaching the lower corner, to release the adhesive bond.
- Should adhesive separation prove difficult, applying heat to the left edge may facilitate the process.
- Reheating the left edge can soften the adhesive for easier separation.
Step 16 | Open the iPhone
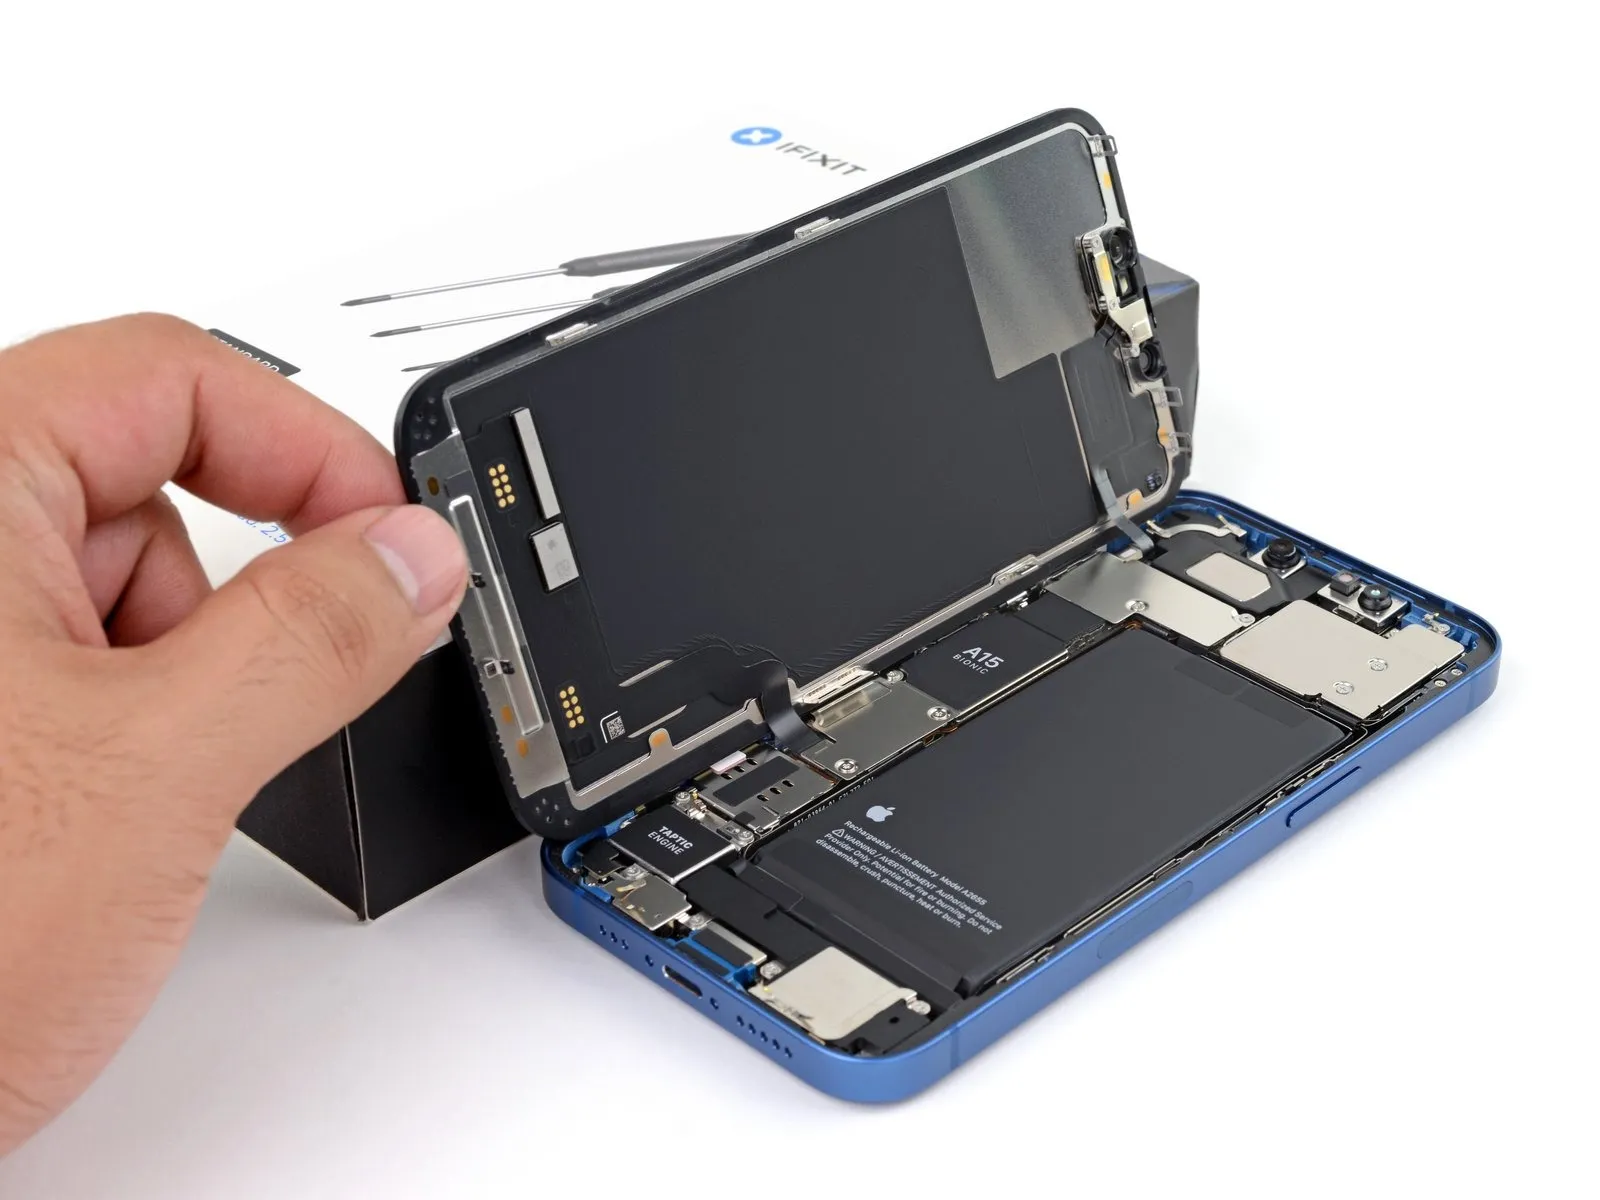
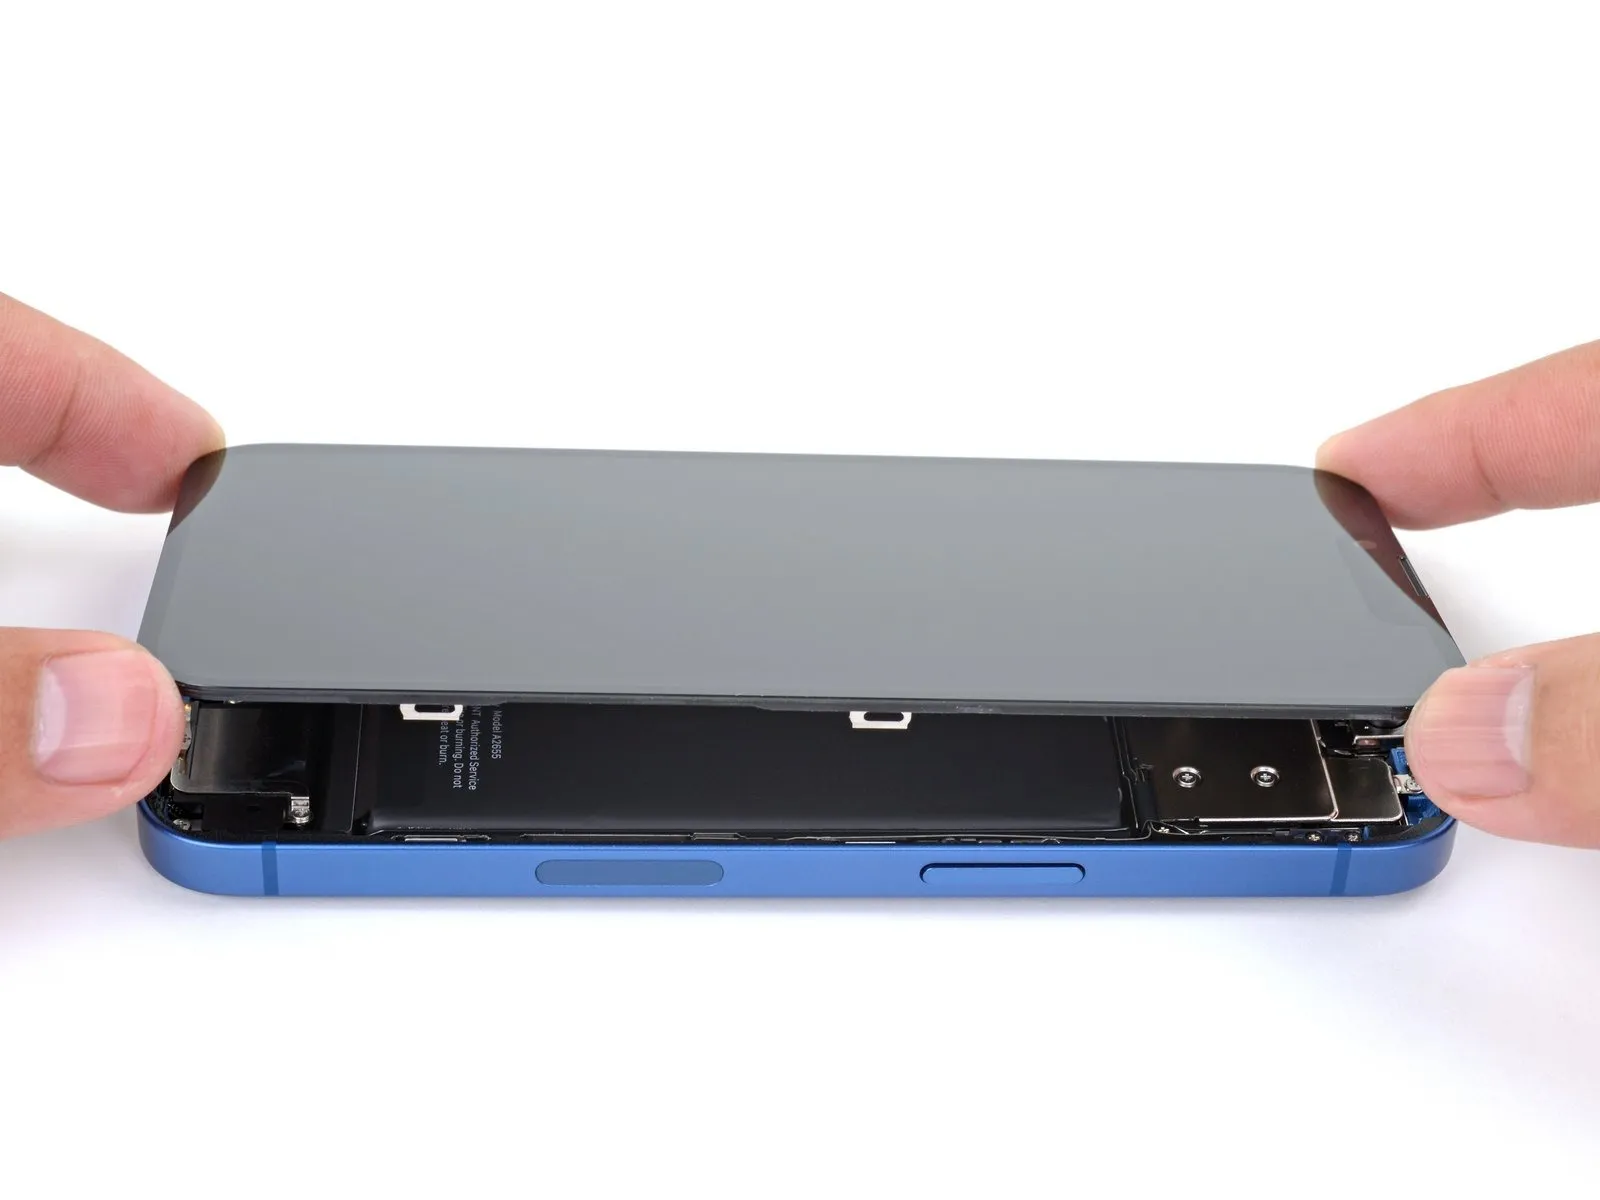
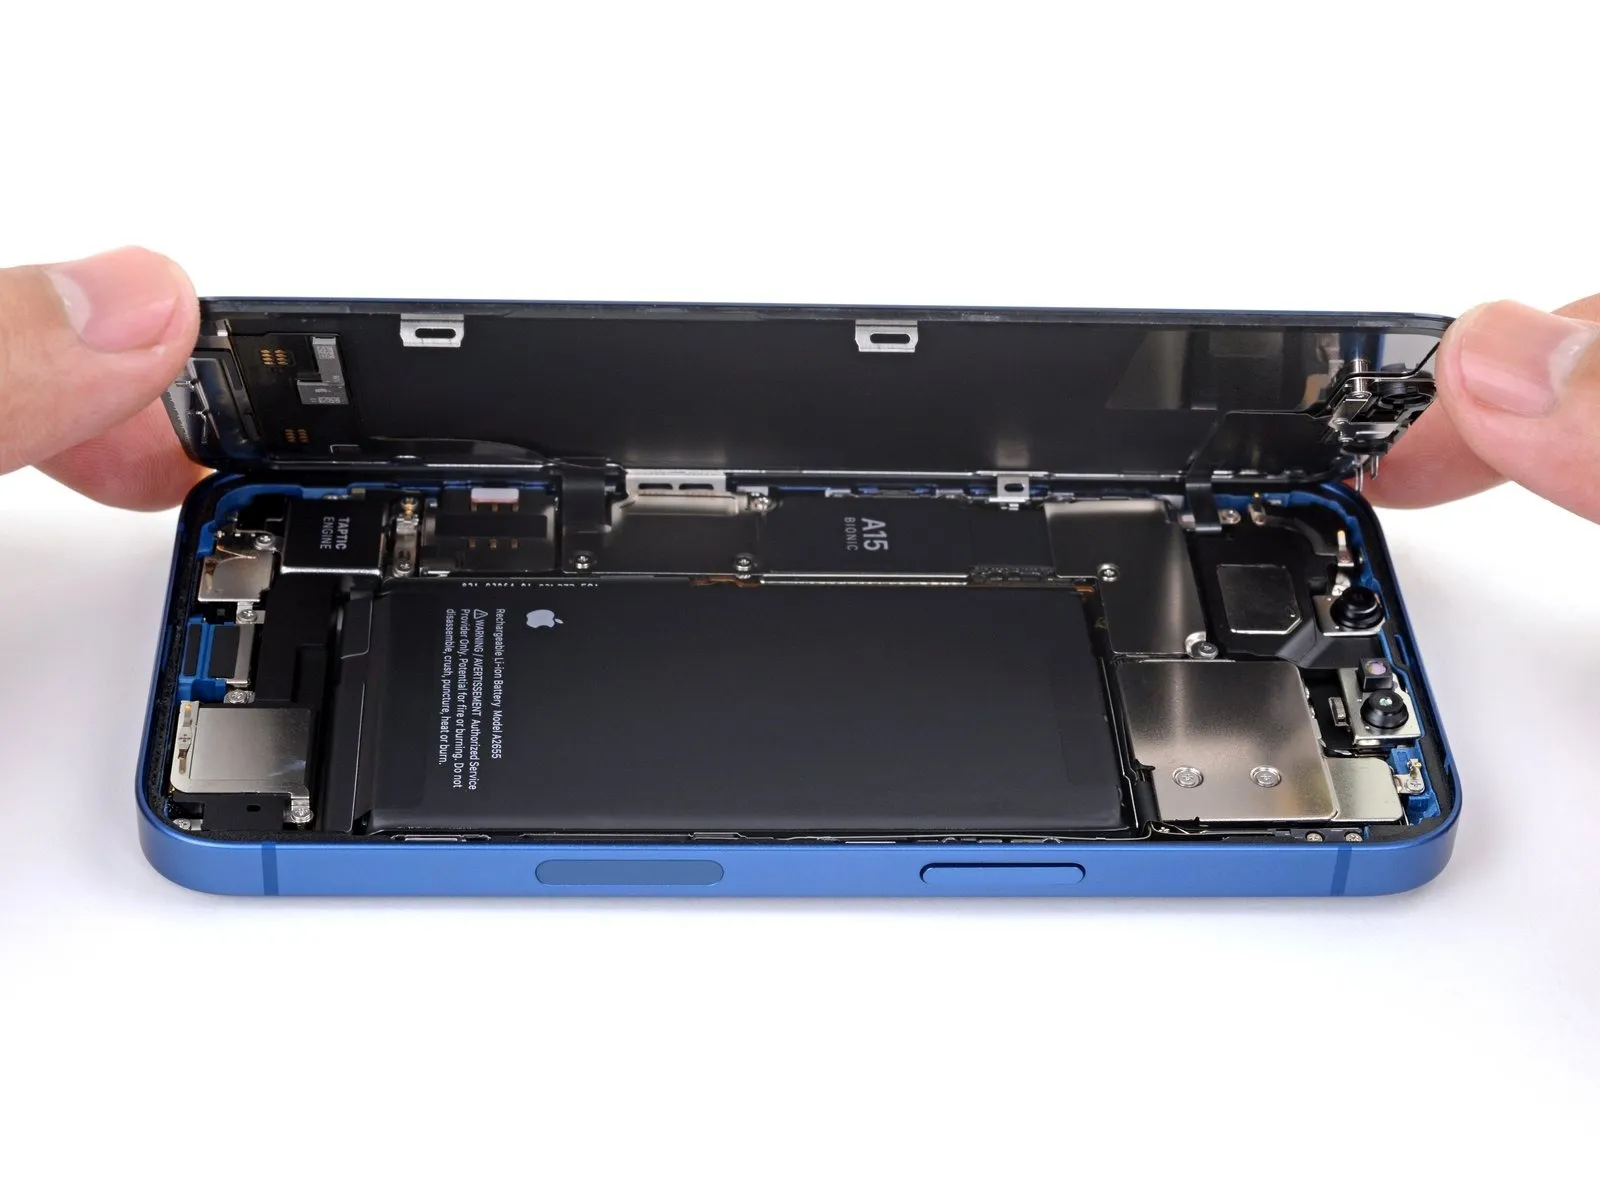
- Prior to proceeding, ensure the suction handle has been detached.
- Orient the iPhone so that its right-hand edge is directed towards you.
- Initiate the display opening process by pivoting the screen upwards from the right side, mimicking the action of opening a book's cover.
- Refrain from completely disconnecting the display at this stage, because several delicate ribbon cables maintain its connection to the iPhone's logic board.
- To maintain stability, support the display with a prop while performing subsequent repair steps.
- When reassembling, position the display, match the clips along the upper edge, and then gently apply pressure to the top edge before securing the remainder of the display; if resistance is encountered, inspect the clips around the display's border for any deformation.
Step 17 | Unscrew the battery and display connector cover
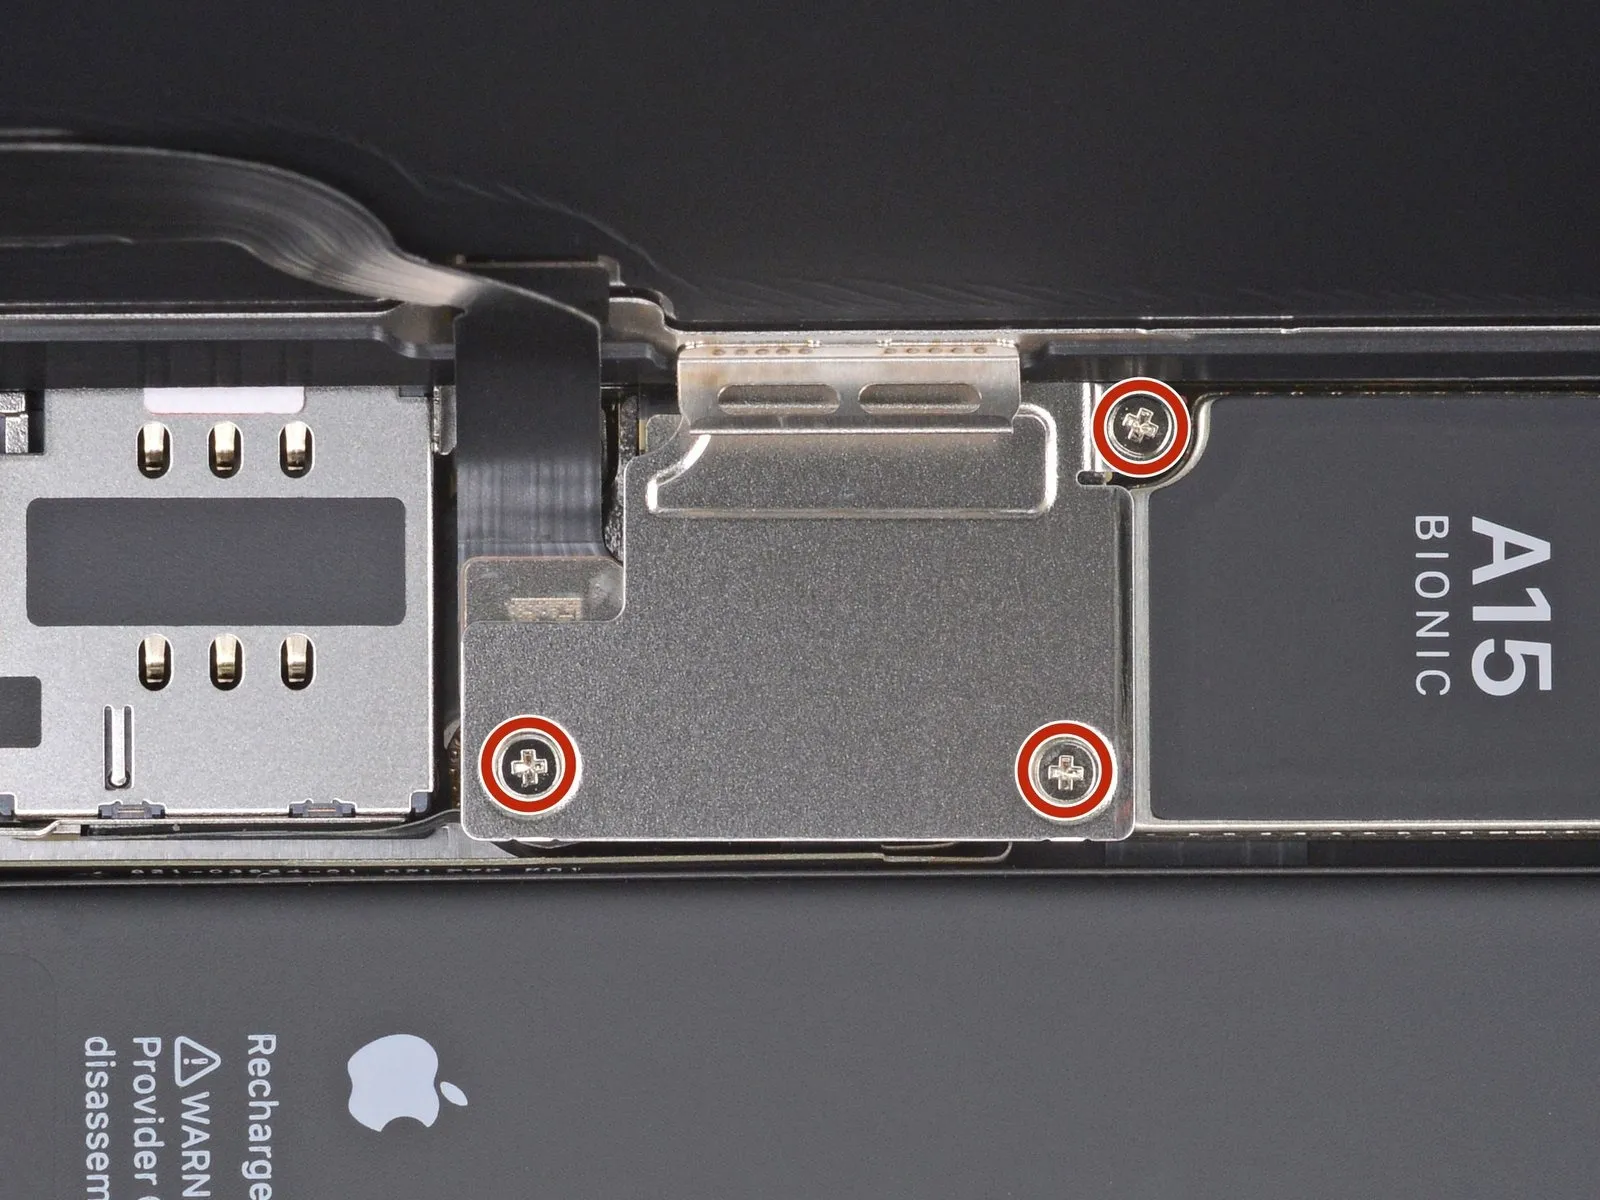
- Employ a Phillips screwdriver to detach the three 1.3 mm screws that hold the battery and display connector cover in place.Carefully monitor the location of each screw during disassembly, ensuring correct placement during reassembly to prevent potential damage to the iPhone.Prior to securing the display, it's advisable to activate the iPhone and verify all operational features at this stage.Completely de-energize the iPhone by powering it off before proceeding with the remaining repair steps.The three screws, each measuring 1.3 mm in diameter, fasten the cover protecting the battery and display connectors.
- Maintaining an organized record of screw locations is crucial to avoid component damage when reassembling the iPhone.
- A functional test of the iPhone, including all features, should be performed while the display is still unsealed, followed by complete power-down before final assembly.
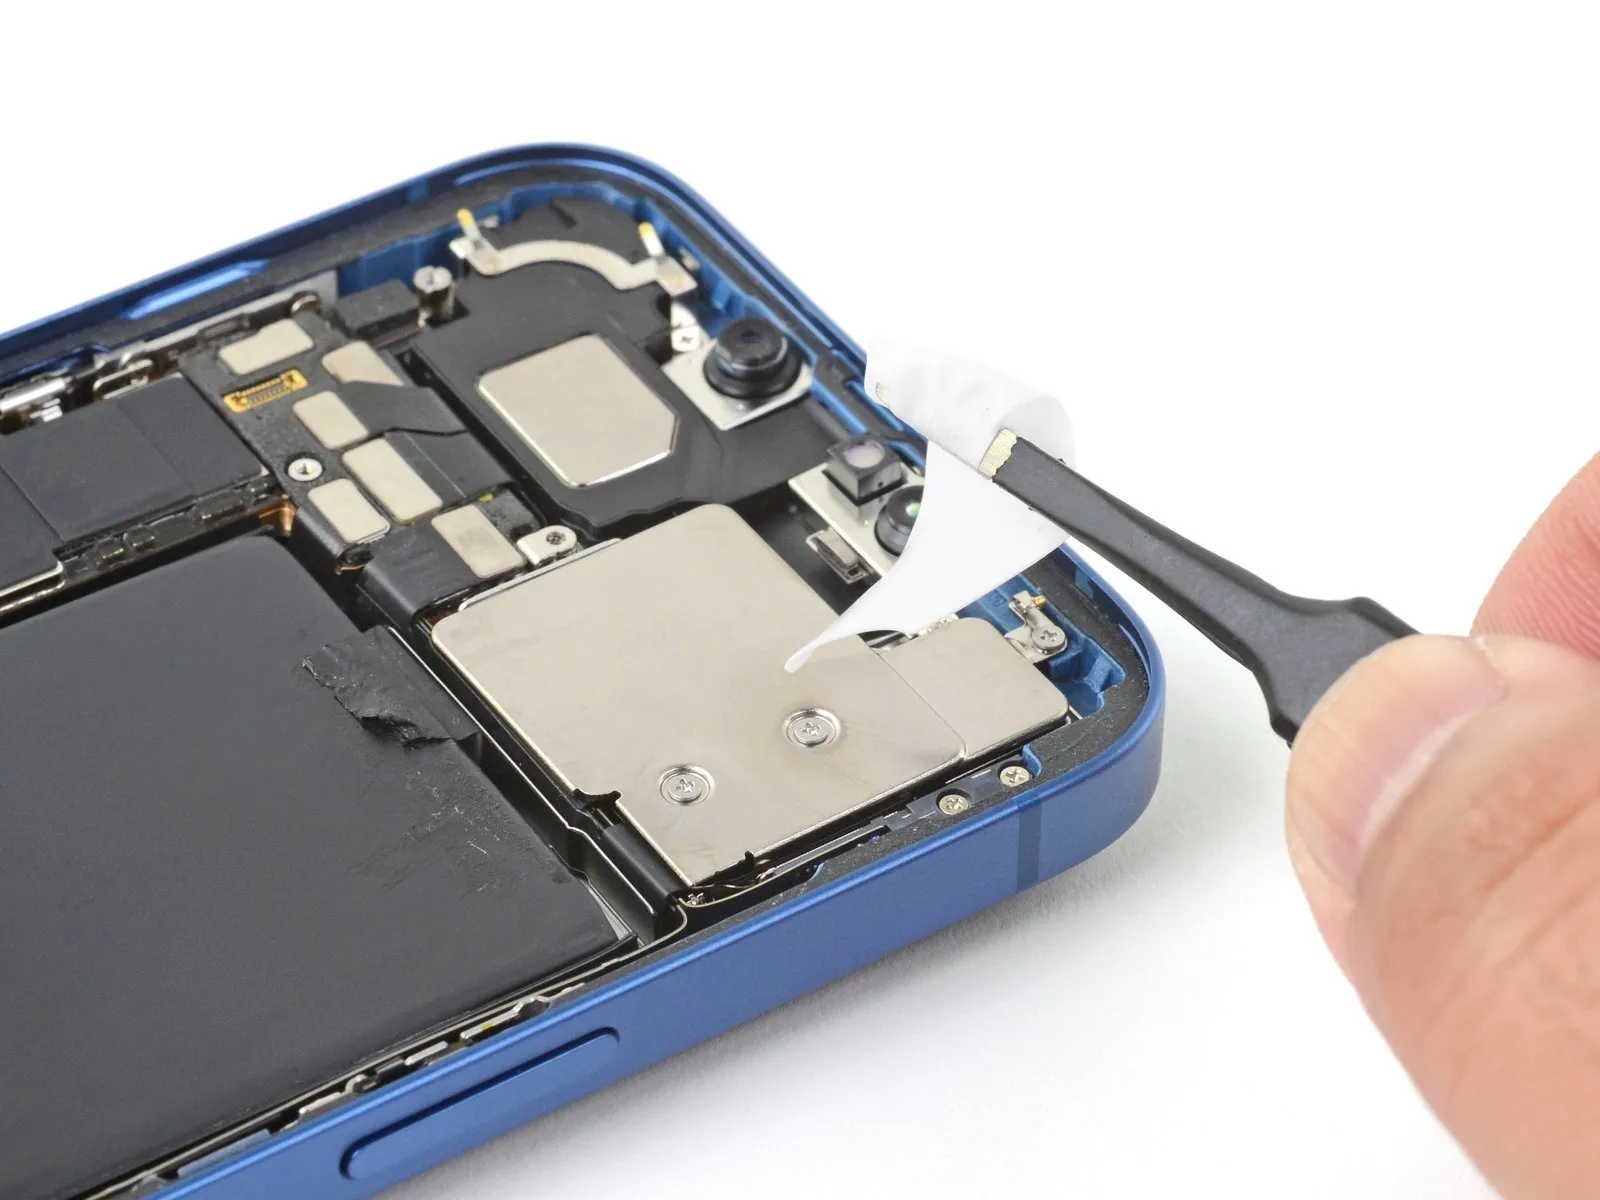
Step 18 | Remove the battery and display connector cover
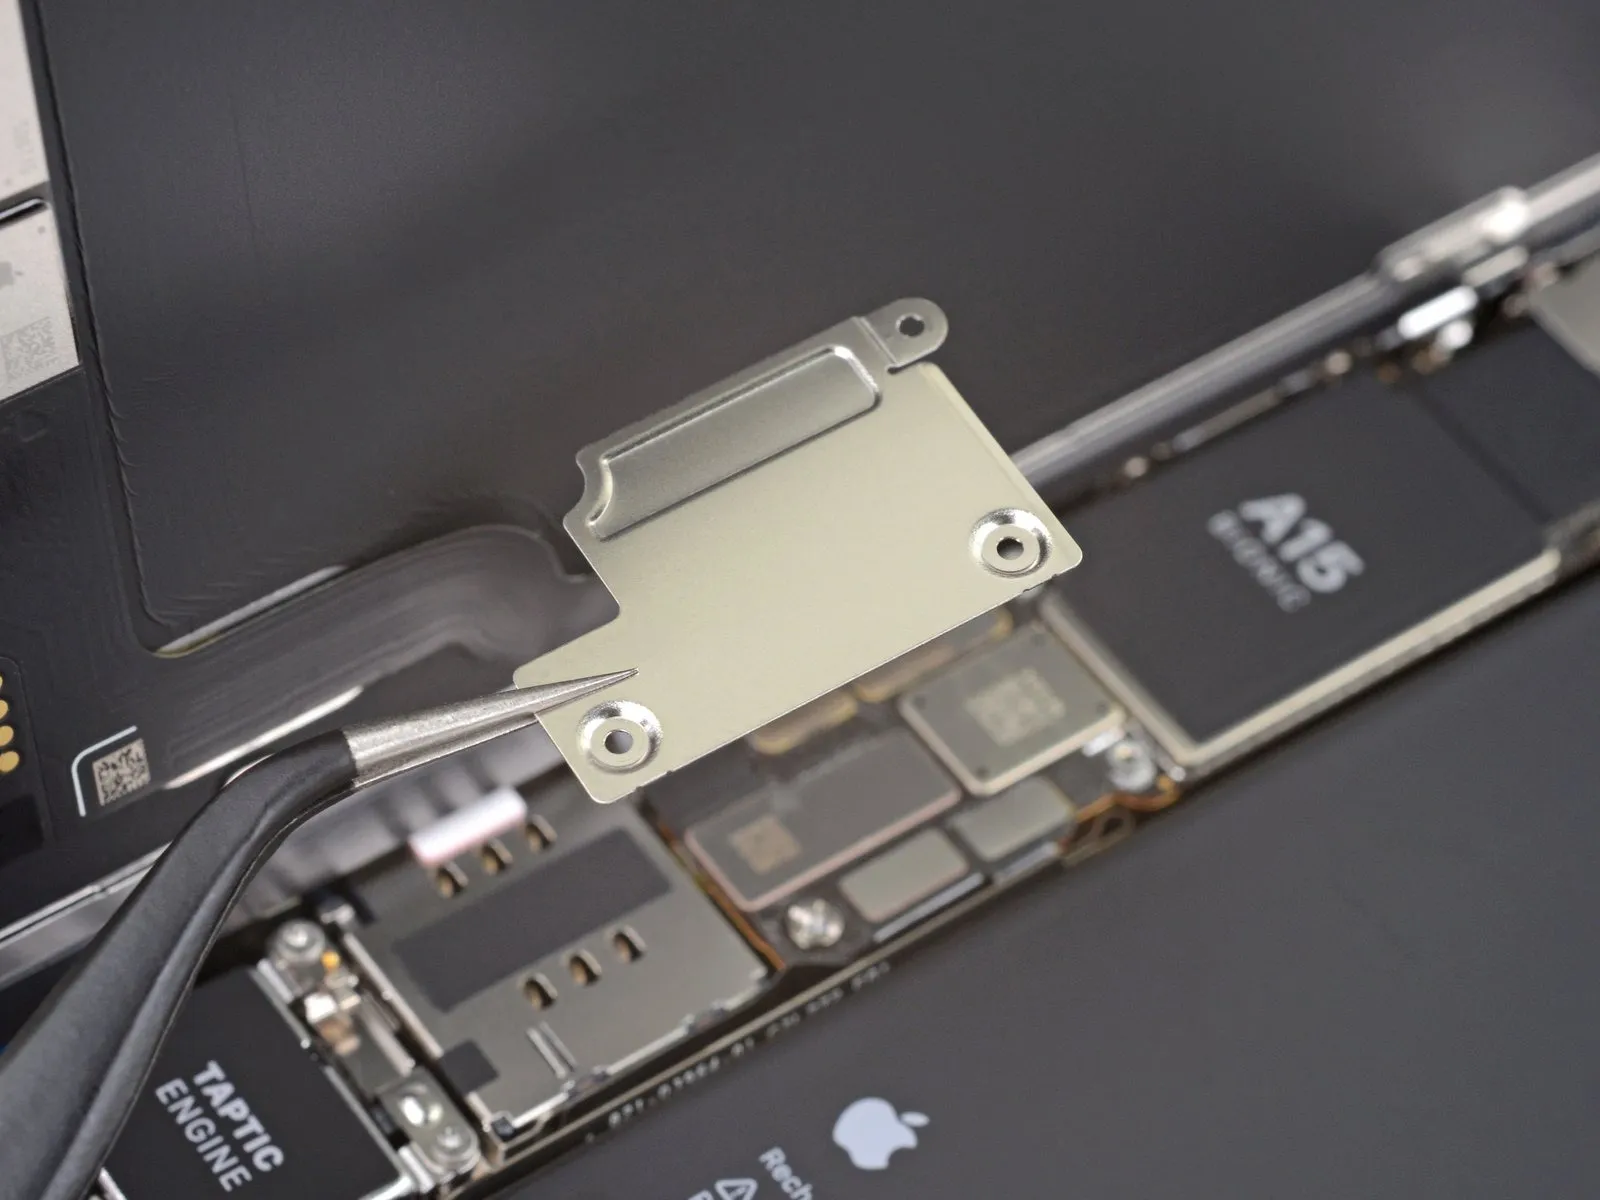
Detach the protective housing.
Step 19 | Disconnect the battery
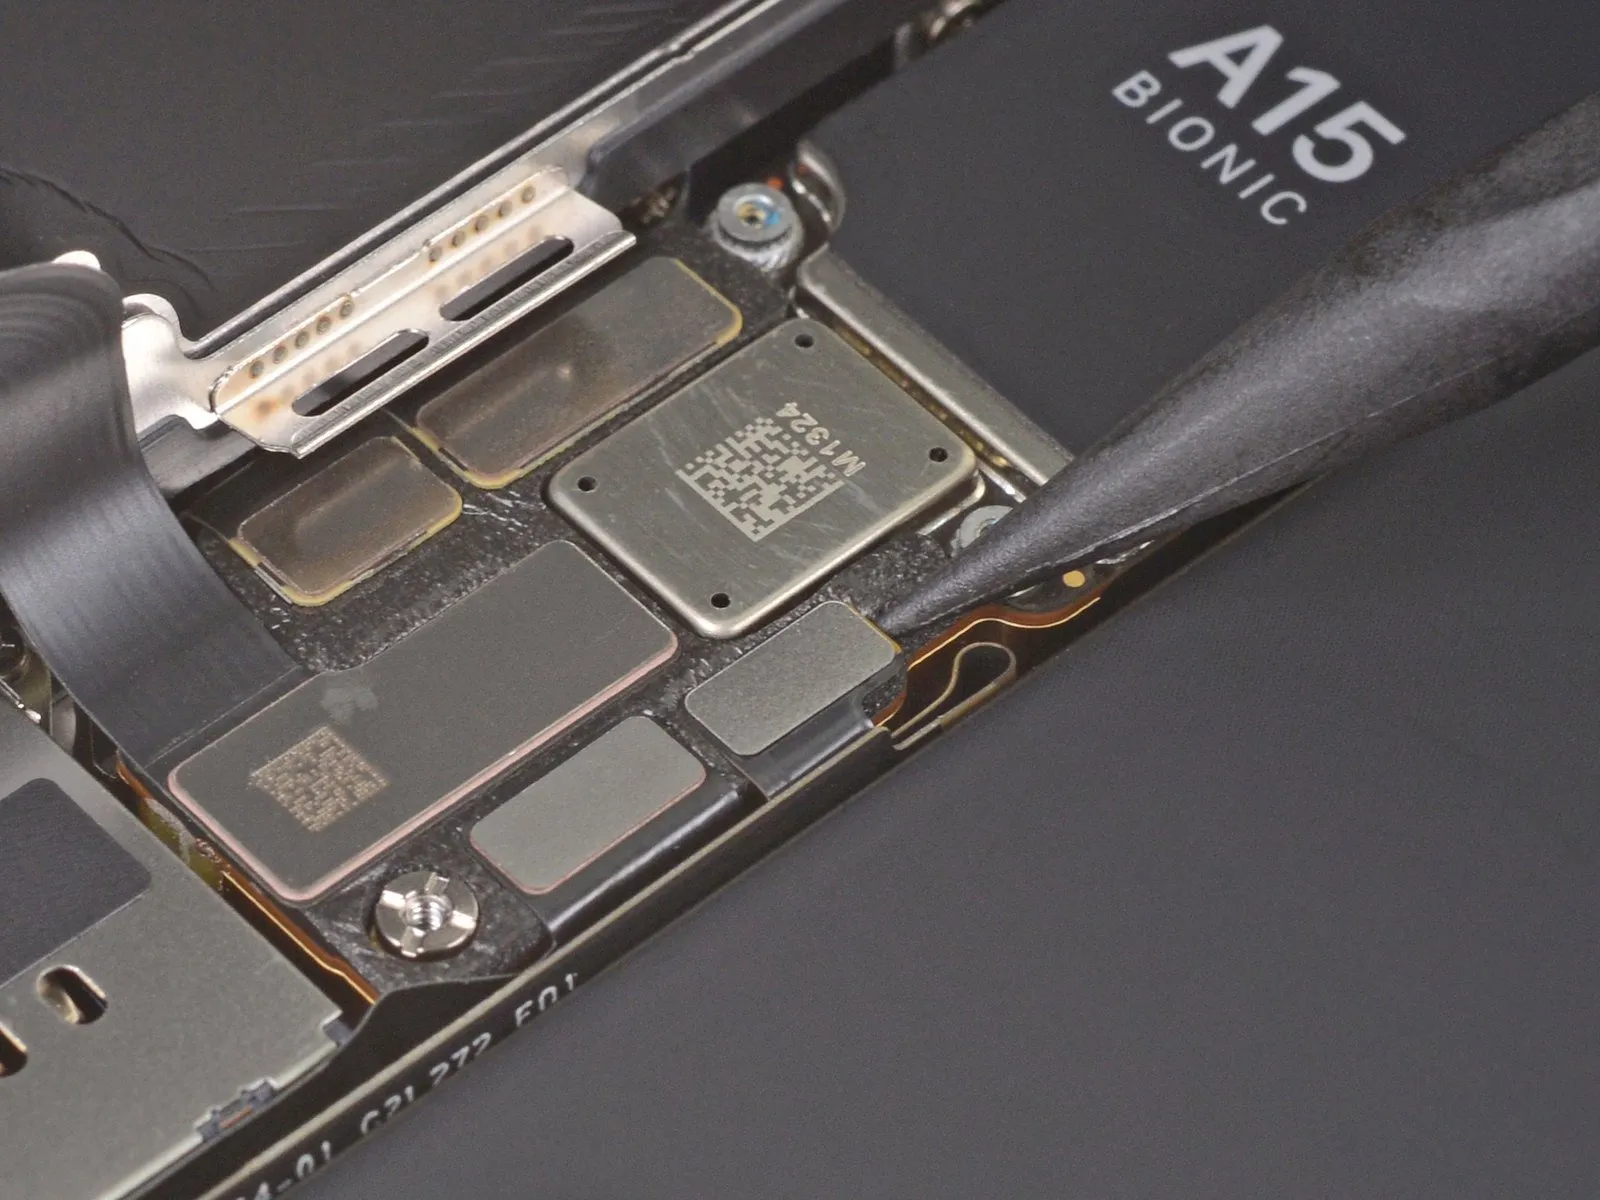
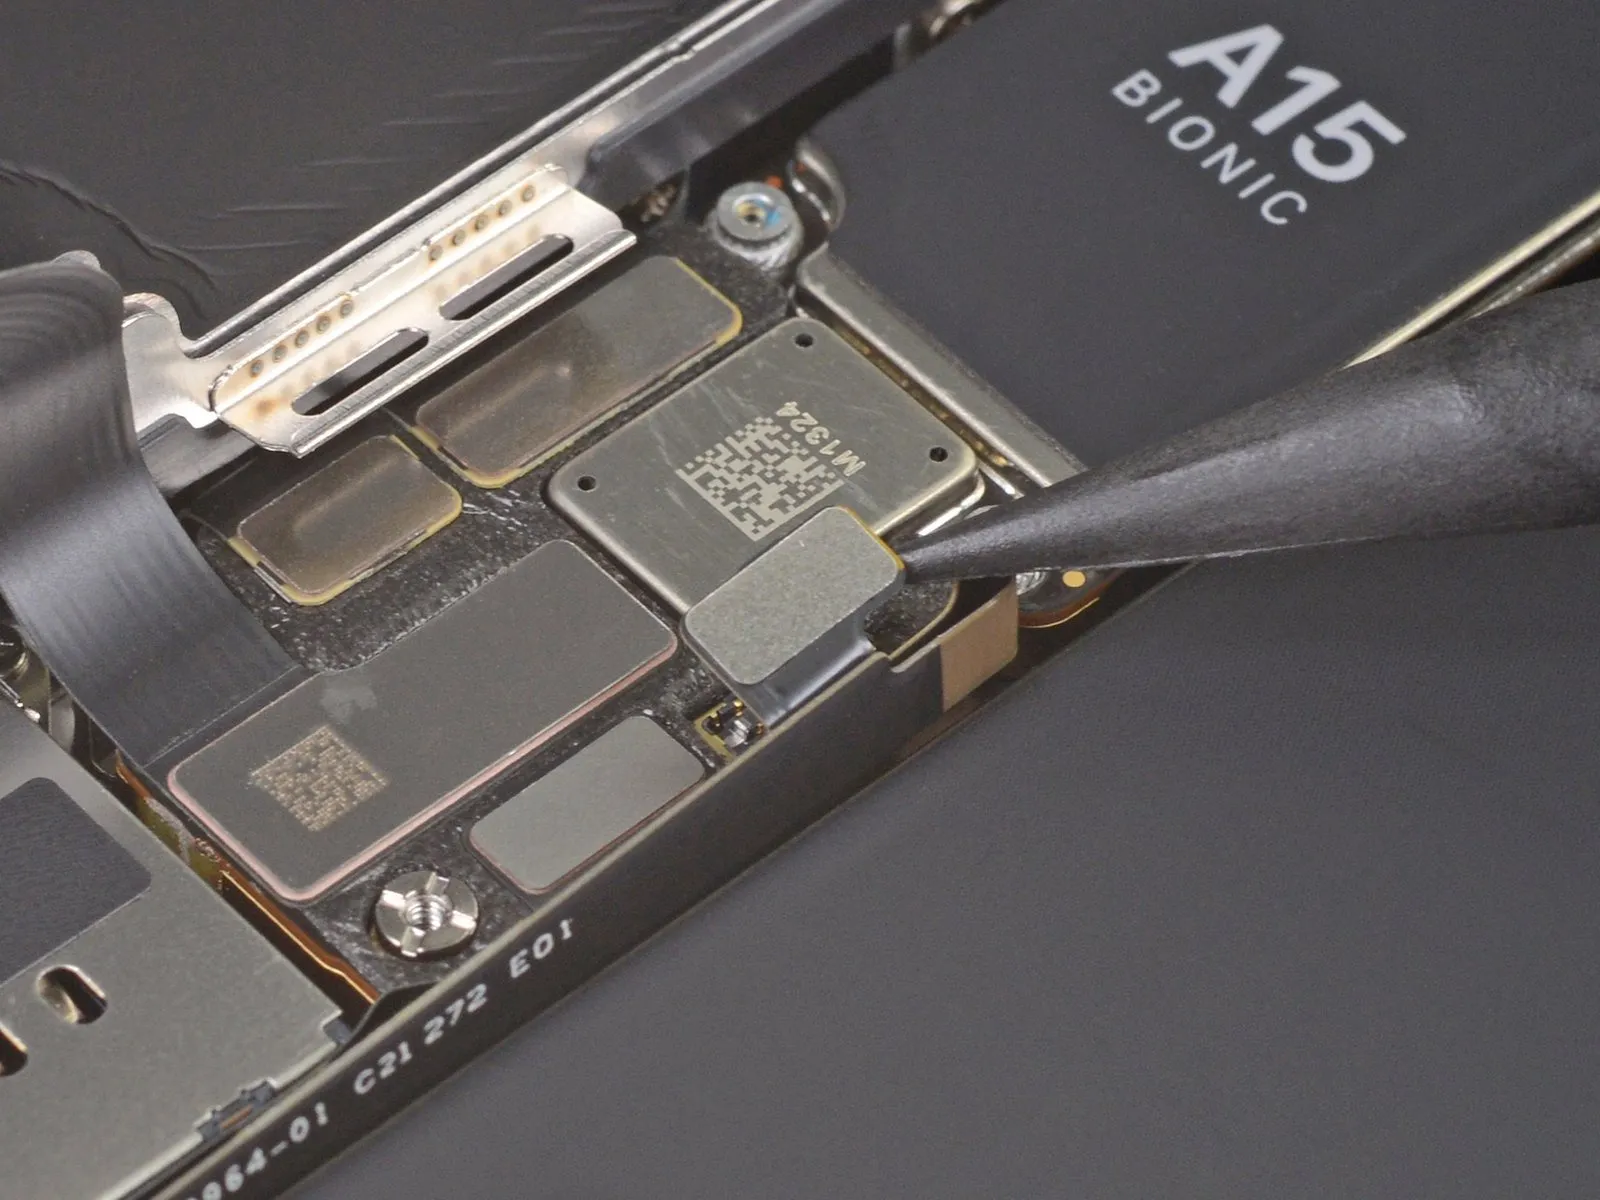
- Employ a spudger tool, or a similarly non-marring object like a clean fingernail, to lift the battery connector's retaining clip from its corresponding receptacle on the logic board.Exercise caution to avoid harming the black silicone sealant that surrounds this connector and others on the board, as it is crucial for safeguarding against water and dust ingress.Slightly deflect the connector away from the logic board's surface, ensuring it remains disengaged from the socket to preclude any unintended power delivery to the device during the repair process.
- The silicone seals are integral to the device's environmental protection, so their integrity must be maintained throughout the repair procedure.
- Careful manipulation of the battery connector is essential to prevent accidental electrical shorts and potential damage to the phone's internal components.
Step 20 | Disconnect the display cable
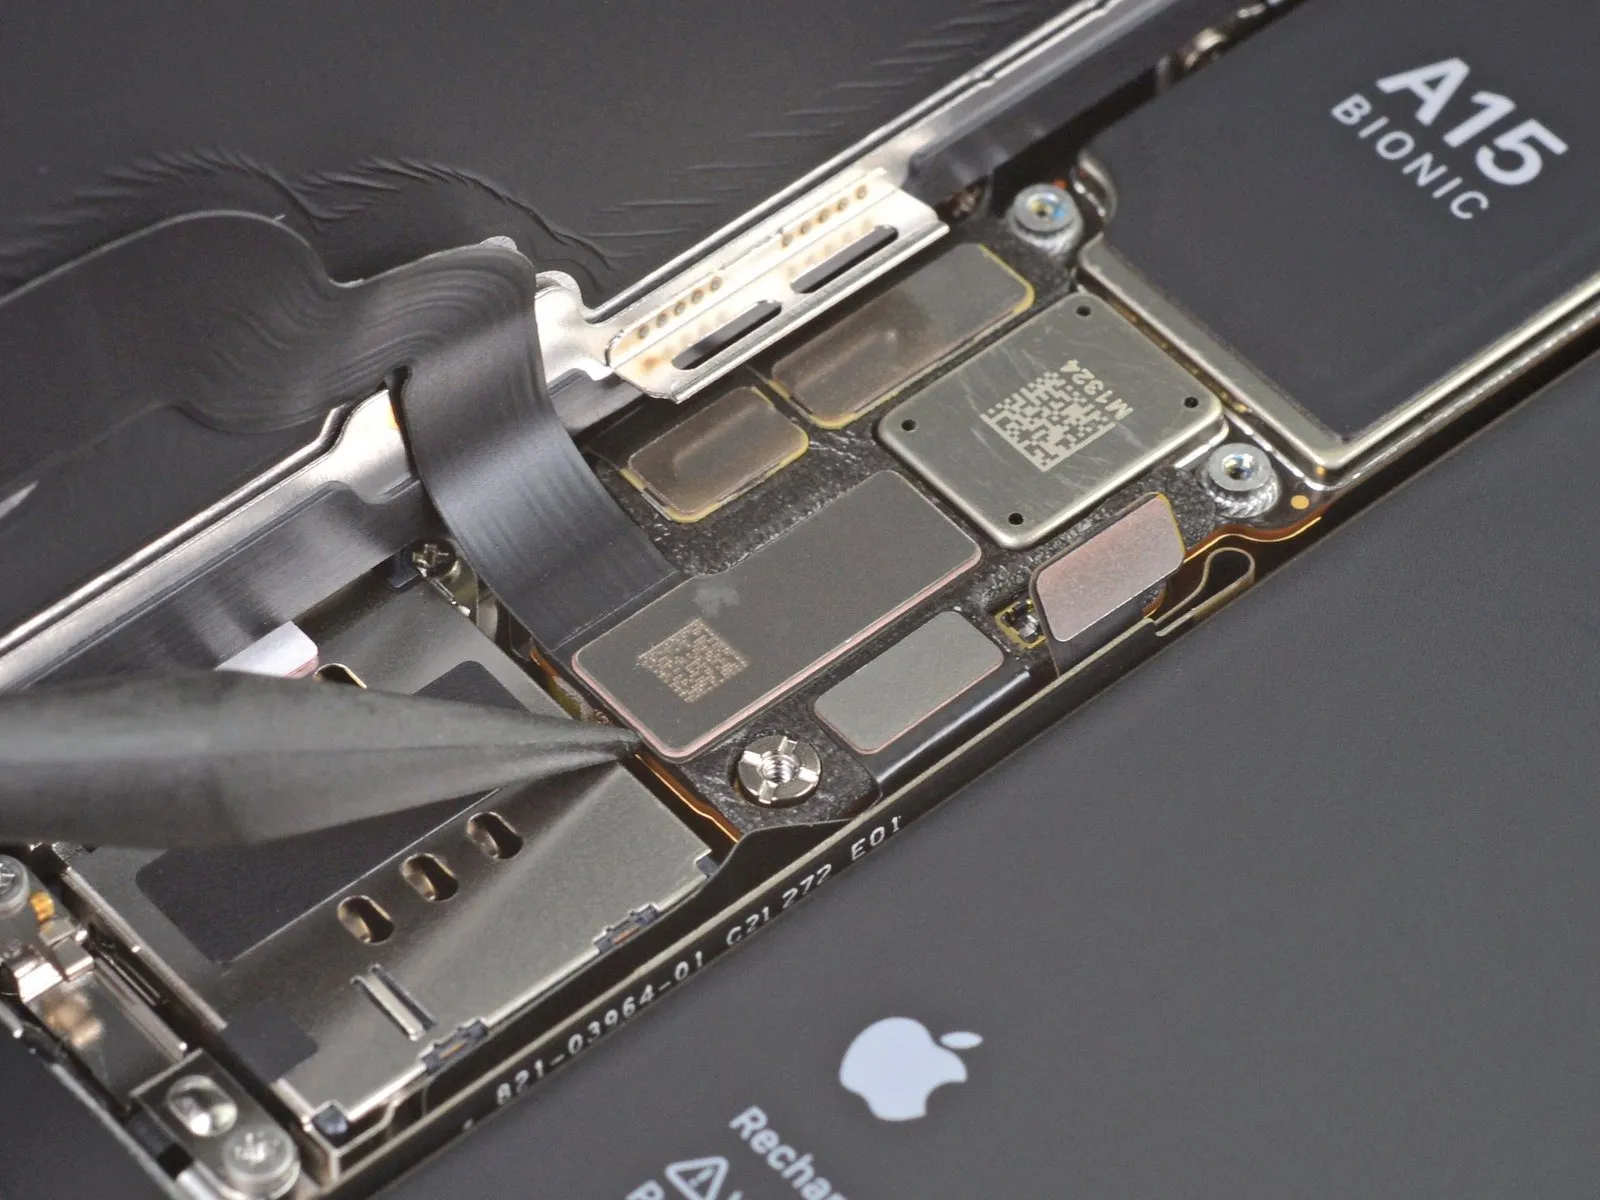
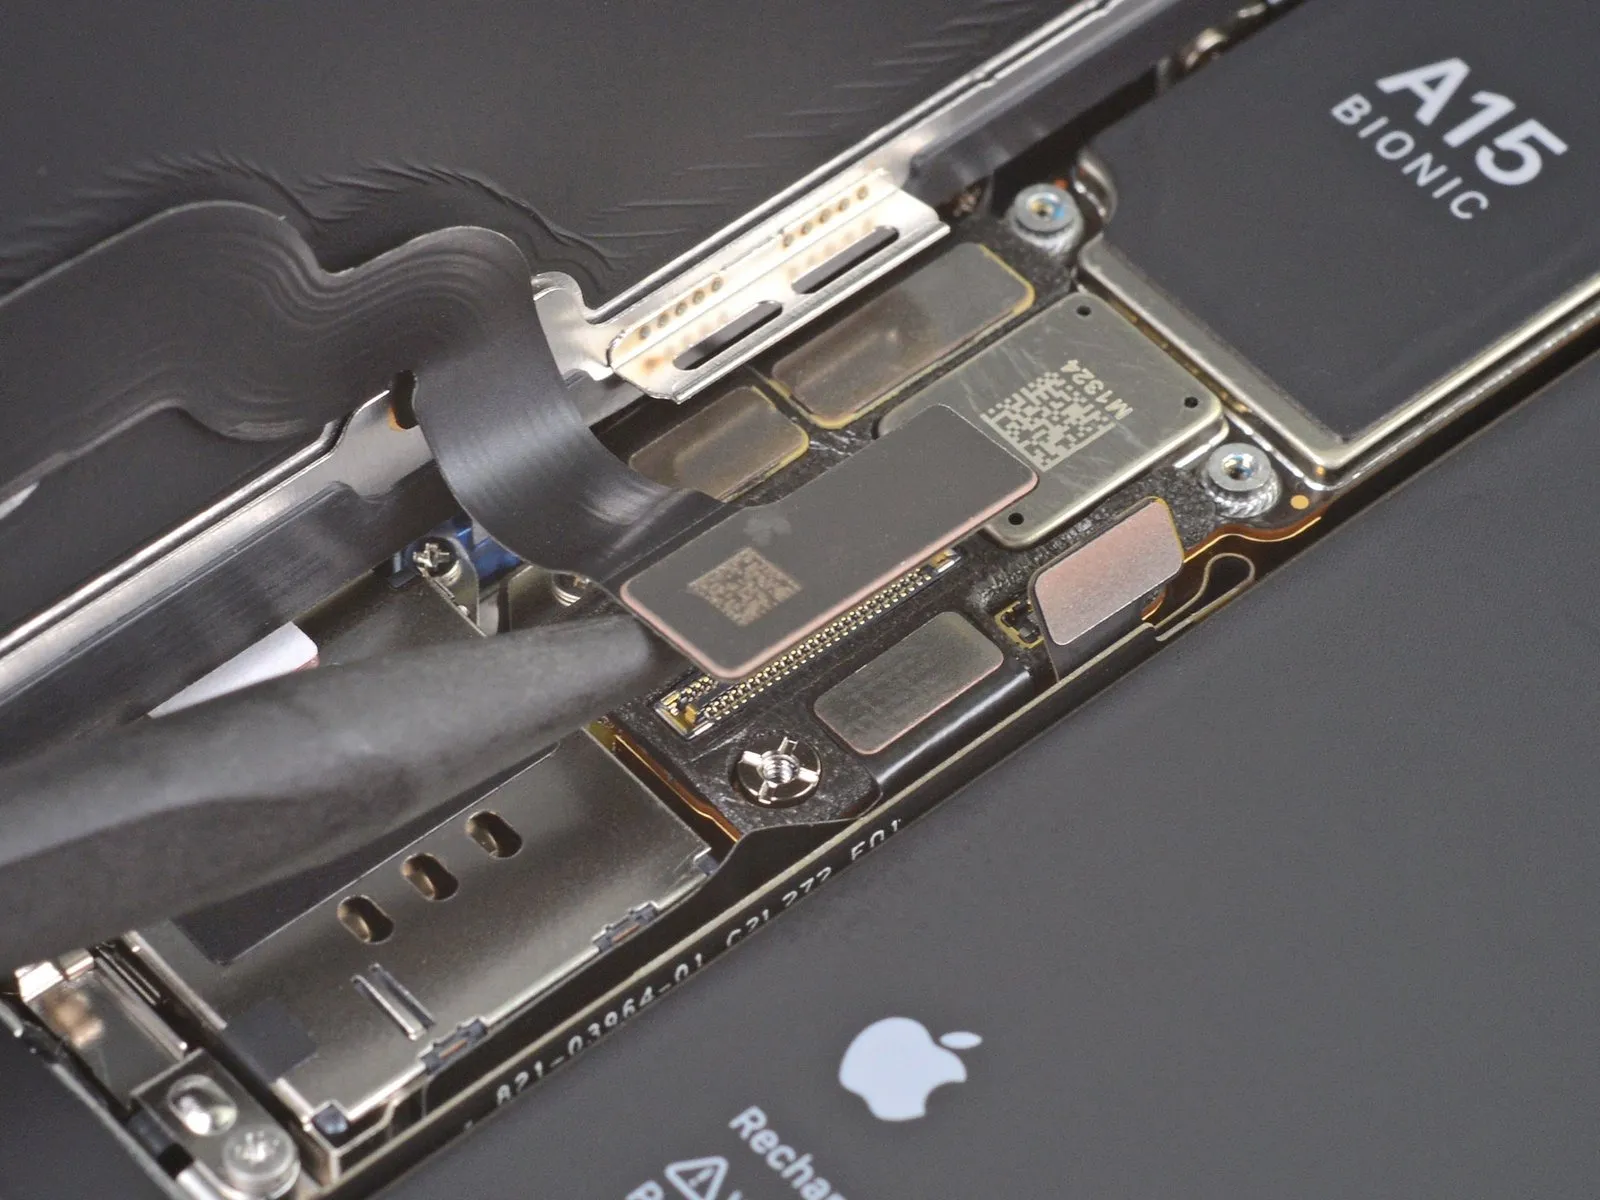
- Employing a spudger or fingernail, detach the display cable connector.For reattachment, meticulously align the connectors, initiating the process by pressing down on a single edge until a click is heard, subsequently repeating this action on the opposing edge.Avoid applying pressure to the central portion of the connector during reattachment.
- Misalignment risks bending the connector pins, potentially leading to irreversible damage.
Step 21 | Unscrew the front sensor connector cover
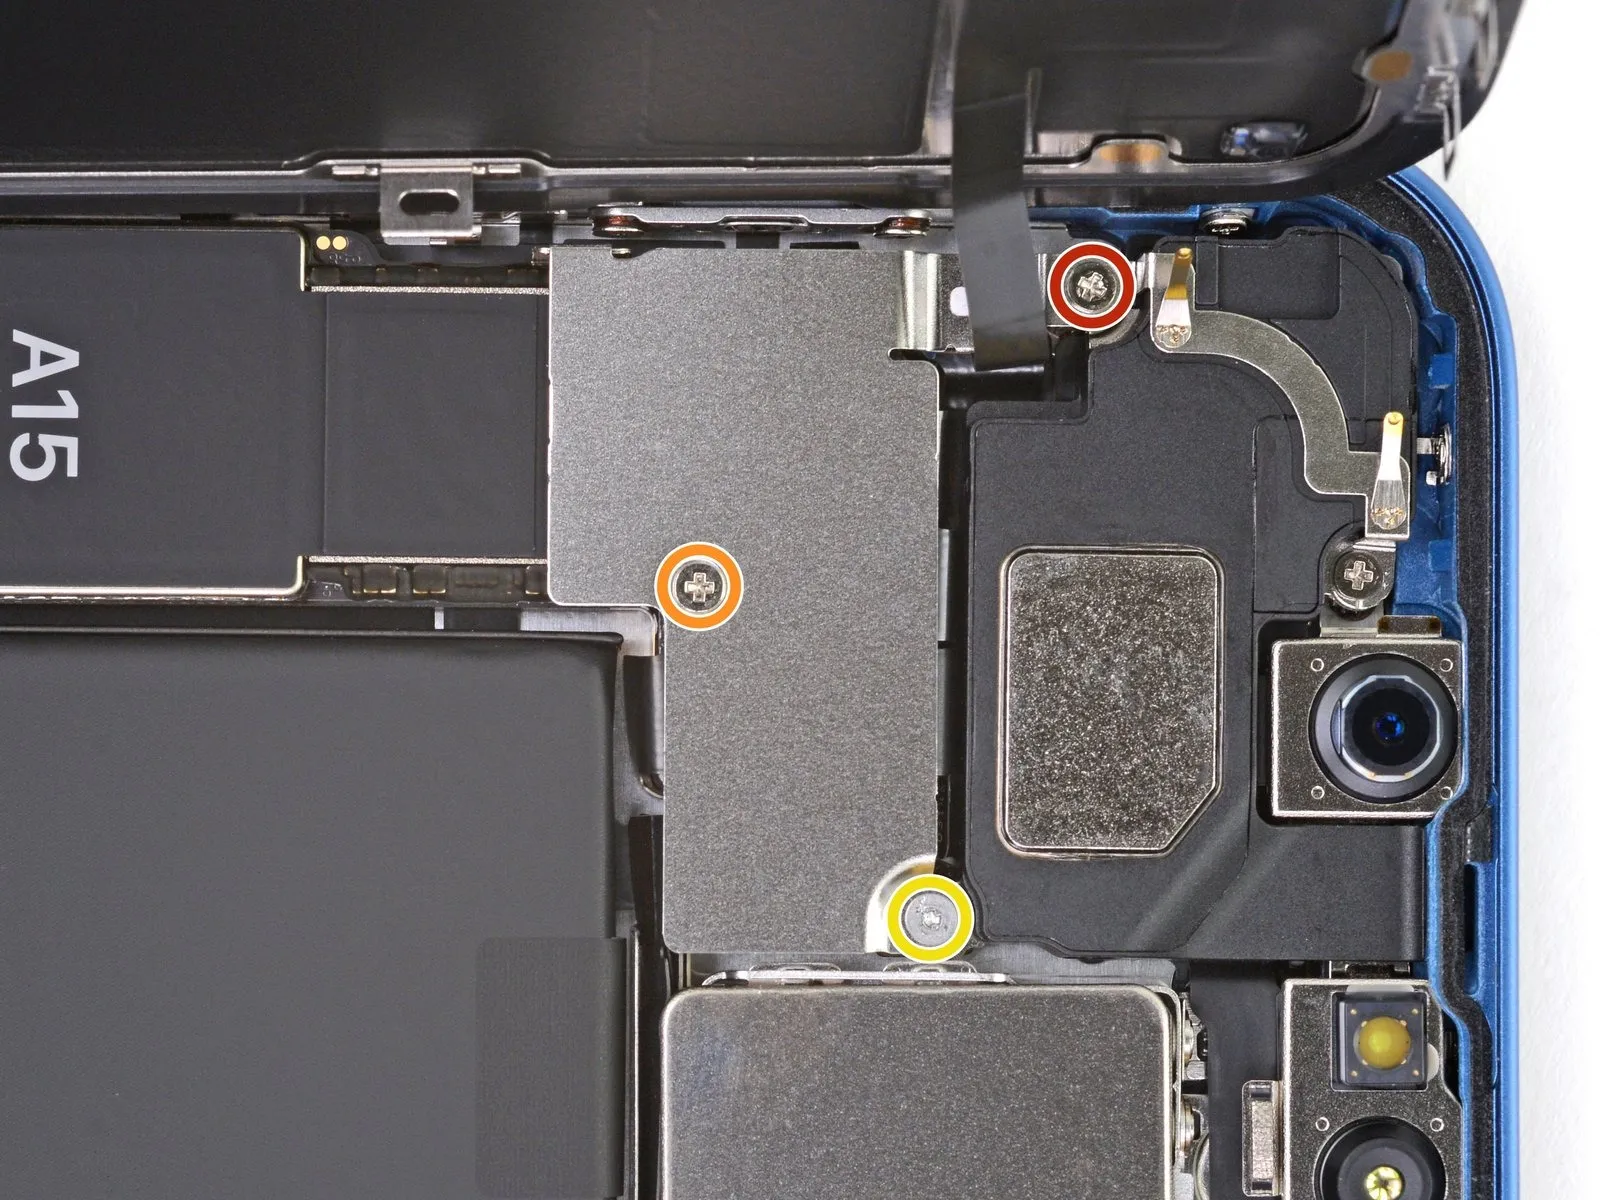
- To detach the cover protecting the front sensor connector, it is necessary to eliminate three fastening screws.
- A 1.7-millimeter Phillips head screw is required for disassembly.
- A 1.3-millimeter Phillips head screw is also needed for this process.
- Additionally, a 1.8-millimeter Y000-type screw must be removed.
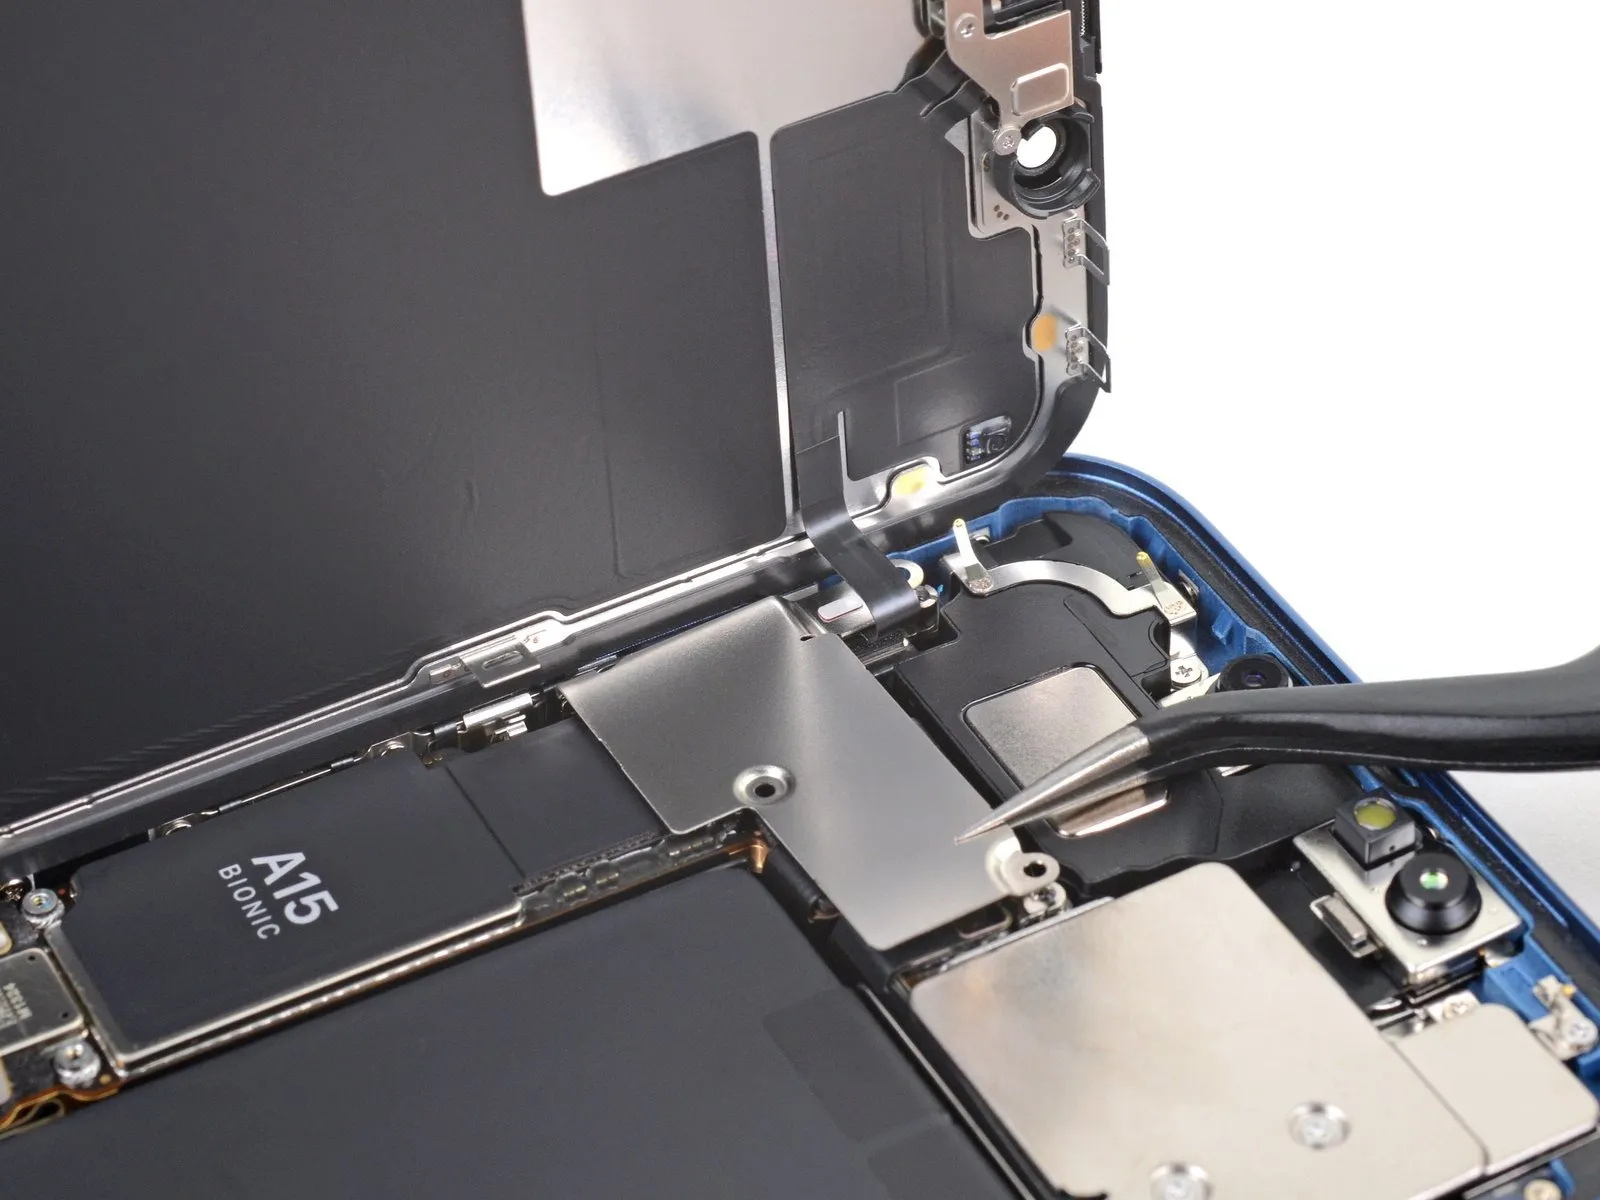
Step 22 | Remove the front sensor connector cover
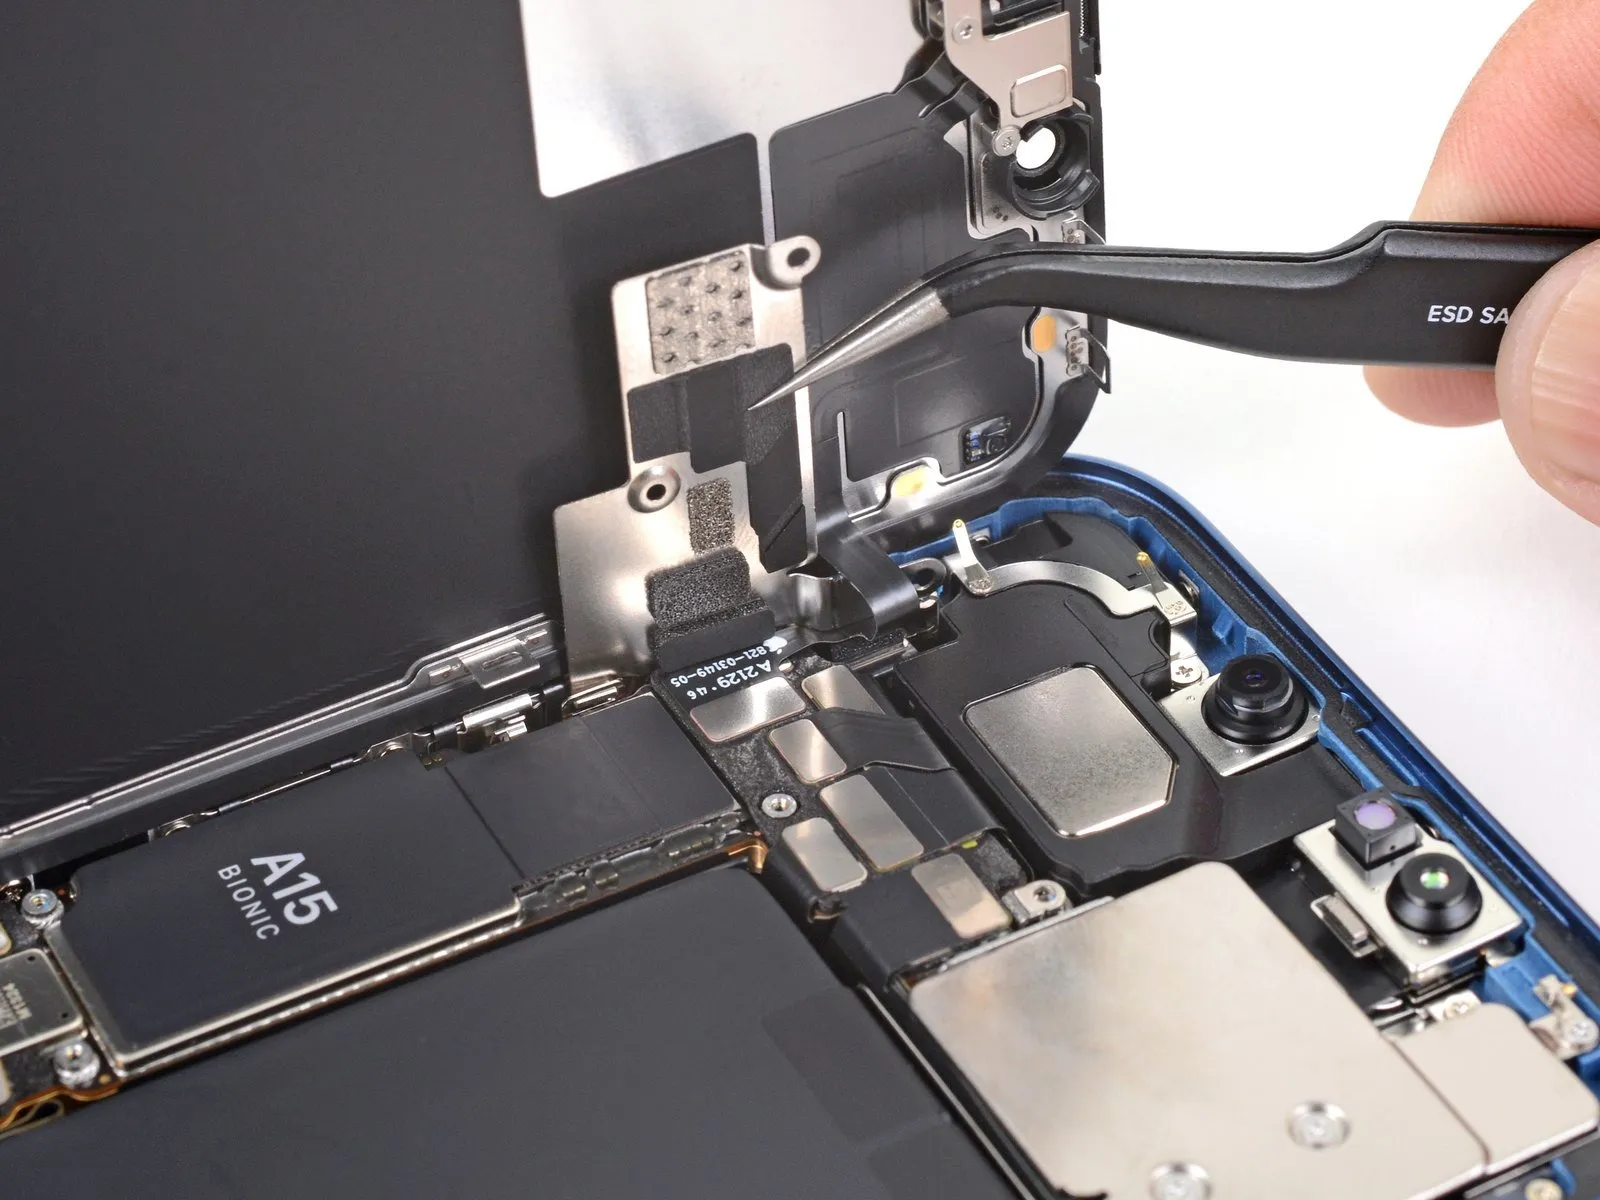
Step 23
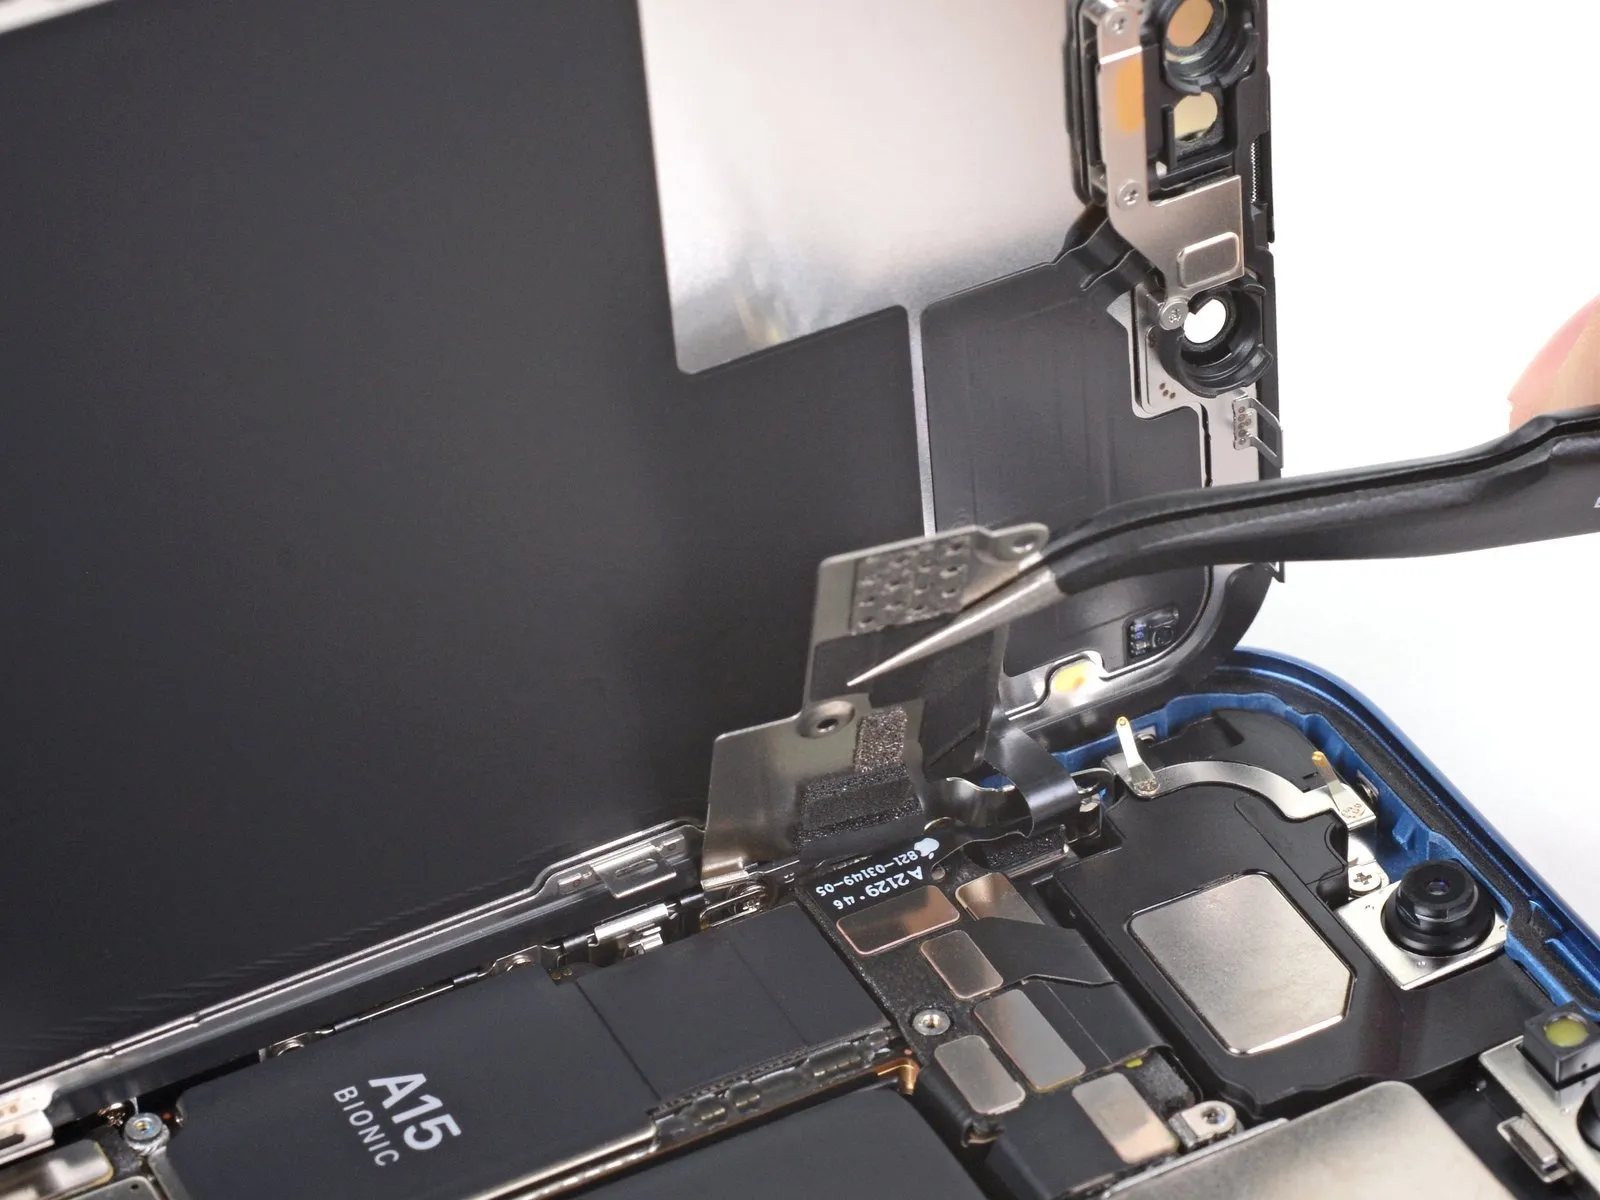
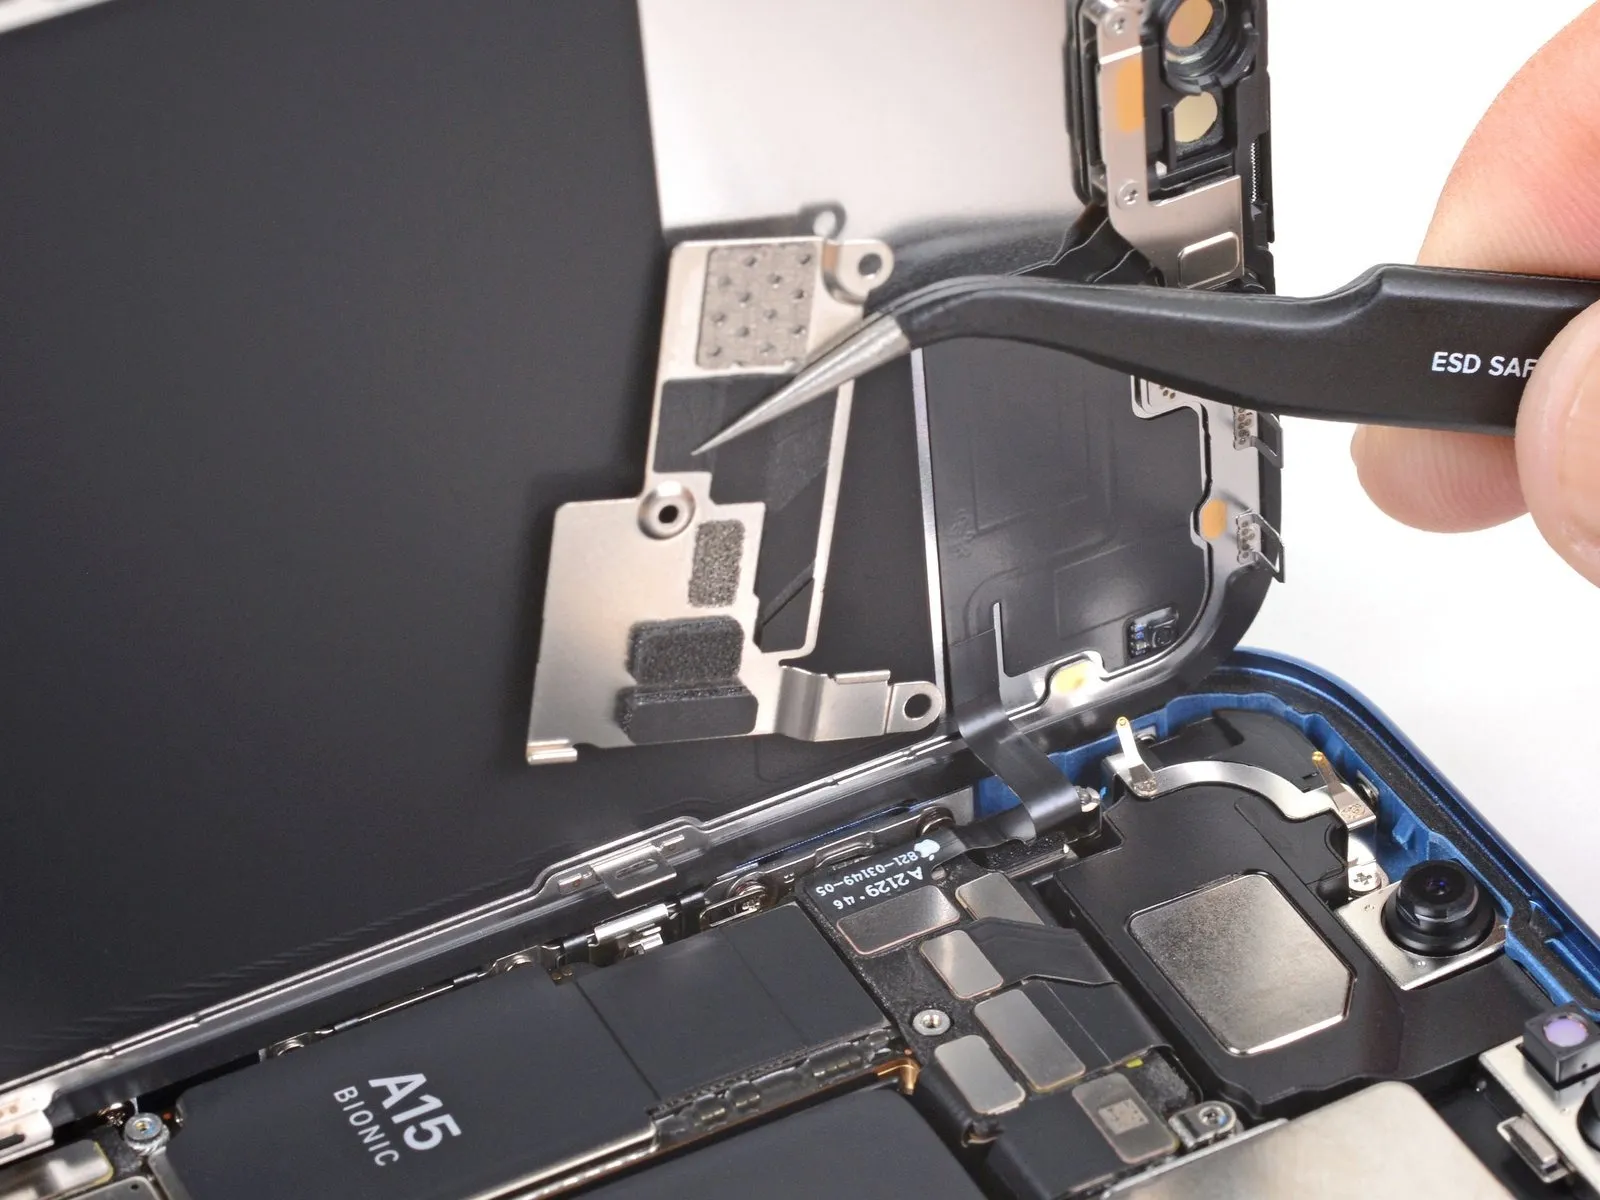
- Detach the protective housing.
- To reassemble, initially position the clip located on the left side into the corresponding receptacle, subsequently aligning the remainder of the housing to secure it.
Step 24 | Disconnect the front sensors
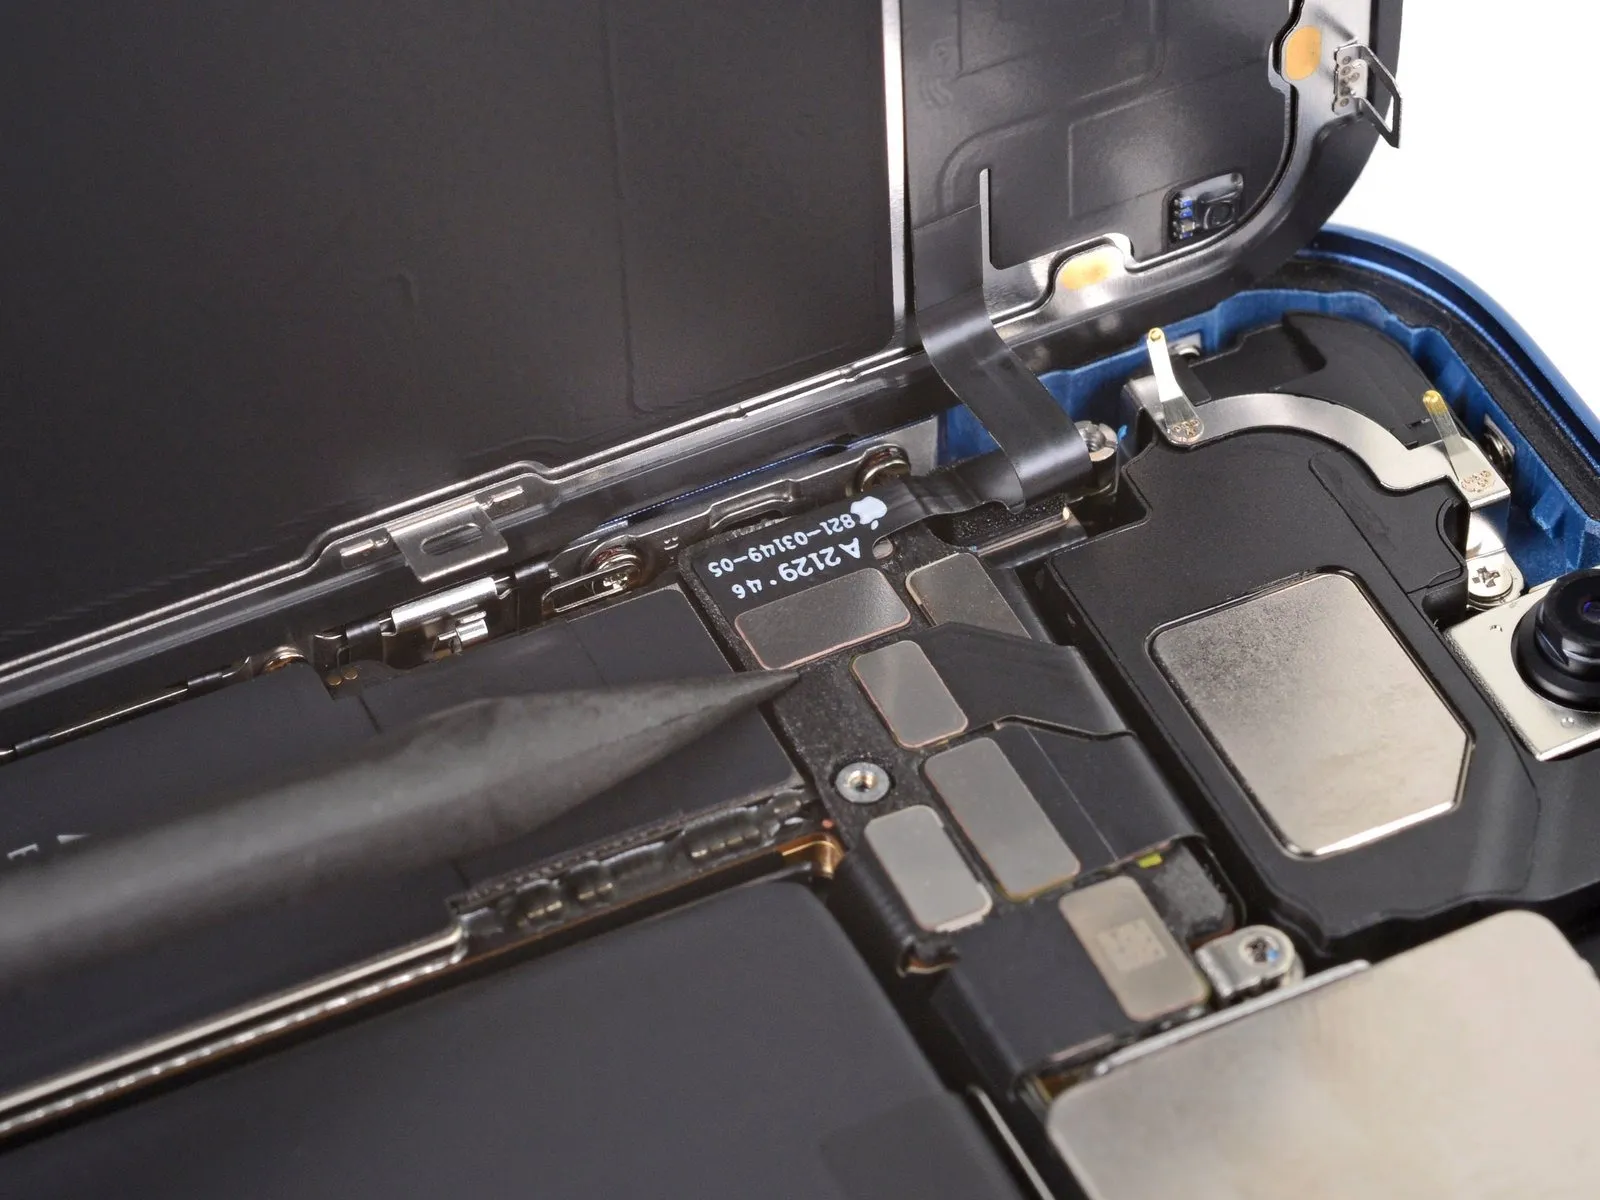
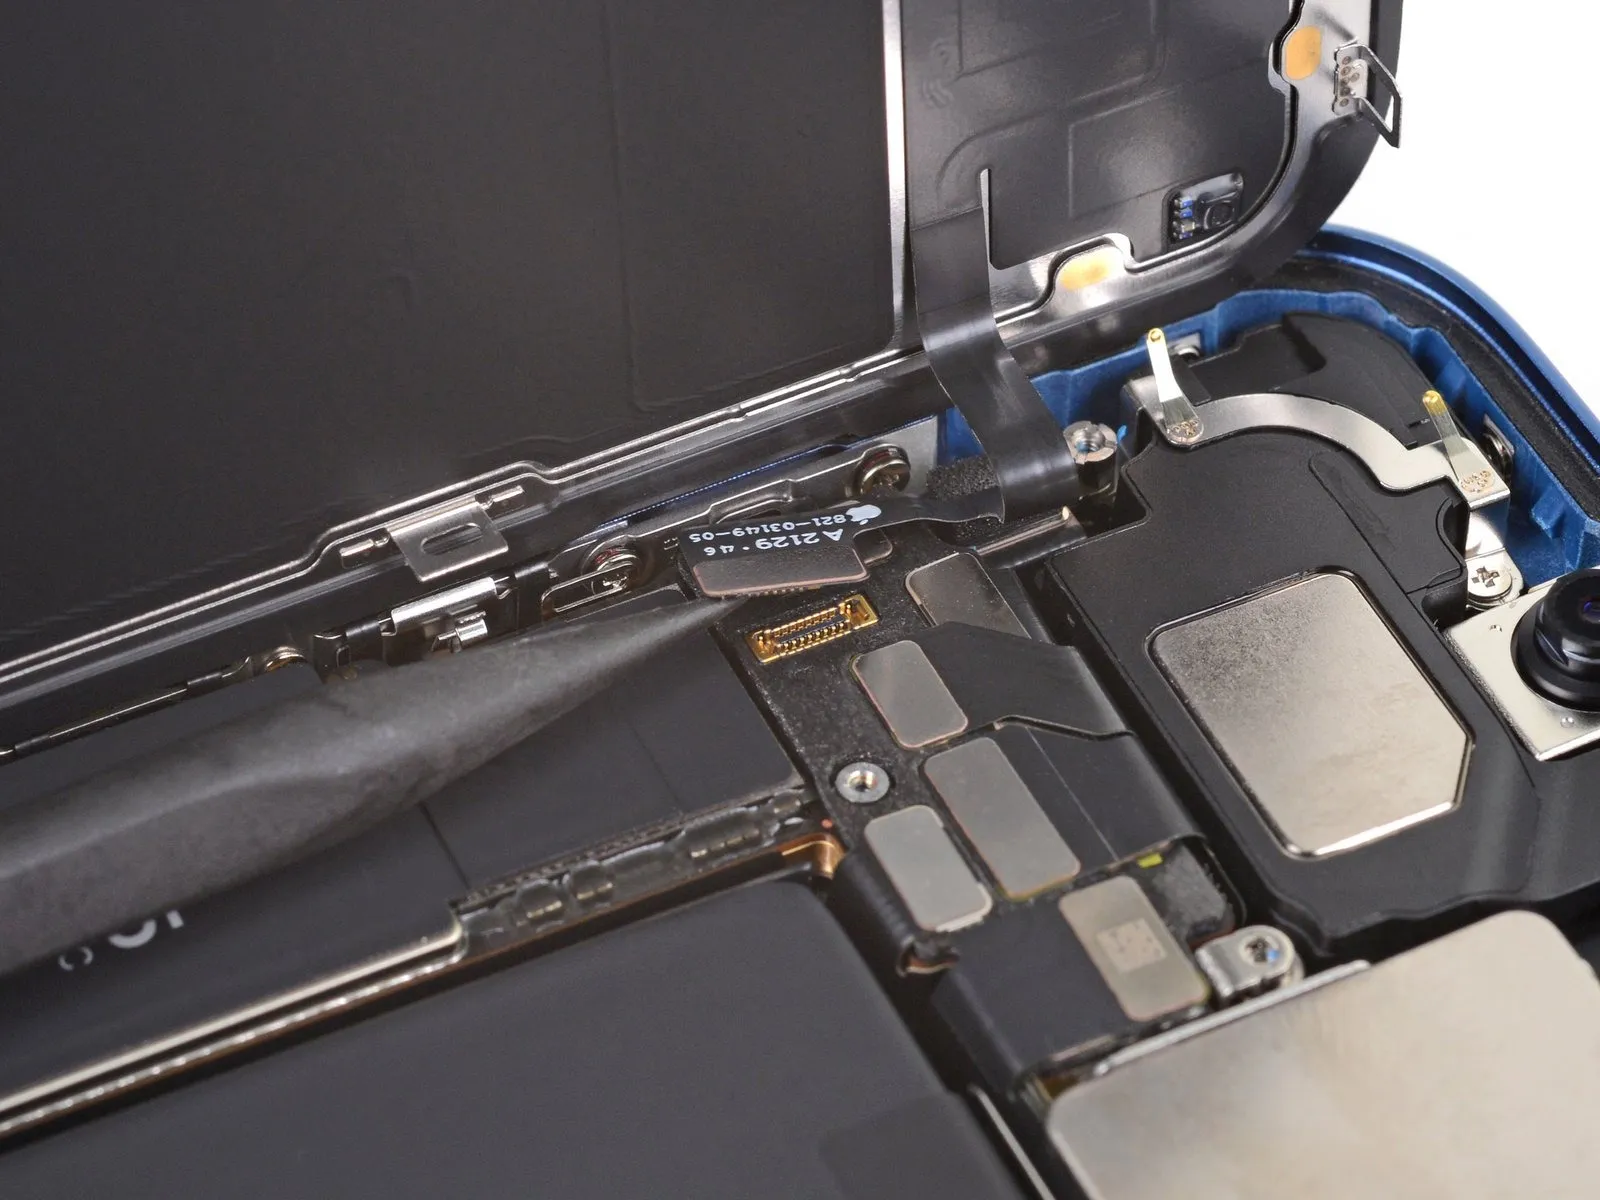
Step 25 | Remove the screen
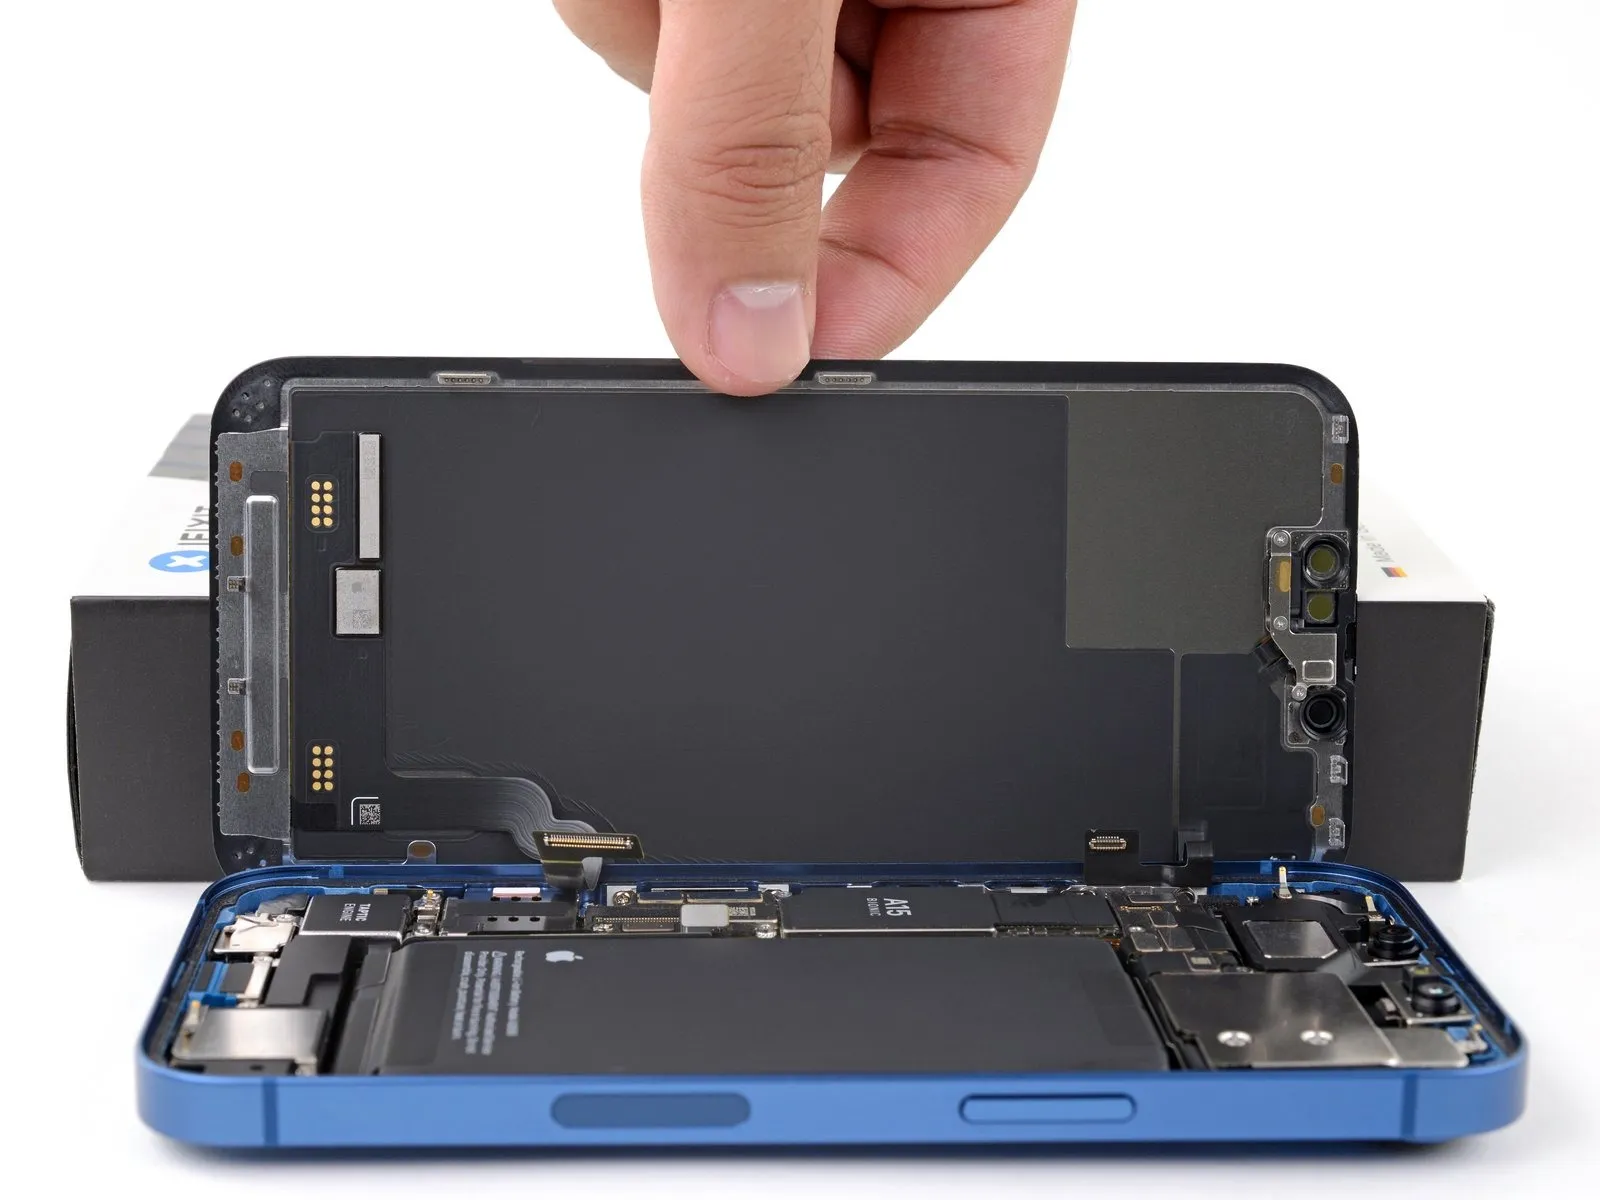
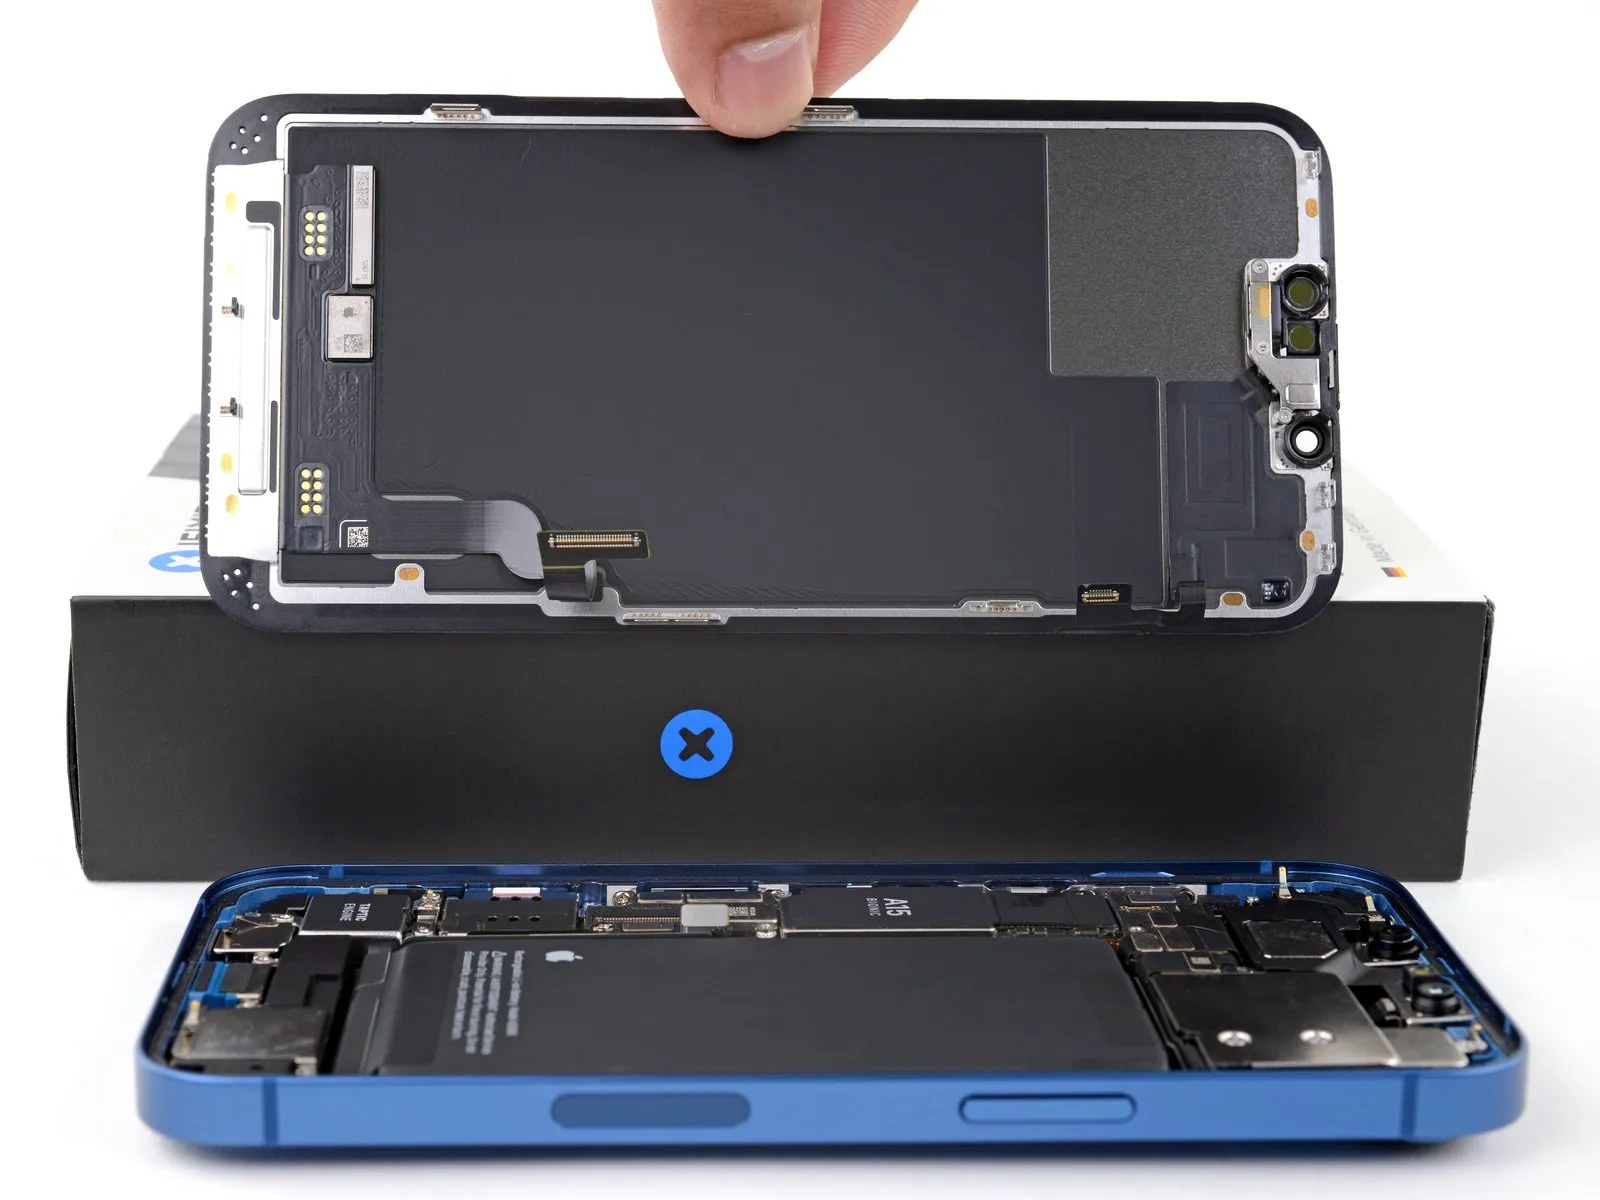
- Detach the display panel from the device.
- If a replacement of the waterproof sealant bordering the display's perimeter is desired, halt the reassembly process at this juncture.
Step 26 | Unscrew the loudspeaker
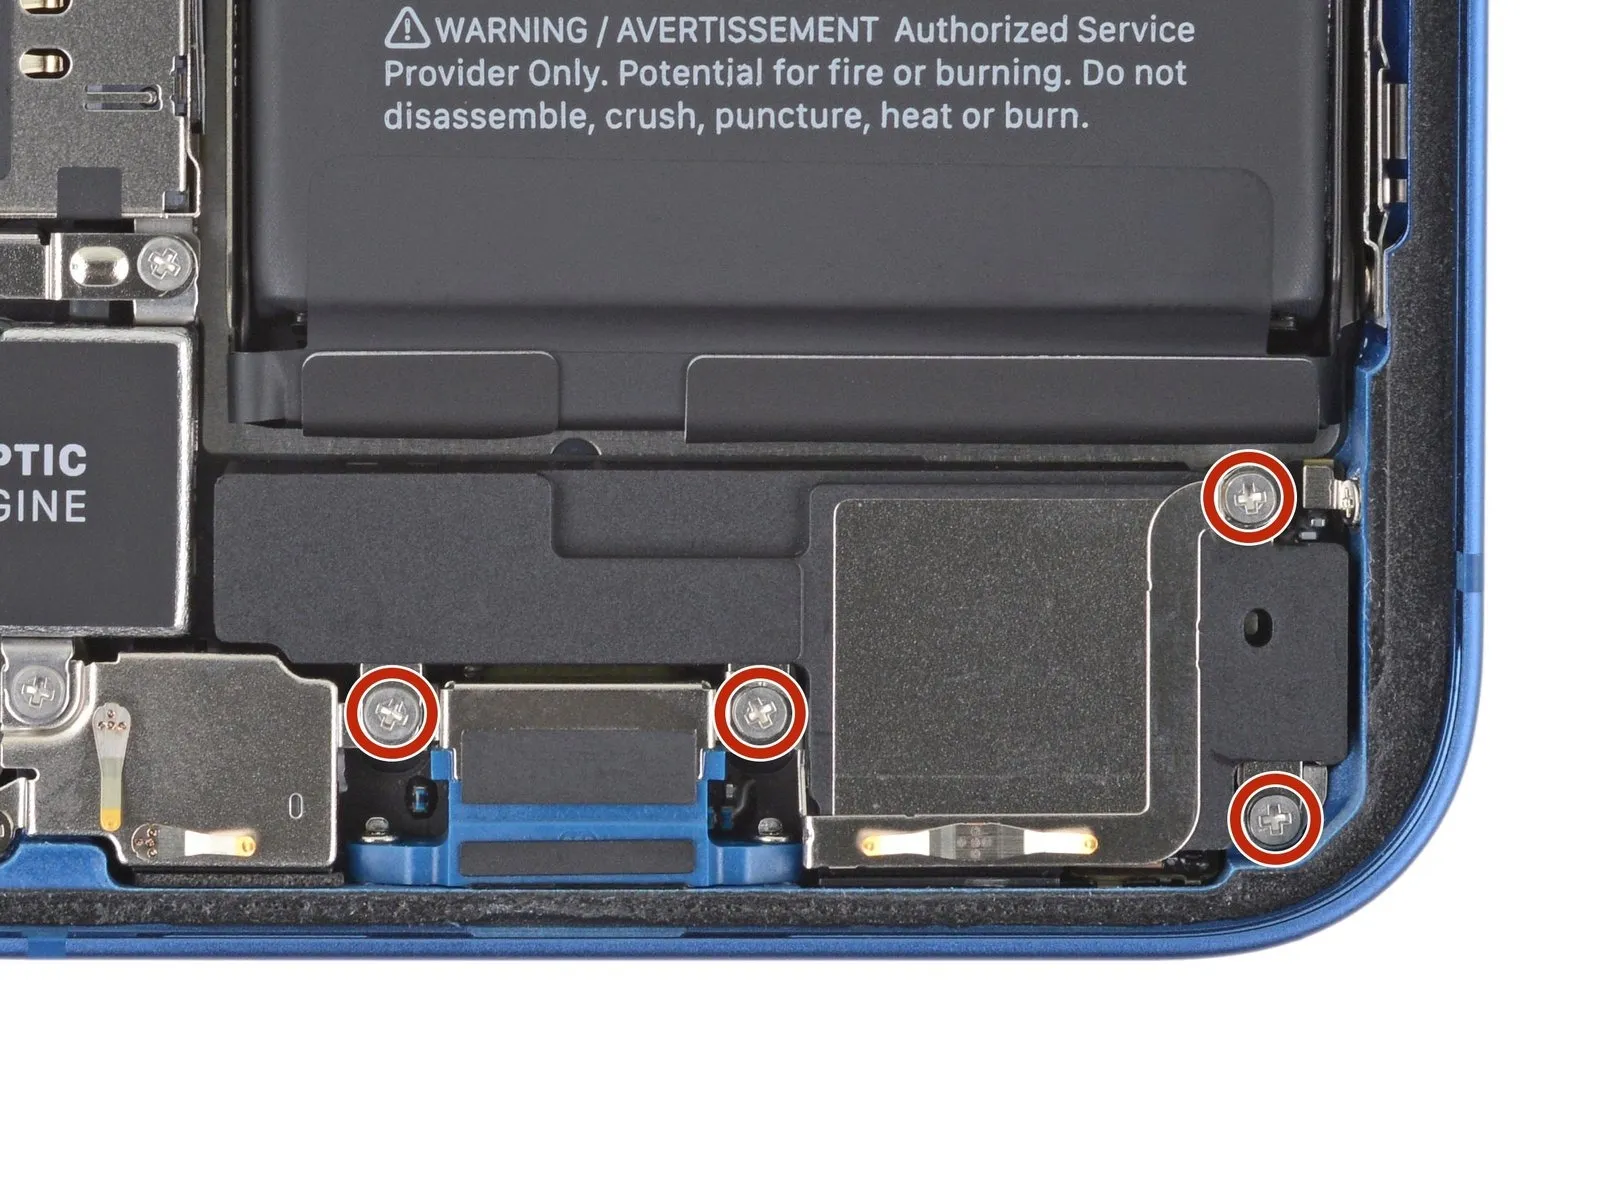
Step 27 | Remove the loudspeaker
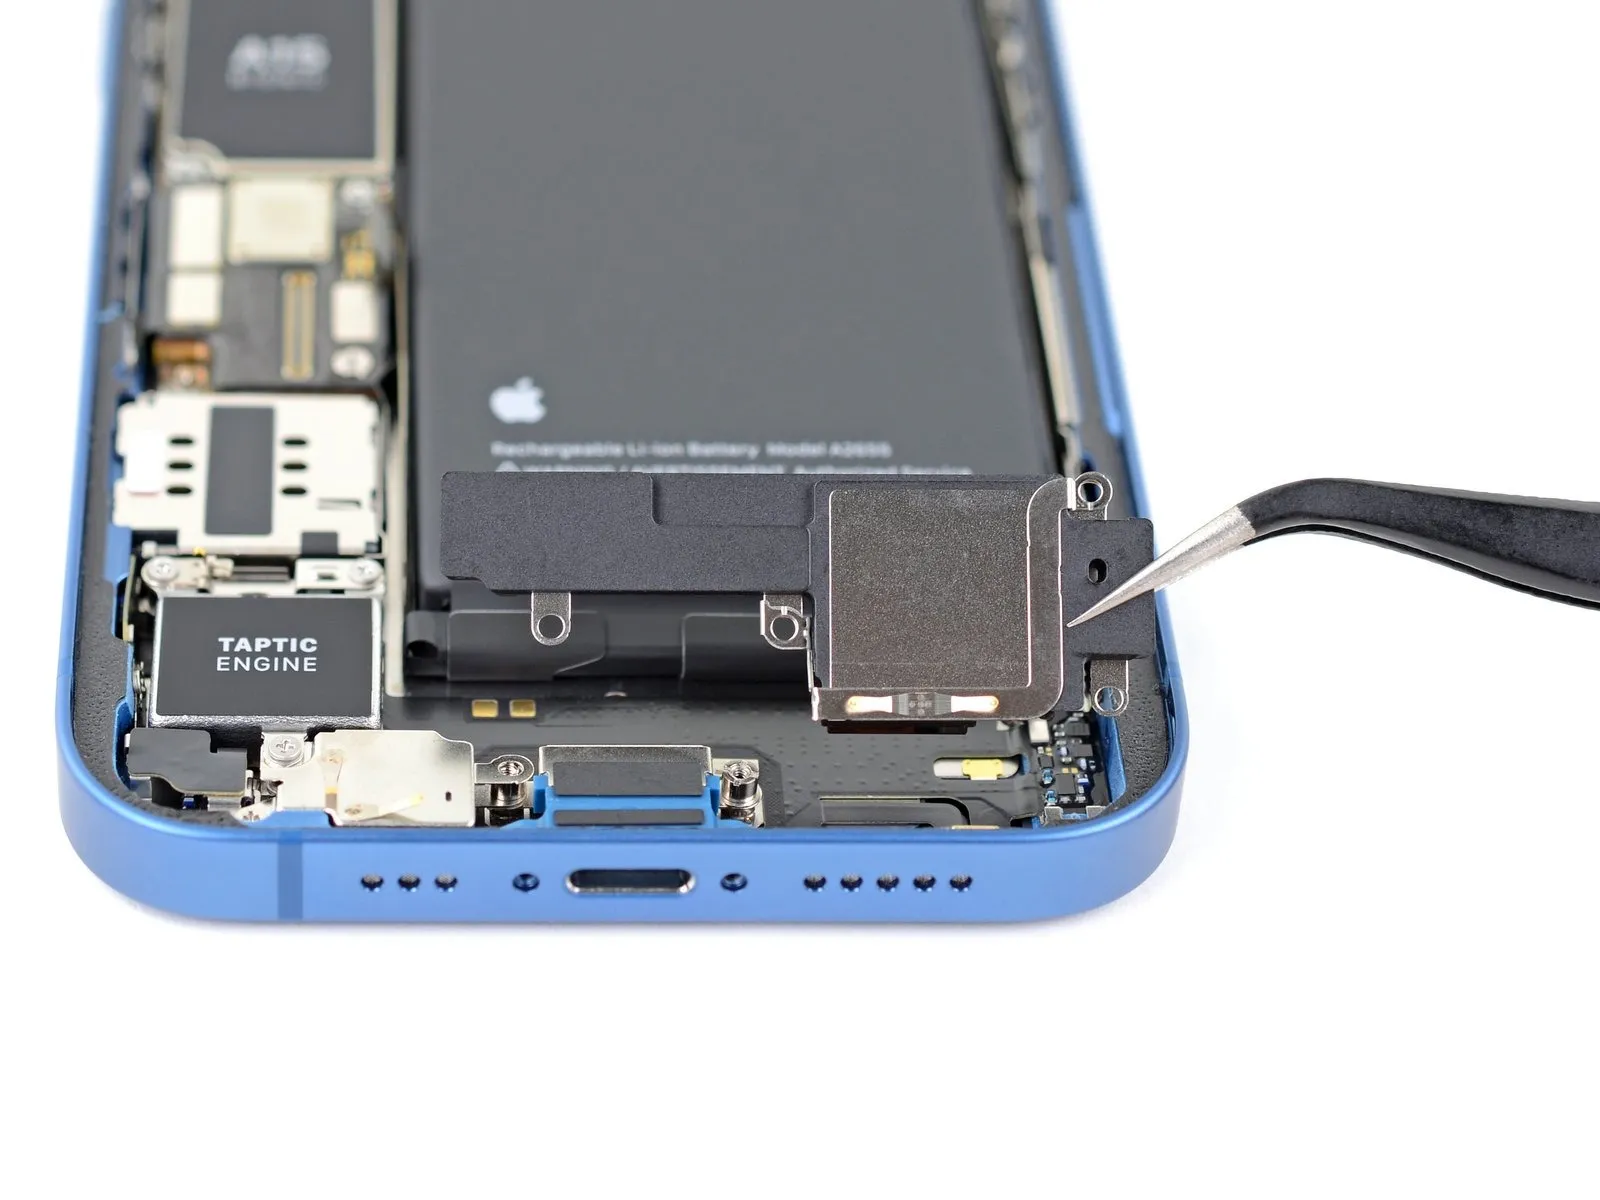
Step 28 | Locate the adhesive pull-tabs
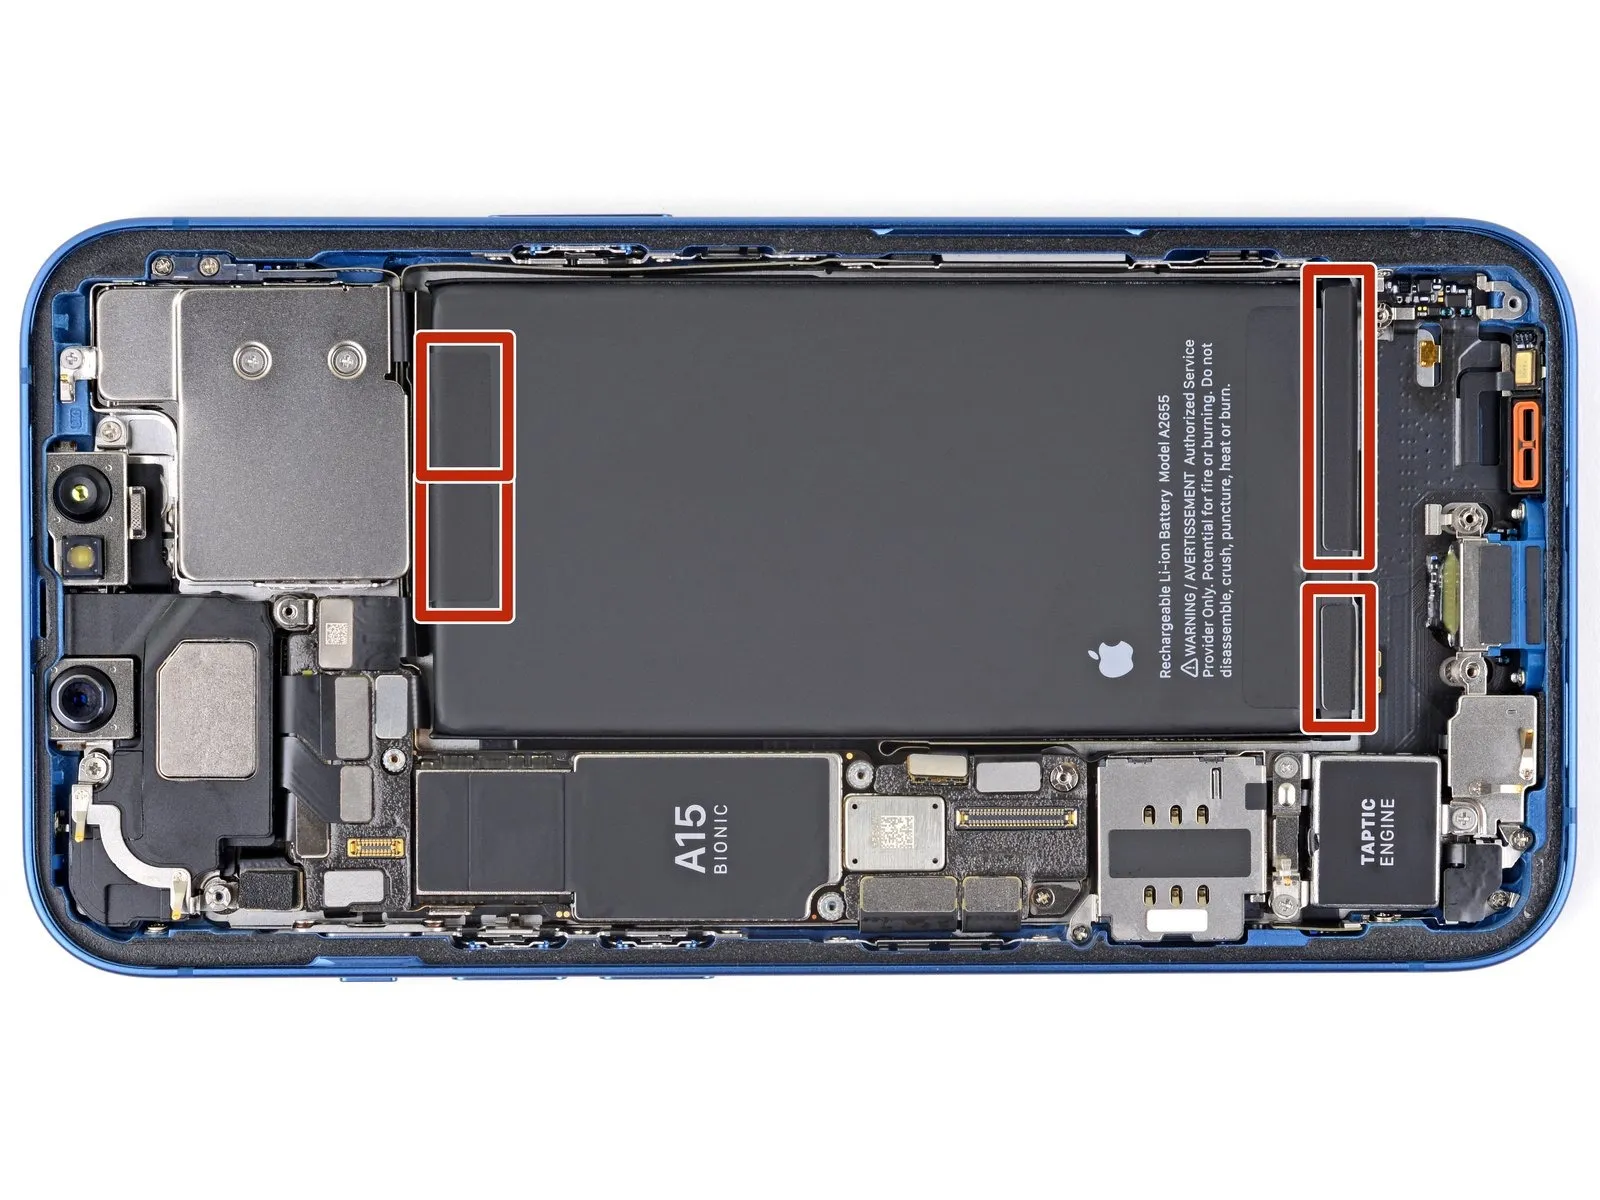
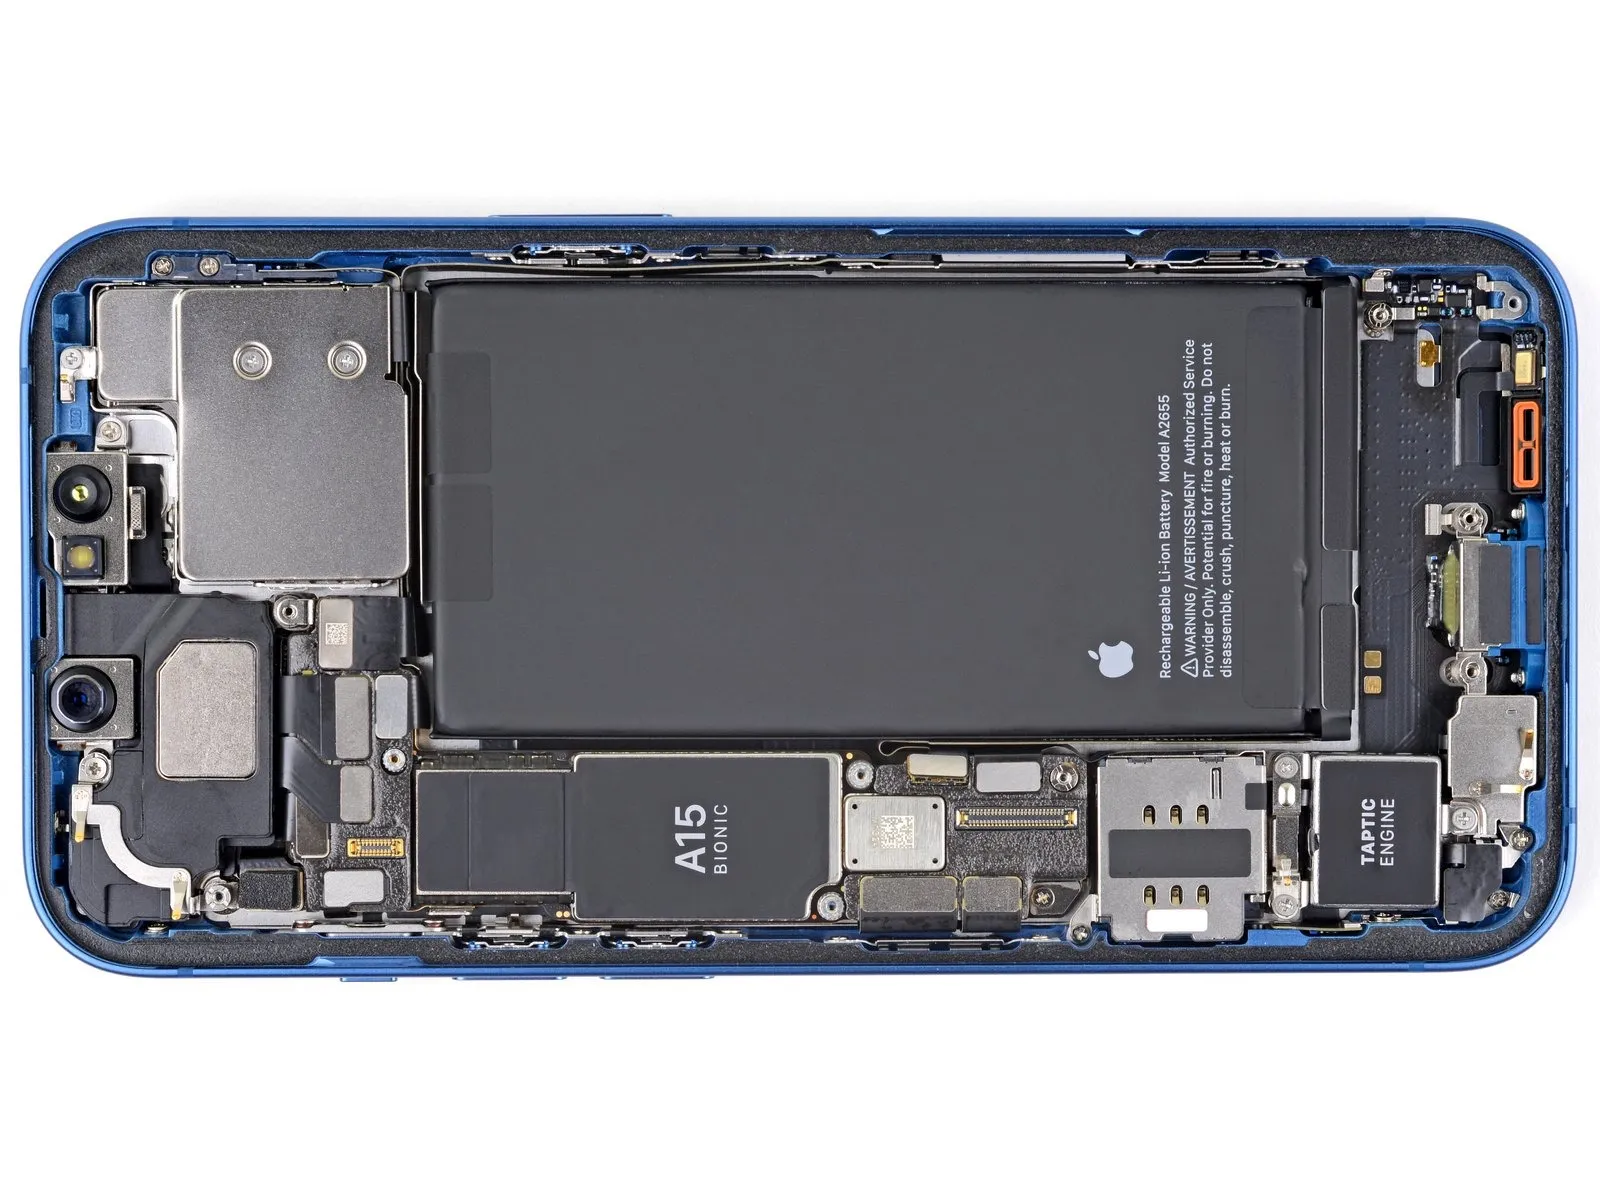
- Four stretch-release adhesive strips fasten the battery to the rear case; two are positioned along the battery's lower border and the remaining two along its upper border.
- A small, black pull-tab extends from the end of each adhesive strip, initially attached to the battery's edge.
- The subsequent instructions detail pulling each tab, which will gradually extend the adhesive layer beneath the battery; these adhesives, similar to command strips, diminish their holding power when stretched, facilitating battery removal.
- Should an adhesive strip tear during the process, proceed without concern, as their performance can be inconsistent; further guidance for dealing with broken strips is provided later.
Step 29 | Remove the stretch-release adhesive
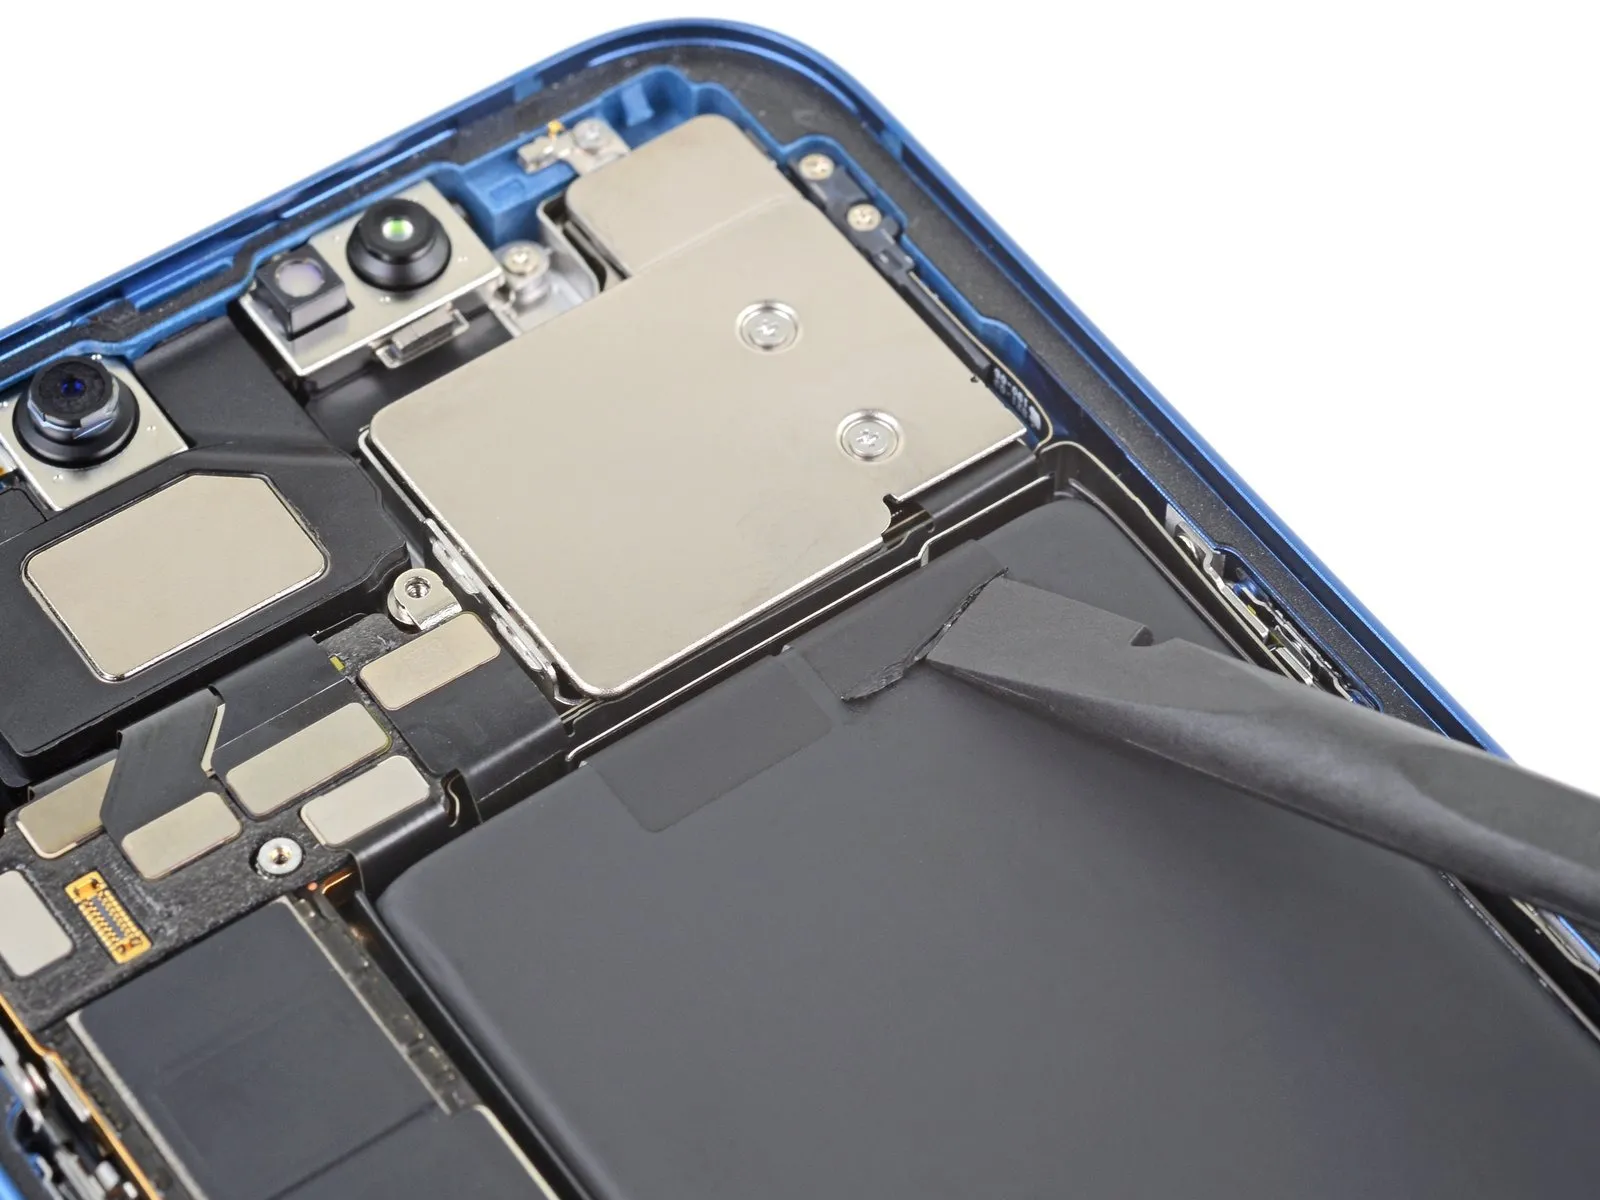
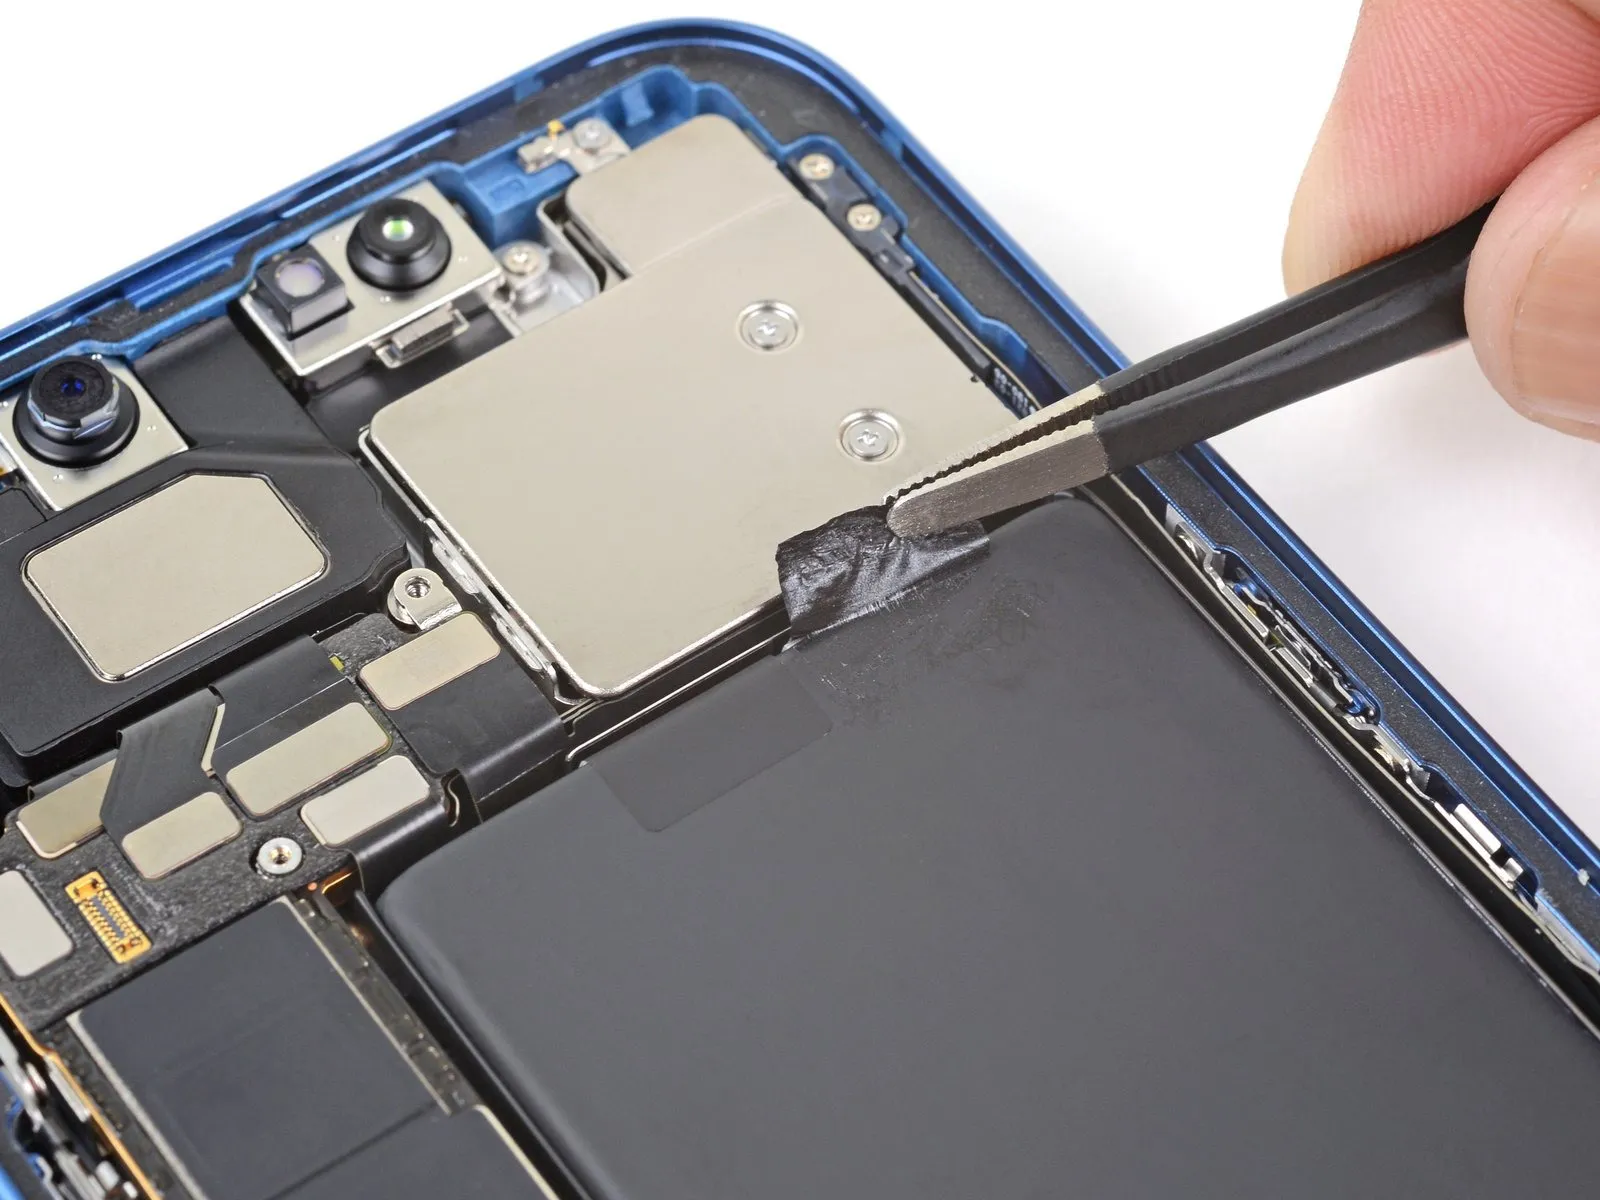
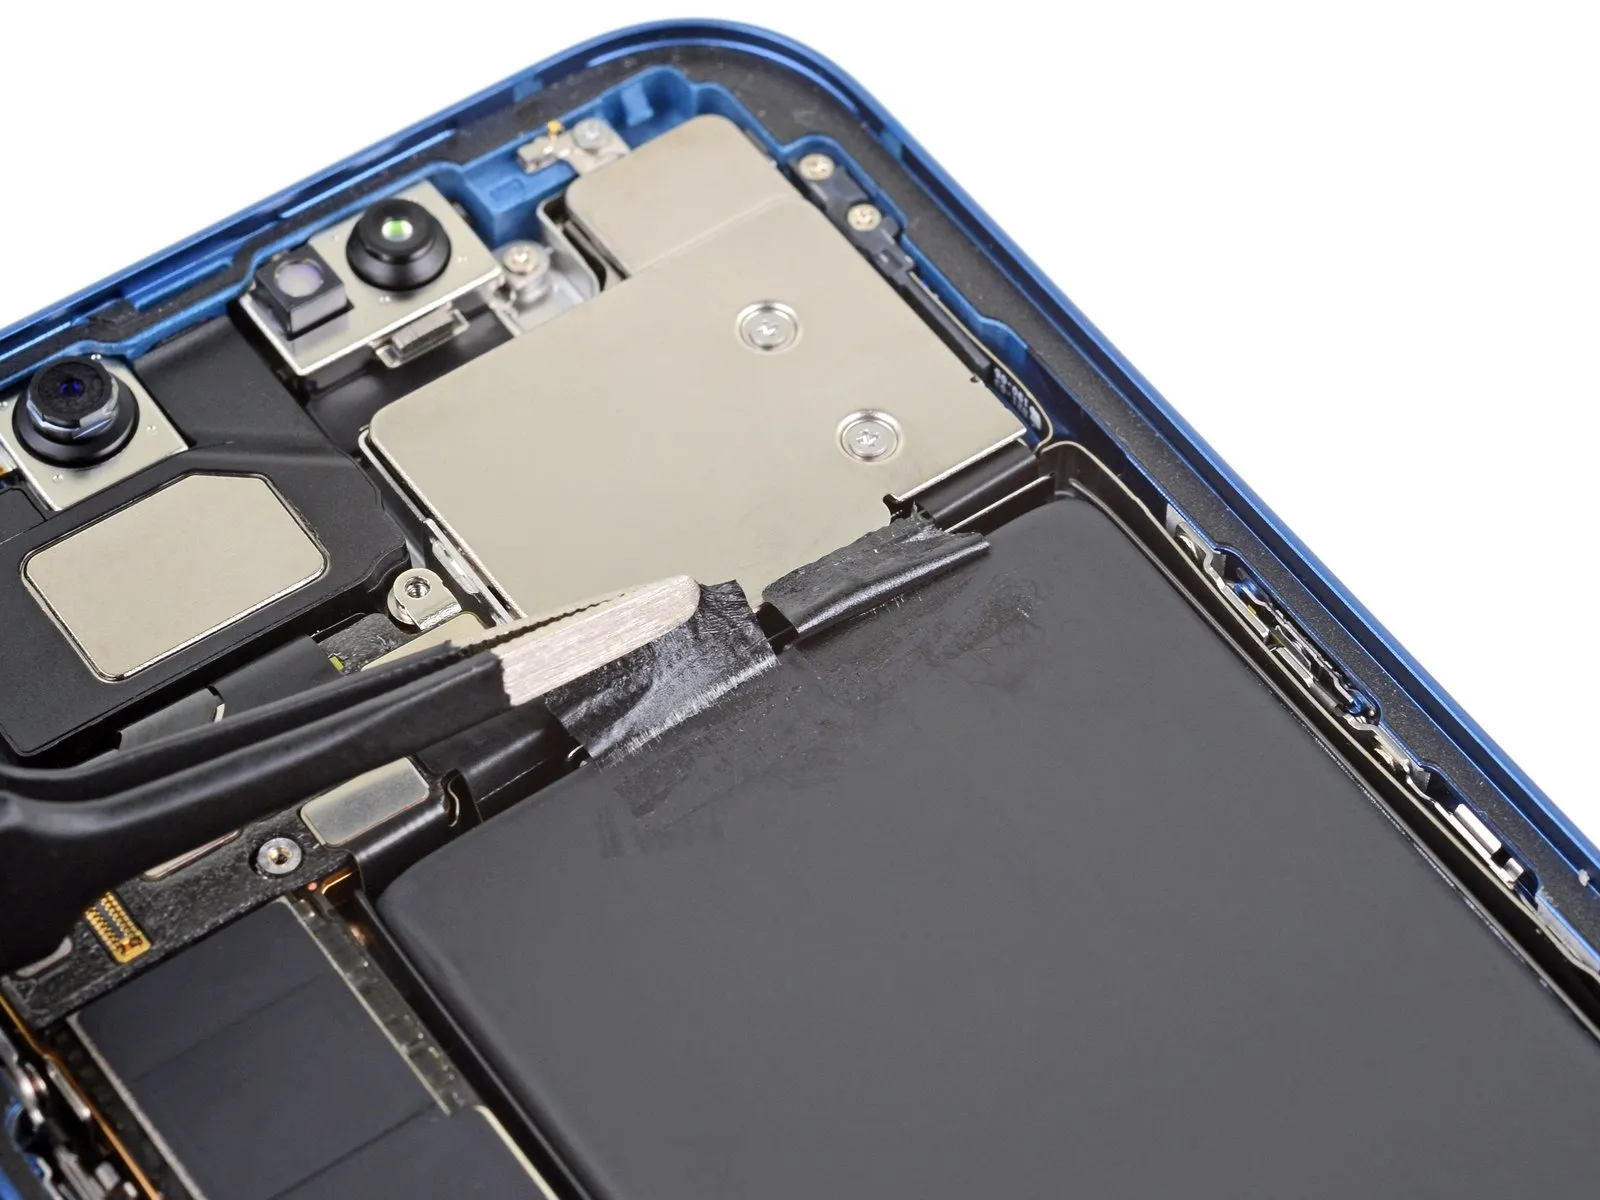
- Important safety notice:Avoid using pointed implements on the battery, as penetration could result in the release of hazardous substances or ignition.
- Employ the broad, planar end of a spudger to carefully elevate the right-hand edge of the battery adhesive pull-tab, facilitating a secure grip with blunt tweezers.Detach the battery adhesive pull-tab by peeling it downwards, separating it from the battery's upper surface.Perform the same procedure to release the battery adhesive pull-tab located on the left side of the battery.
- The battery adhesive pull-tabs are designed for single use and should not be reattached.
- Damage to the battery presents a risk of chemical leakage and potential fire hazard; exercise extreme care.
Step 30
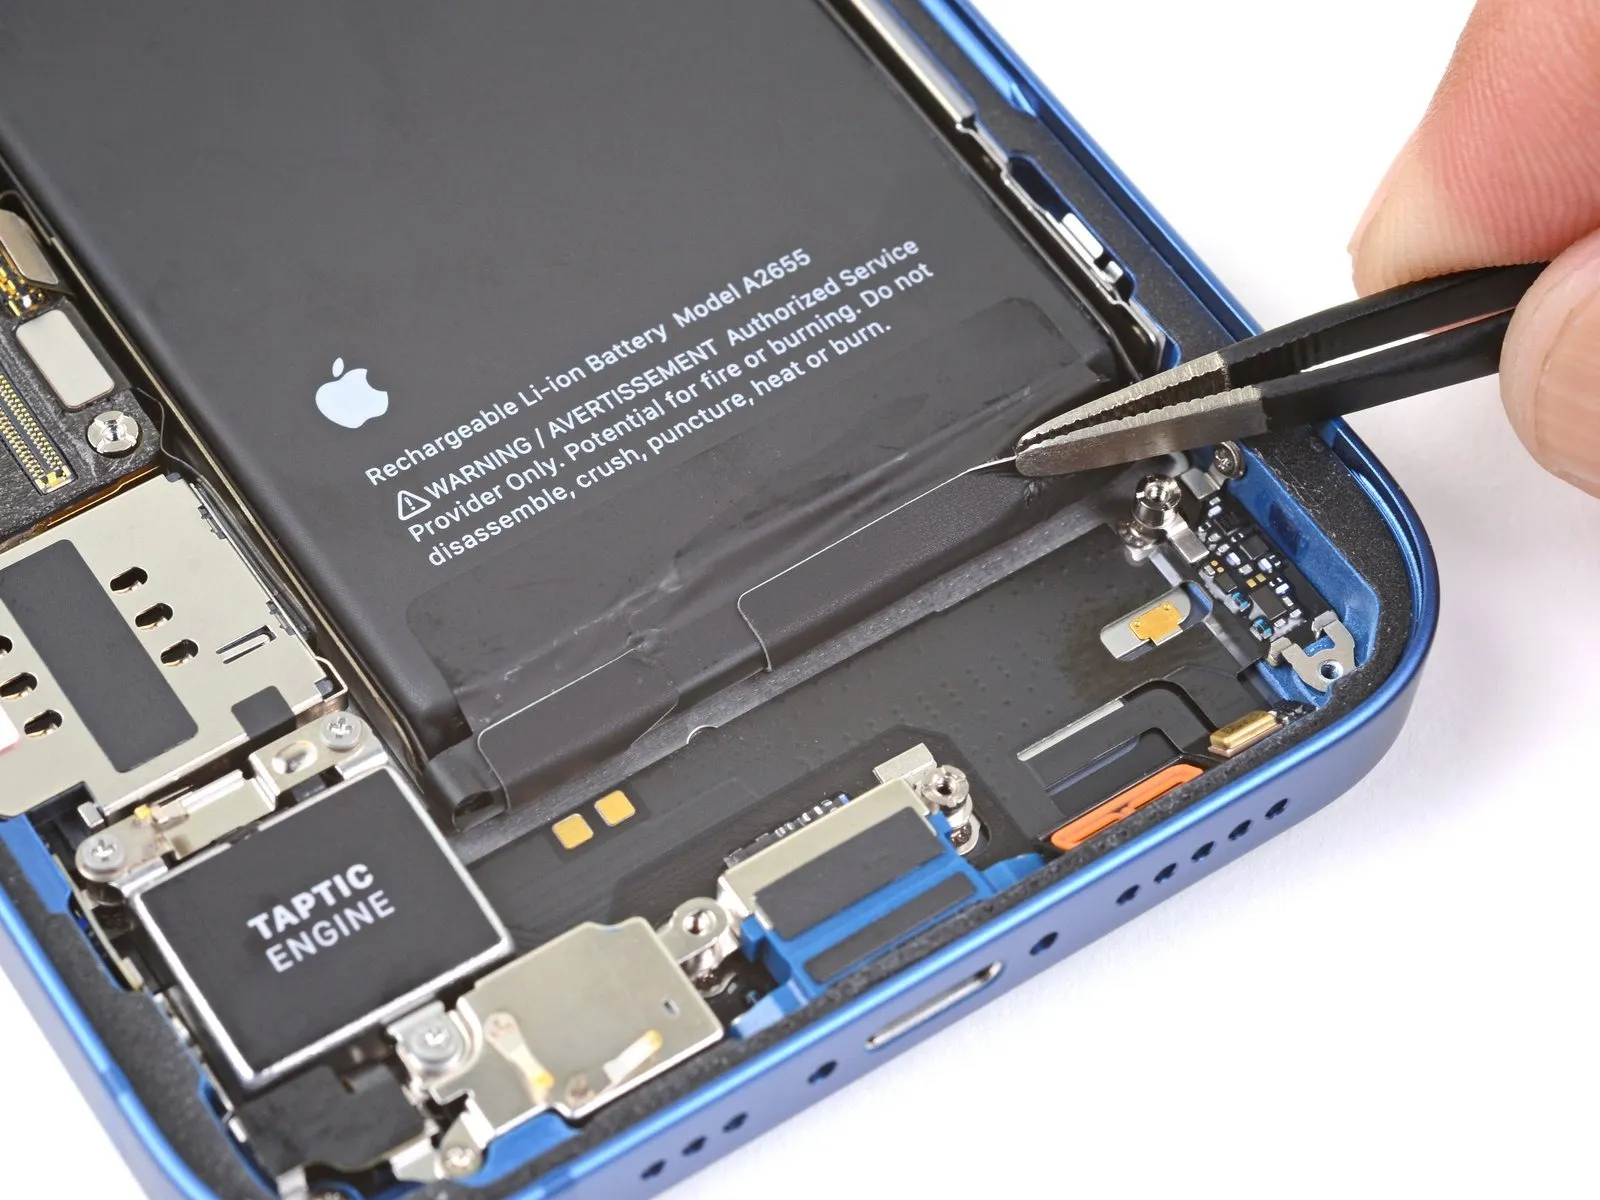
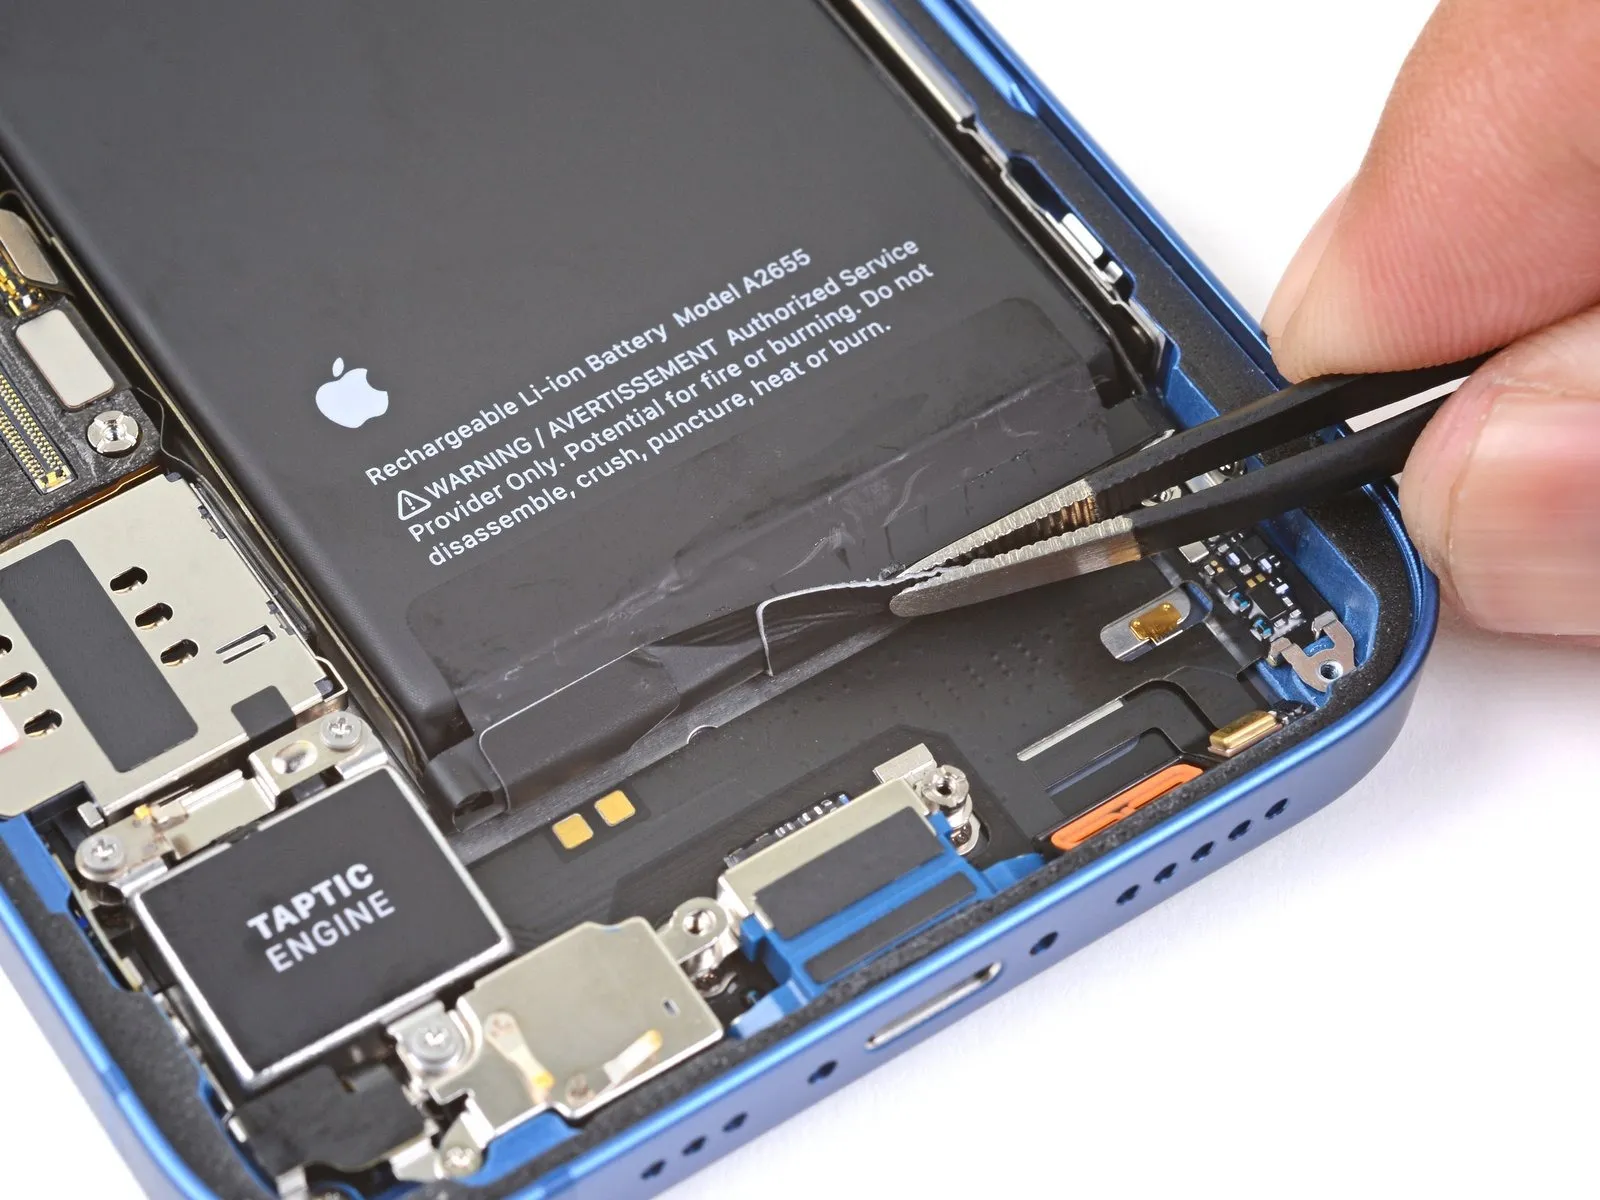
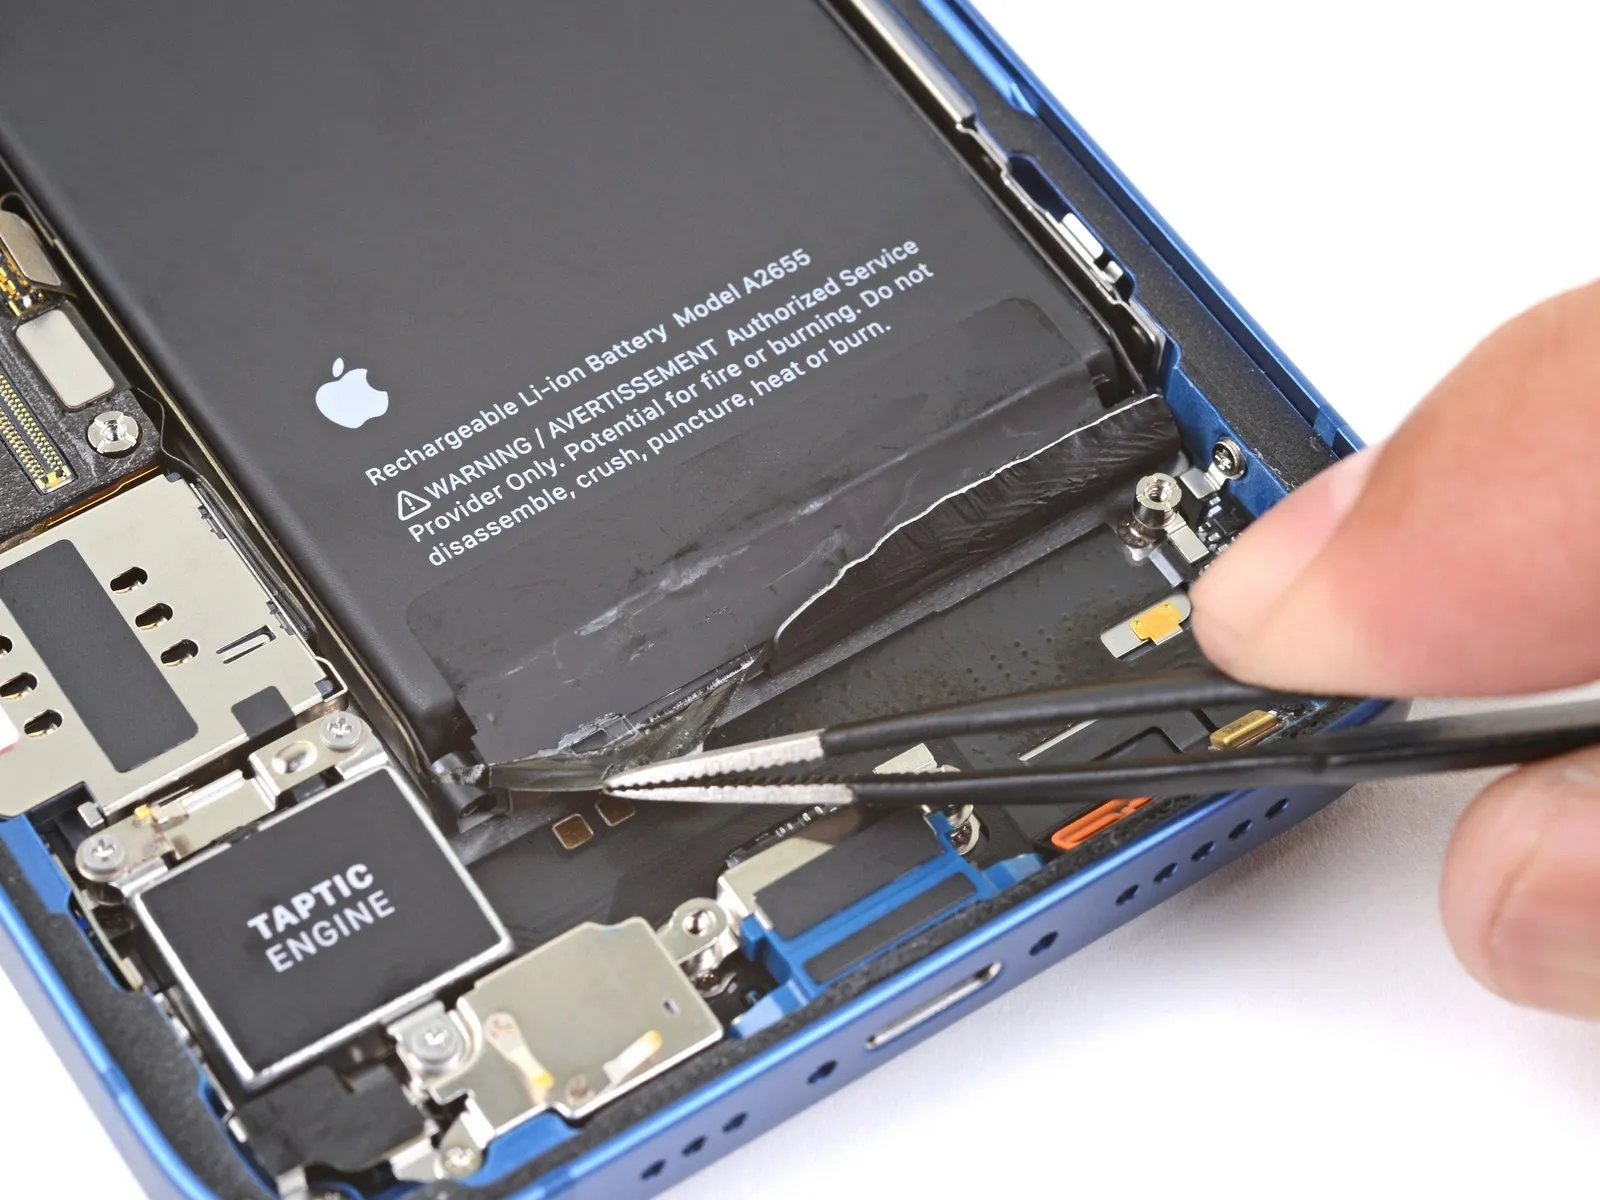
- To release the battery from its adhesive backing, detach the two remaining pull-tabs from the lower edge.
Step 31
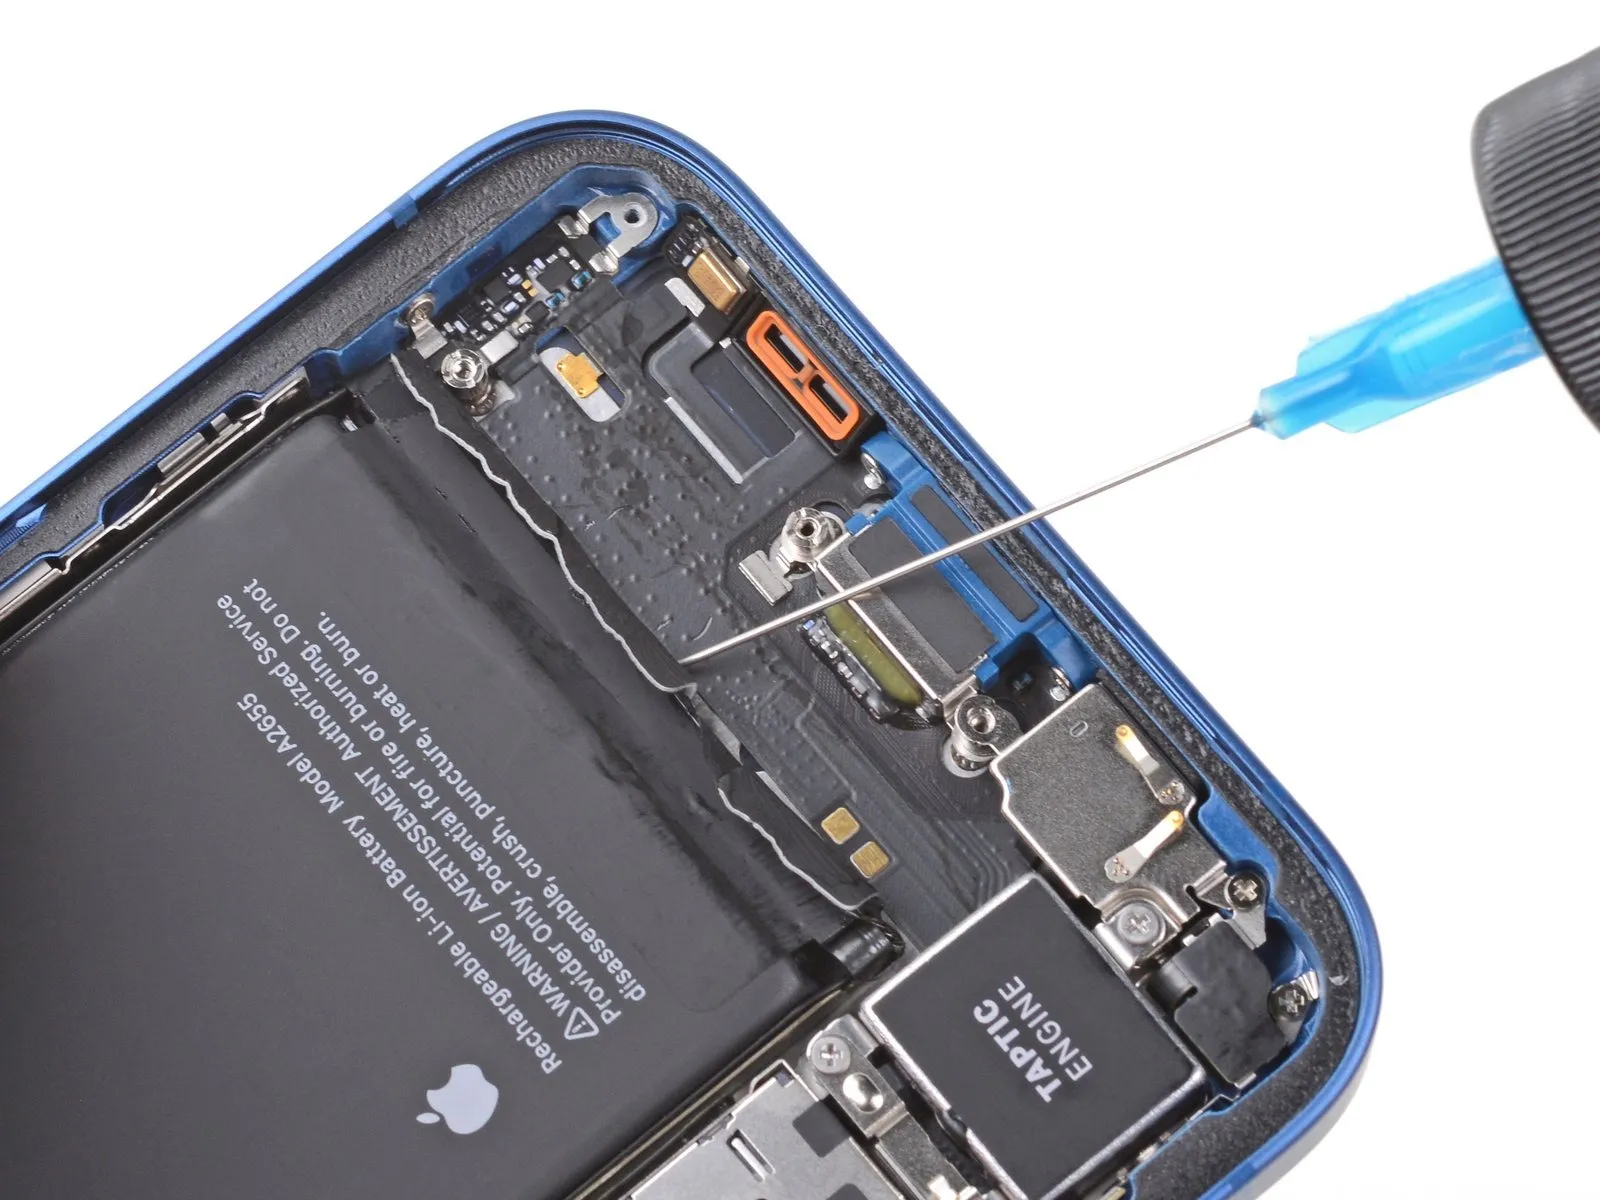
To potentially ease separation, elevate the phone's lower portion and introduce a small quantity of isopropyl alcohol possessing a concentration of at least 90% to the battery's lower border.Allow a sixty-second interval for the alcohol to permeate, as this facilitates the weakening of adhesive bonds, a process particularly beneficial for older devices.The solvent's purpose is to soften the adhesive securing the battery, which is most effective after a brief waiting period.
Step 32
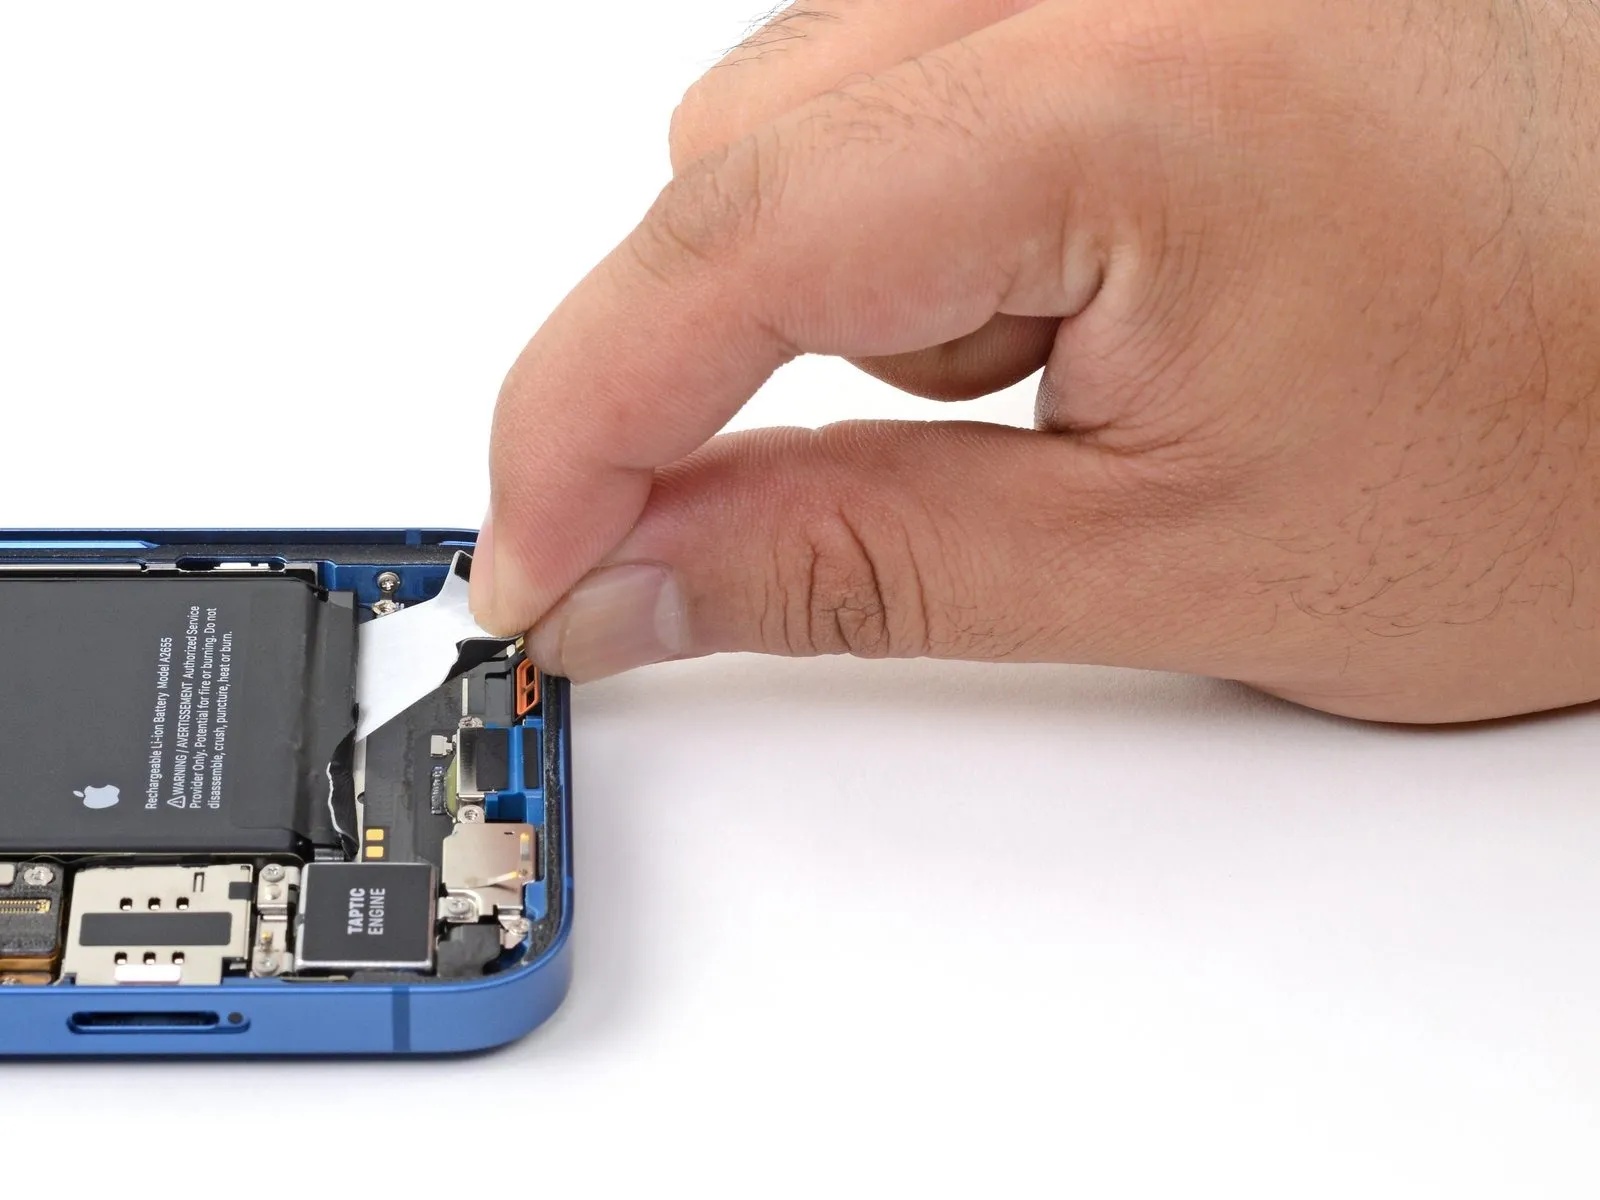
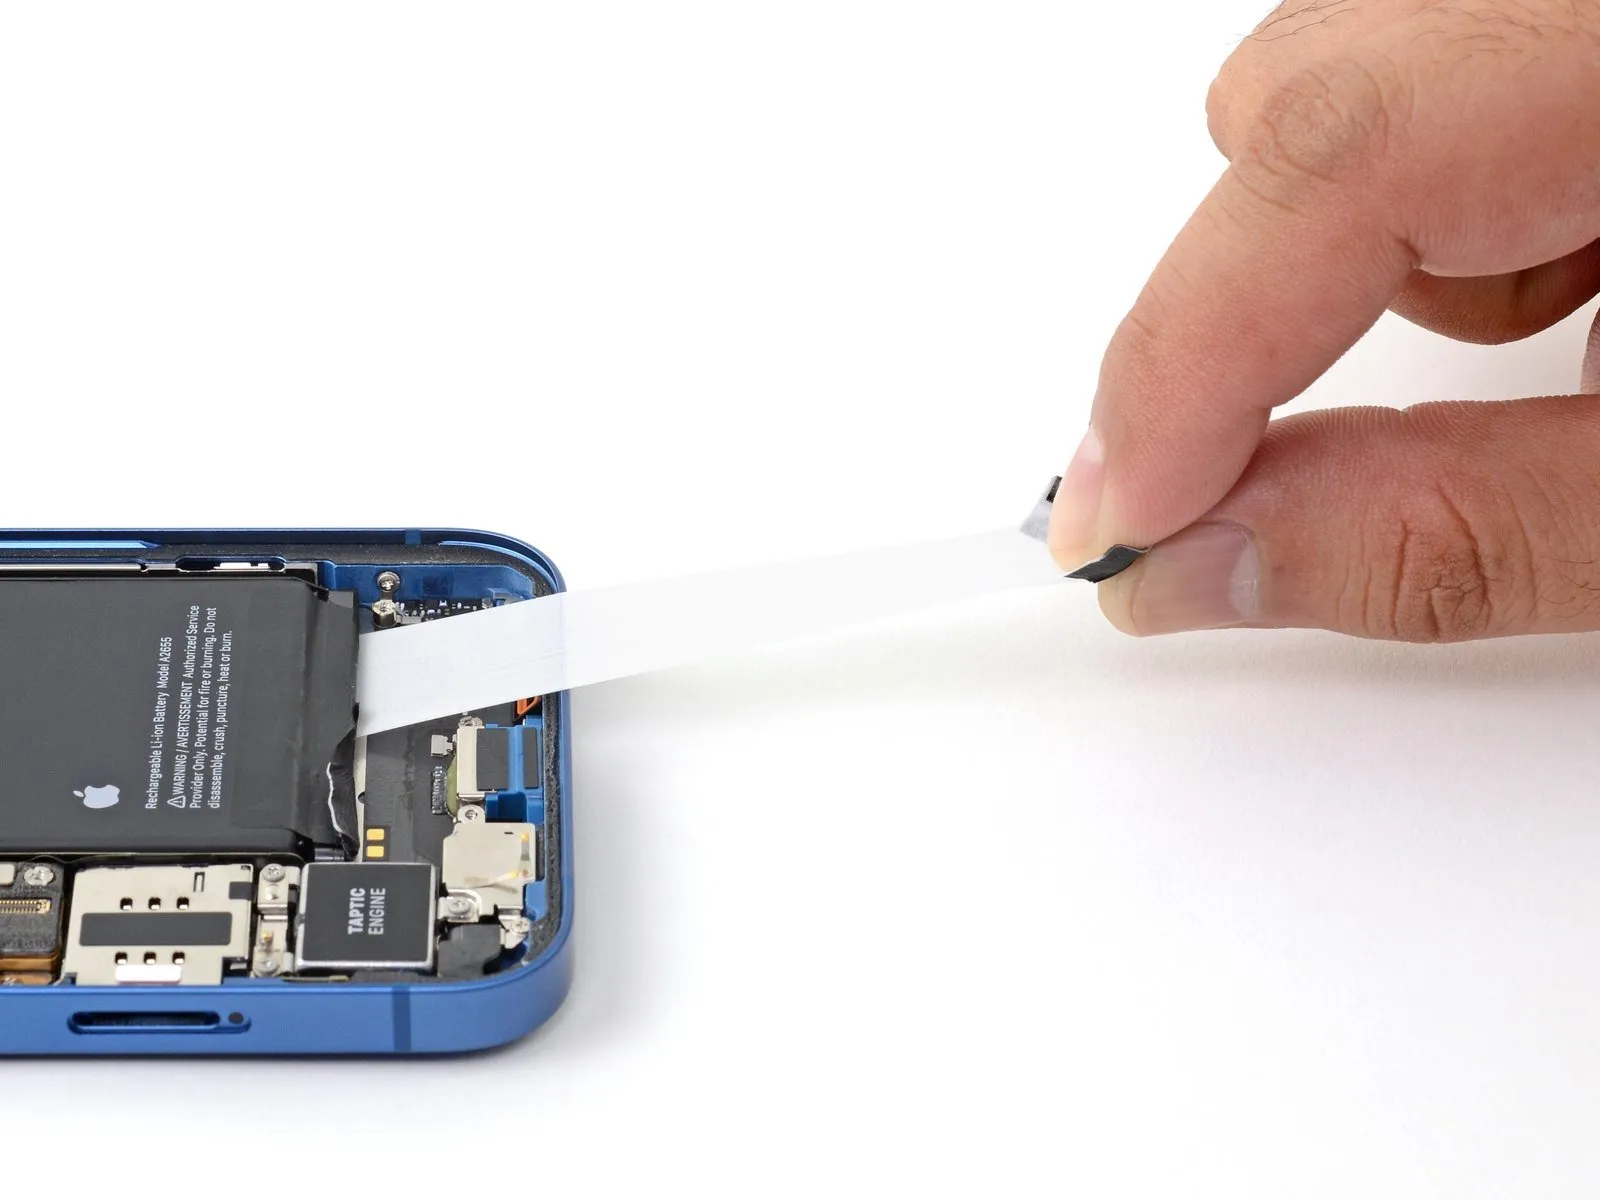
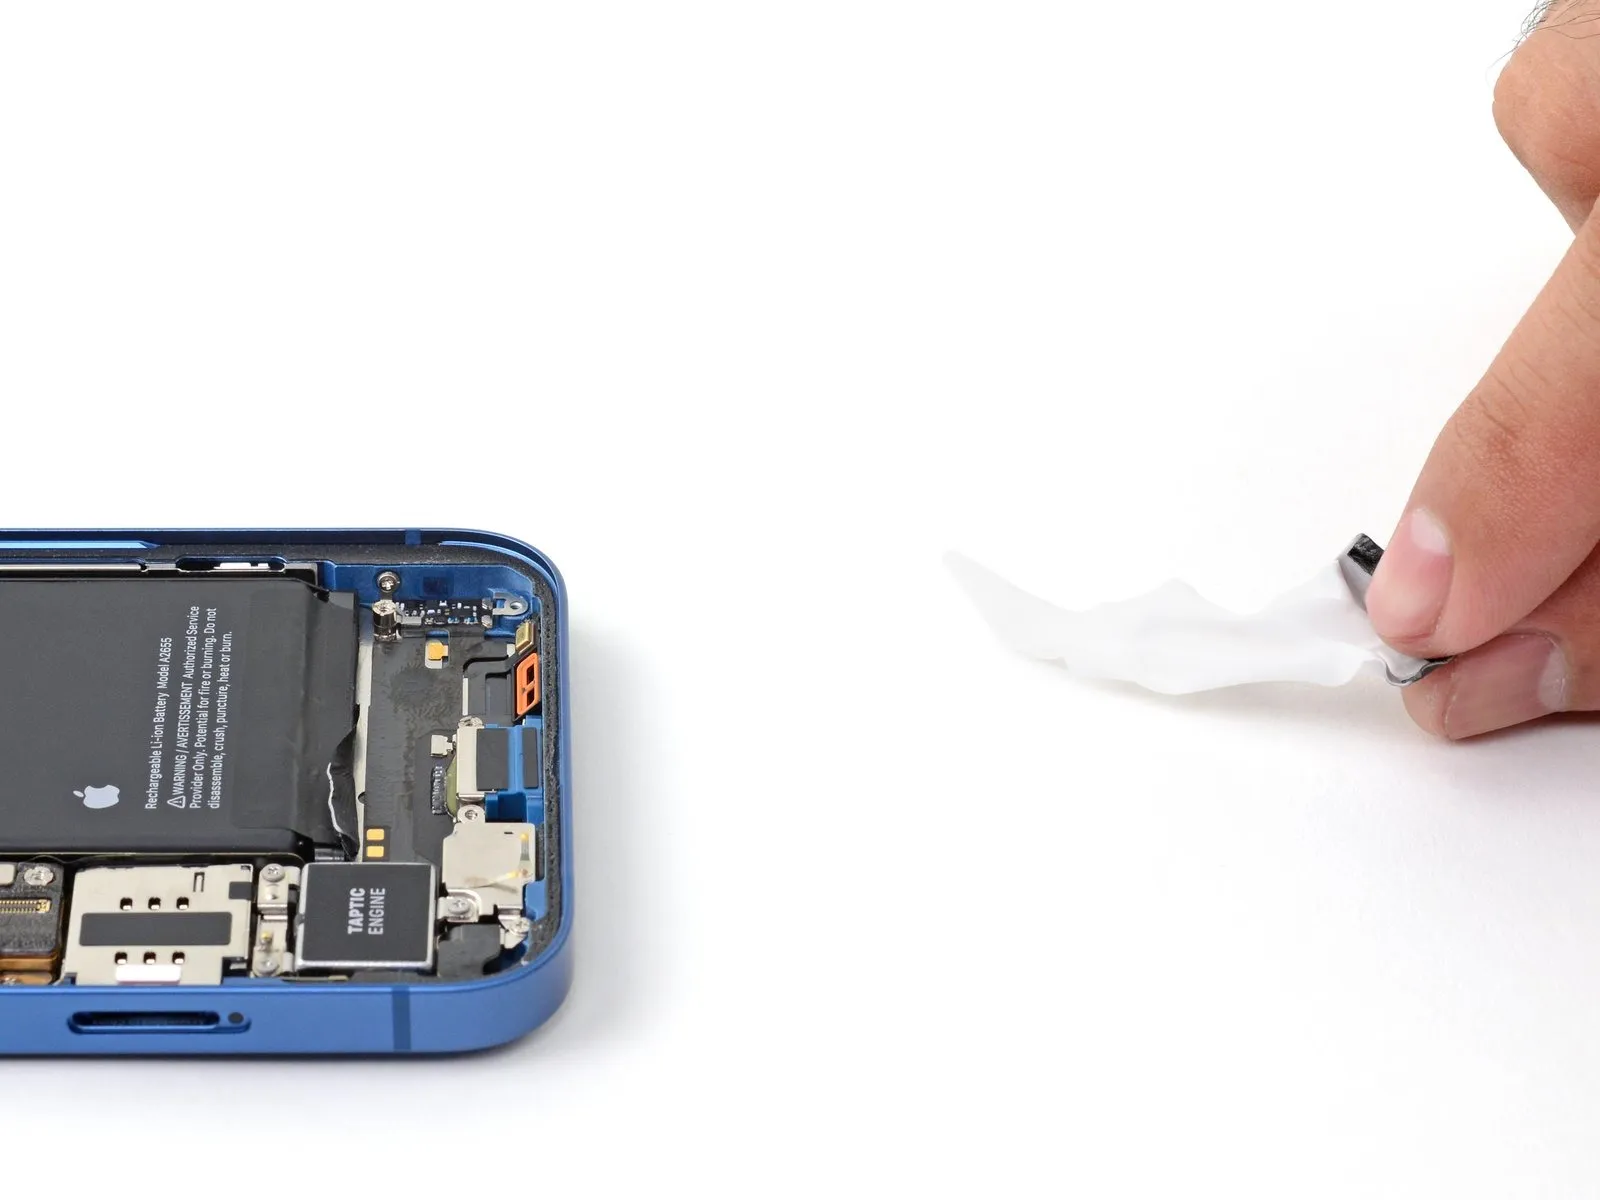
- Securely grasp the lower-right pull tab utilizing your fingertips, then gradually detach it from the battery's surface, directing it towards the iPhone's base.
- Maintain consistent tension on the adhesive strip during removal, allowing ample time for stretching and separation from beneath the battery's surface, avoiding excessive force.
- Refrain from applying pressure to the battery itself; instead, firmly secure the iPhone via its lateral edges.
- Ensure the adhesive strip remains smooth and free of creases, distributing pulling force uniformly across its entire length to prevent localized stress.
- Maintain a shallow pulling angle to minimize the likelihood of the strip catching on the battery's perimeter.
- Should the adhesive strip fracture during removal, attempt to recover the fragments with your fingers or blunt tweezers, and resume pulling, but avoid prying beneath the battery.
- In the event that broken adhesive strip segments become irretrievable from under the battery, proceed with removing the remaining strips and follow subsequent instructions.
Step 33
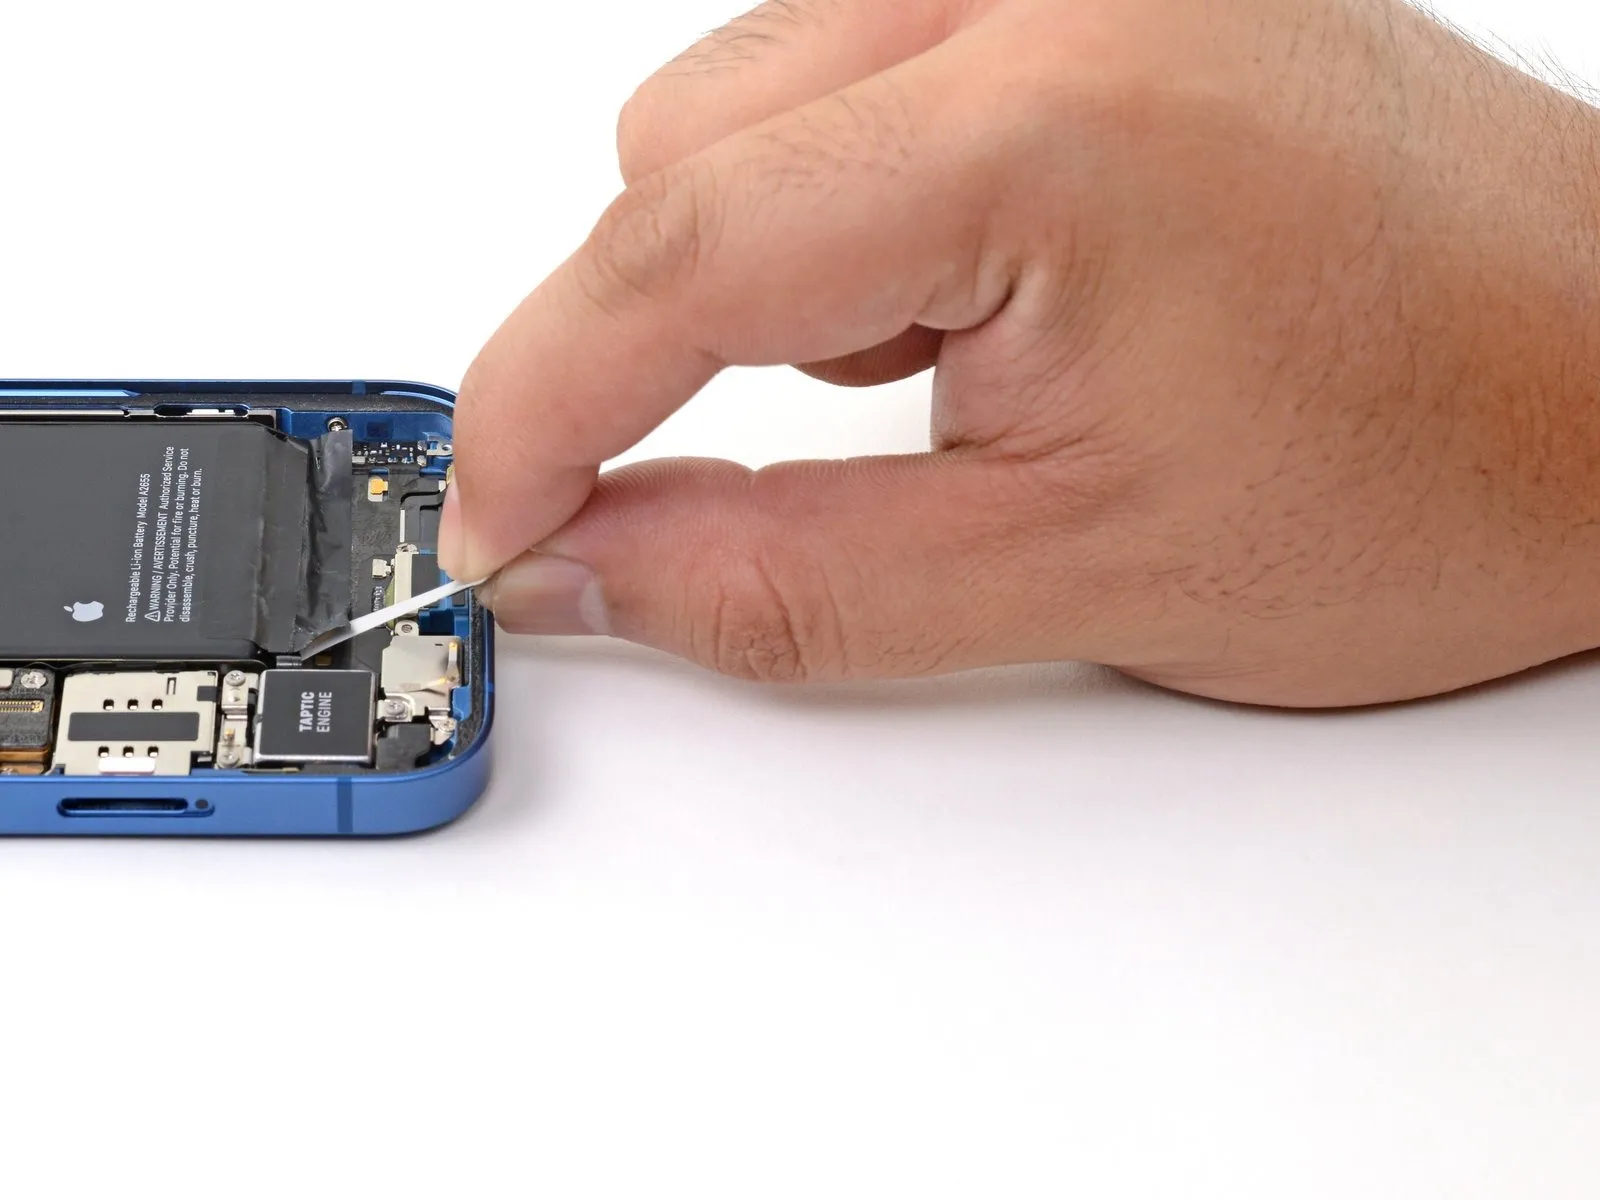
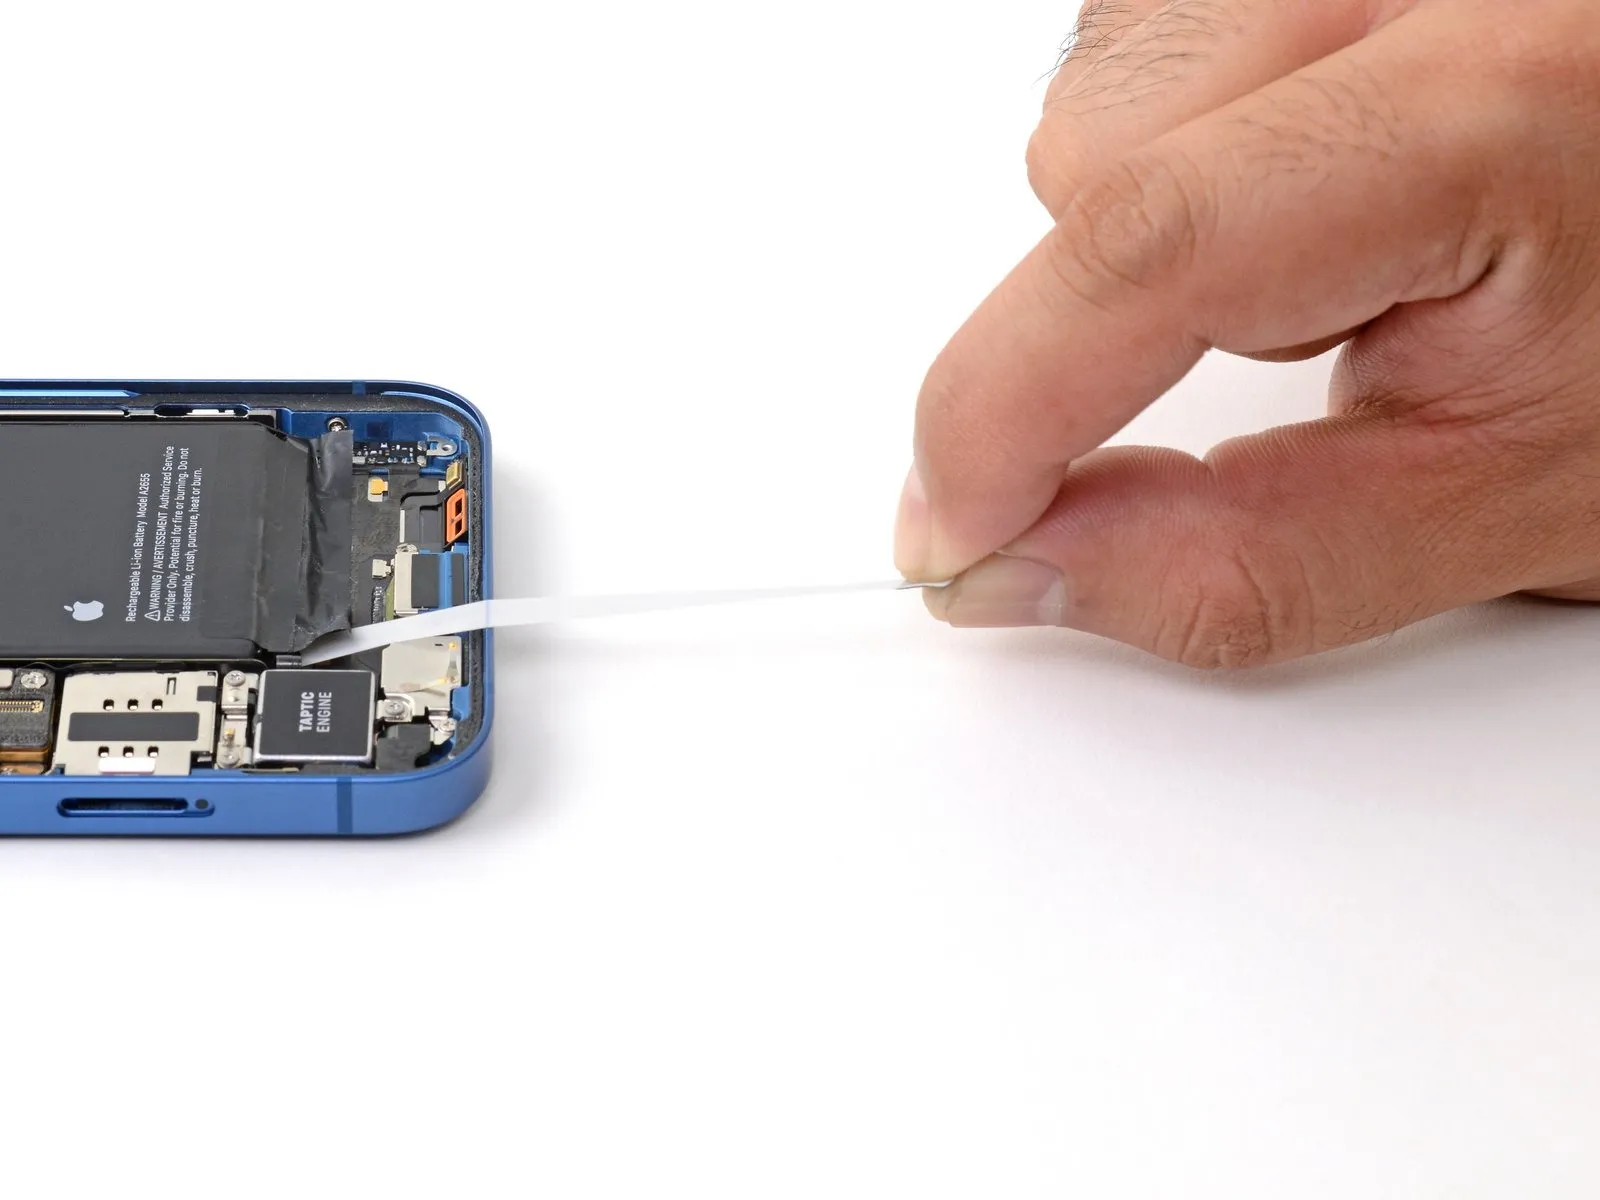
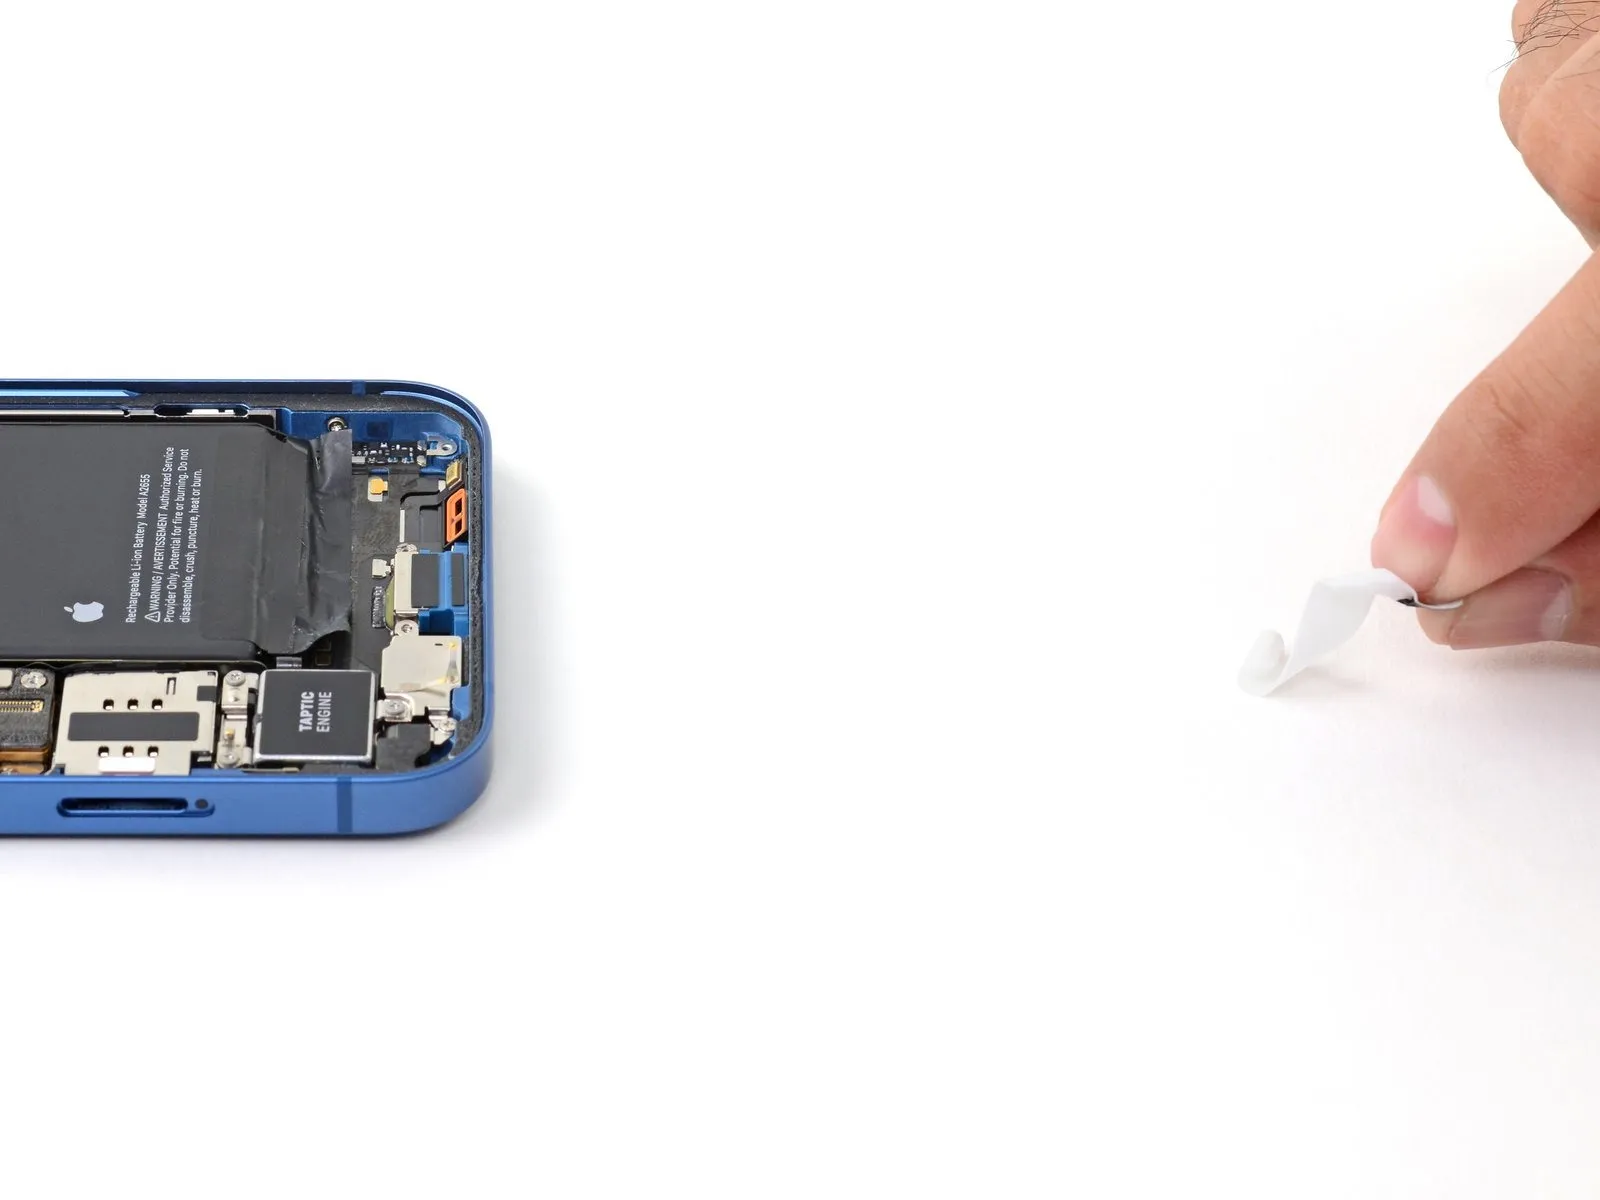
- Employ your fingers to grasp the lower-left pull-tab, then detach it from the battery's surface, directing it downwards along the iPhone's base.
- Replicate the technique utilized for the prior strip, ensuring the battery remains undisturbed, the strip maintains a smooth, wrinkle-free profile, and the pulling action is performed at a shallow inclination.
- Should the adhesive strip fracture during removal, attempt to recover the fragments with your fingers or blunt tweezers; proceed with pulling, avoiding any leverage applied beneath the battery.
- In the event that the adhesive layer detaches from beneath the battery and becomes irretrievable, advance directly to the subsequent repair stage.
Step 34
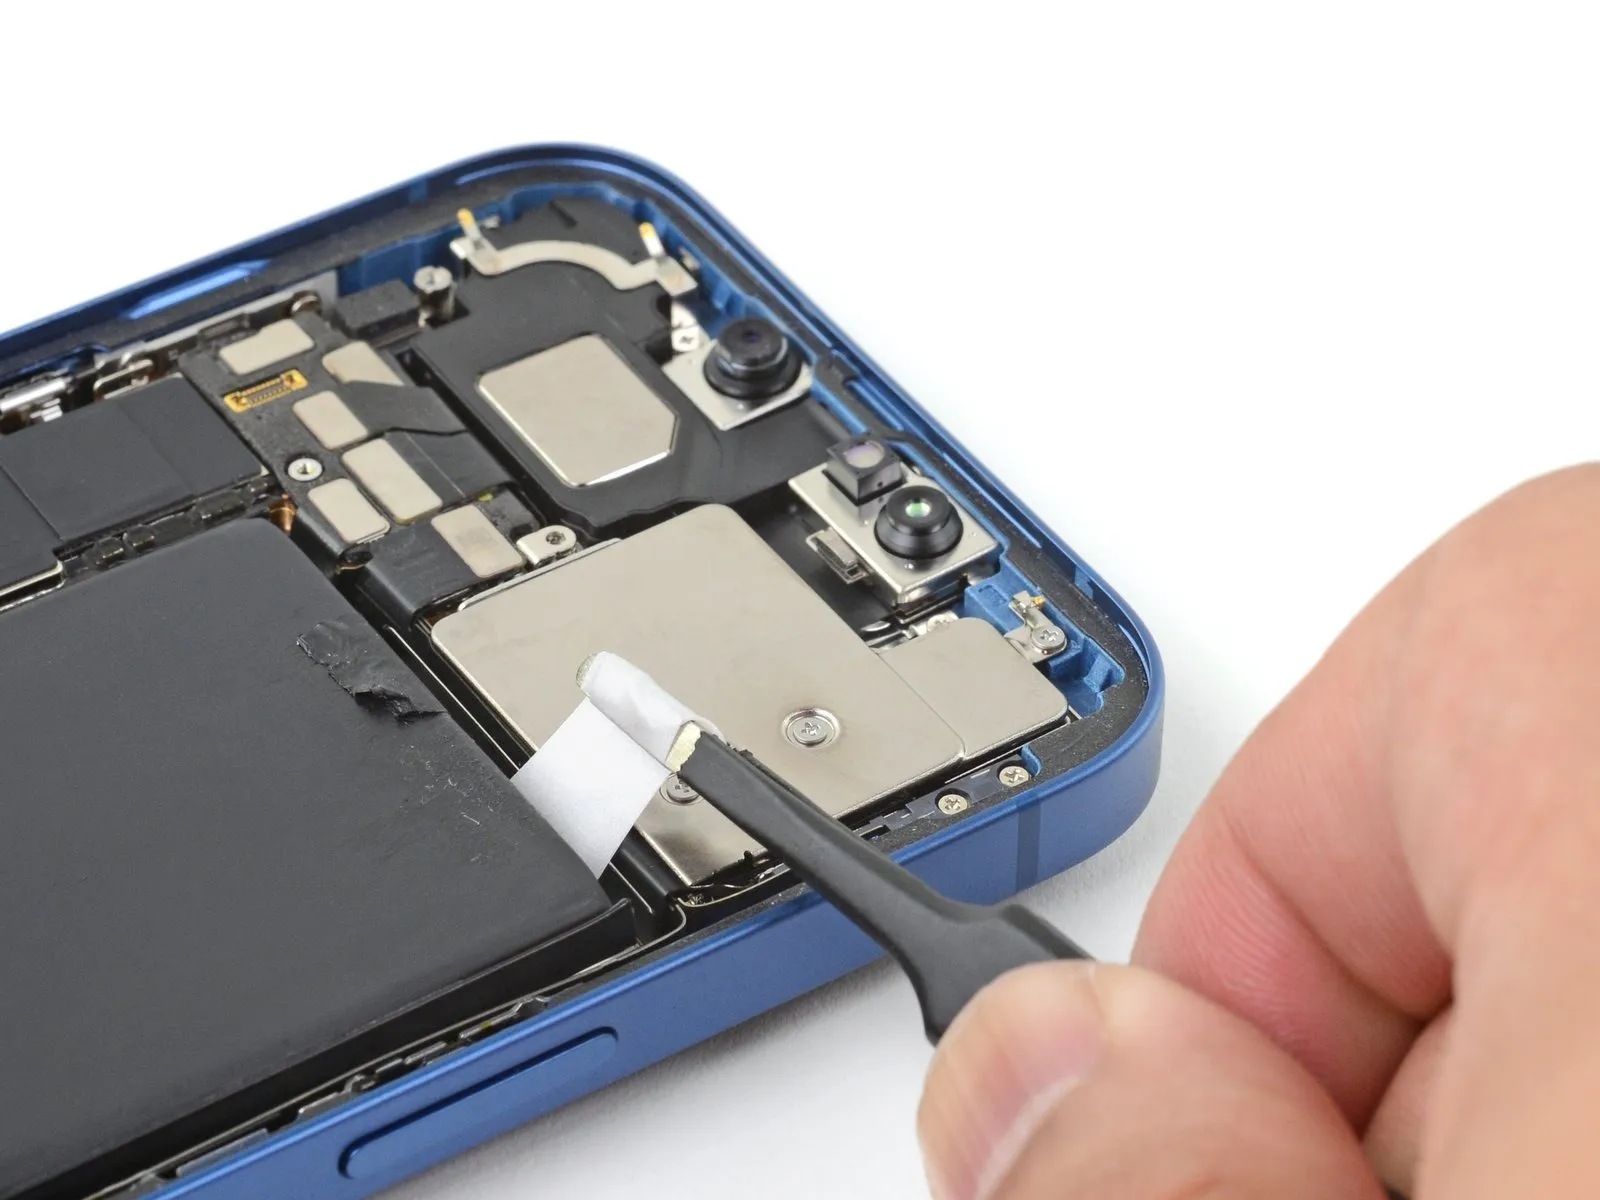
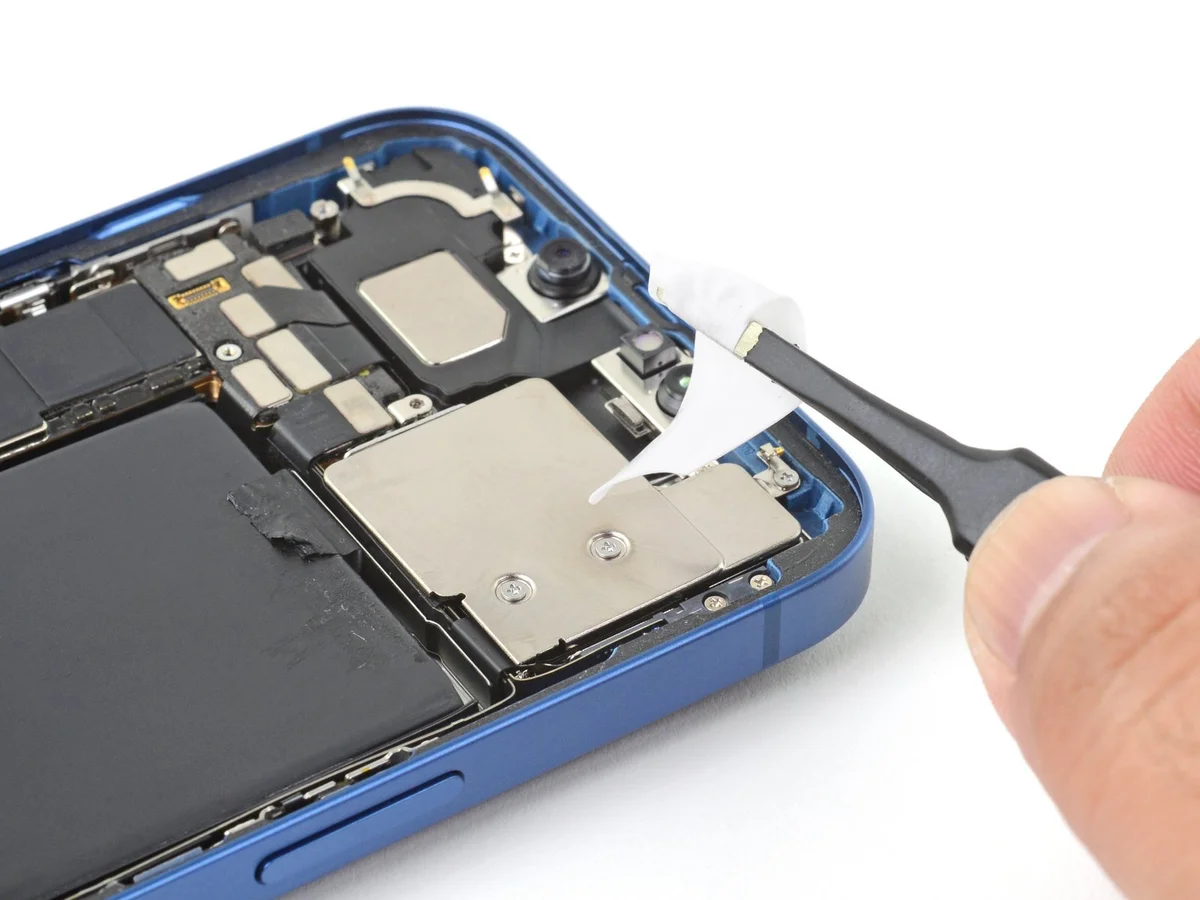
- For enhanced grip during removal, the pull-tabs may be secured to the blunt tweezers' ends.
- Employing blunt tweezers, grasp the full extent of the pull-tab's width to ensure a firm hold.
- To facilitate extraction, carefully enclose both the pull-tab and the adhesive strip around the blunt tweezers' pointed ends.
- Following the established method, draw the upper-right pull-tab outward, extending the adhesive strip for its complete detachment, while avoiding contact that could damage its integrity.
Step 35
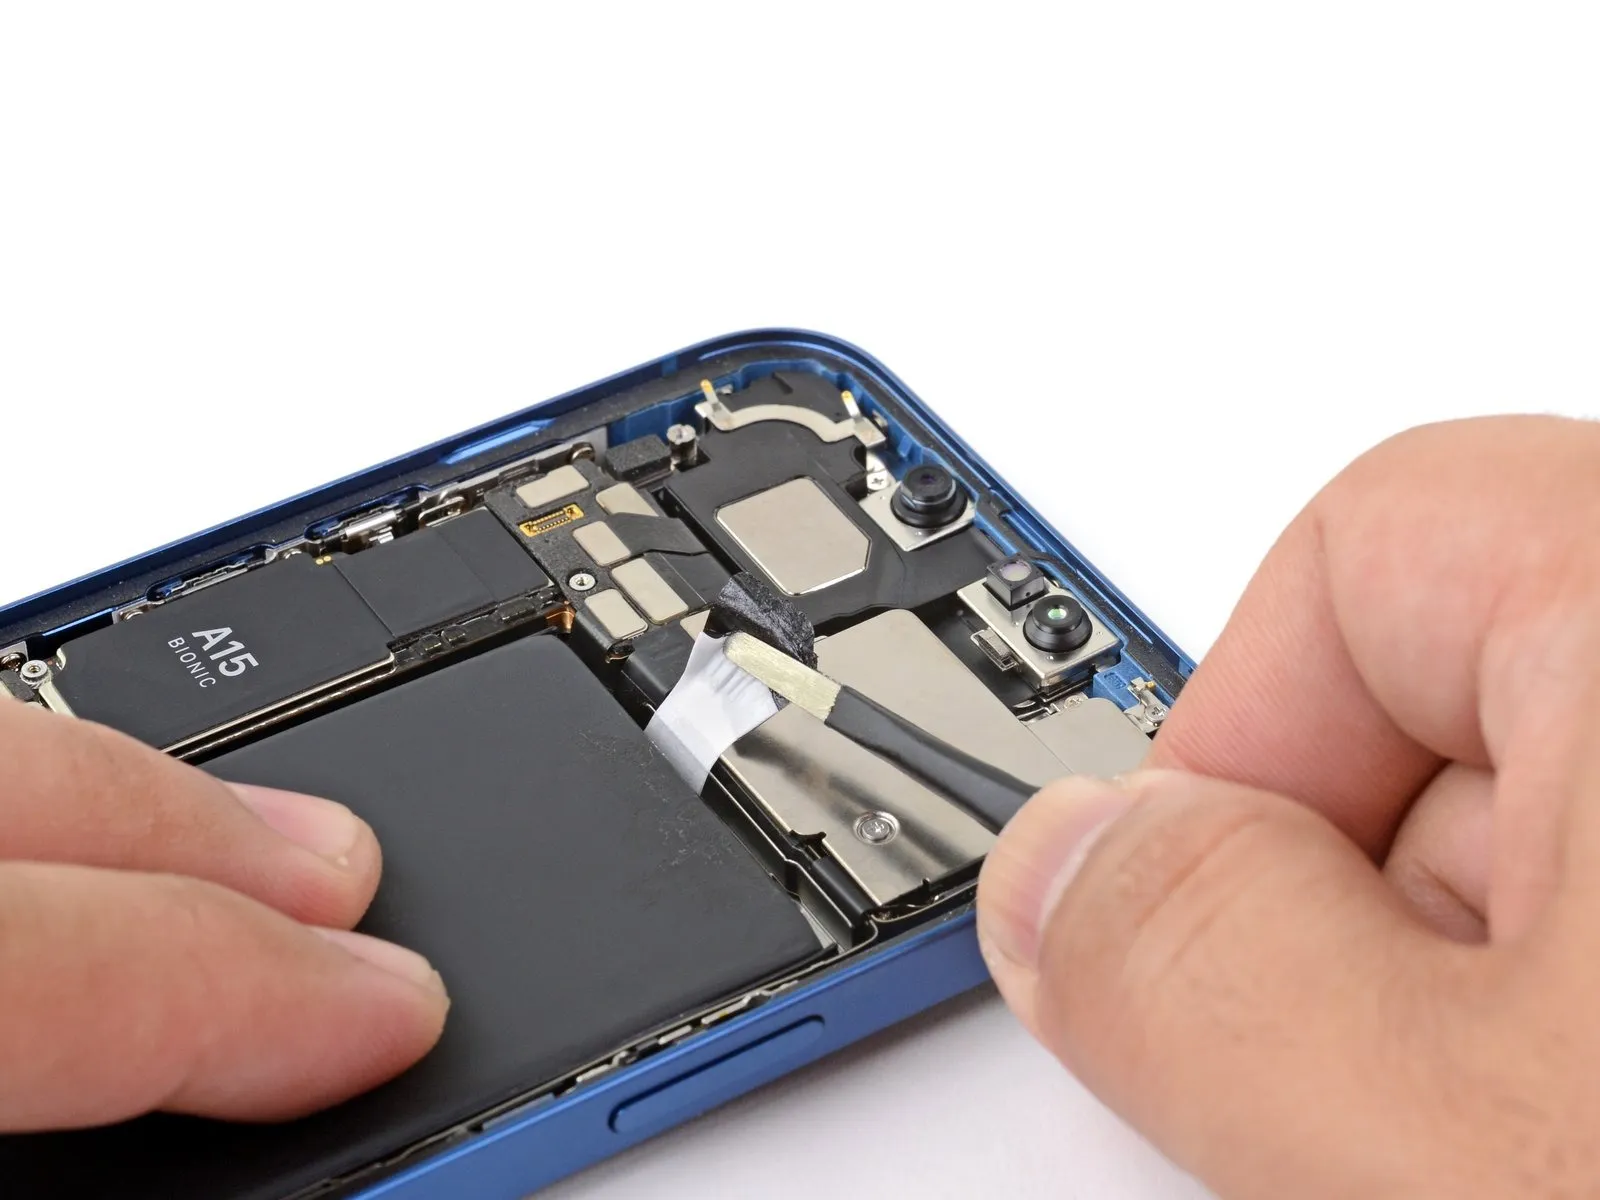
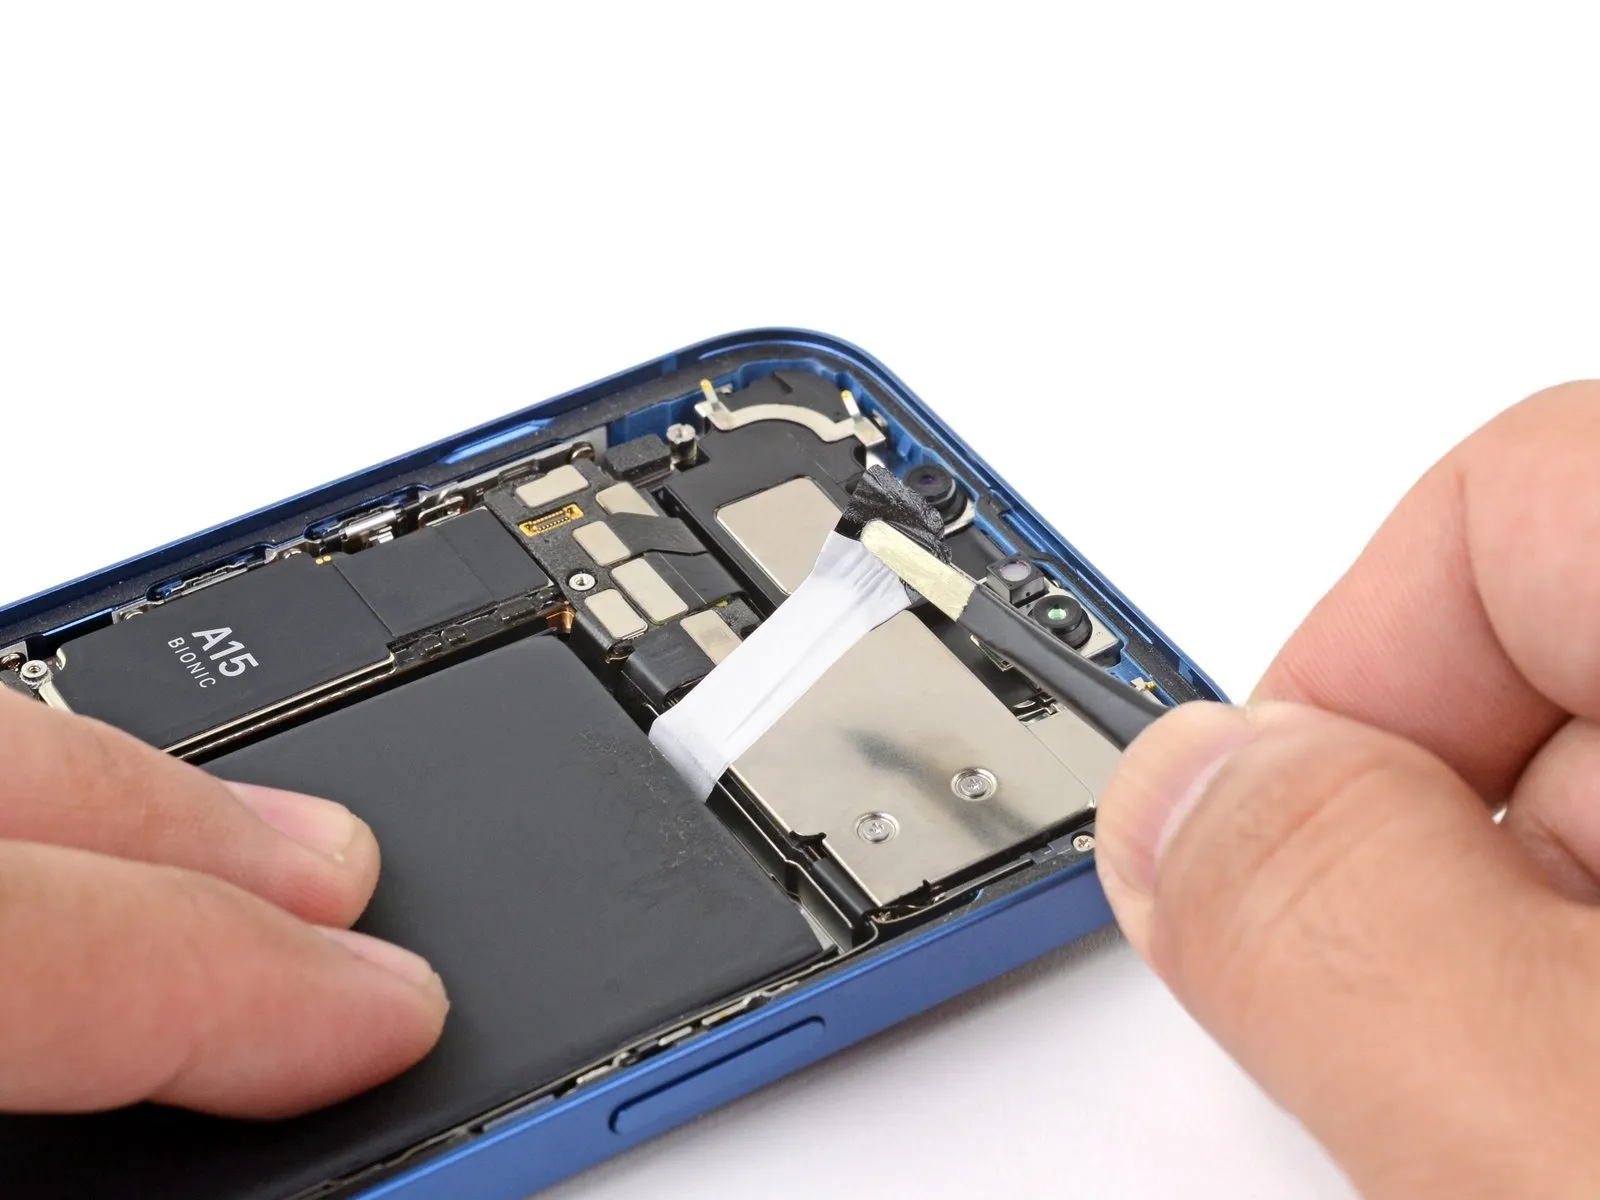
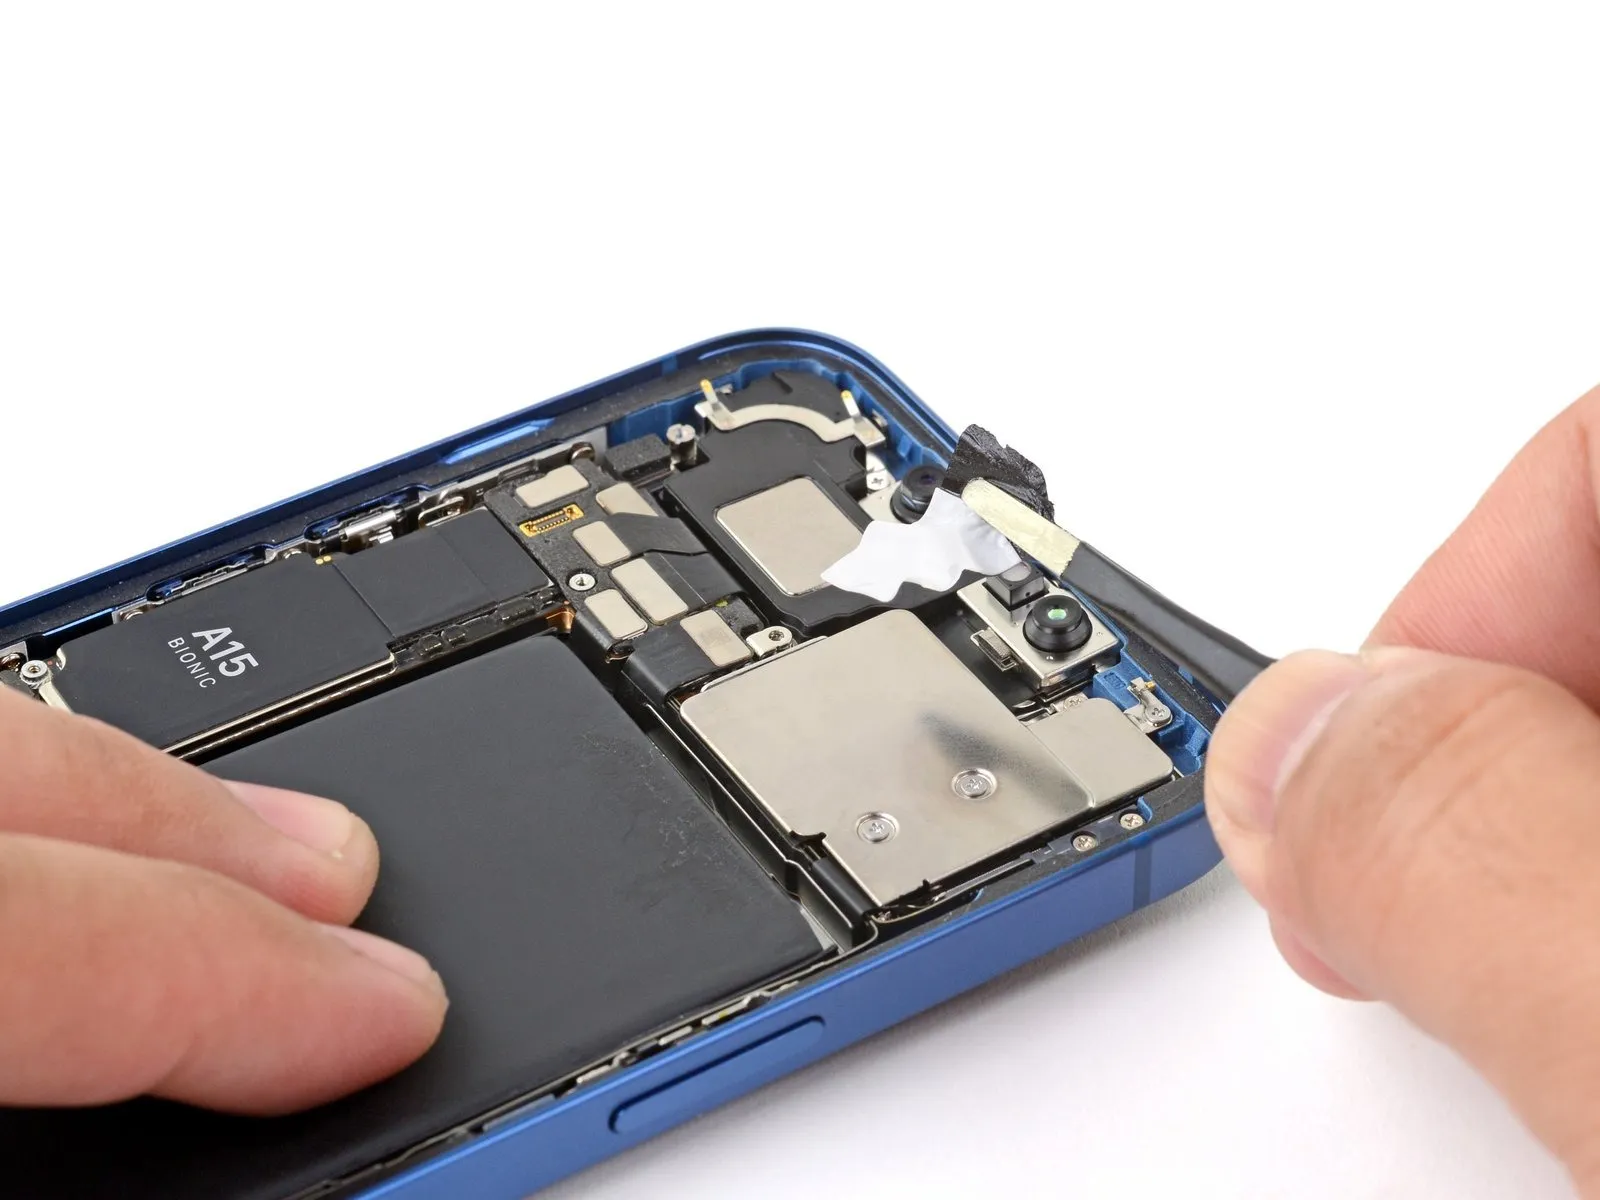
- To avoid the battery ejecting during removal of the last adhesive layer, gently position two fingertips on its central area.
- Avoid applying significant downward pressure to the battery.
- Employing a set of blunt tweezers, carefully draw and extend the remaining adhesive tab to detach the final strip securing the battery.
- Should all adhesive strips have been successfully removed, proceed past this instruction.
- Conversely, if adhesive remains, follow the subsequent instructions.
Step 36 | How to remove a stuck battery
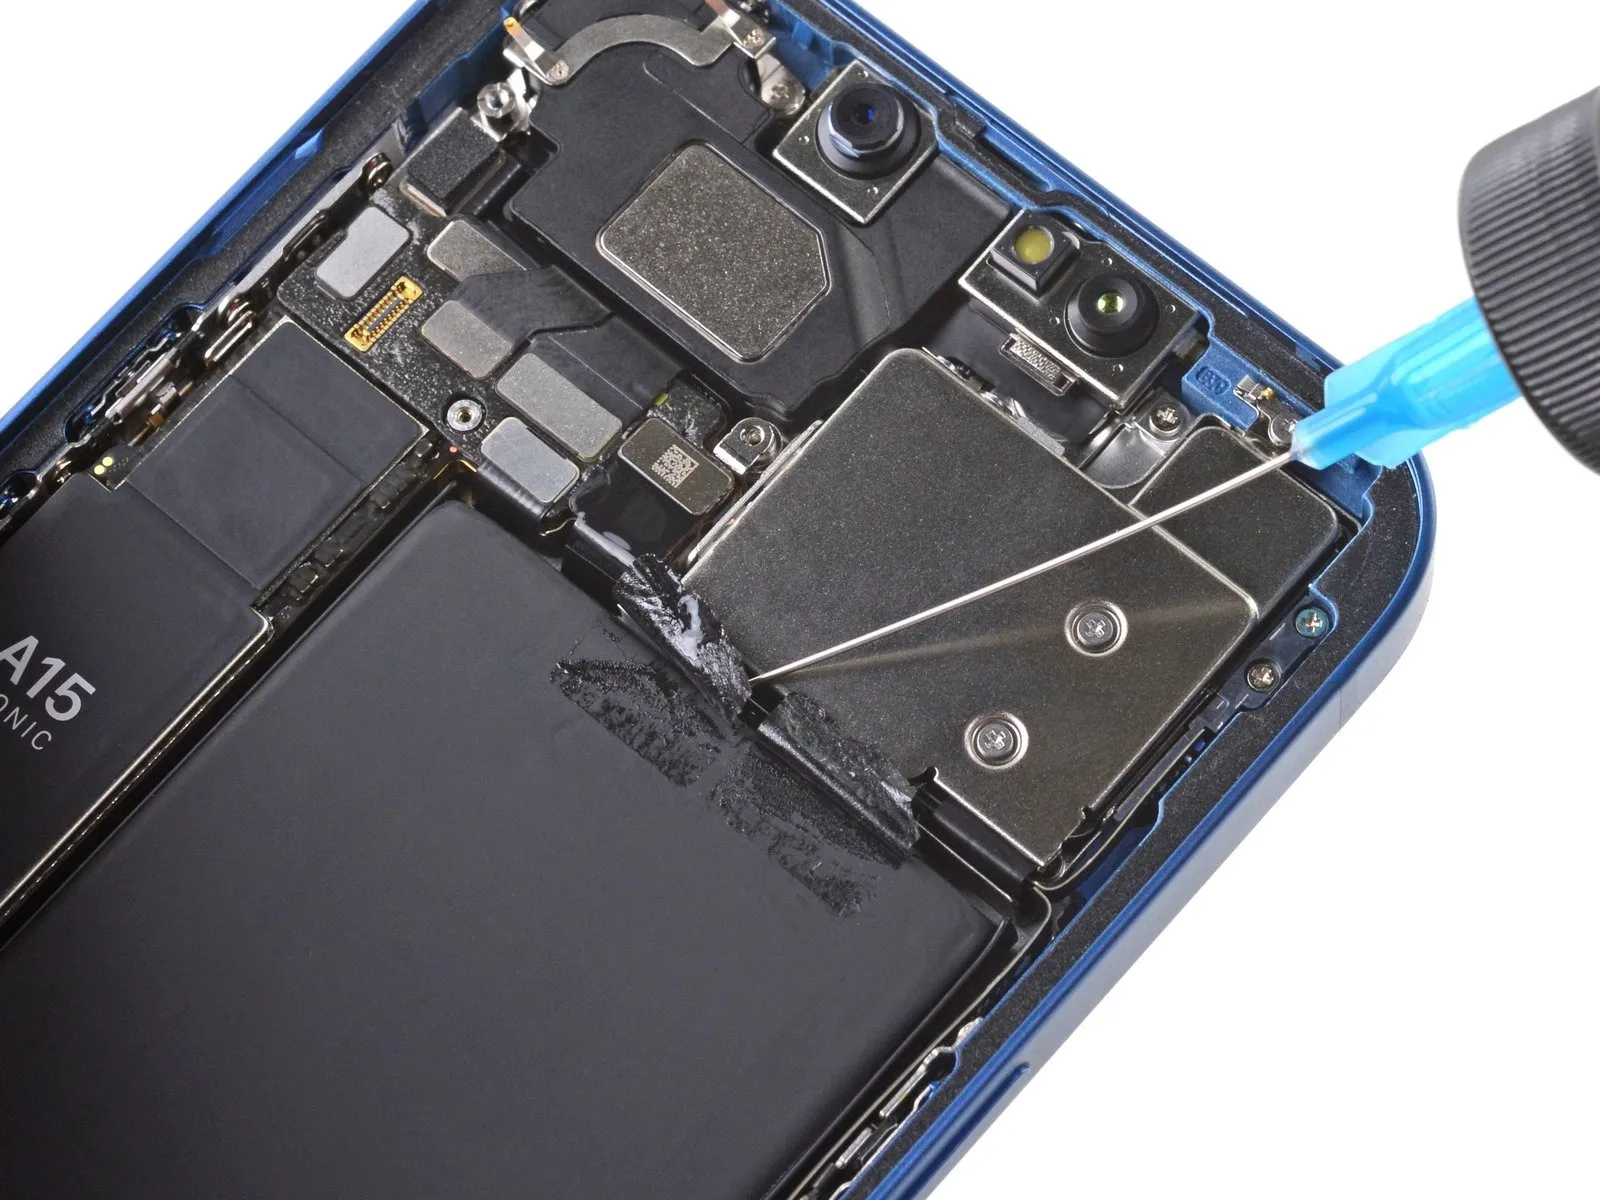
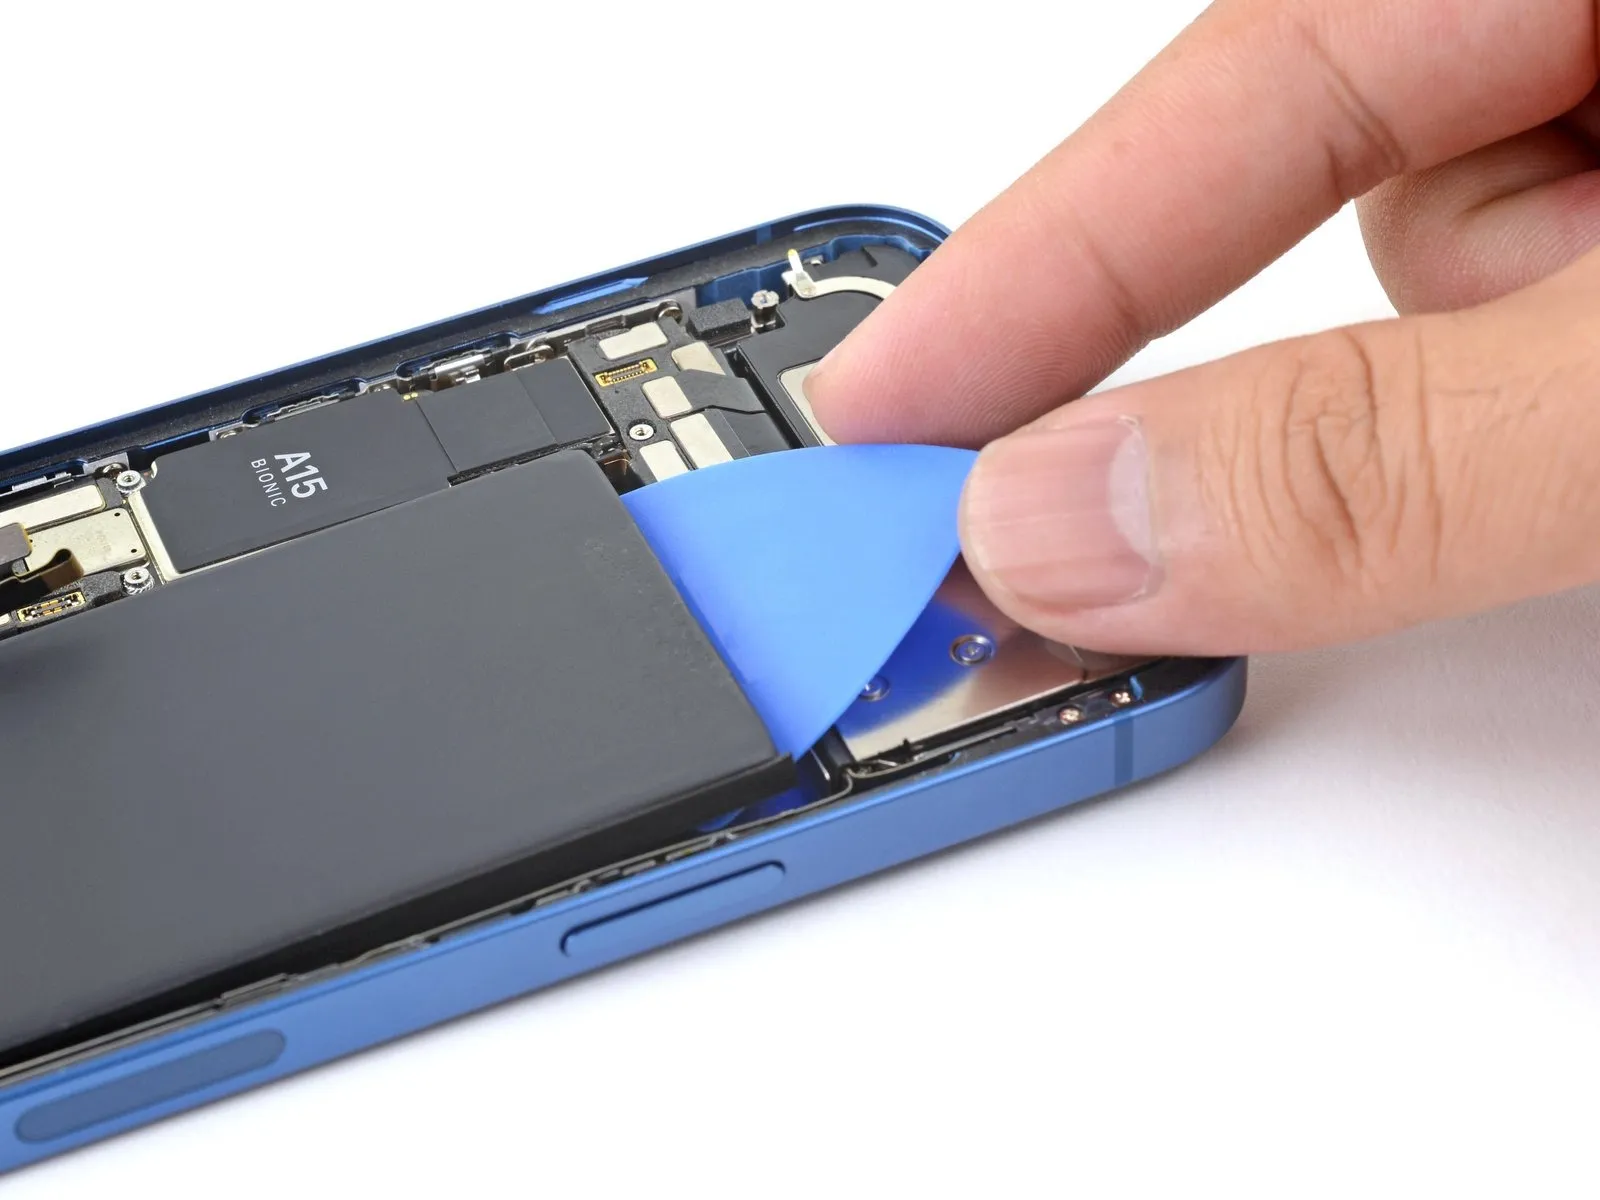
- Introduce a small quantity of isopropyl alcohol, possessing a concentration of at least 90%, beneath the battery's perimeter, specifically targeting the damaged adhesive strip(s).
- Position the device at an upward angle to facilitate the flow of isopropyl alcohol towards the adhesive bond.
- Allow approximately sixty seconds for the alcohol to reduce the adhesive's strength.
- Employ an opening pick or the planar end of a spudger to carefully initiate separation of the battery.
- Avoid applying excessive force to dislodge the battery; if resistance is encountered, introduce additional isopropyl alcohol to further compromise the adhesive, ensuring the pry tool does not compromise the battery's structural integrity.
Step 37 | Remove the battery
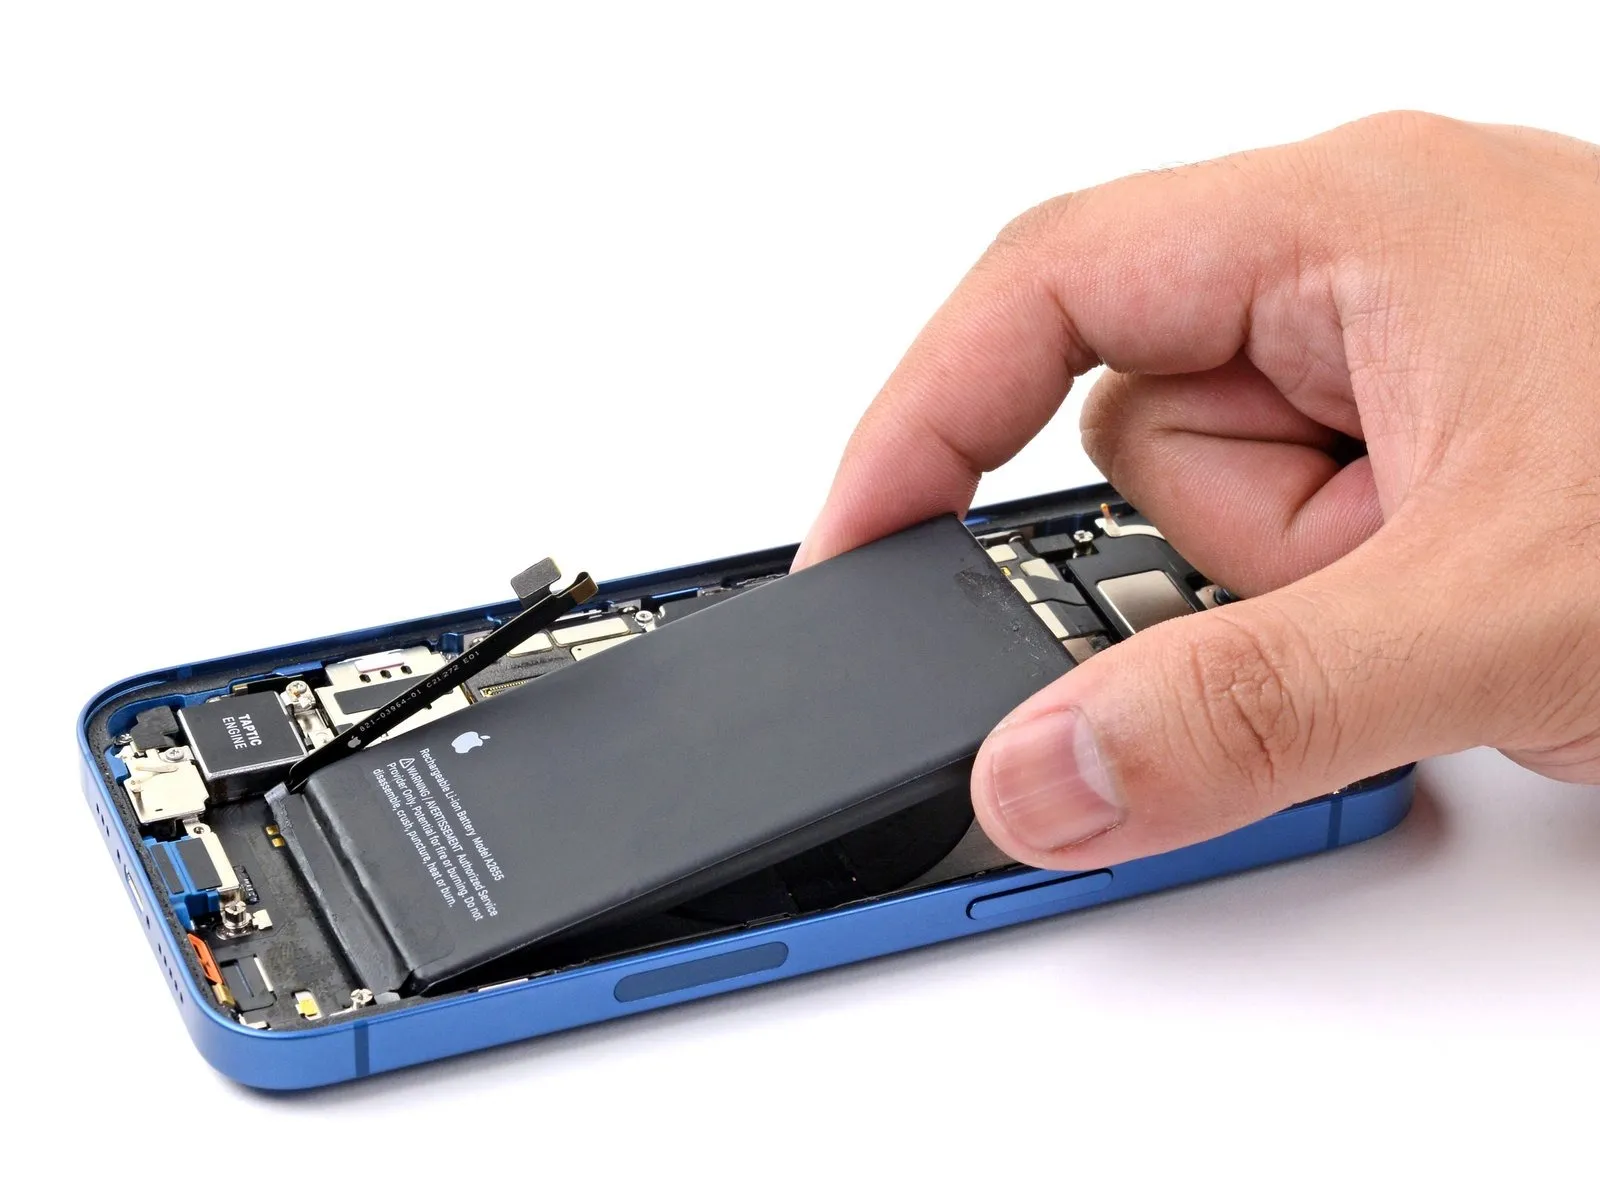
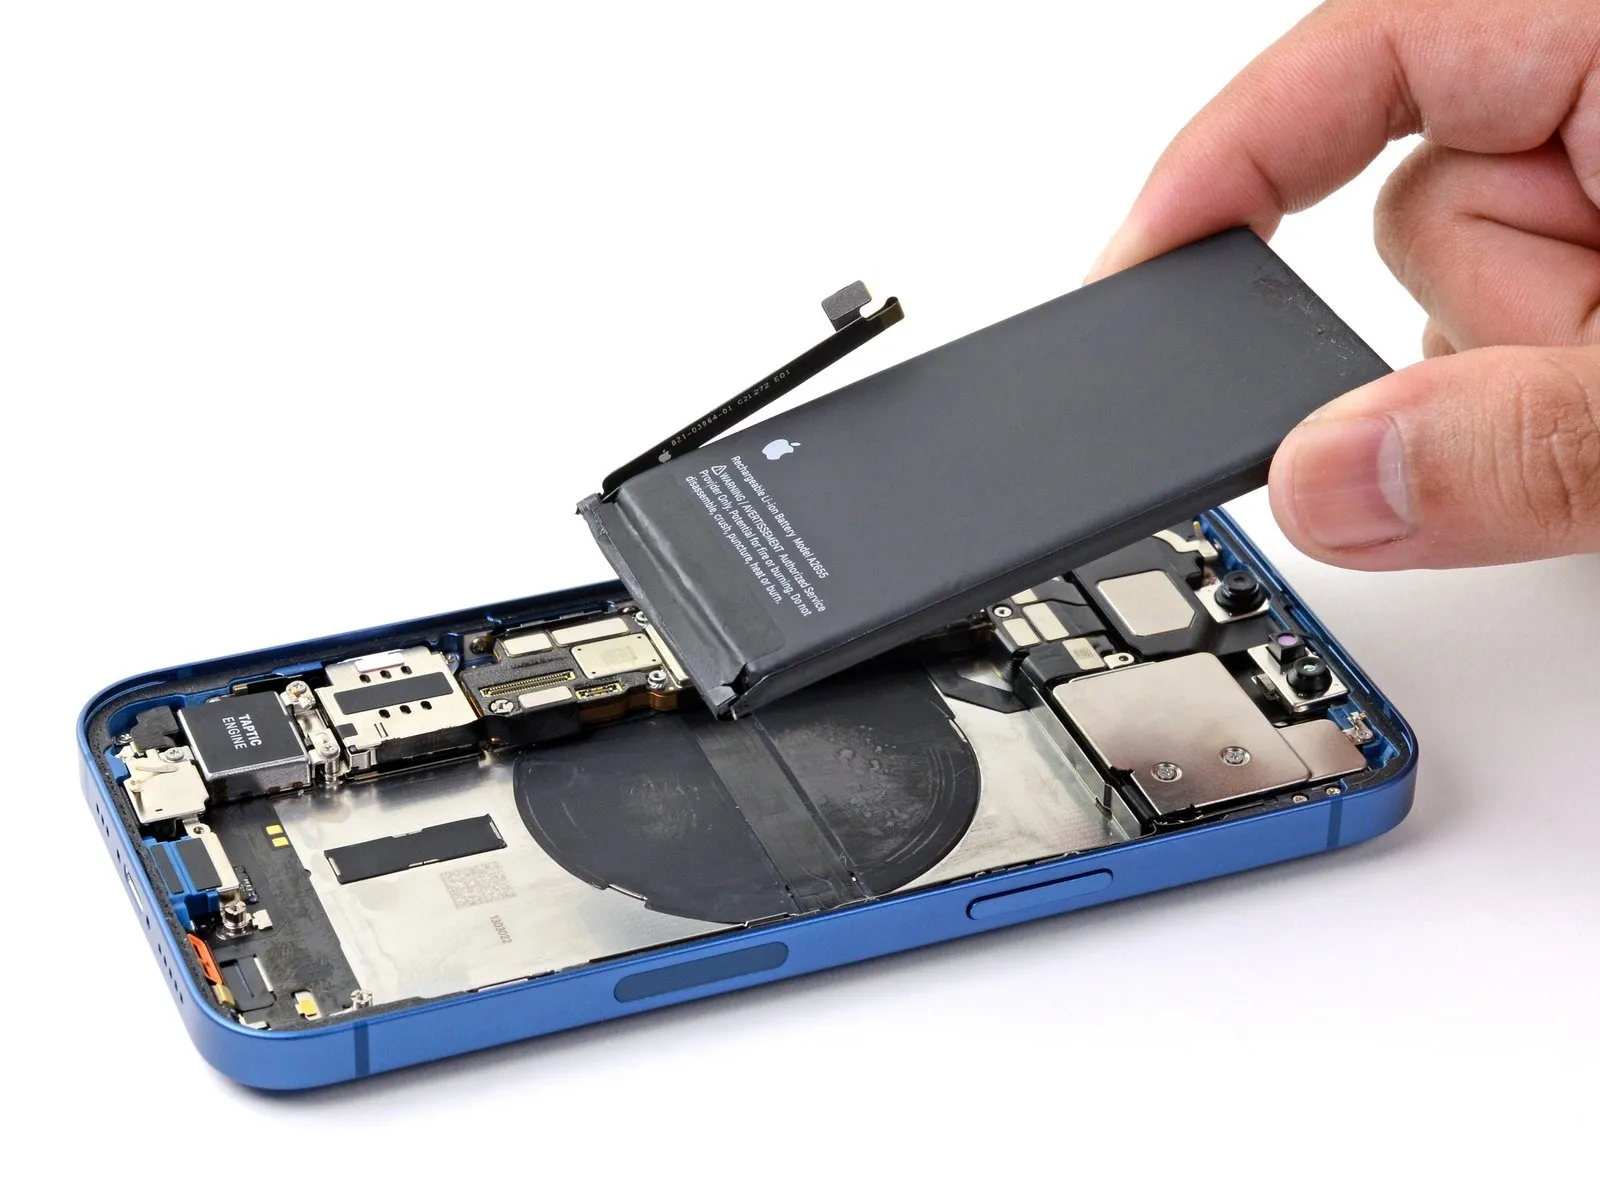
- Ensure complete evaporation of any residual cleaning solution from within the device's casing, either by gently blotting with a coffee filter or permitting natural ventilation.
- Should your replacement battery lack pre-applied adhesive, consult the provided instructions for proper adhesive strip replacement.
- To resolve potential operational anomalies and streamline future diagnostic efforts, execute a forced restart following the reassembly process.
- A forced restart, achieved through a specific button sequence, is recommended post-repair to mitigate potential problems and ease troubleshooting.