iPhone 15 Plus Screen Replacement
This document provides instructions for swapping out a damaged or fractured display assembly on an iPhone 15 Plus.It is crucial to exercise heightened caution throughout the repair process, avoiding metal implements and direct contact with internal circuitry, as battery disconnection is not possible.Be aware that Apple's component pairing policies limit functionality; on iOS versions up to and including 17.6, True Tone and automatic brightness will be unavailable following screen replacement, even with a genuine Apple component.
- With newer iOS releases, restoration of these features may occur automatically.If a genuine Apple replacement screen is utilized, the Repair Assistant application can be employed to perform calibration and potentially restore functionality.
- The absence of battery disconnection necessitates meticulous attention to prevent short circuits and further damage during the screen replacement procedure.Adherence to these guidelines is essential to ensure a successful repair and avoid complications related to Apple's parts pairing restrictions and iOS version compatibility.
Step 1 | Prepare your phone for disassembly


- To optimize battery health, permit the power cell to discharge to a level below 25 percent capacity.Maintaining a fully charged lithium-ion battery presents a potential safety risk.Disconnect all connected cables from the device prior to proceeding.
- Simultaneously depress the power button and either volume button, subsequently swipe across the screen to initiate the shutdown sequence.
- This procedure will completely de-energize the phone.
Step 2 | Tape over any cracks


- To prevent injury and simplify the subsequent separation of components, apply multiple layers of adhesive packing tape across the fractured screen or rear glass surface.
- Confirm the presence of a sufficiently sized, uninterrupted region adjacent to the lower edge, suitable for creating a secure attachment point for a suction cup.
Step 3 | Mark your opening picks


- Excessive insertion of a pick can potentially harm the device; therefore, it's crucial to implement a marking procedure to avoid such incidents.
- Using a measuring tool, determine a distance of3 mmfrom the pick's leading edge and clearly indicate this point with a durable, permanent marker.
- For enhanced precision, consider marking the pick's other corners with varying distance measurements.
- As an alternative method, affix a coin to the pick's shaft, positioning it3 mmaway from the tip to serve as a depth indicator.
Step 4 | Remove the pentalobe screws
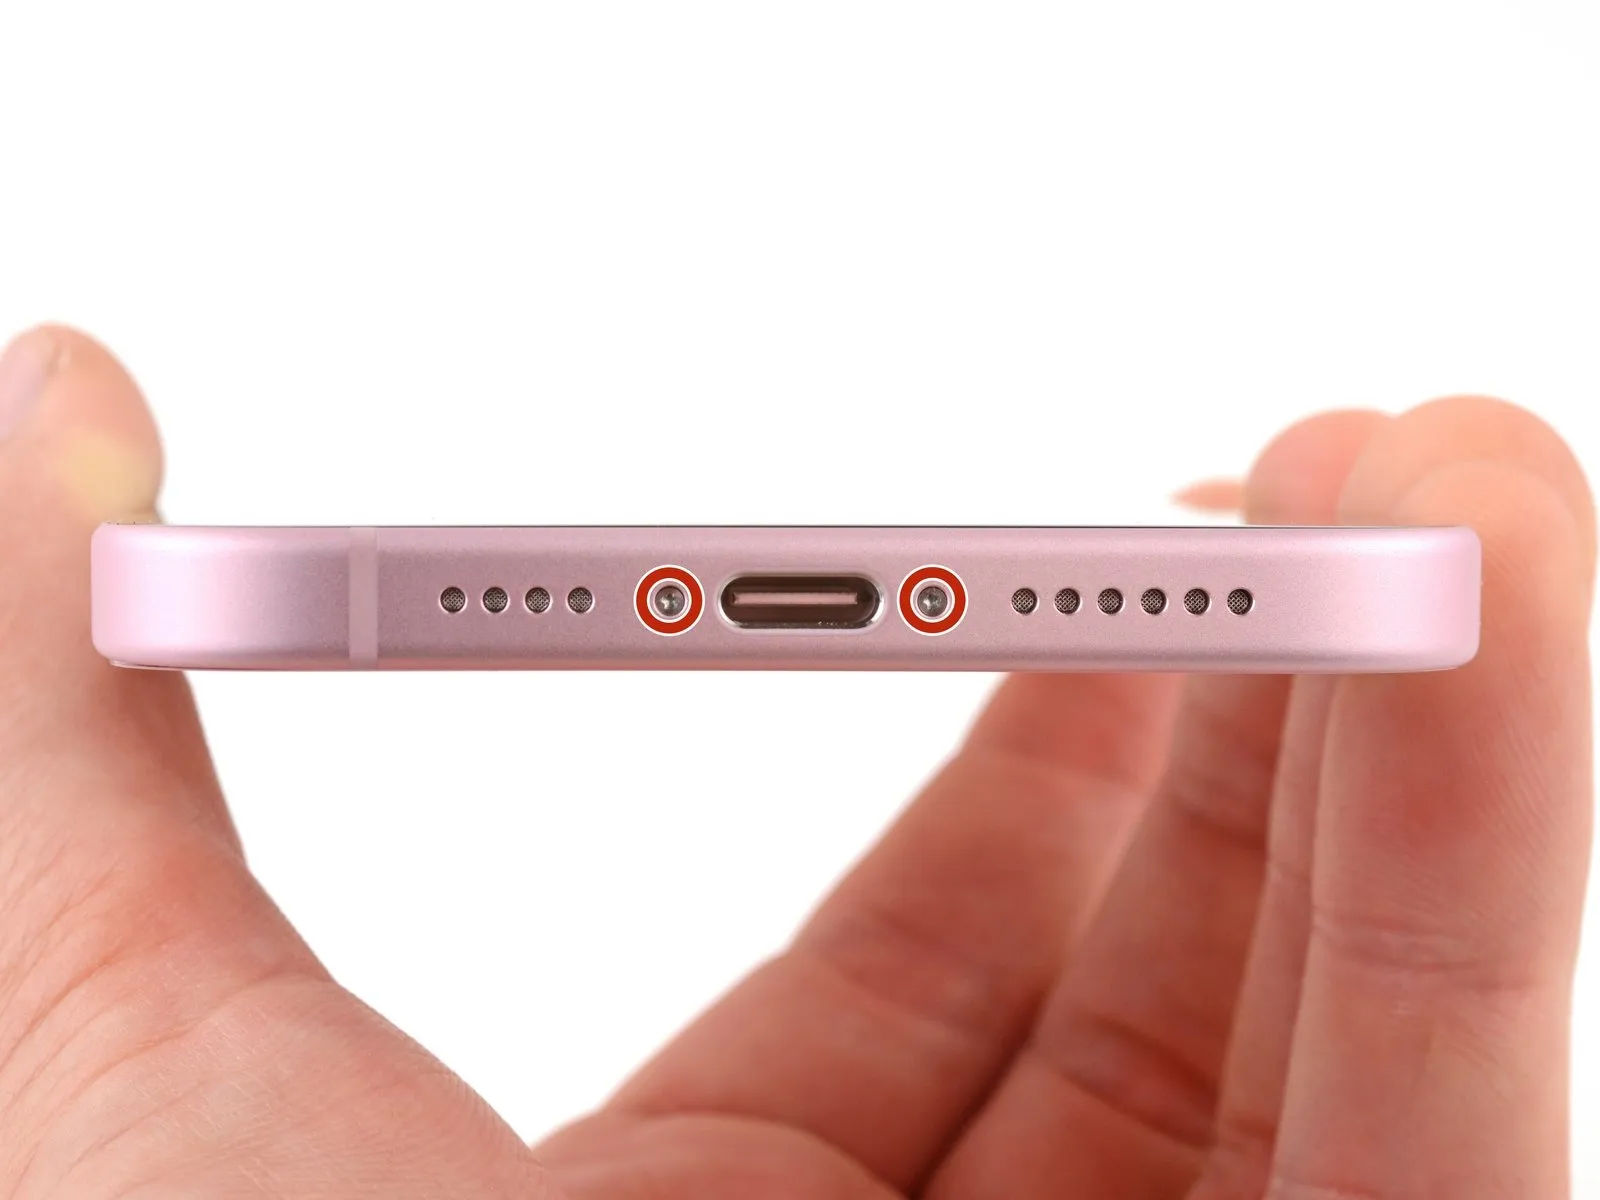
Employ a P2 pentalobe screwdriver to detach the two screws.The screws securing the charging port are each 7.7 millimeters in length.These fasteners are located on both lateral aspects of the charging port.
Step 5 | Heat the bottom edge
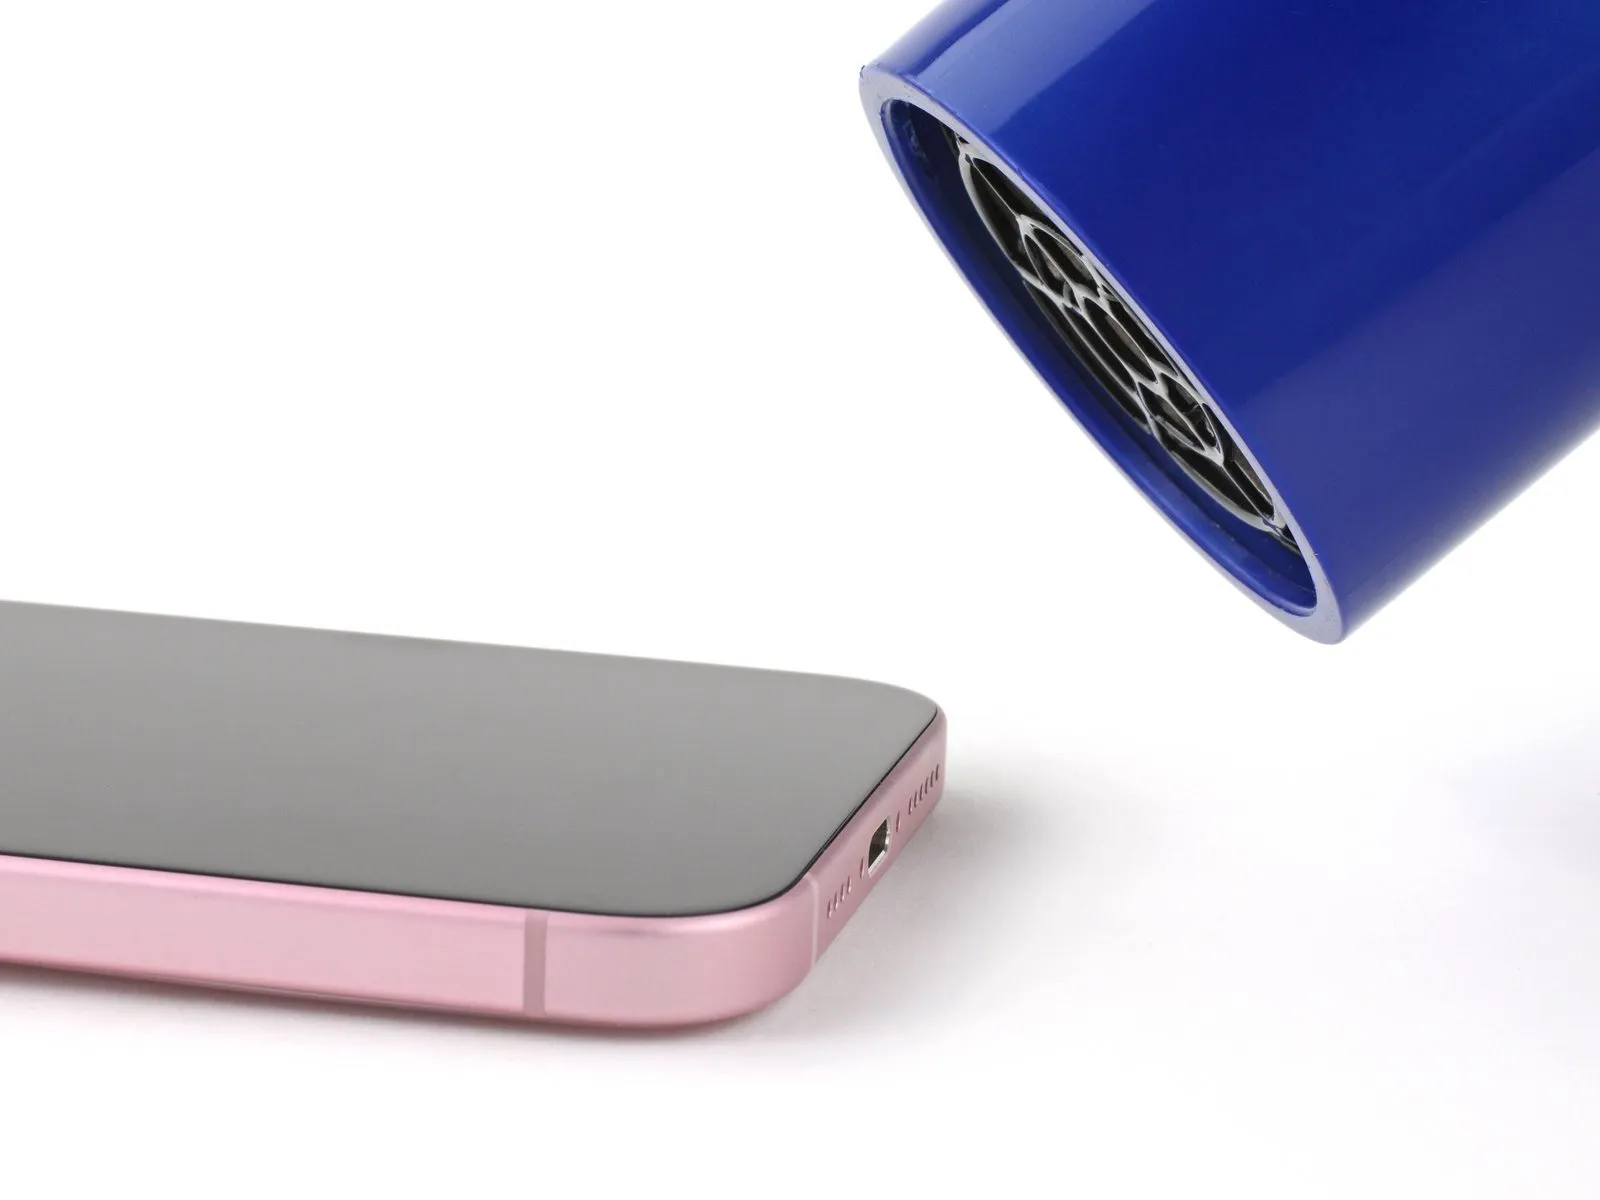
- Apply warmth to the screen's lower border utilizing a hair dryer or heat gun.The screen's bottom edge should reach a temperature that is noticeable upon contact.Avoid excessive heat application, as the device's battery is vulnerable to thermal degradation.Battery damage can occur if the device's temperature exceeds safe limits.A hair dryer or heat gun can be employed to gently warm the display's lower edge.
- Ensure the temperature remains within a safe range to prevent potential harm to the battery.
Step 6 | Insert an opening pick

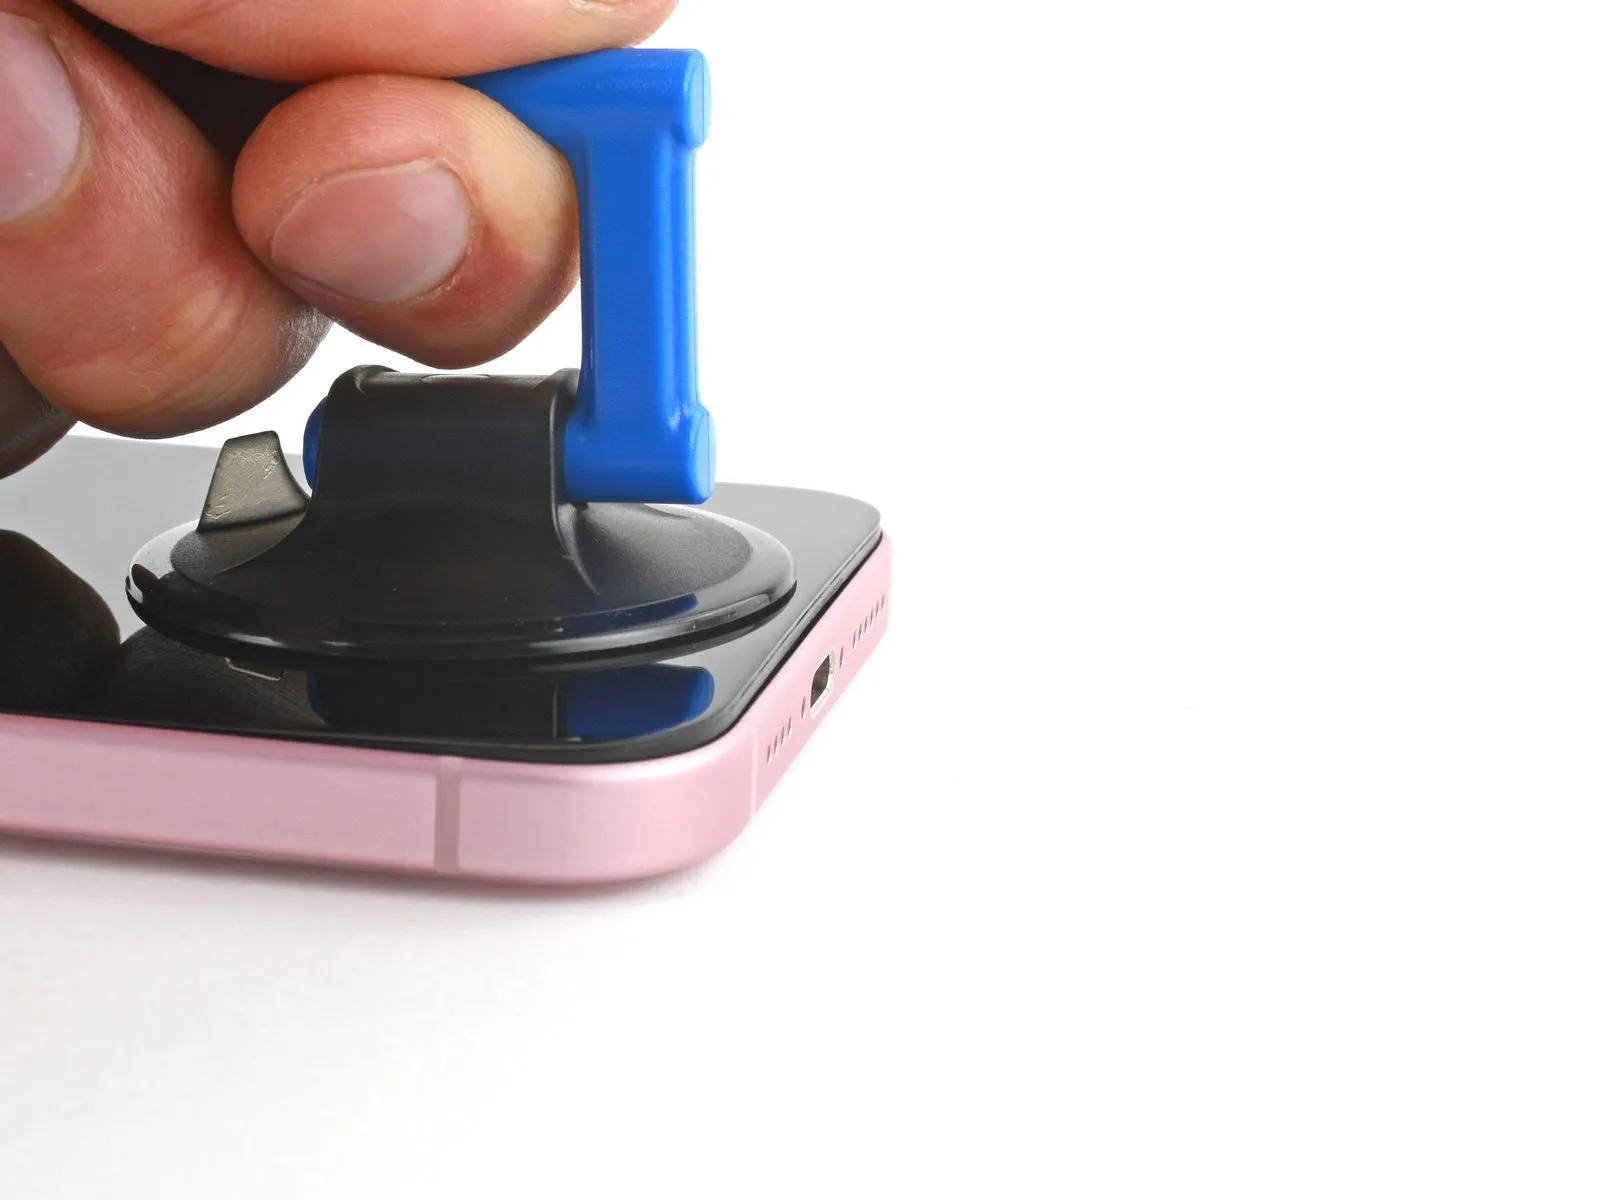
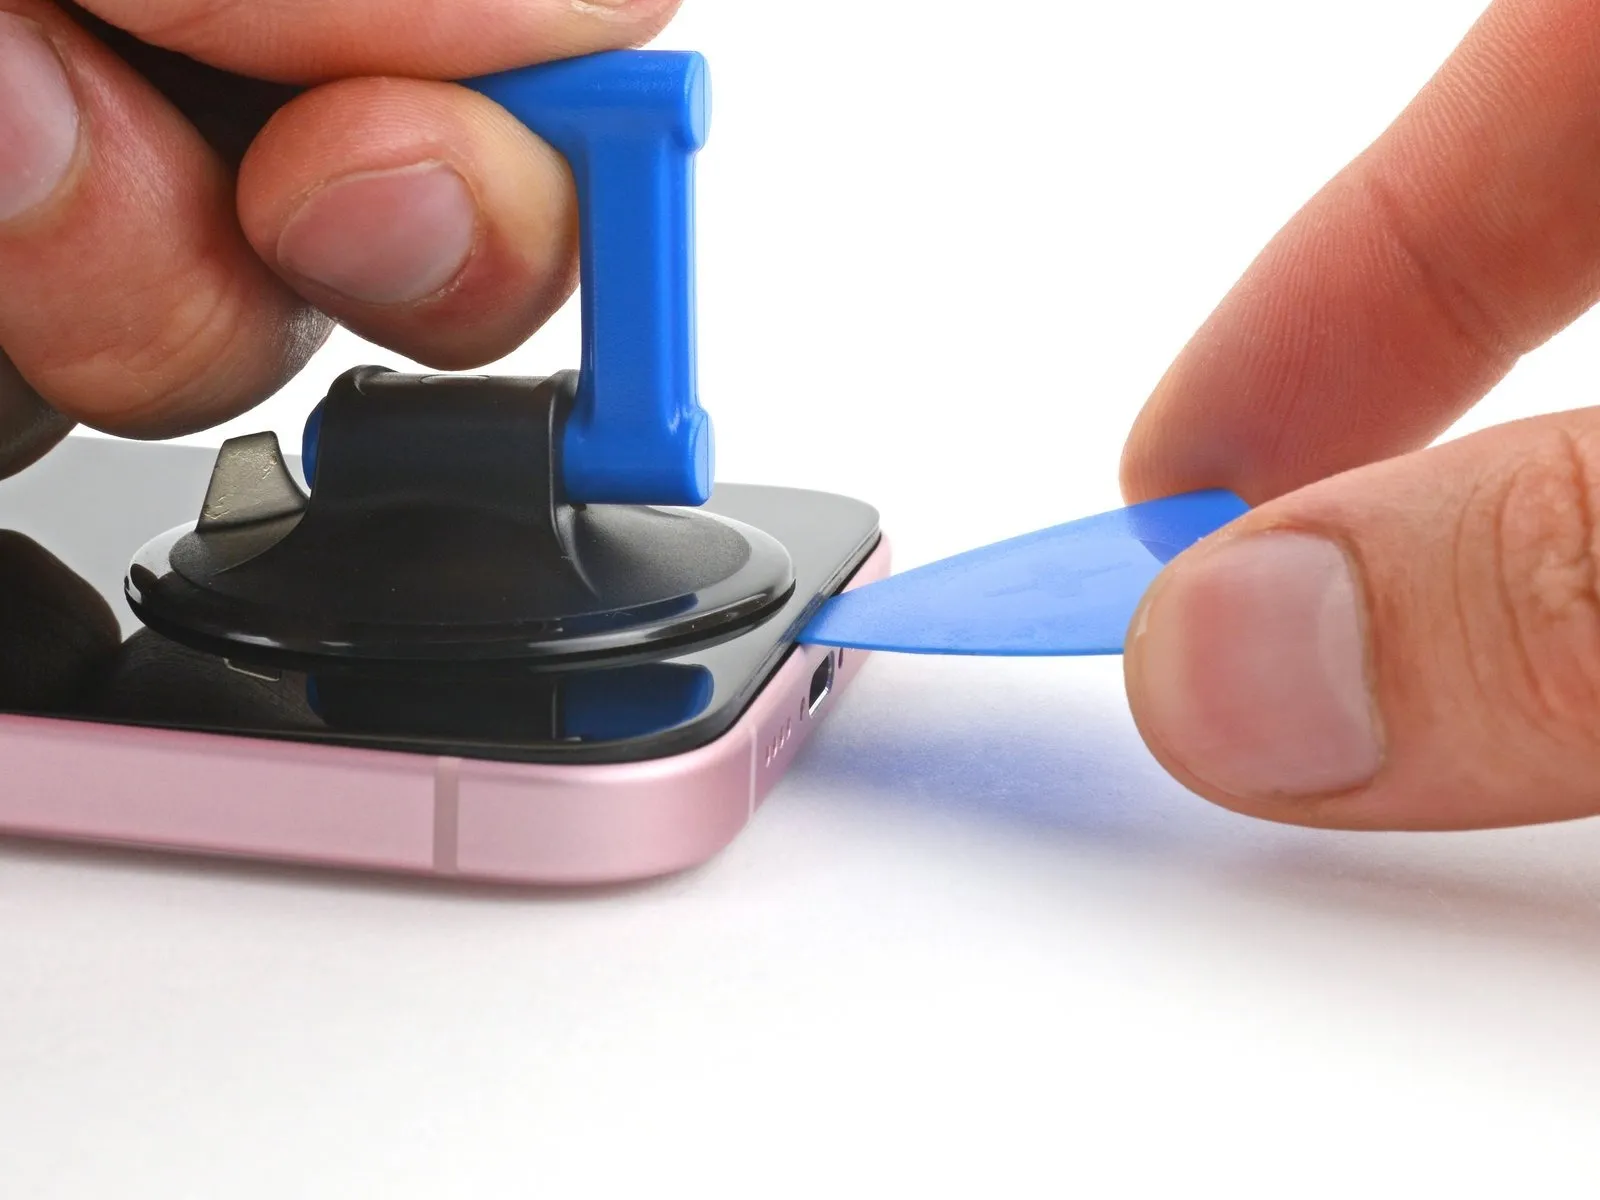
- Securely attach a suction cup to the lower border of the display assembly.
- Exert a consistent, considerable upward pull on the suction cup to generate separation between the display and its surrounding structure.
- Carefully introduce the pointed end of a prying tool into the newly formed space.
Step 7 | Screen information
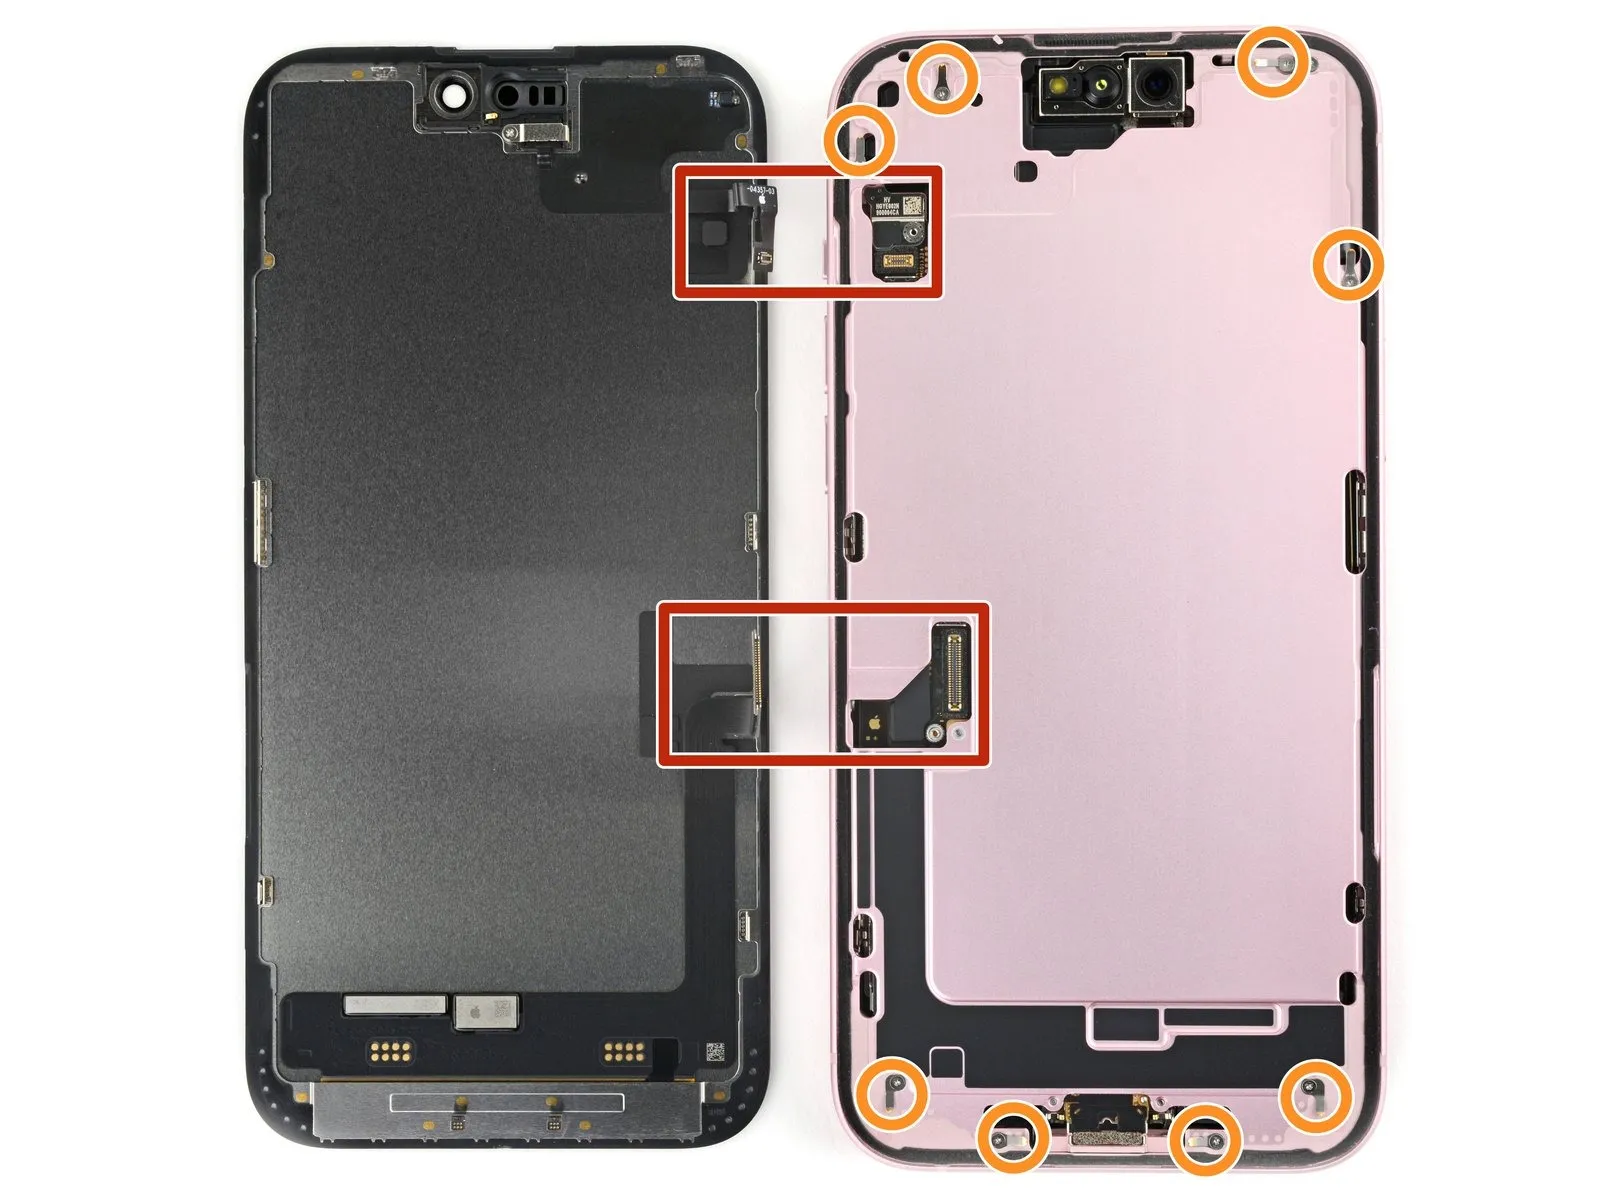
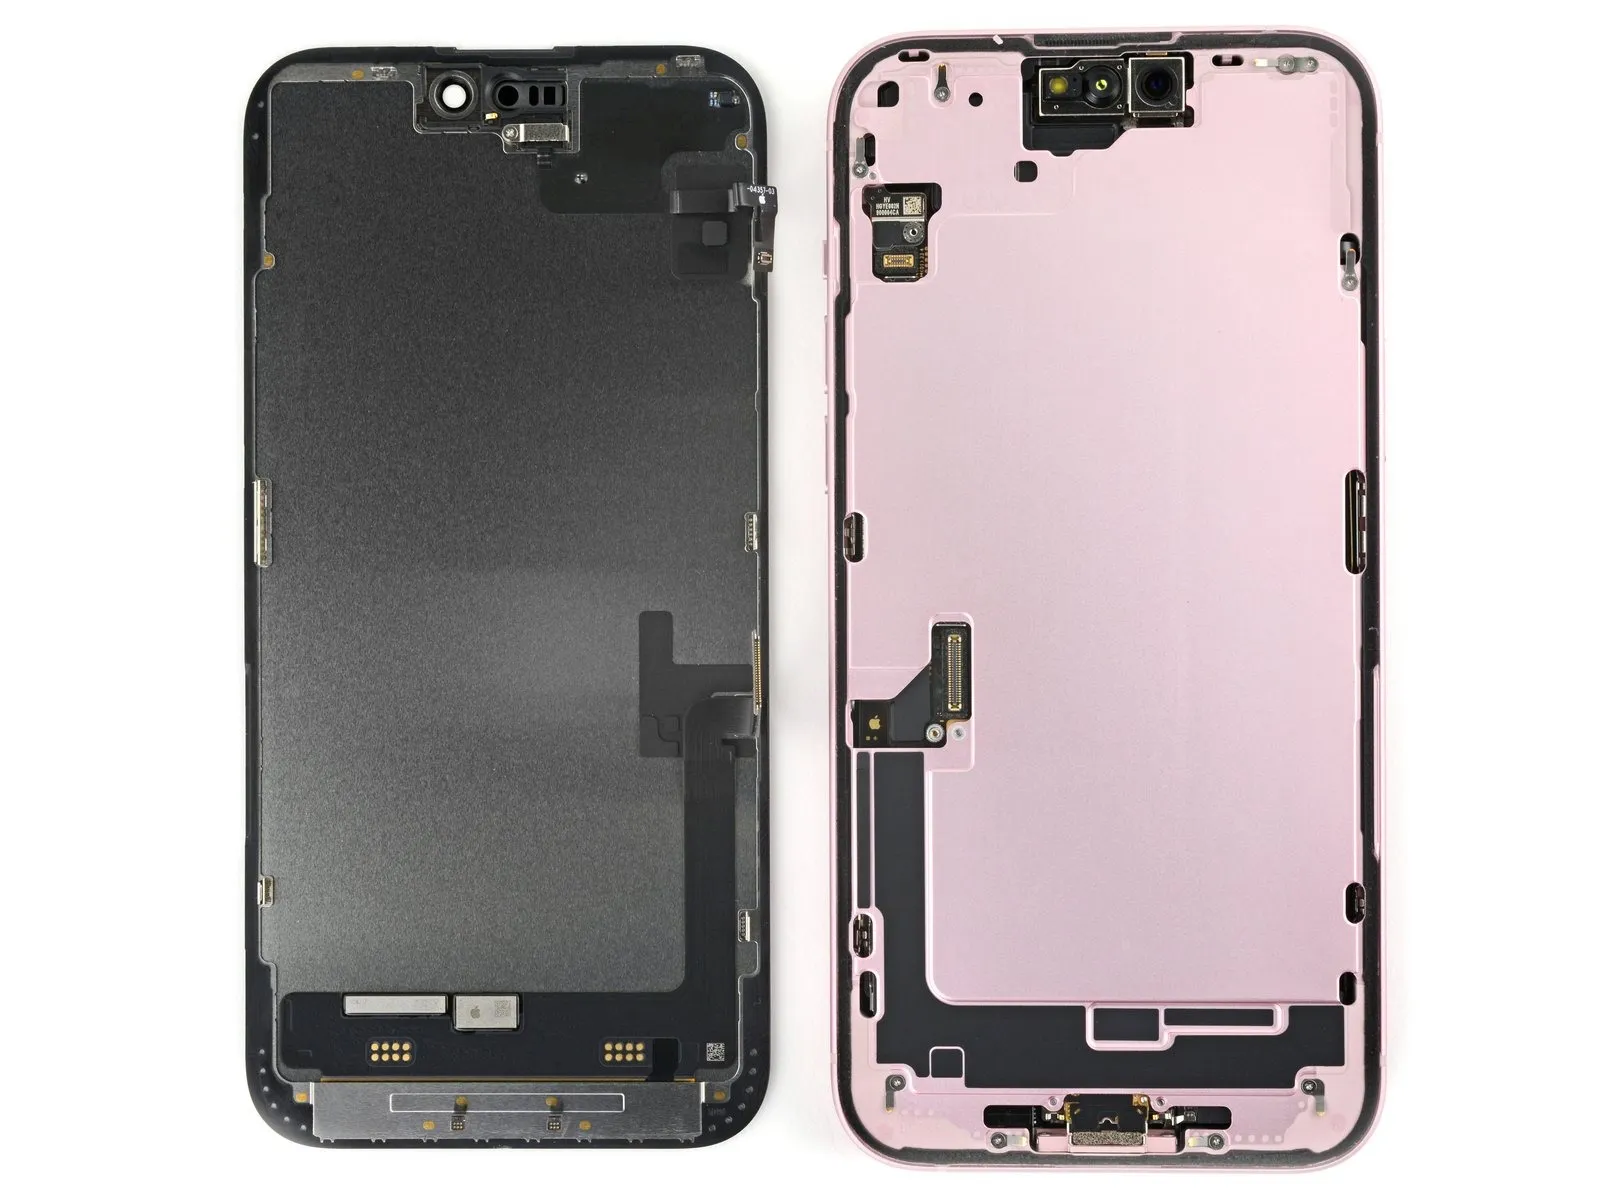
Exercise caution when separating the adhesive that holds the screen in place during the subsequent procedures, paying close attention to the areas detailed below.
- Two fragile cables establish the screen's connection to the device; one is situated directly above the mute switch, while the other is located approximately midway between the volume down button and the phone's lower edge.
- Numerous spring contacts are distributed along the phone's edges; prevent contact bending by restricting the depth of your tool's insertion to the recommended level in these specific zones.
Step 8 | Separate the bottom edge adhesive
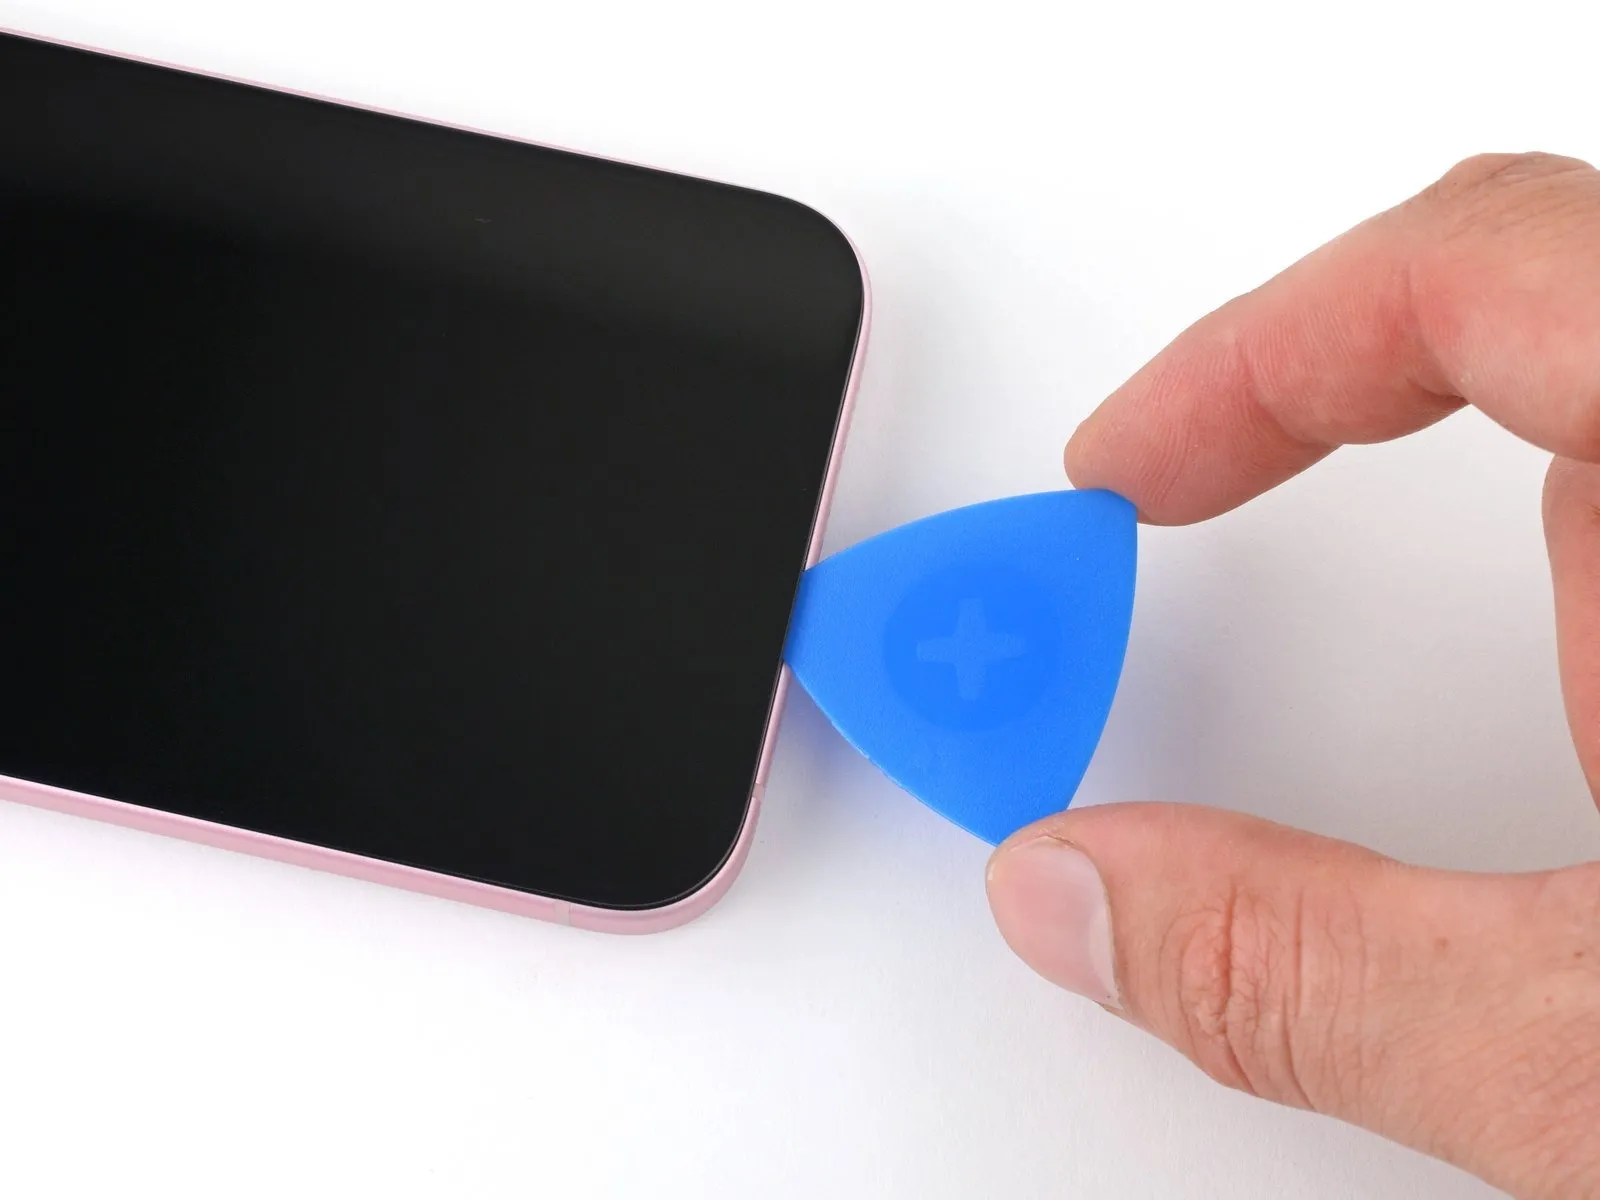
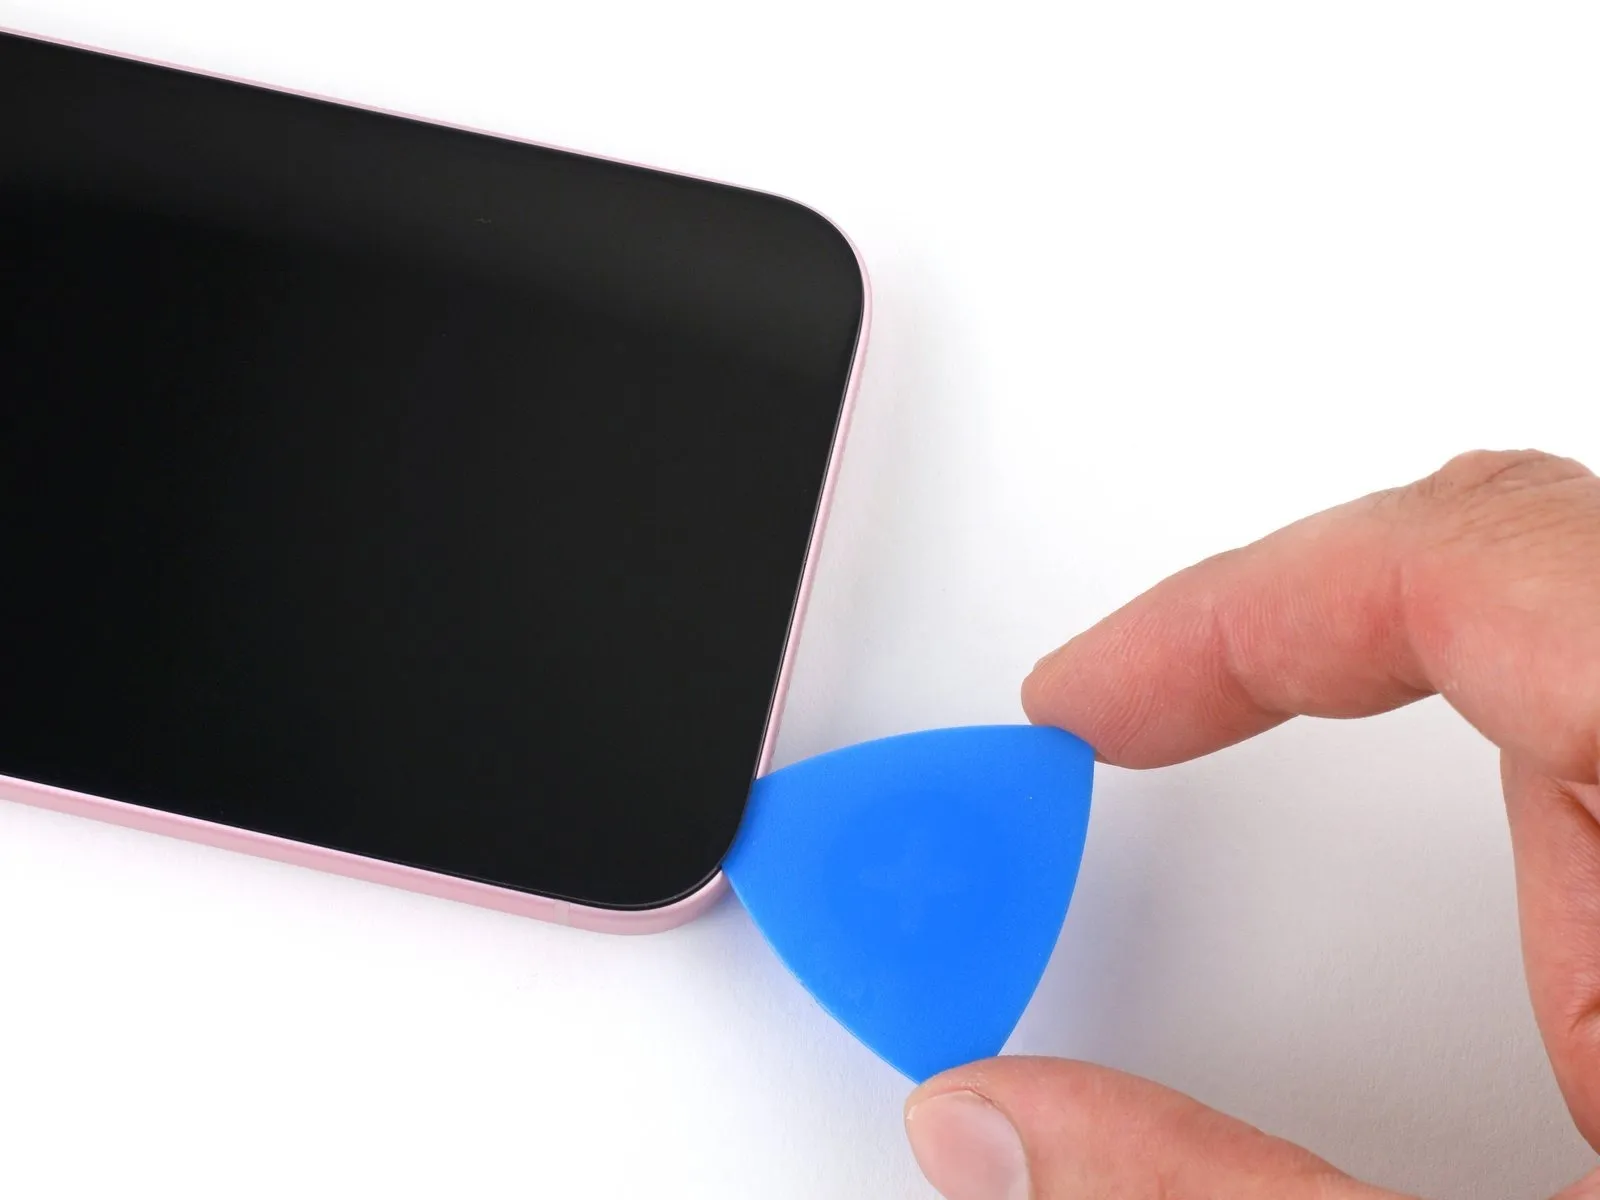
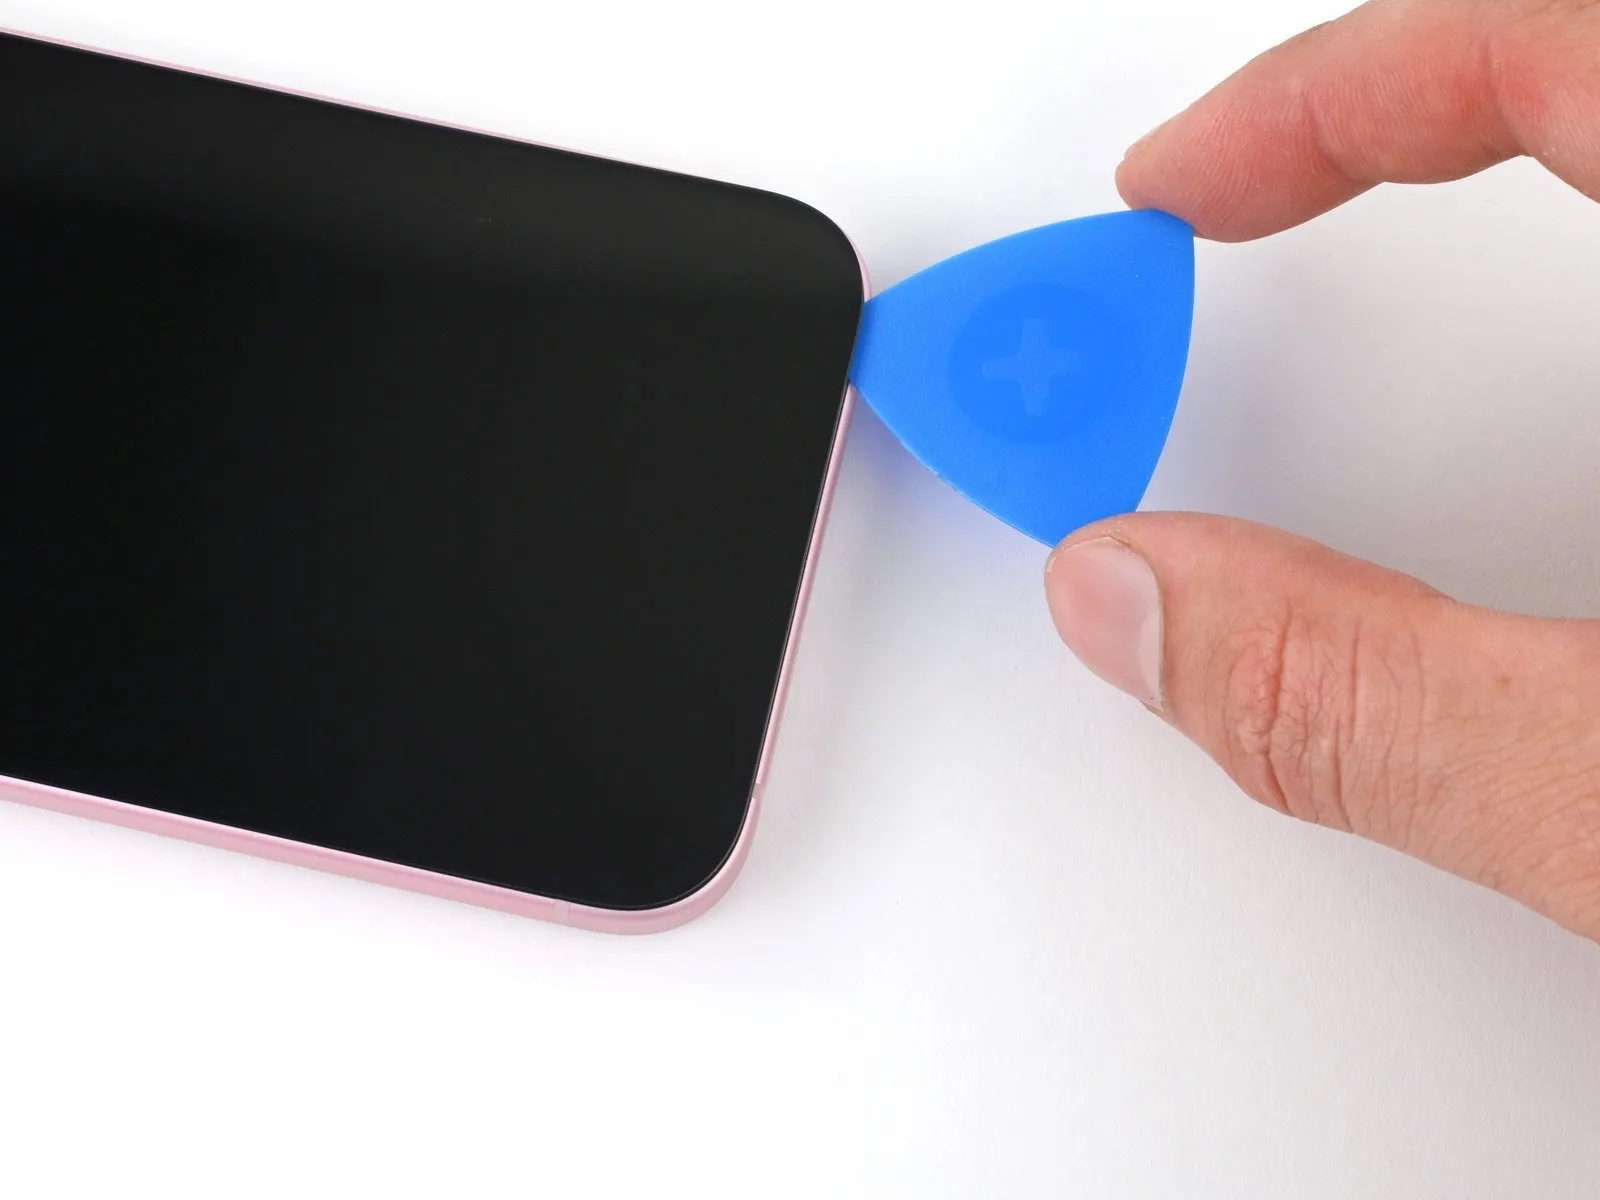
- Ensure the initial insertion of your opening tool does not exceed a depth of 3 millimeters from the lower border.Employ a reciprocating motion of the tool across the lower edge to sever the adhesive bond.The adhesive layer can be broken apart by gently moving the tool back and forth.
- Maintain the tool's position within the lower-right corner to inhibit the adhesive from reforming a seal.
- Positioning the tool in the lower right corner will help prevent the adhesive from reattaching.
Step 9 | Heat the right edge
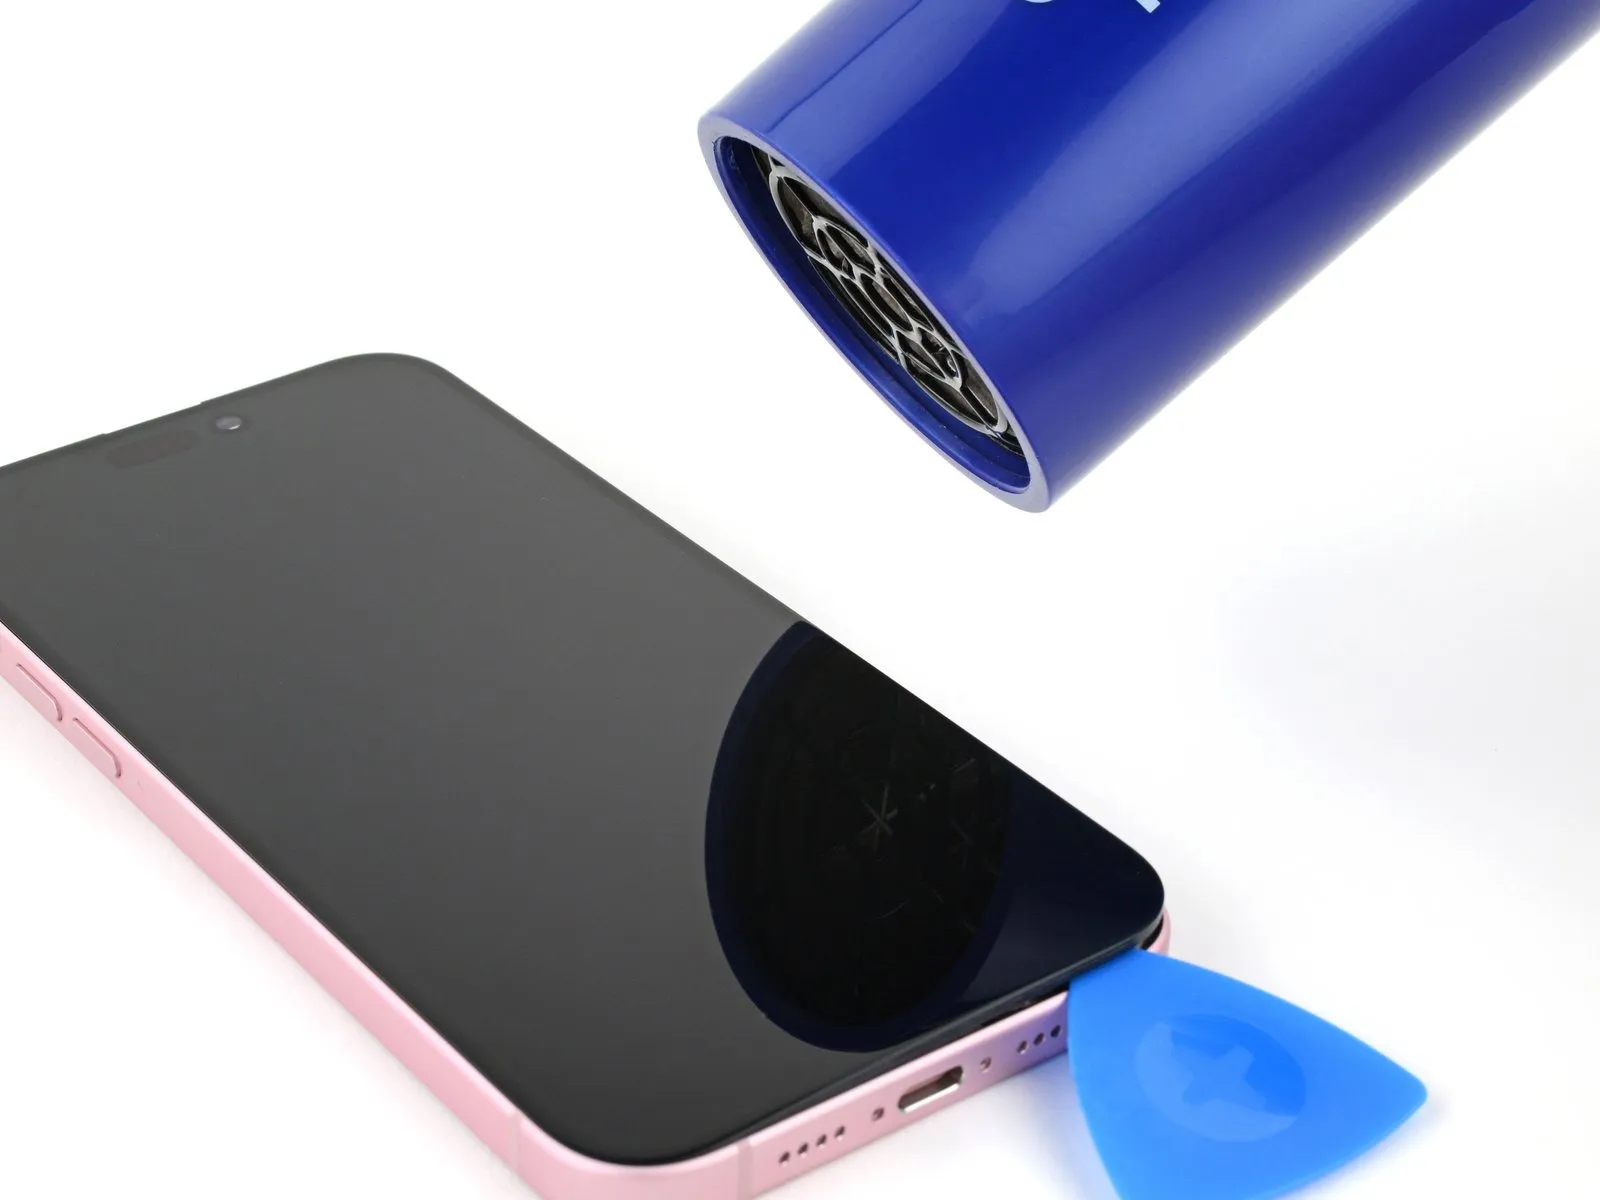
Apply warmth to the screen's right border, ensuring it reaches a temperature that is noticeable upon contact.Elevate the temperature of the display's right-hand side to a level where tactile sensation confirms its warmth.Using heat, bring the screen's right edge to a point where it feels warm when touched.
Step 10 | Separate the right edge adhesive

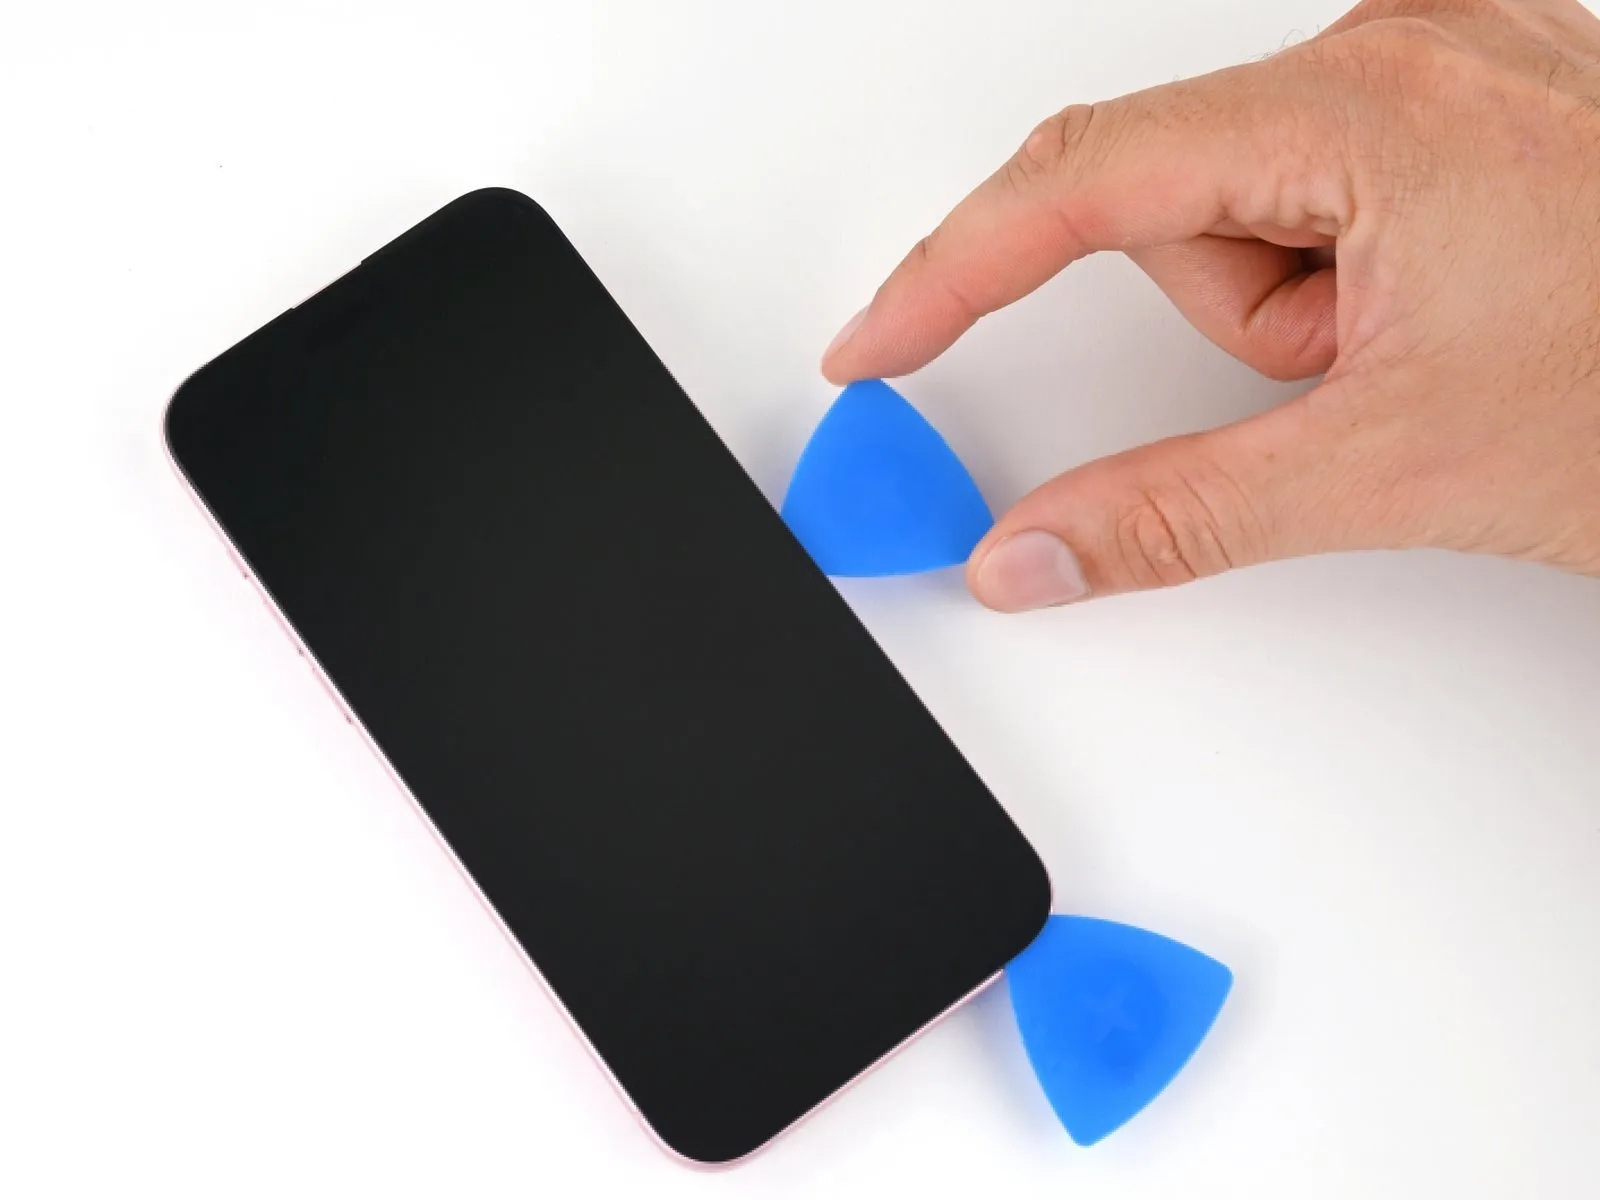
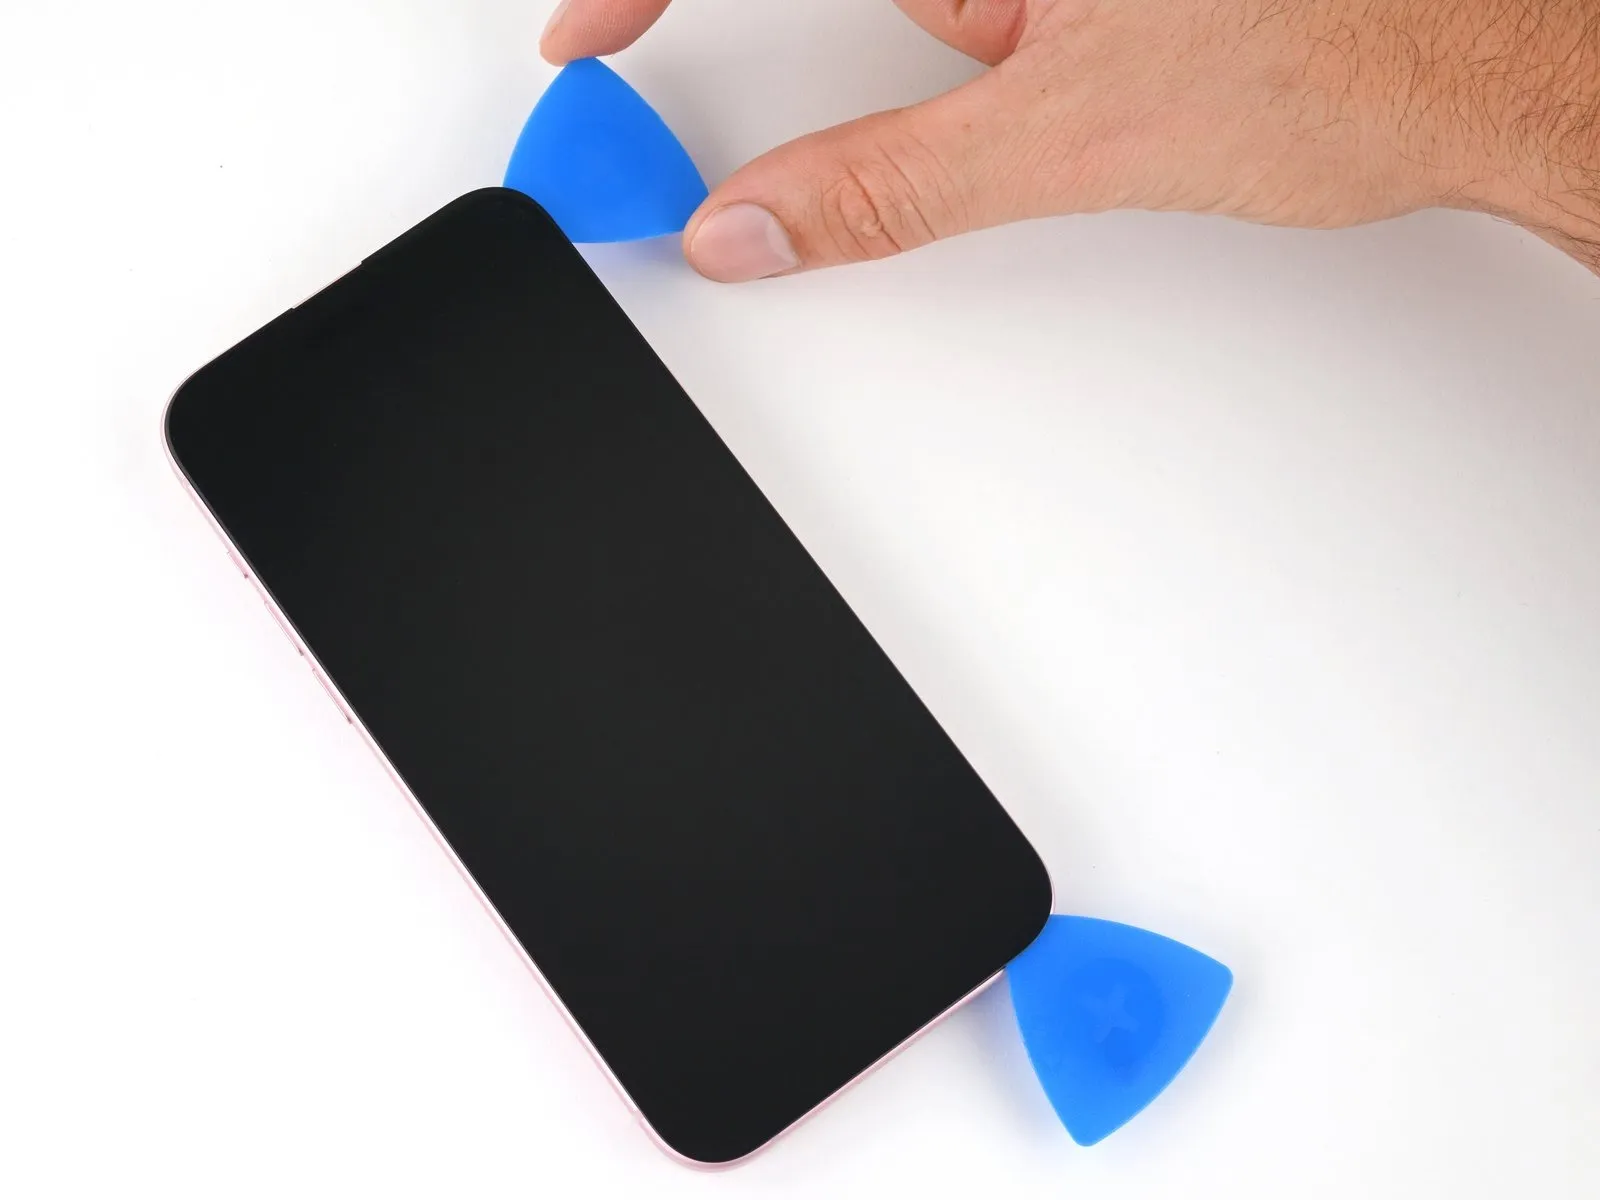
- Ensure the repair tool's insertion does not exceed a depth of 5 millimeters.A measurement of 5 millimeters represents the maximum allowable penetration depth for the tool.Position the tool adjacent to the right screen edge.Introduce a second tool, placing it immediately to the right of the initial insertion point.Move the second tool along the right edge to disengage the retaining clips.
- The movement of the tool facilitates the release of clips that hold the screen in place.
- The adhesive bond securing the screen is released through this sliding action.Carefully slide the tool along the right edge to break the adhesive seal.This process allows for the separation of the screen from the device's frame.
Step 11 | Heat the top edge

Apply warmth to the screen's upper boundary, ensuring it reaches a temperature that can be felt upon contact.Elevate the temperature of the display's uppermost region to a level perceptible through touch.Using heat, warm the screen's top edge until a tactile sensation indicates sufficient warmth.
Step 12 | Separate the top edge adhesive

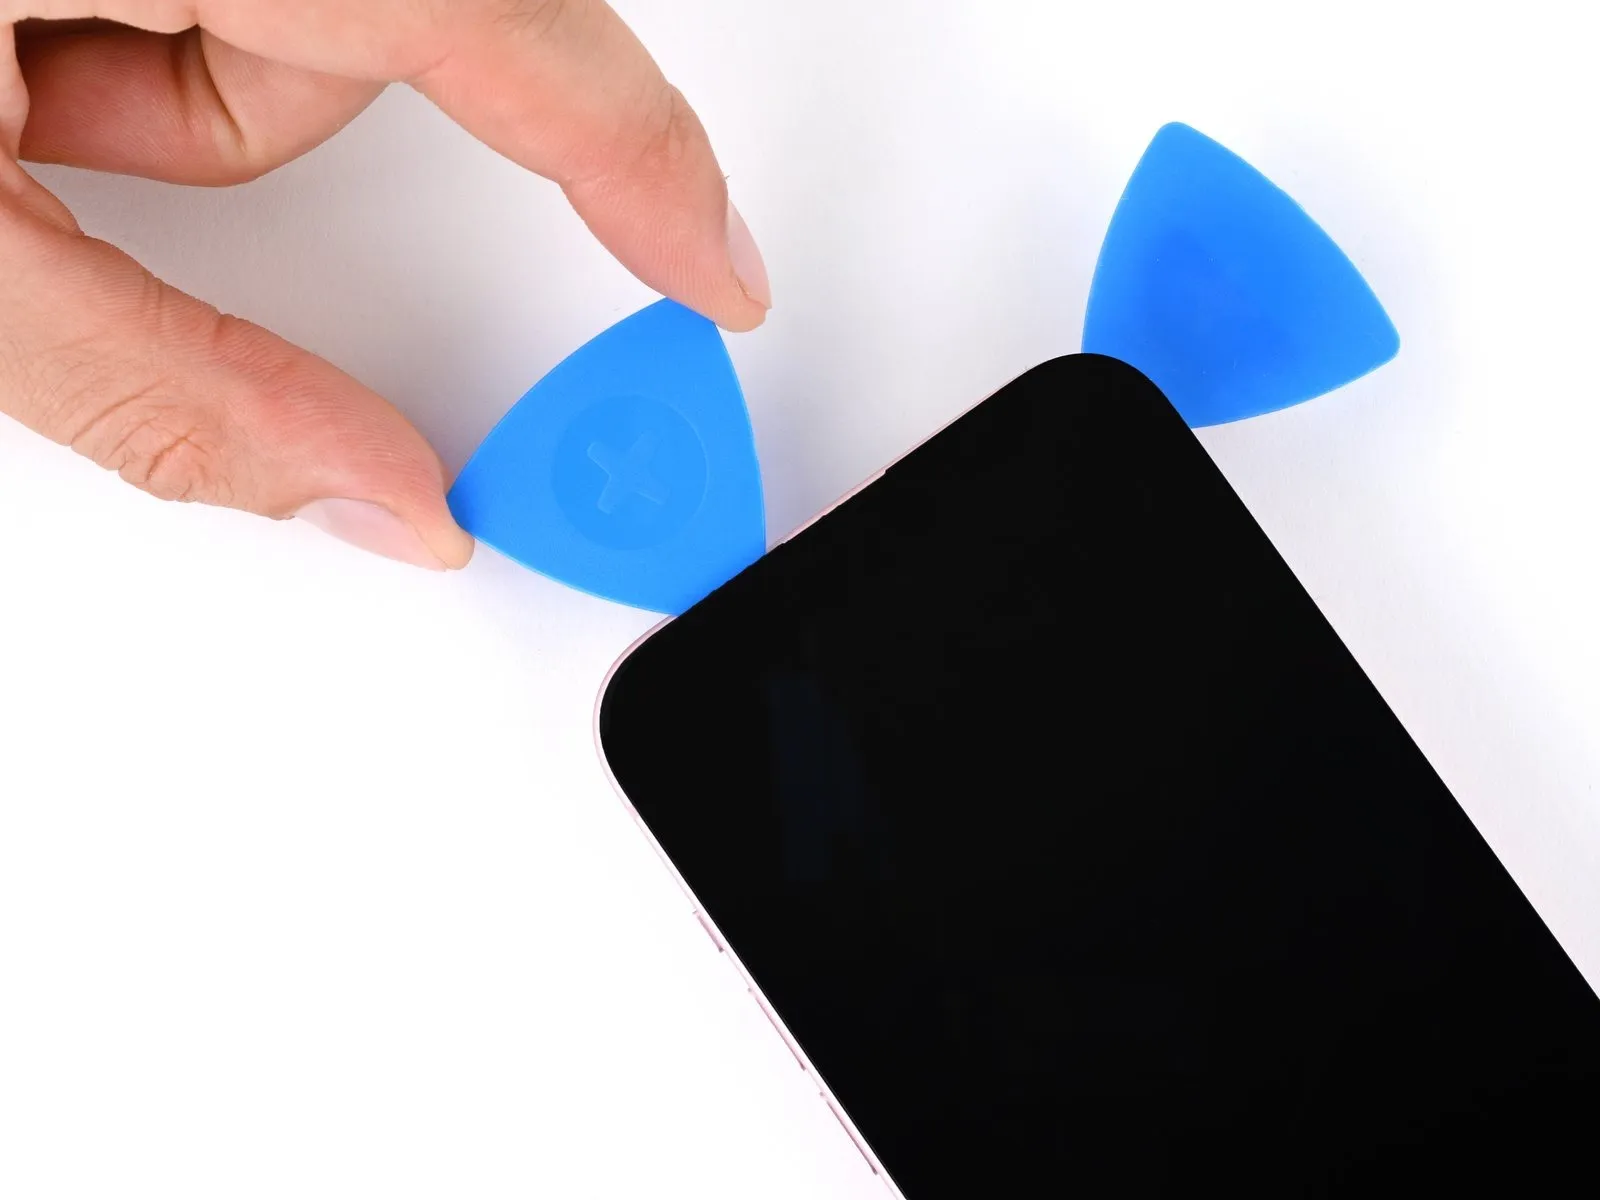
- To prevent damage, ensure the repair tool's insertion depth remains no greater than 3 millimeters.The upper boundary of the device should serve as a guide for the tool's maximum penetration.Position a third prying tool at the upper-right corner.Advance this third tool along the upper boundary.This movement will disengage the two retaining clips.
- Simultaneously, the sliding action will separate the adhesive bond.The adhesive secures the component in place.Carefully release the component using this method.
Step 13 | Heat the left edge
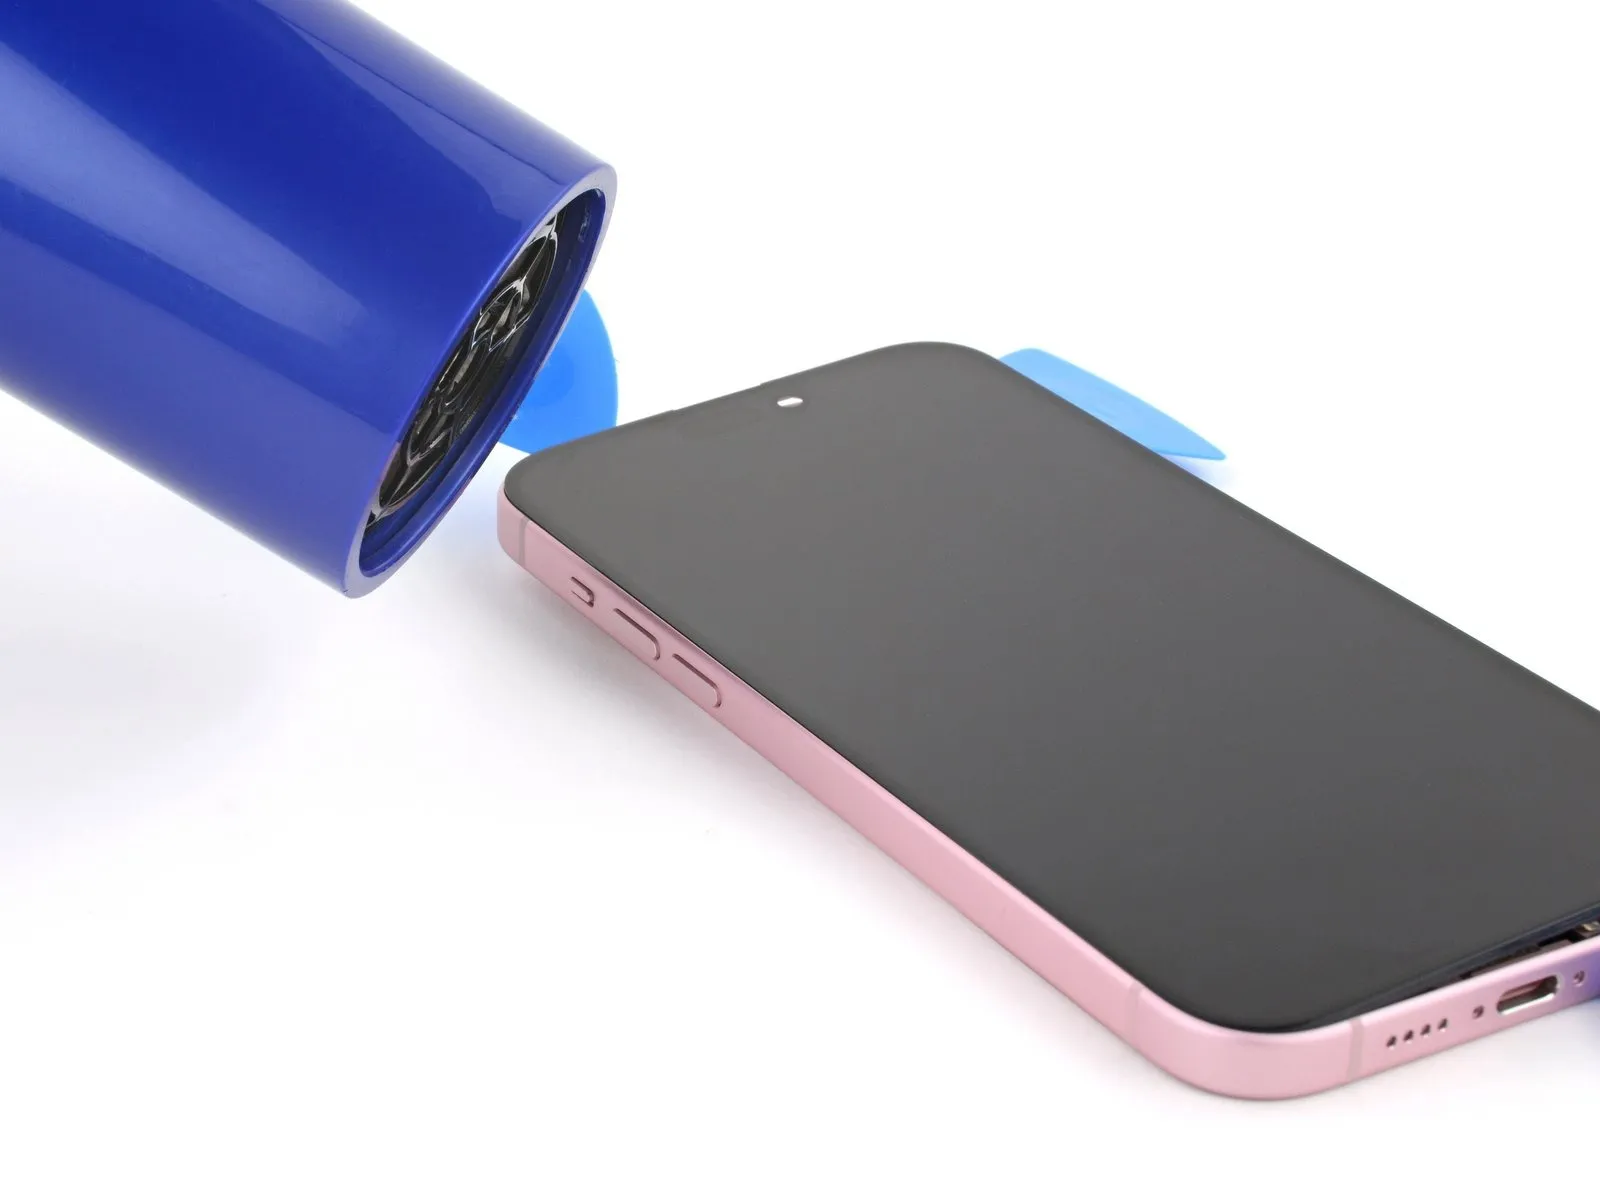
Apply warmth to the screen's left border, ensuring it reaches a temperature that is noticeable upon contact.
Step 14 | Separate the left edge adhesive

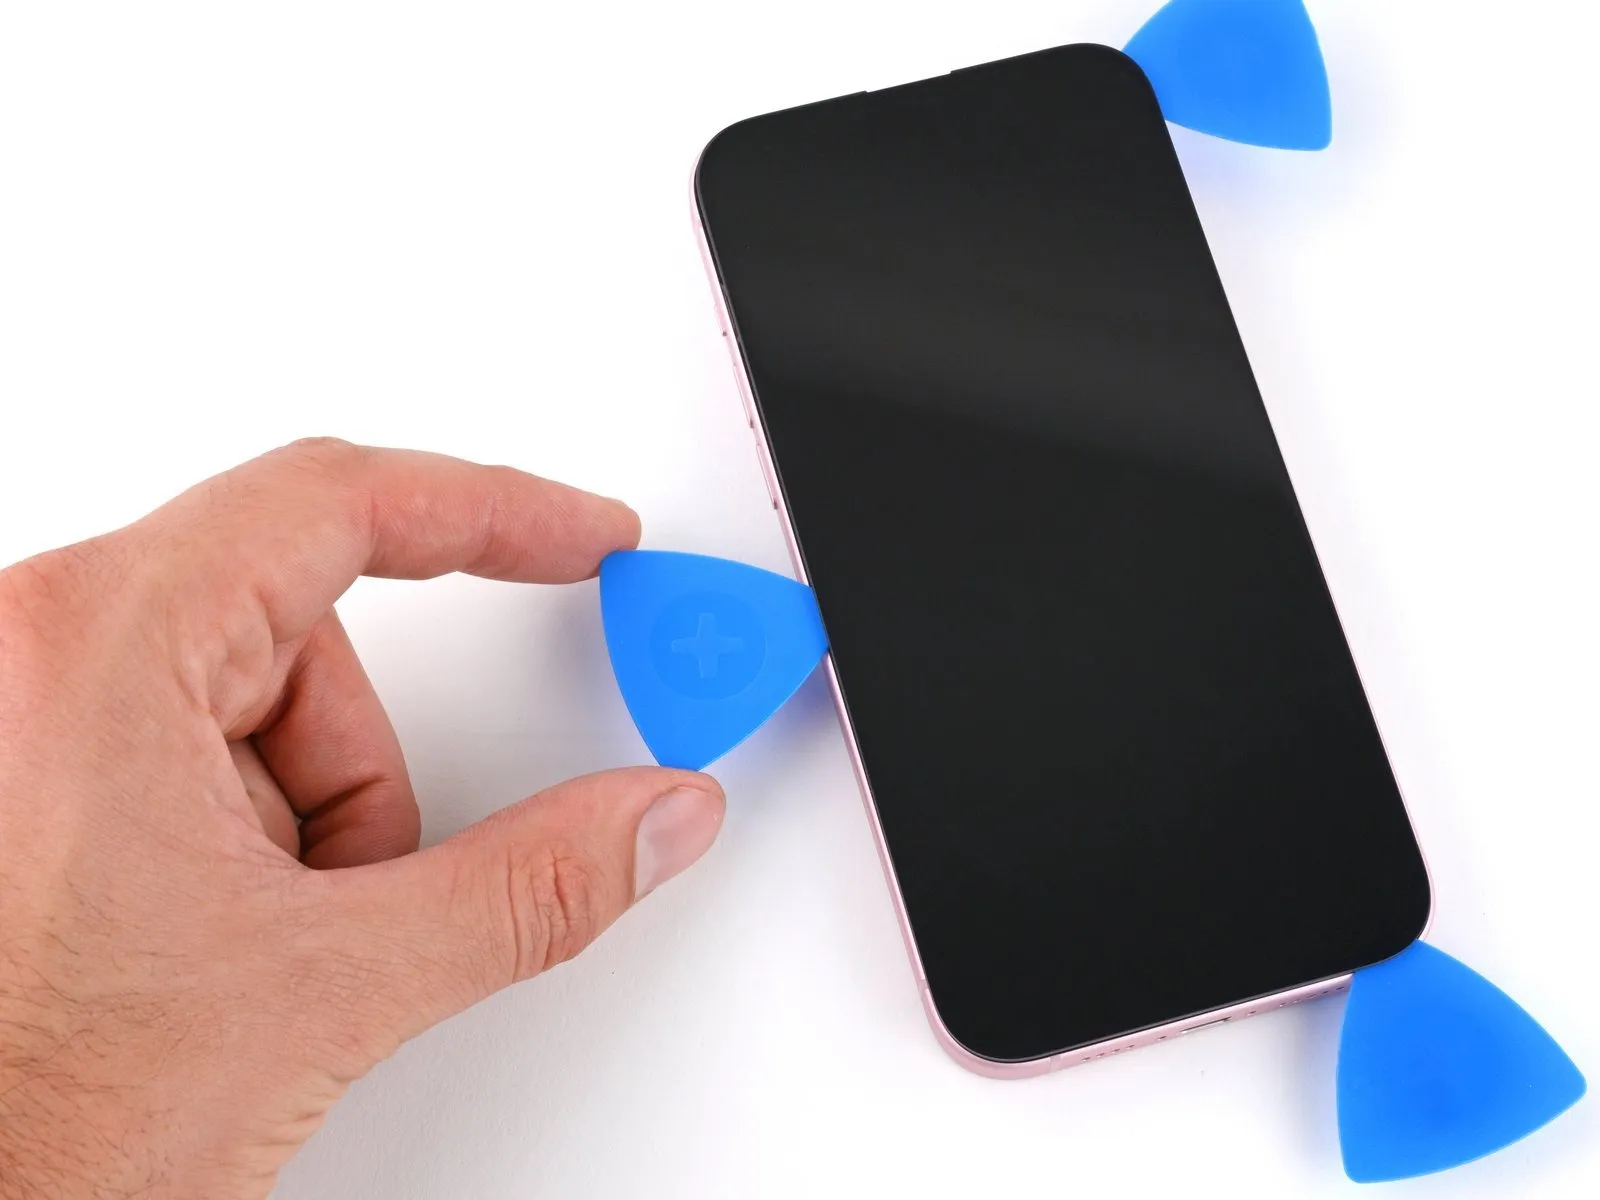
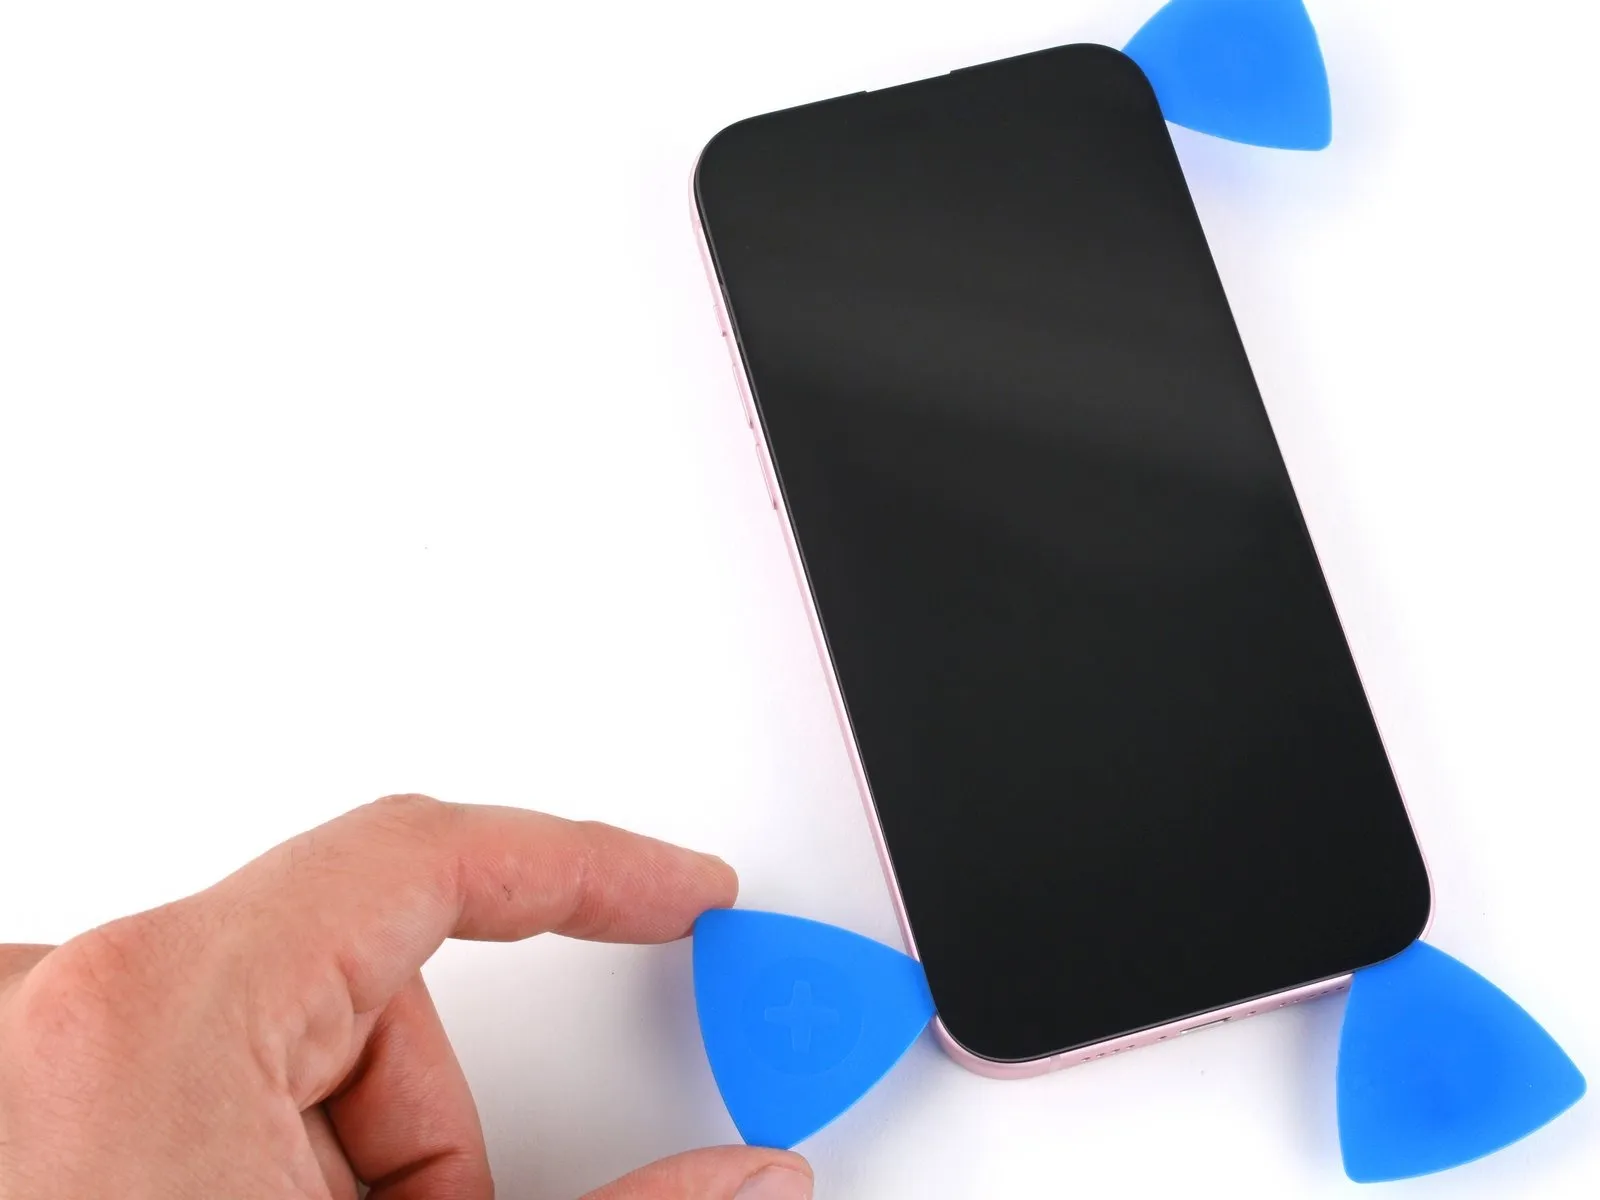
- To prevent damage to the two screen-to-phone cables, ensure the opening of your tool does not exceed a depth of 3 millimeters near the left side.Carefully maneuver your opening tool along the upper-left corner and the left edge of the display assembly.This action will disengage the retaining clips and loosen the adhesive bond holding the screen in place.
- Separation of the screen from the device is achieved through this controlled release of the adhesive.
Step 15 | Swing open the screen

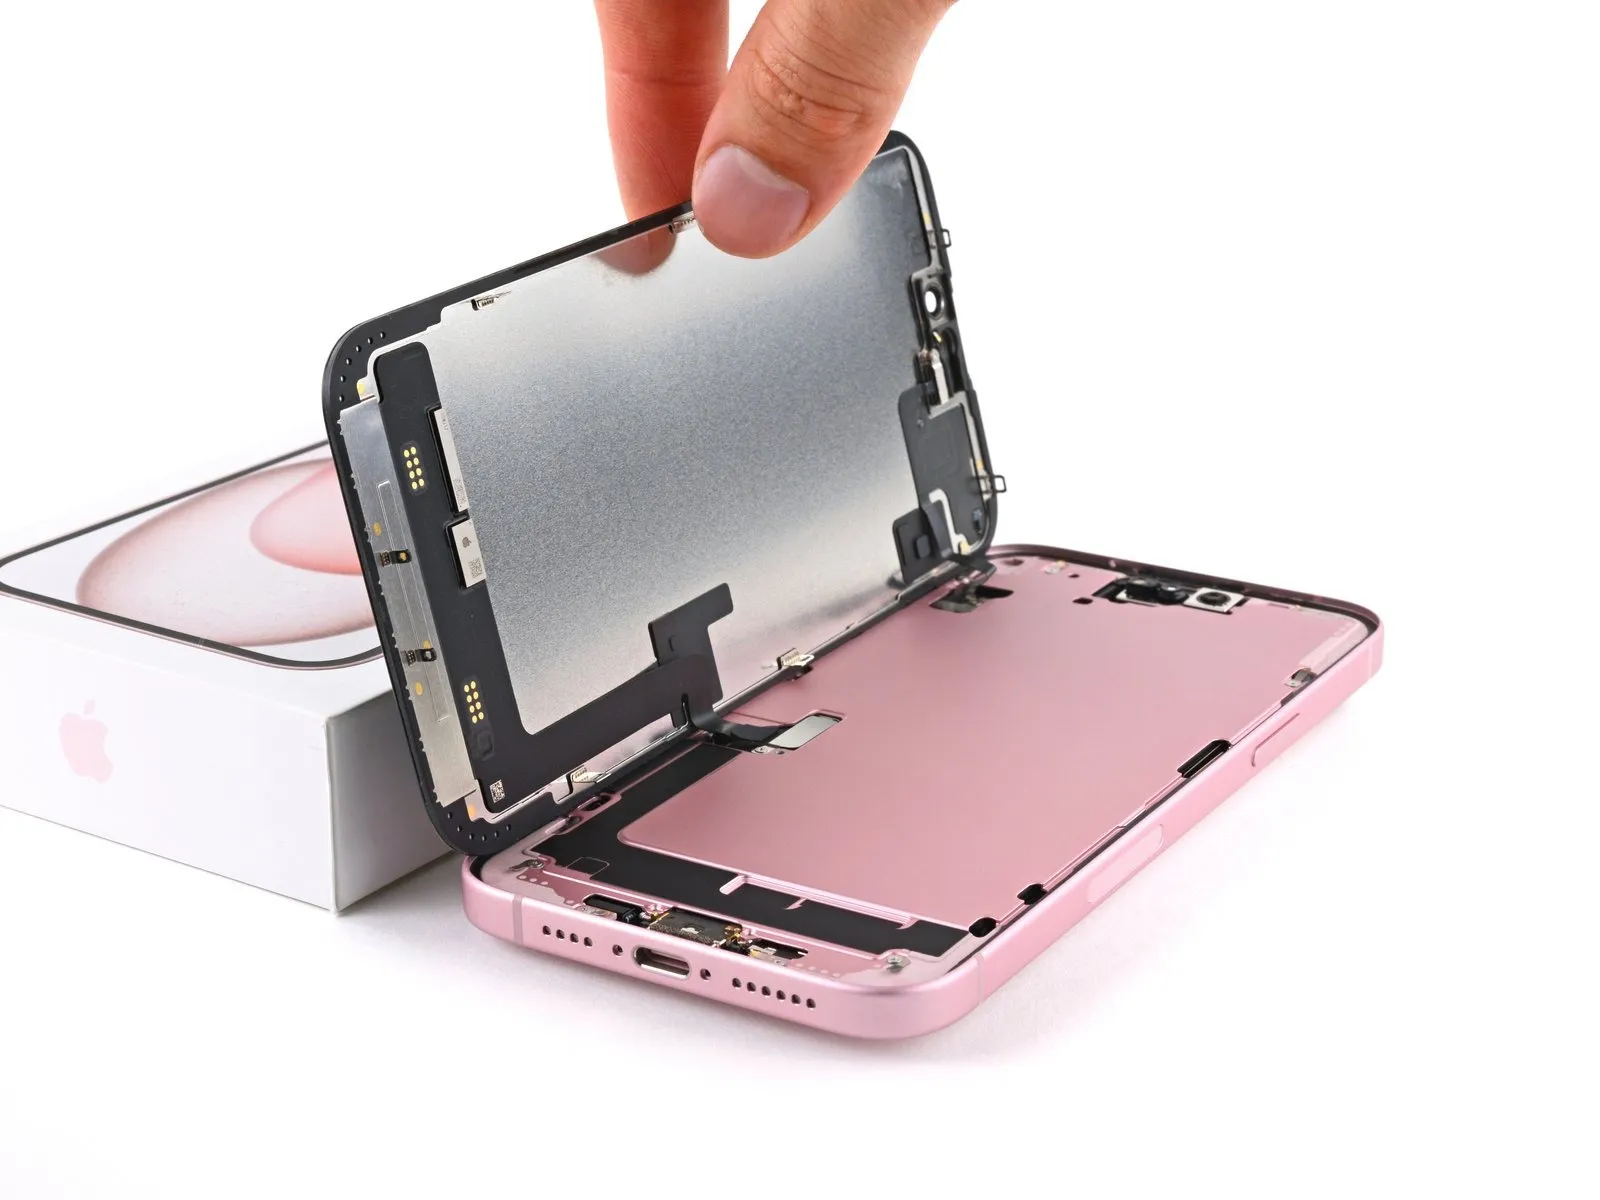
Carefully pivot the display assembly away from the phone's left side.
Should resistance be encountered during screen separation, re-examine the device's edges to identify any remaining adhesive or secured clips.
To prevent cable stress, prop the display open using a supporting structure like a box.
Step 16 | Unfasten the front sensor connector cover

Employ a specialized tri-point Y000 driver for disassembly.The screw, measuring 0.9 millimeters in length, requires a tri-point Y000 driver for removal.A tri-point Y000 driver is essential for loosening the securing screw.To detach the front sensor connector cover, utilize a tri-point Y000 driver.The front sensor connector cover is fastened with a 0.9 mm screw, necessitating a tri-point Y000 driver for its removal.
Step 17 | Remove the cover

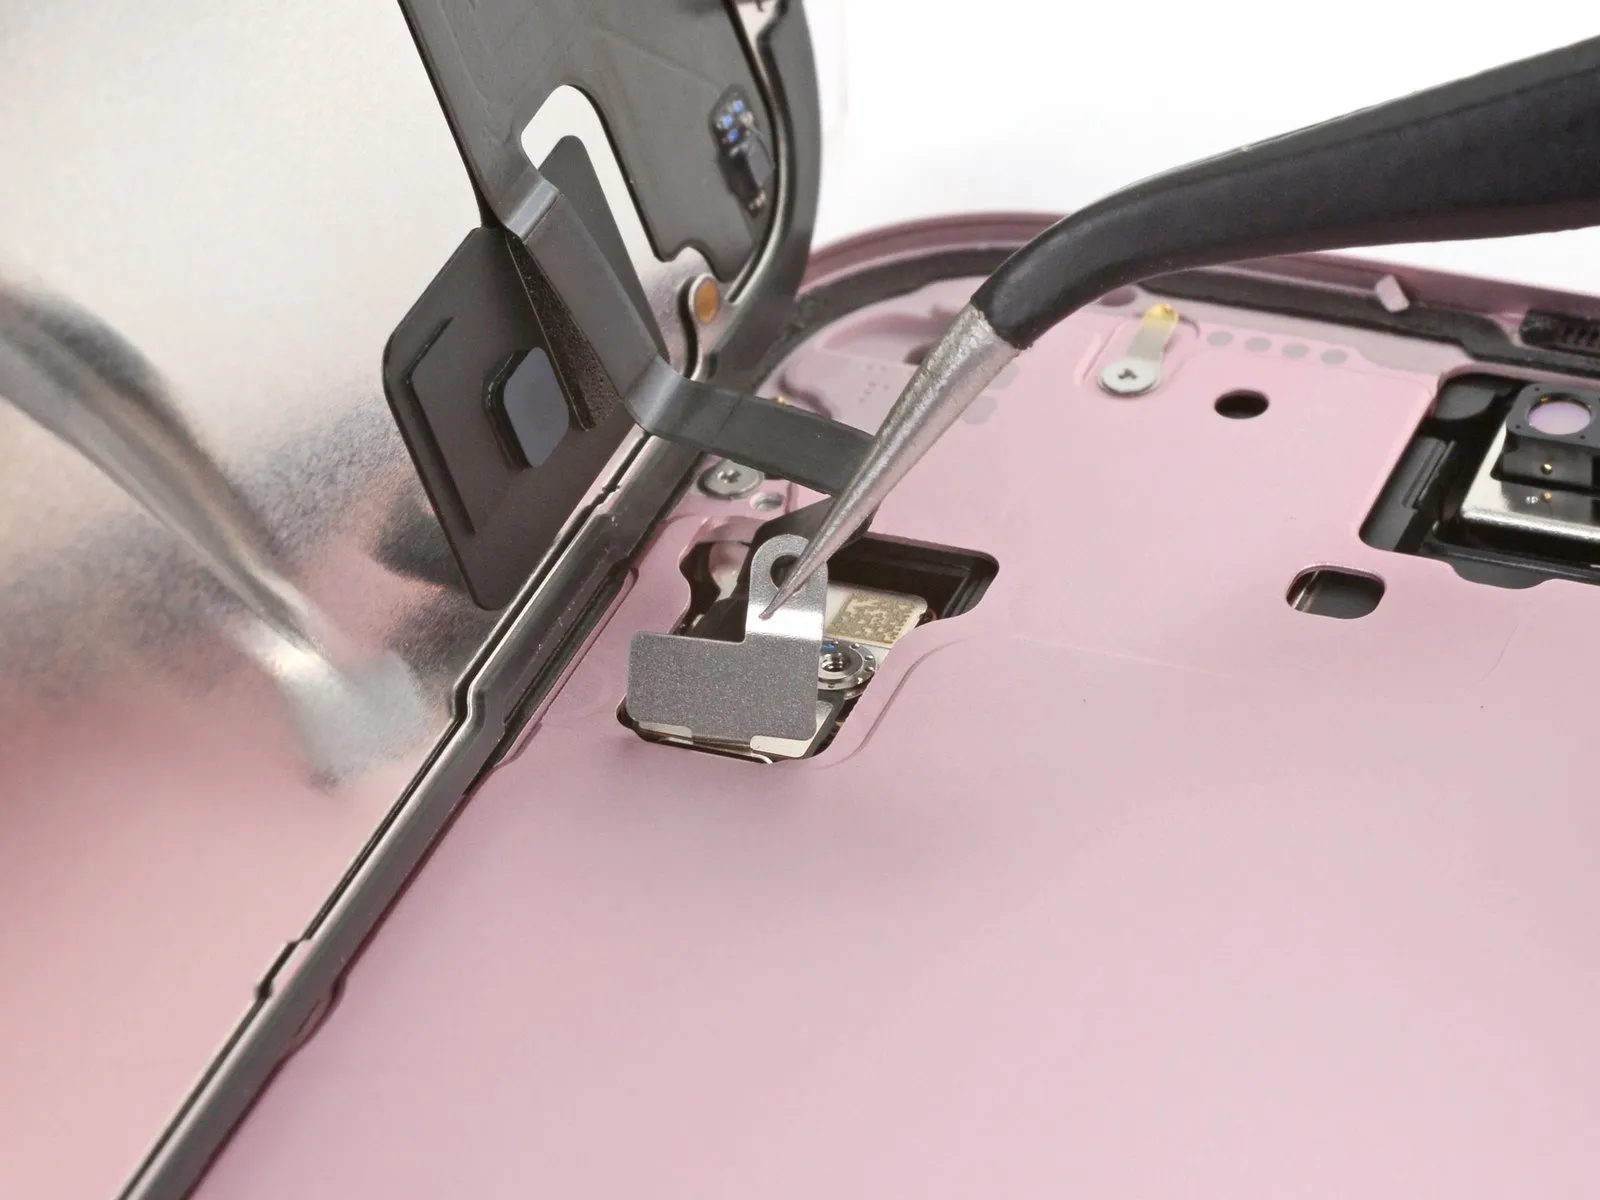
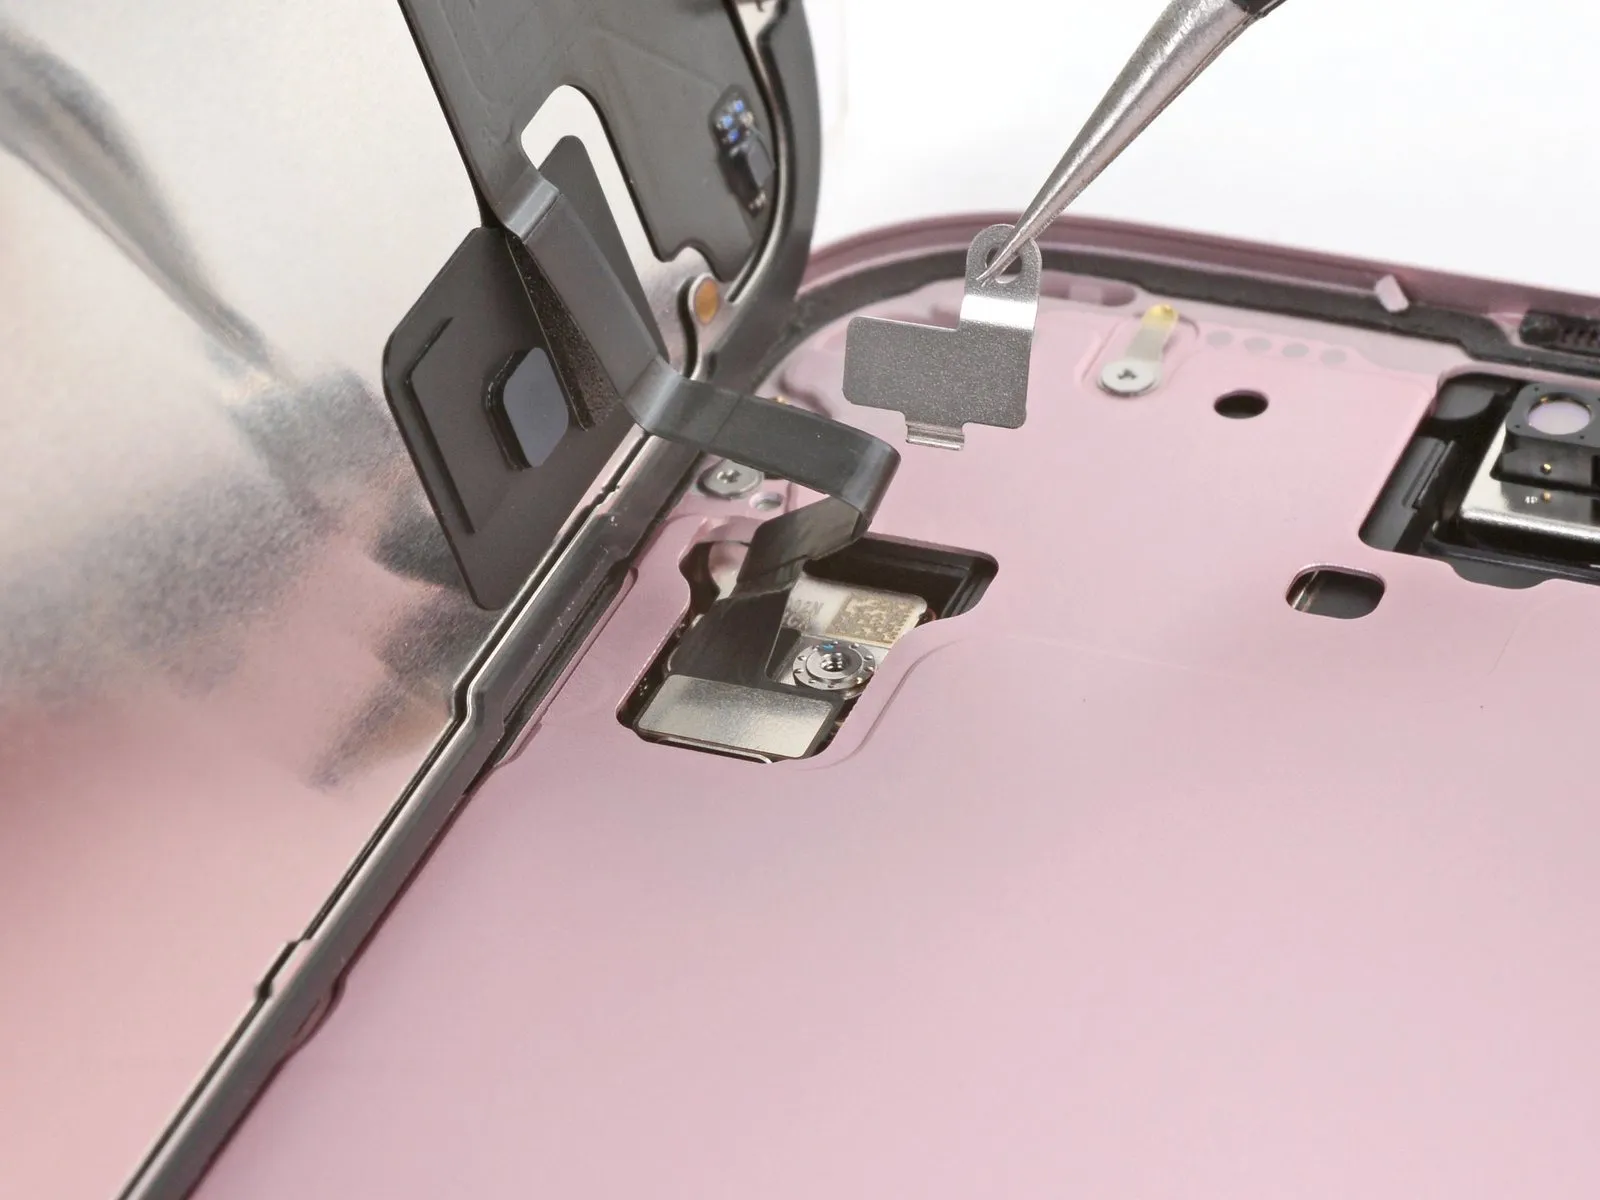
- Employ tweezers to elevate the cover, achieving a 90-degree opening.Disengage the cover's securing feature from the designated slot located on the logic board.
- Detach the cover completely from its position.
- Proceed with the removal of the cover.
Step 18 | Disconnect the front sensor

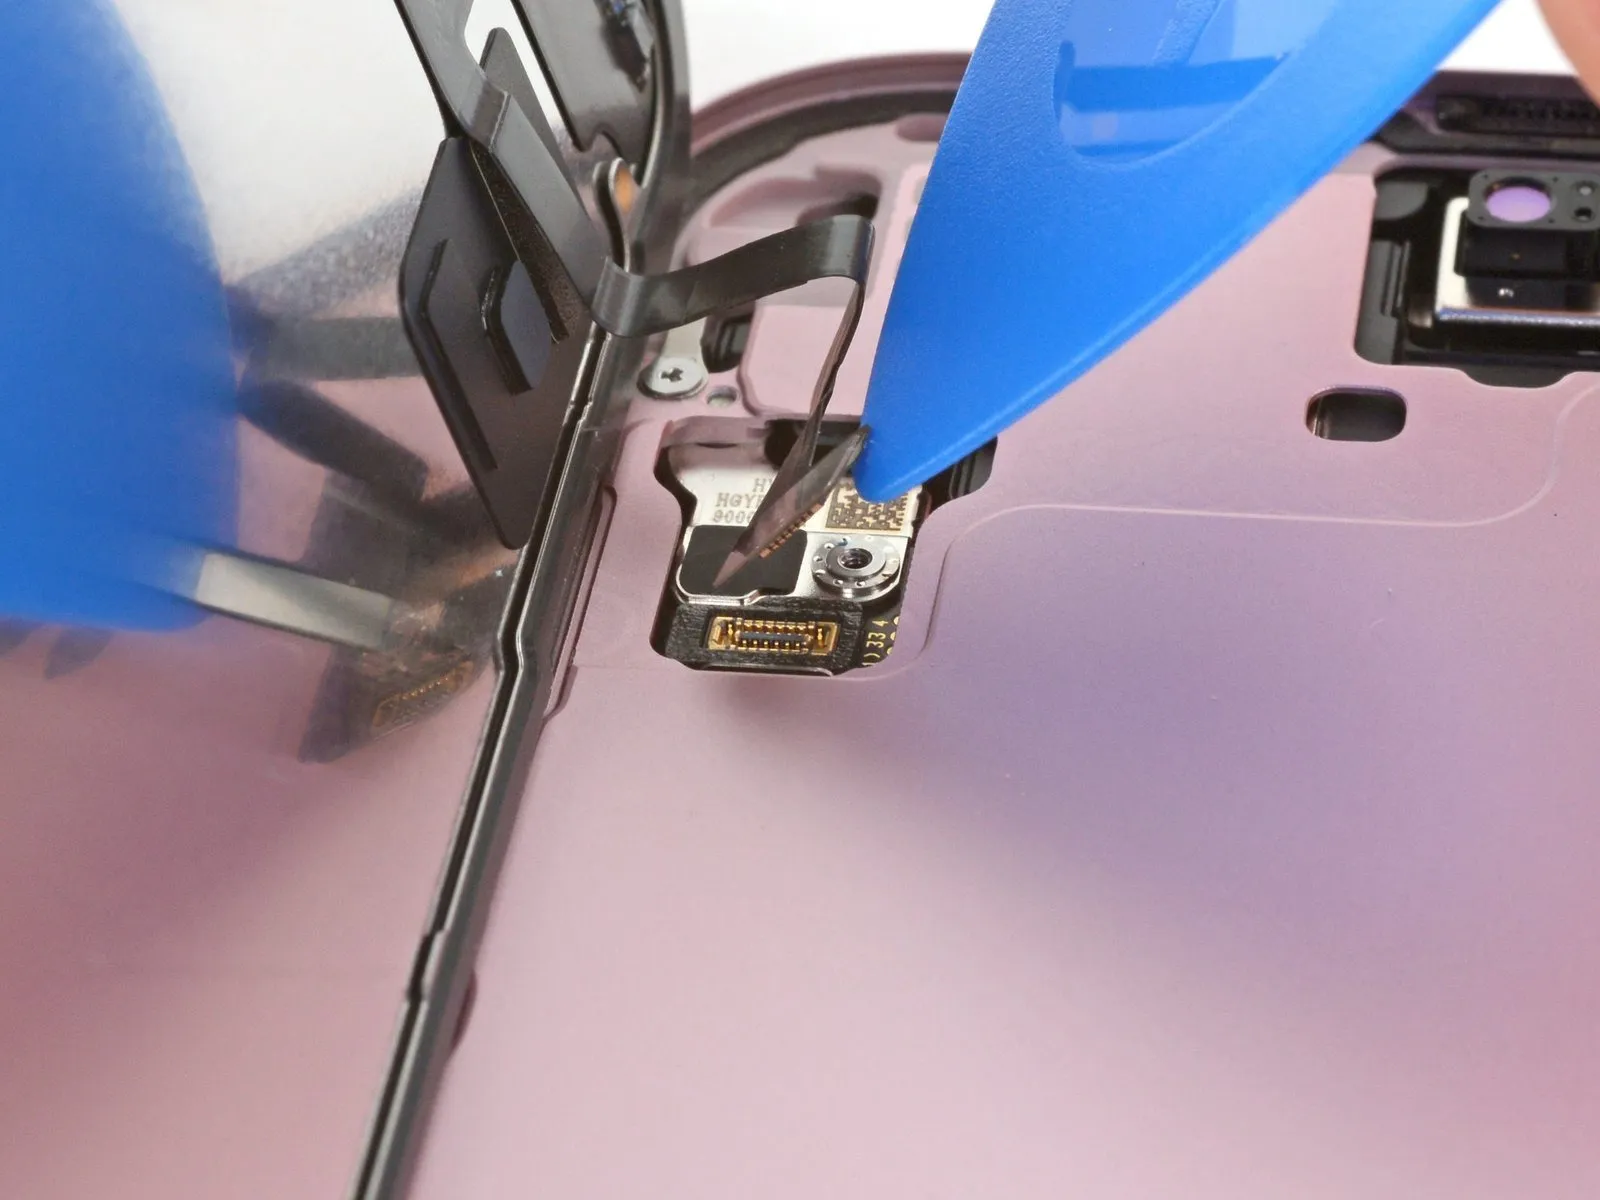
- Utilize a specialized opening tool to release the front sensor's connector by leveraging it to separate the press connector.Reattachment of a press connector necessitates precise alignment with its corresponding socket, followed by a controlled downward force on a single lateral aspect until an audible click confirms secure engagement, subsequently applying similar pressure to the opposing side.
- The press connector's secure connection is verified by a distinct clicking sound upon application of downward pressure to both sides after initial alignment with its socket.
Step 19 | Unfasten the screen connector cover

Step 20 | Remove the cover

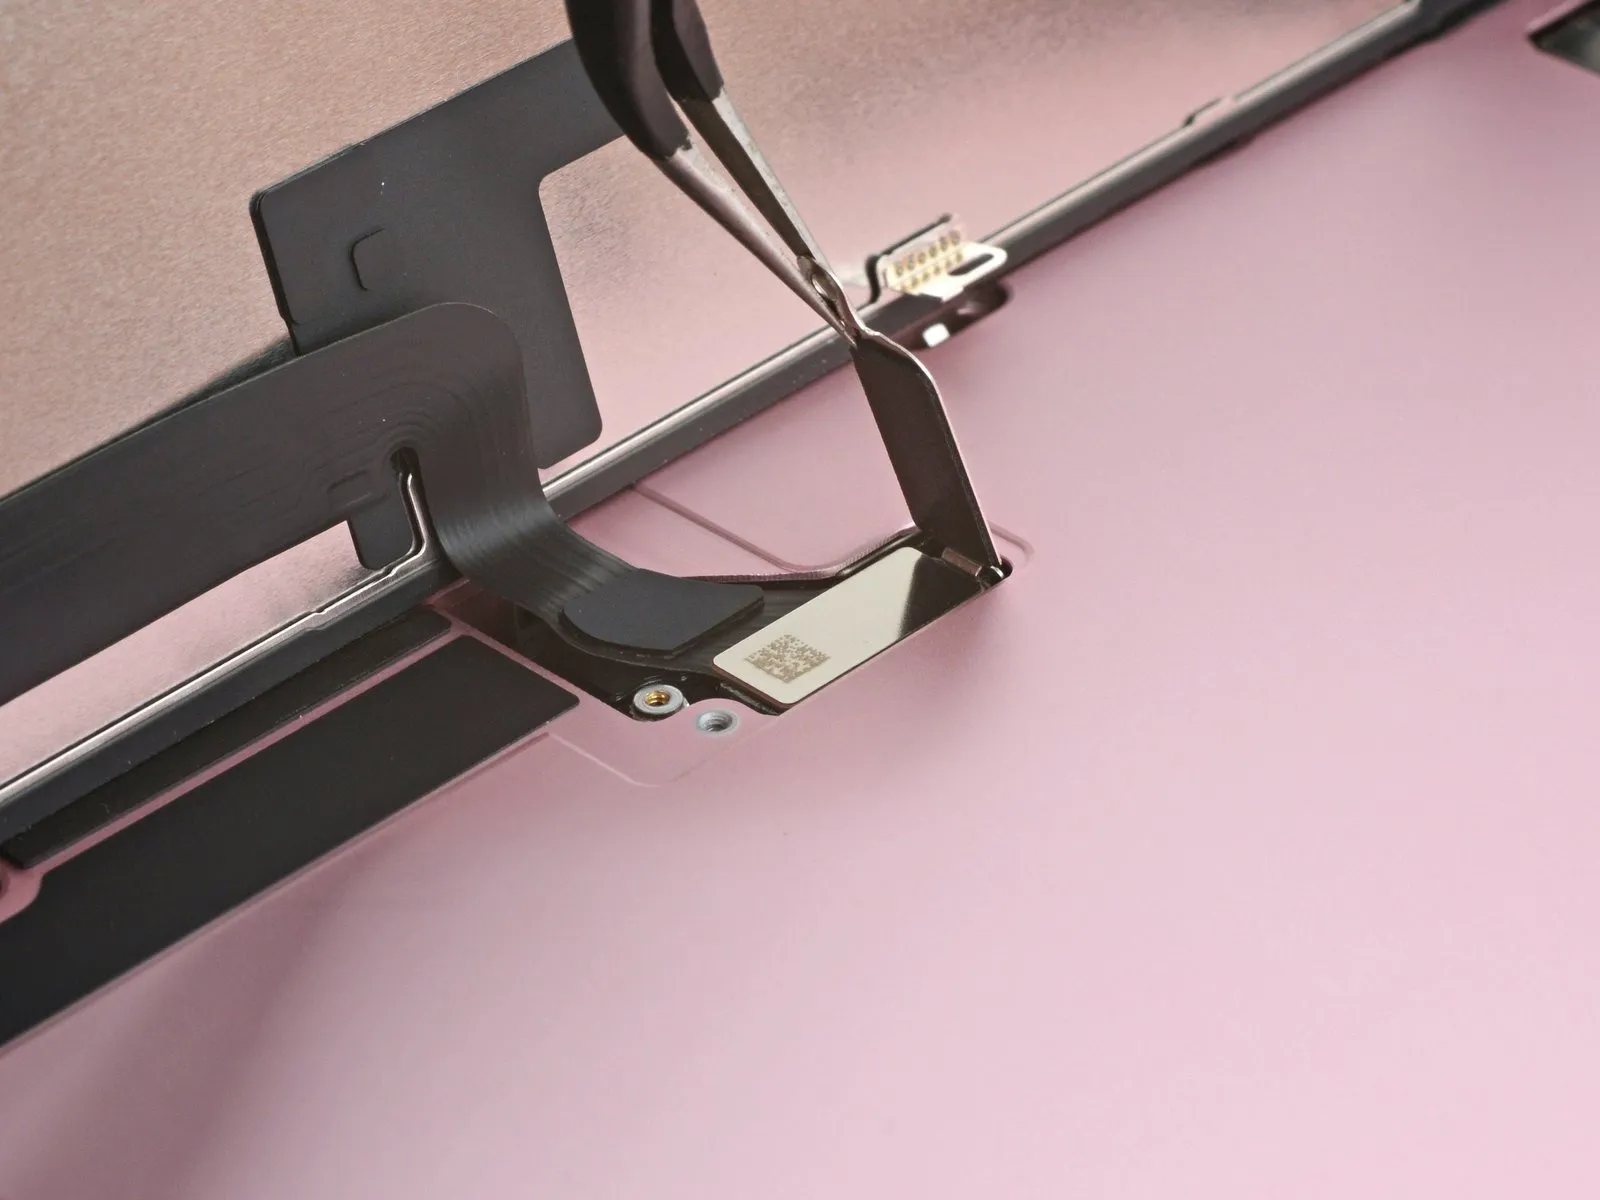
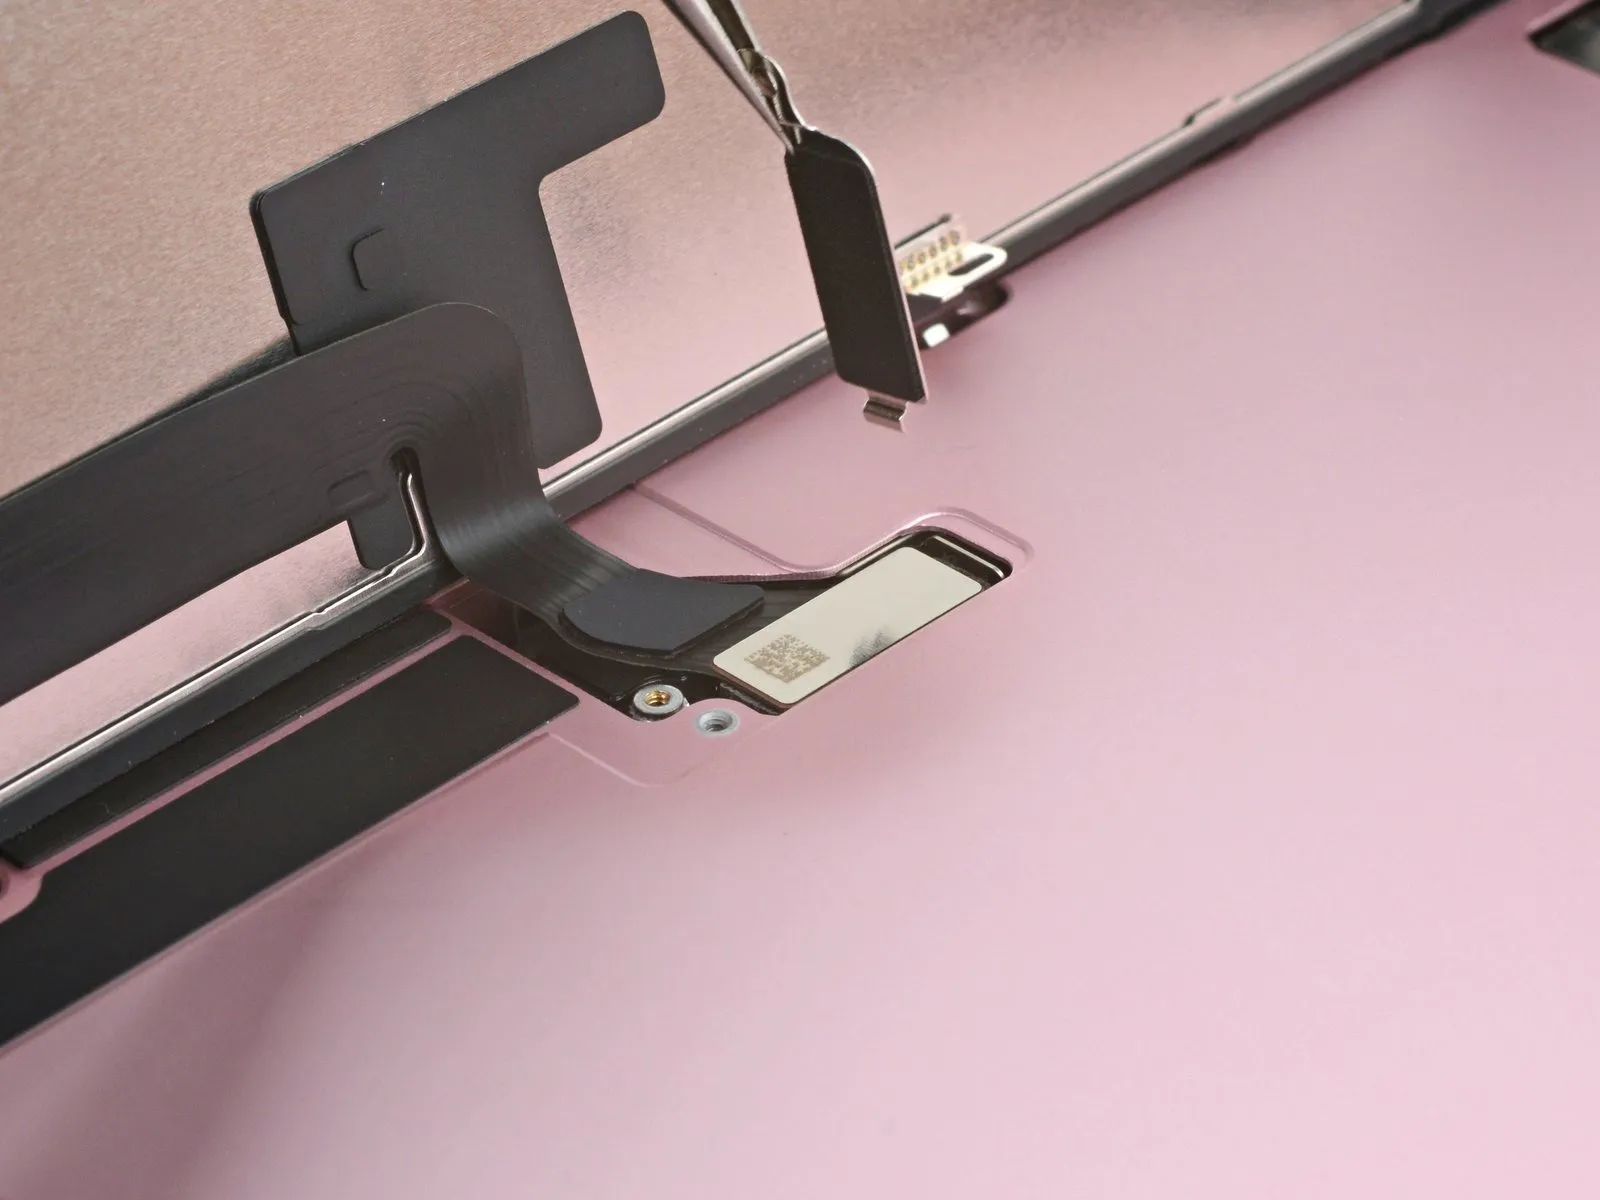
- Employ tweezers to elevate the cover, disengaging it from the retaining hook situated on the logic board.The cover should be detached from its secured position.
- Proceed with the removal of the cover.
Step 21 | Disconnect the screen
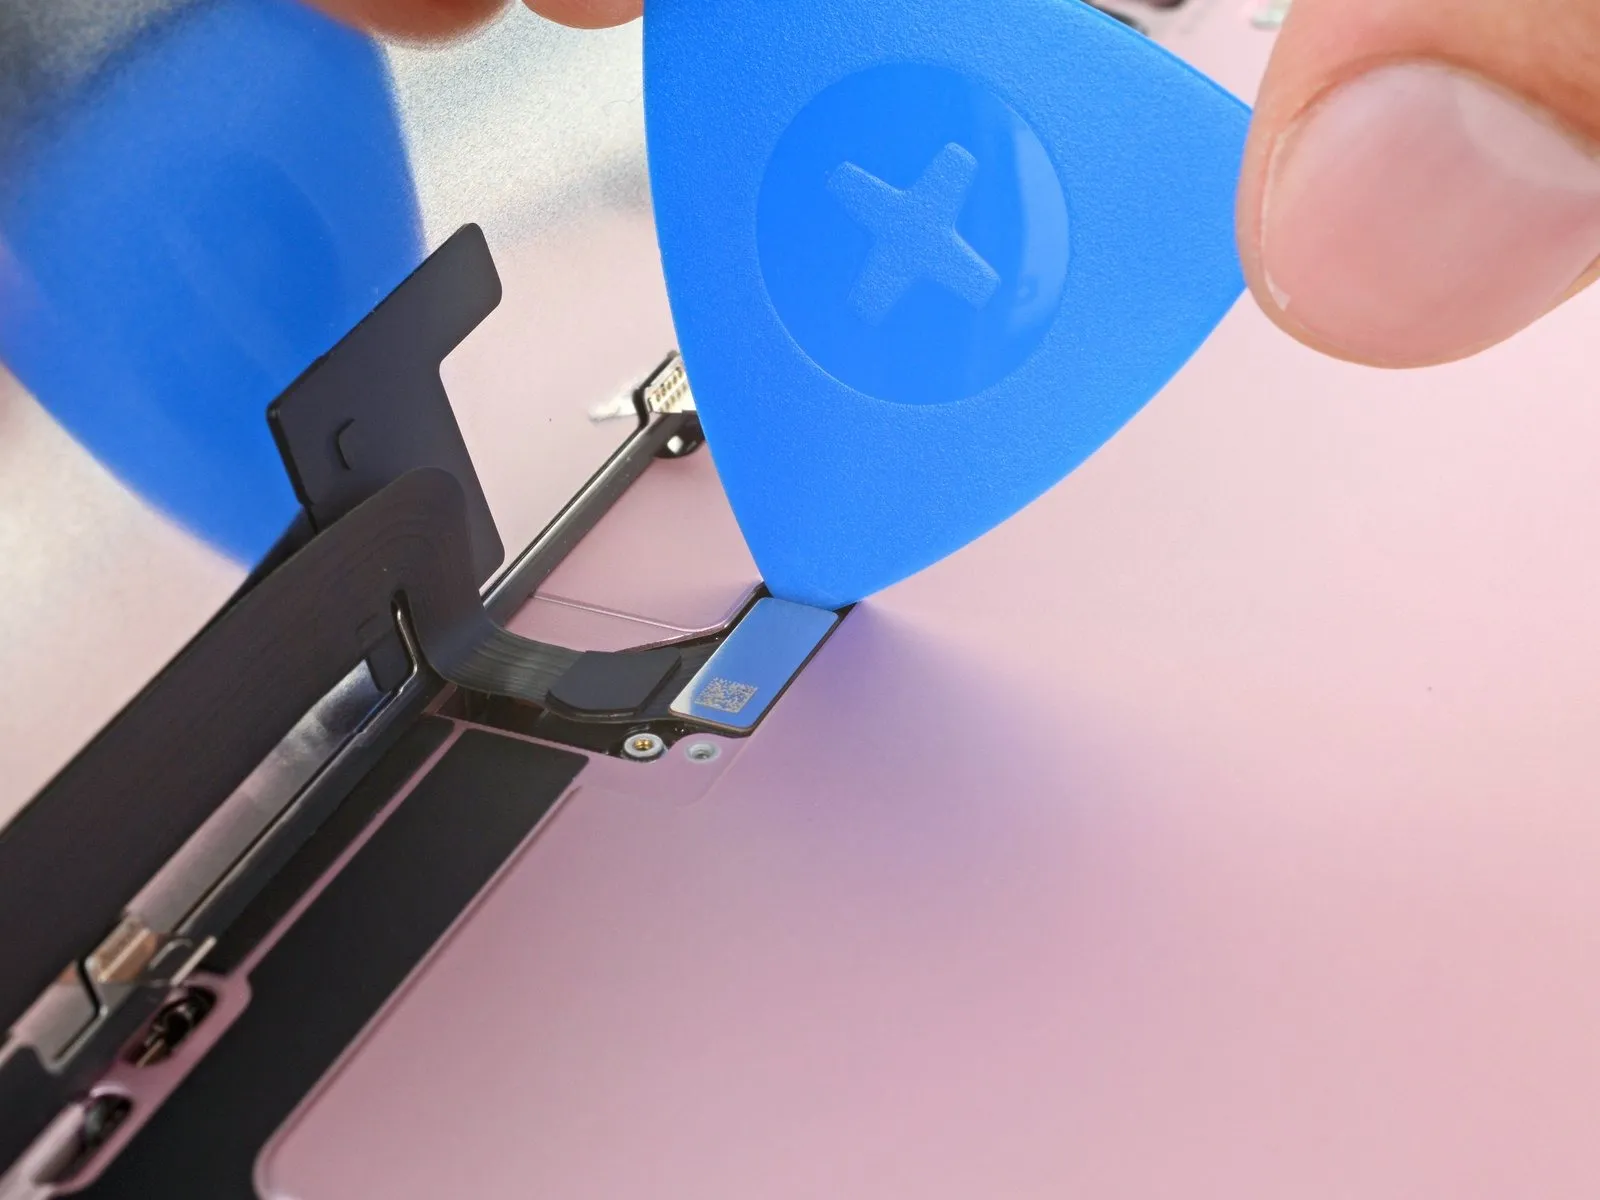
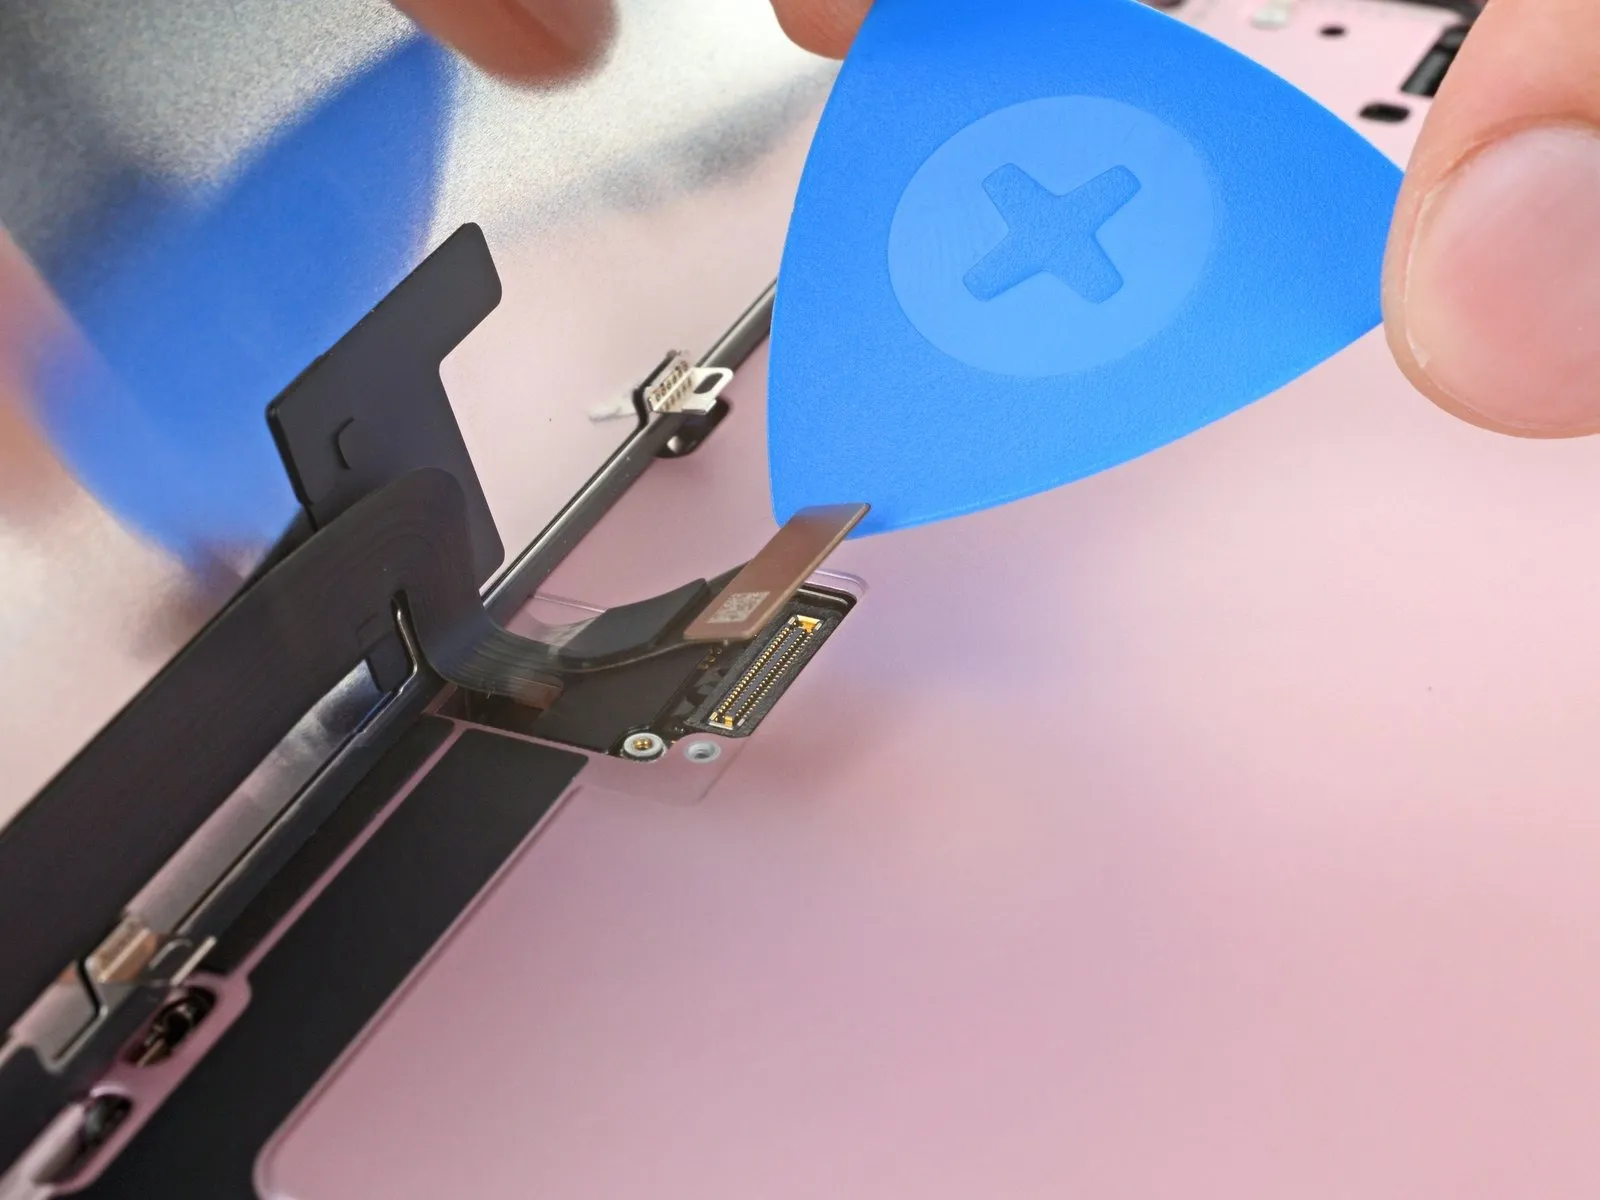
- Employing the pointed end of a prying tool, carefully lift and detach the screen press connector.
Step 22 | Remove the screen
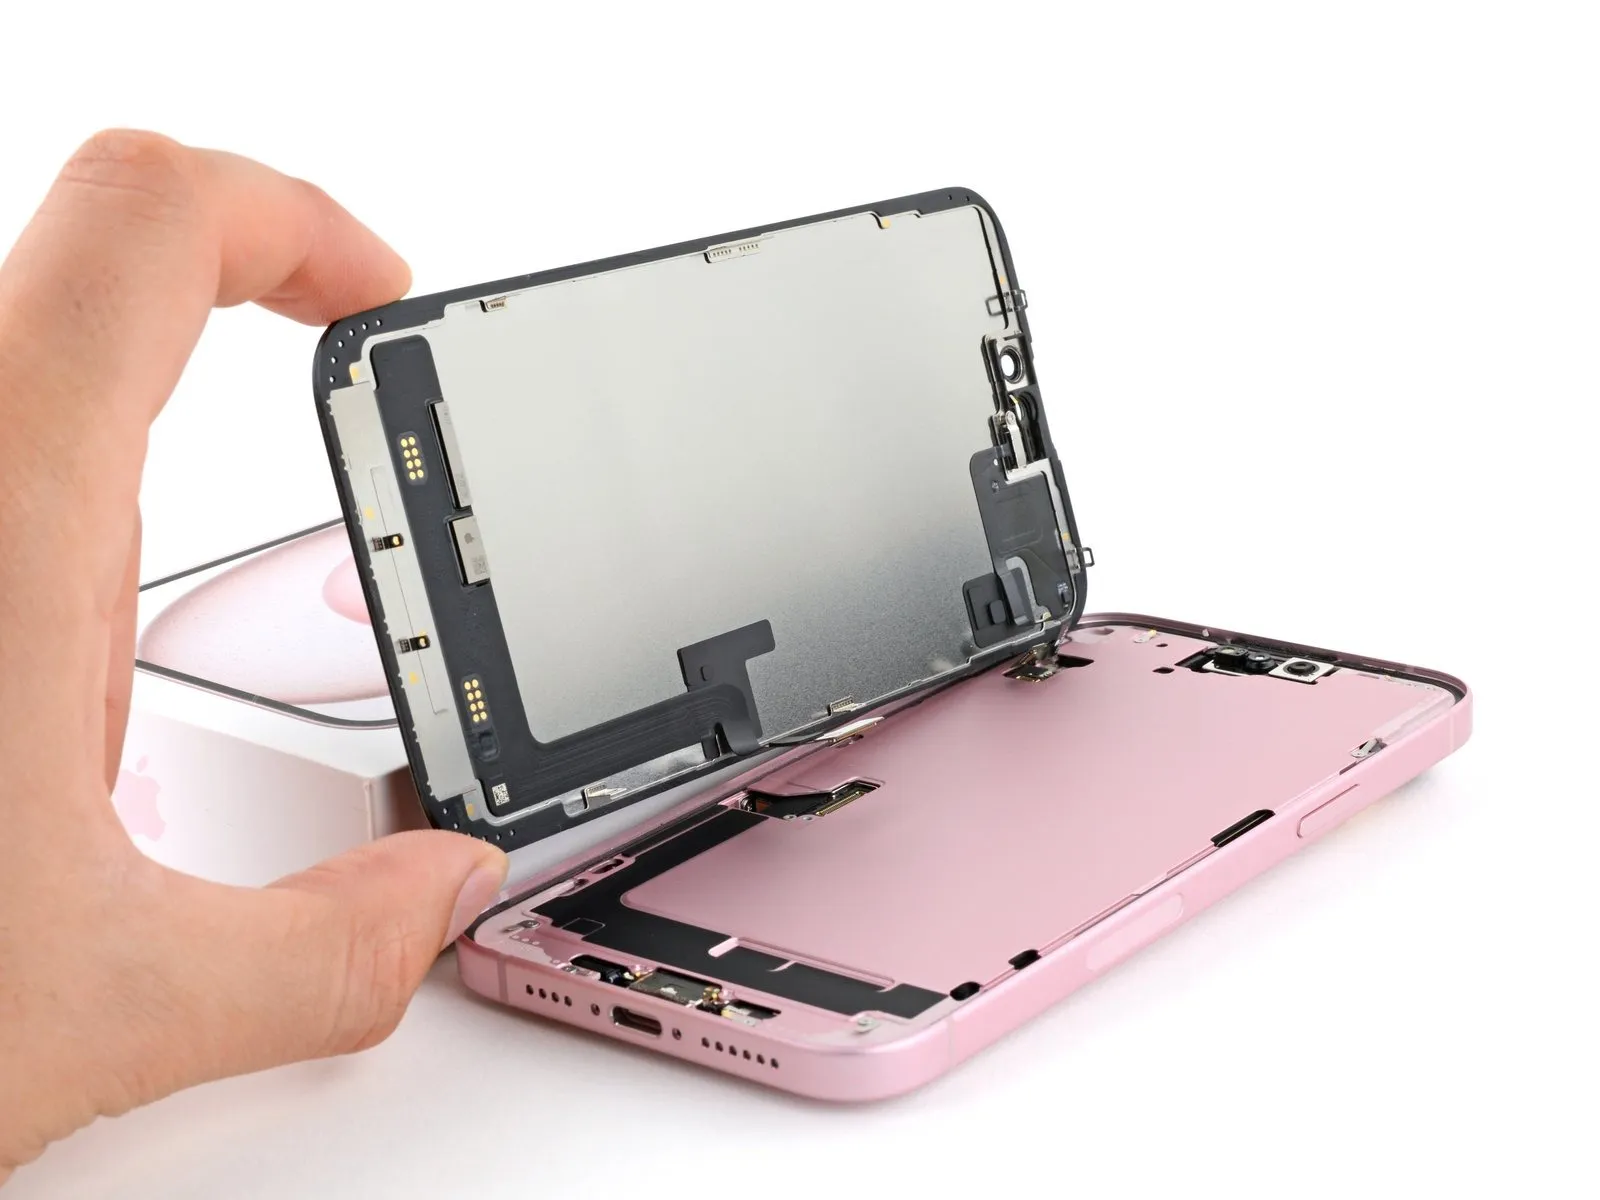
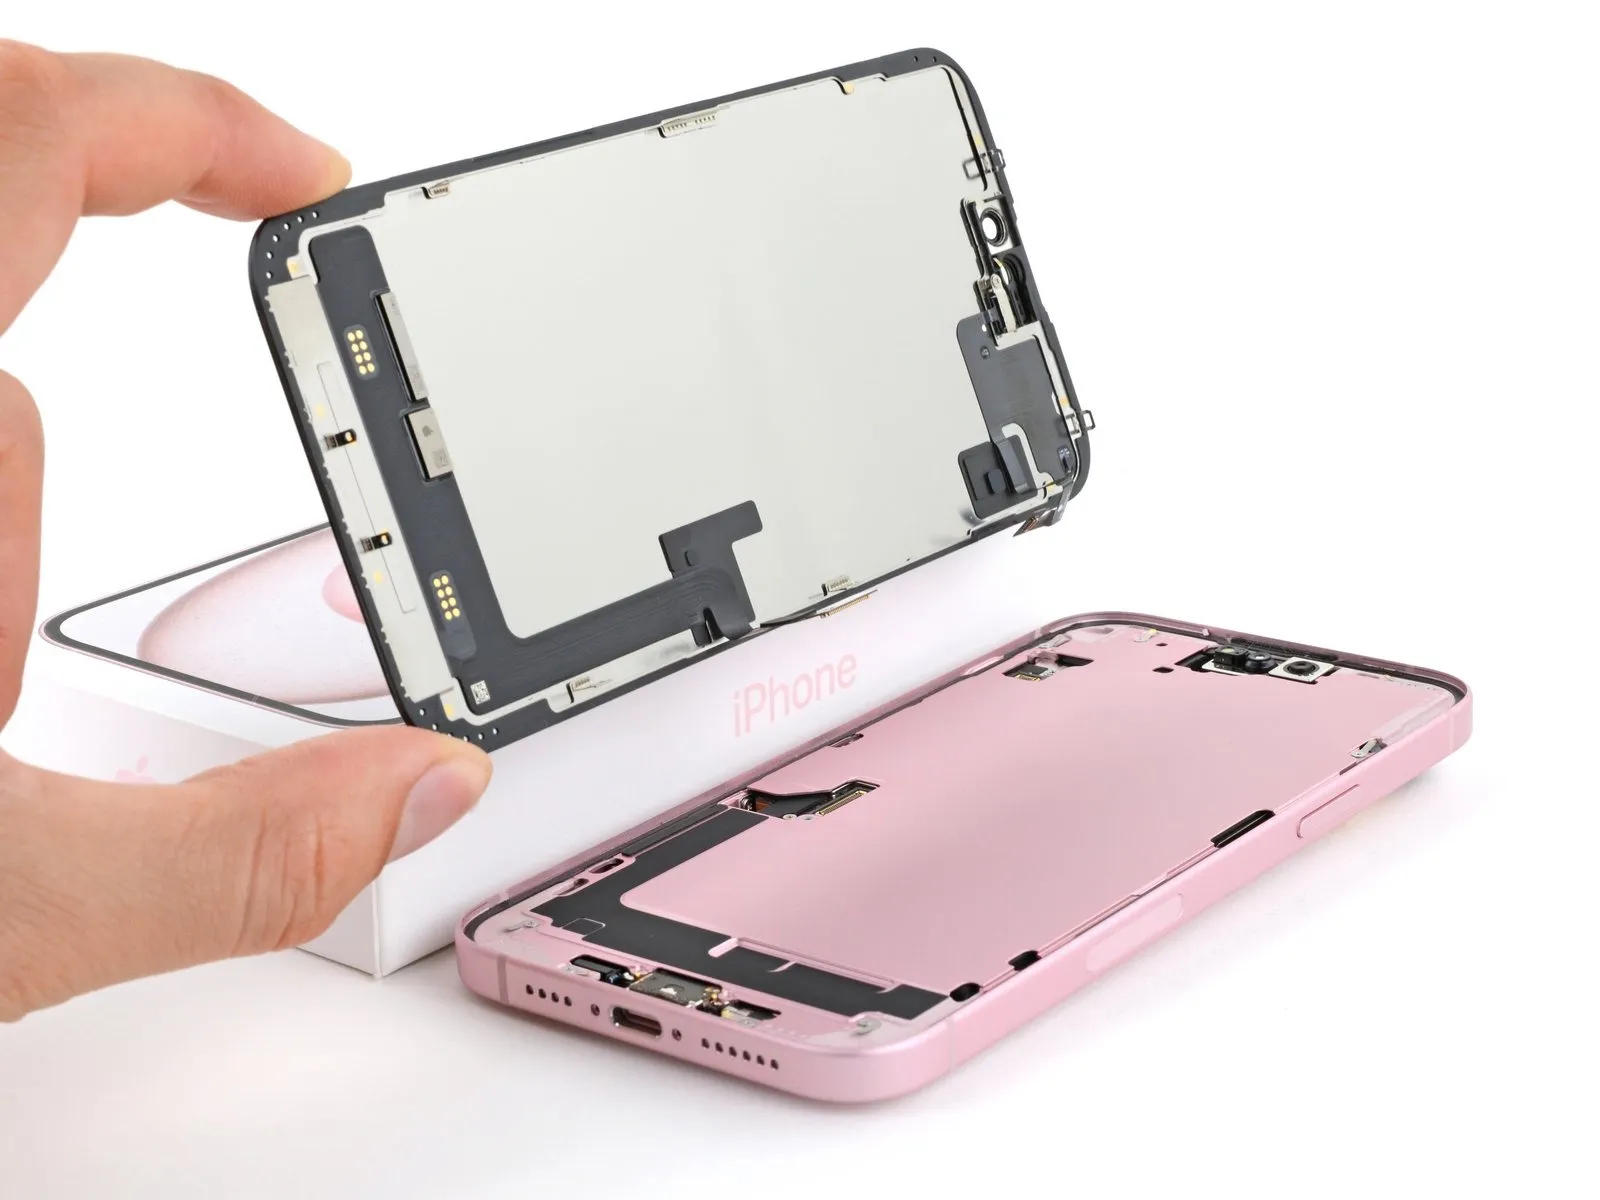
- Detach the display panel.
Step 23 | End of disassembly

Having finished the disassembly process, the following instructions detail the reassembly procedure.
To ensure proper connection during reattachment, meticulously position each connector above its corresponding socket, applying pressure initially on one side with a fingertip or spudger, then repeating on the opposite side until a distinct click confirms secure engagement; avoid applying excessive force, and if difficulties arise, reposition the connector and retry.
The visual aids for reassembly depict the iPhone 15 standard model; while aesthetic variations may exist, the outlined steps remain accurate.
Step 24 | Remove the screen adhesive


- Exercise caution to prevent any harm to the spring contacts during the cleaning process of the frame.
Prior to finalizing the phone's reassembly, it's advisable to verify the repair's functionality; connect the display, activate the device, and confirm expected operation, then deactivate it to proceed.
Adhesive residue, which is challenging to eliminate, often remains on the phone's surfaces; if removal proves problematic, applying warmth with a hairdryer or heat gun can assist.
Employ a spudger to lift the screen adhesive, facilitating a grip with tweezers.
Employ tweezers or your fingertips to detach the adhesive completely around the iPhone's edges.
Step 25


- Remaining adhesive traces can negatively impact the iPhone's water resistance, necessitating a complete cleaning of the frame.
- To facilitate cleaning, secure a microfiber cloth or a cloth free of lint around the tip of a spudger.Apply a small quantity of isopropyl alcohol, with a concentration exceeding 90%, onto the cloth's surface.Employing a single direction, meticulously clean the frame's edge to eliminate adhesive remnants.
- Allow several minutes to elapse to ensure complete evaporation of any surplus isopropyl alcohol.
- Continued work should be delayed until the alcohol has fully evaporated to prevent complications.
Step 26 | Ambient light sensor information

The ambient light sensor's position is situated behind the display assembly, immediately below the opening designed for the Face ID sensor array.
Determine whether the newly acquired screen component includes a pre-installed ambient light sensor; if so, proceed directly to the subsequent procedure.
Step 27 | Remove the ambient light sensor bracket


Employ a Phillips screwdriver to detach the screw, measuring 1.3 millimeters in length, which holds the ambient light sensor bracket in place.The bracket that secures the ambient light sensor is fastened with a screw requiring removal using a Phillips screwdriver.A Phillips screwdriver is necessary for unscrewing the 1.3 mm screw that provides stability for the ambient light sensor bracket.
Step 28


Employ tweezers or your fingertips to detach and extract the bracket securing the ambient light sensor.
Step 29 | Heat the ambient light sensor

- Employing a hair dryer, heat gun, or iOpener with a heating function can loosen the adhesive securing the ambient light sensor and its associated cable.Applying warmth to the adhesive beneath the ambient light sensor and cable facilitates separation.The adhesive bonds holding the ambient light sensor and cable in place become more pliable when exposed to heat.Utilize one of the listed tools – a hair dryer, heat gun, or iOpener – to gently warm the adhesive.Gentle heating of the adhesive is necessary to prevent damage to the ambient light sensor and its cable during removal.
Step 30 | Pry up the ambient light sensor


- Employ a spudger to carefully dislodge the ambient light sensor.
Step 31 | Peel up the ambient light sensor cable


- Carefully insert a separation tool beneath the ambient light sensor cable, initiating the process close to the sensor itself and progressing toward the distant corner to disengage it from the display.The cable's release from the screen is achieved through this sliding motion.Should the adhesive bond resist separation, additional heat application is necessary.
- Increased warmth facilitates easier adhesive detachment.
Step 32 | Remove the ambient light sensor

- Employing tweezers, carefully detach the ambient light sensor from the display surface.
Step 33 | Prepare the ambient light sensor


- Employing tweezers allows for the careful relocation of any adhesive residue potentially obstructing the ambient light sensor during screen detachment.The repositioned adhesive ought to create a defined perimeter encircling the elevated, rectangular white feature.Should the existing adhesive become compromised or remain adhered to the discarded display assembly, substitute it.
- A narrow band, measuring 1 millimeter in width, of flexible, double-sided adhesive tape is required for the replacement.This replacement adhesive strip should be applied along the lower edge of the sensor's mounting area.Ensuring proper sensor functionality necessitates a clean and secure adhesive border.
Step 34 | Place the ambient light sensor


- Ensure the ambient light sensor is positioned correctly within the designated cavity located on the rear surface of the display assembly.
- A specialized prying tool, such as a spudger, or a fingertip may be utilized.Apply gentle pressure to the ambient light sensor to secure it within its intended mounting area.This action will seat the sensor firmly within the recessed compartment on the display's backside.
Step 35 | Warm the ambient light sensor

- To facilitate separation, apply warmth to the adhesive securing the ambient light sensor and its associated cable, utilizing a hair dryer, heat gun, or iOpener; ensure the temperature remains moderate, avoiding excessive heat.
Step 36 | Press the ambient light sensor


- Apply direct pressure to the ambient light sensor cable using a fingertip.
Should the ambient light sensor cable fail to adhere, secure it with several small segments of double-sided adhesive tape.A suitable adhesive material for this purpose is Tesa tape.The Tesa tape should be affixed to the dorsal surface of the sensor cable.
Step 37 | Install the ambient light sensor bracket

- Employing tweezers or direct finger manipulation, secure the ambient light sensor bracket onto the sensor's rear surface by hooking it into position.The bracket's placement should ensure it is firmly seated against the sensor's back.This action establishes the physical connection between the bracket and the sensor, maintaining its alignment.
Step 38
- Employ a Phillips screwdriver for the installation process.A 1.3-millimeter screw is required for this procedure.The screw's purpose is to fasten the ambient light sensor bracket.Ensure the Phillips screwdriver is appropriately sized for the screw head.Properly securing the bracket with the screw is essential for sensor functionality.
Step 39 | Orient the adhesive


- Ensure proper alignment of the adhesive strip relative to the device by utilizing existing openings, such as those accommodating spring contacts and the front-facing camera.
Variations in appearance may be observed among adhesive components.
Step 40 | Apply the adhesive


- After applying pressure to secure the adhesive, any adjustments are impossible; complete removal and replacement with fresh adhesive will be necessary.
Initiate the peeling process of the adhesive's backing liner from its bottom edge using the provided pull tab, but refrain from complete removal.
Maintaining the liner's separation, meticulously position the visible adhesive edge in relation to the iPhone's lower frame.
Step 41


Step 42


- Gradually remove the protective backing from the adhesive strip, ensuring firm contact with the iPhone's perimeter during application.
- Proper alignment of the lower edge will typically result in the side and top edges seating correctly; if misalignment occurs, discard the adhesive and reapply a fresh strip.
- Should a replacement adhesive strip be unavailable and misalignment has already occurred, the iPhone can be reassembled and used temporarily without adhesive; however, be advised that water resistance will be diminished until new adhesive is installed.
Step 43 | Press the adhesive into place


- Verify correct liner positioning by confirming that both the spring connectors and the front camera are situated within their designated openings; if misalignment is observed, discard the current adhesive sheet and initiate the process anew.
- Employing the broad, planar edge of a spudger tool, apply consistent pressure to secure the adhesive across the entire perimeter of the iPhone’s housing.
- Exercise caution to avoid applying force to the camera module, spring contacts, or any other delicate internal elements during the adhesive securing process.
Step 44 | Remove the top liner


- Utilize the tip of a spudger to gain access beneath the aperture in the bottom edge of the top liner, which is situated on the frame.
- Apply upward force with the spudger to disengage the liner from the frame's surface, creating sufficient space to secure a manual grip.
- The placement of the pull tab can vary; confirm that you are lifting the complete top liner assembly, as opposed to the thinner liners positioned beneath it.
Step 45


Step 46 | Prop up the screen

- To prevent damage, secure the display panel in an elevated position against the left side of the iPhone’s chassis, utilizing a rigid support like a box.
Step 47 | Connect the screen


- Employ the planar edge of a spudger tool, or your fingertip, to establish contact between the screen and front sensor press connectors.Ensure proper electrical connection by carefully pressing the screen and front sensor press connectors using a flat spudger or a finger.To secure the connection, utilize the broad, flat surface of a spudger or your finger and apply pressure to the screen and front sensor press connectors.
Step 48


- Position the upper edge of the screen connector cover into its designated recess within the frame, subsequently applying pressure via the press connector.
Step 49


- Secure the front sensor connector cover within the frame's designated recess, ensuring a 90-degree orientation.Position the cover perpendicularly to facilitate proper engagement.The cover should be aligned vertically during installation.
- Place the cover atop the press connector to prepare for securing it.
Step 50 | Install the cover screws


- Employ a specialized Y000 tri-point screwdriver for the installation process of the two screws.The screws utilized for securing the front sensor connector and screen connector covers measure 0.9 millimeters in length.These fasteners maintain the position of the covers protecting the front sensor connector and screen connector.
Step 51 | Remove the final adhesive liners
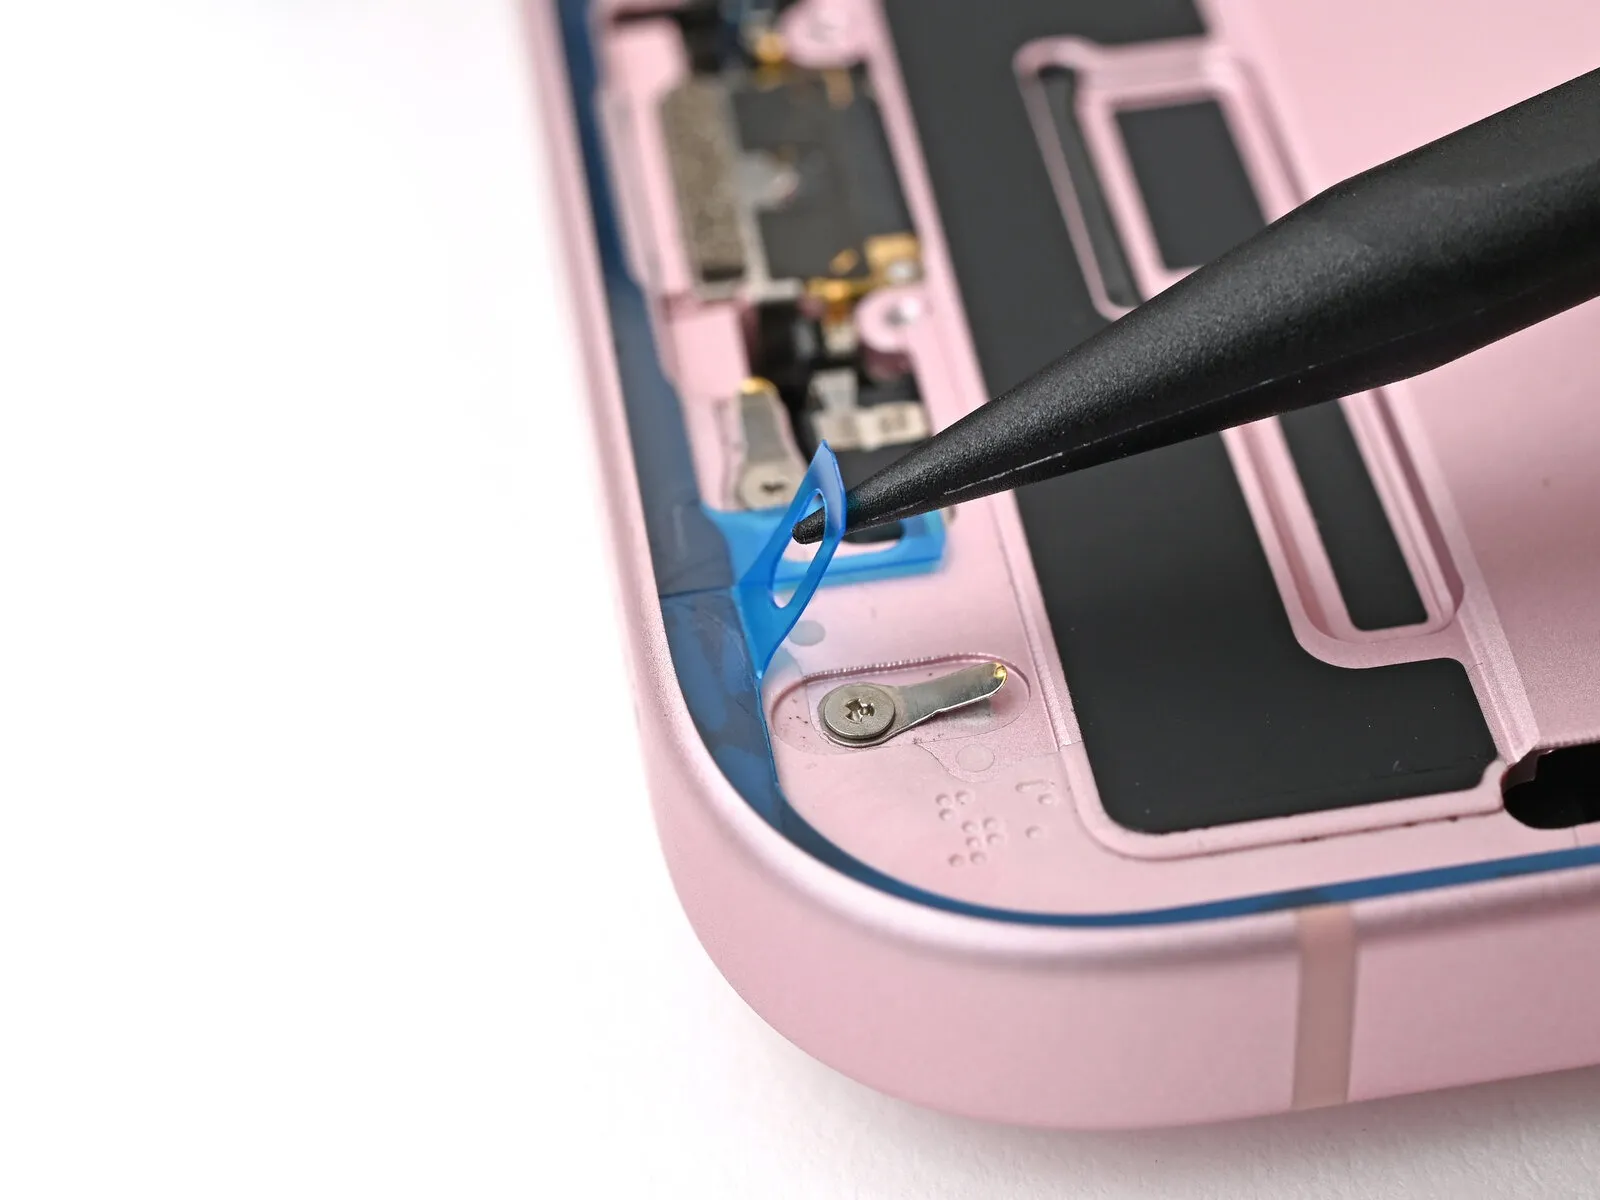

During liner removal in this procedure, the adhesive backing becomes completely visible; prevent any contact with this exposed adhesive.
Employing a spudger or fingertips, detach the pull tabs located at the lower right corner of the frame.
Step 52


Carefully detach the slim protective layer that secures the adhesive material situated on the right and upper borders of the frame.
Step 53


Step 54


- To prevent adhesive contact with the display surface, position the screen above the device, enabling access to the remaining protective liner situated on the left side.
- Employ tweezers or your fingertips to detach the last liner located on the left edge of the device.
Step 55 | Place the screen


- Position the display panel flat against the chassis and apply pressure to ensure the retaining clips securely latch.
- To guarantee all clips are fastened, apply even pressure along the screen's edges.
Step 56 | Heat the screen


- For improved adhesion, warm the screen's perimeter with an iOpener, hairdryer, or heat gun, ensuring it reaches a warm surface temperature.
- Employing screen vise clamps will enhance the new adhesive's bond; alternatively, proceed to the following instructions for alternative screen securing methods.
Step 57 | Press the screen


- Achieving uniform pressure across the iPhone's chassis and reinforcing the screen's adhesion to the frame necessitates consideration of the camera module's protrusion.
- Should the iPhone's original packaging be available, utilize the box lid and position it on a level work area.
- In the absence of the original packaging, proceed to an alternative compression technique, bypassing this initial step.
- Position the iPhone, with the display facing upwards, within the box lid, ensuring the camera bump aligns with the designated indentation.
- Locate an object approximating the iPhone's length but exceeding the box's lateral dimensions; place this atop the iPhone, subsequently adding several substantial weights.
- Maintain the applied pressure for a minimum of thirty minutes; reduce this timeframe proportionally to the weight of the applied objects, with overnight stabilization being the preferred duration.
Step 58


- Lacking the original iPhone packaging, proceed with the subsequent three actions to achieve uniform screen compression.
- Position the iPhone with its display facing downwards onto a level, cushioned surface.
- Secure the rear glass with adhesive tape to safeguard its cosmetic appearance.
Step 59


- To ensure uniform compression, position coins or comparable objects of consistent thickness along the tape's perimeter, adjacent to the rear glass's edges.
- Accumulate these objects to a stable elevation exceeding the camera module's protrusion.
Step 60

- To apply downward pressure for potential iPhone realignment, position several books or a comparable substantial weight on top of the device.
- Because coins can create a lasting mark, avoid using precious or irreplaceable items as the base surface beneath the applied weight.
- Maintain the applied pressure for a minimum of thirty minutes; for less weighty objects, extending the duration to overnight is recommended to ensure optimal results.
Step 61 | Install the pentalobe screws


- Employ a P2 pentalobe screwdriver for the installation process.Secure the two fasteners, each measuring 7.7 mm in length.Position these screws on both lateral aspects of the charging port.The fasteners provide structural integrity adjacent to the charging interface.