iPhone 3GS Battery Replacement
If the battery's runtime is significantly reduced, investigate potential causes.Carefully detach the component and replace it with a new one.
Step 1 | Broken Glass
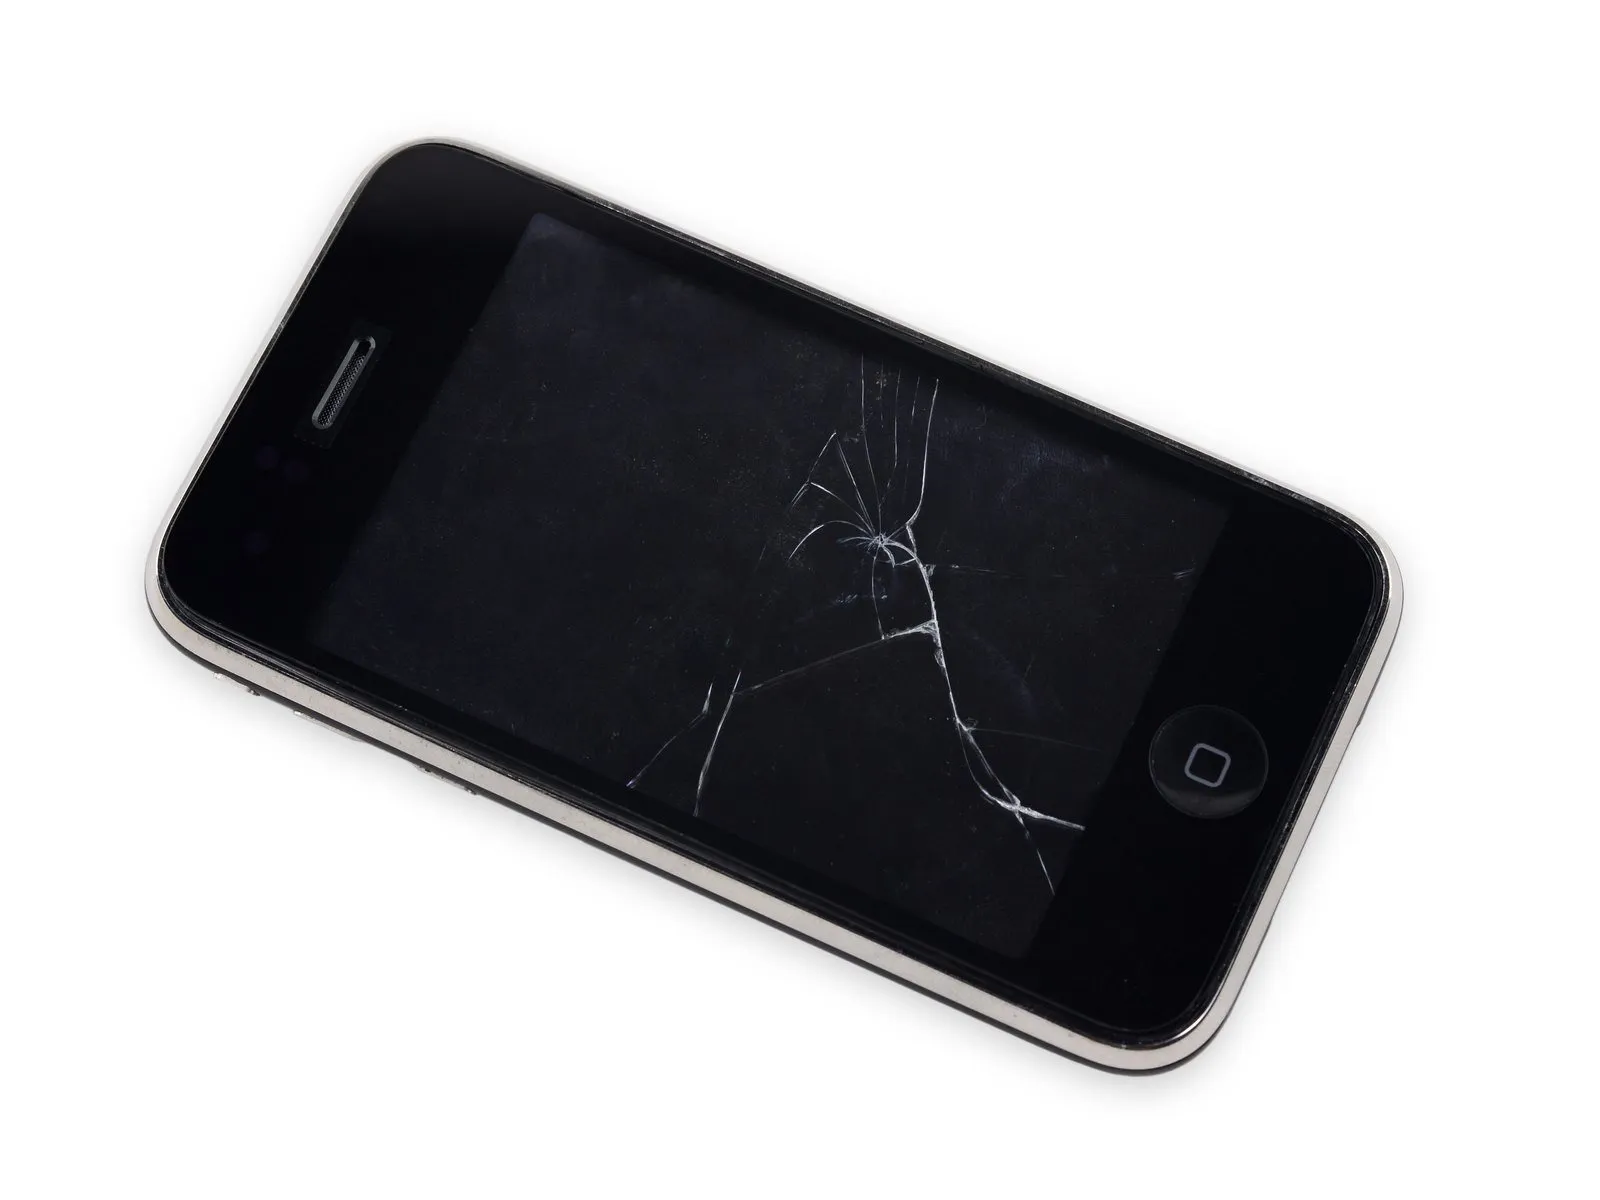
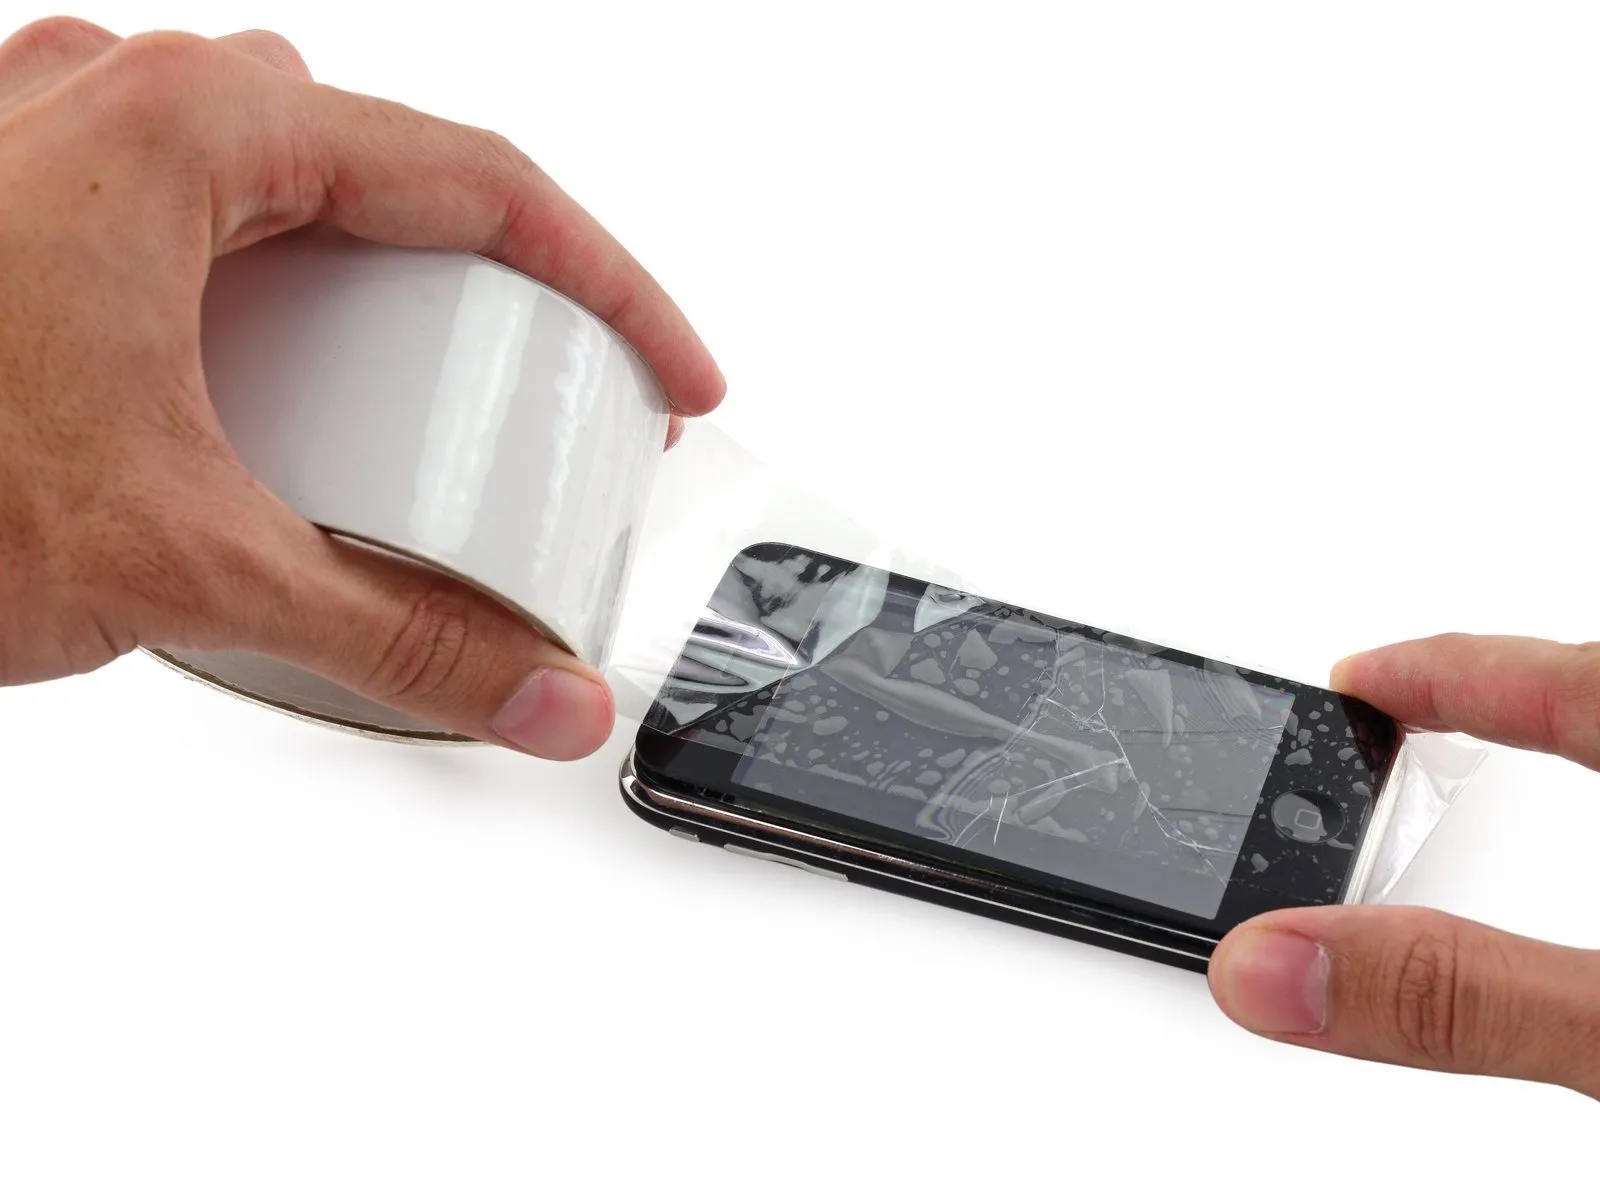
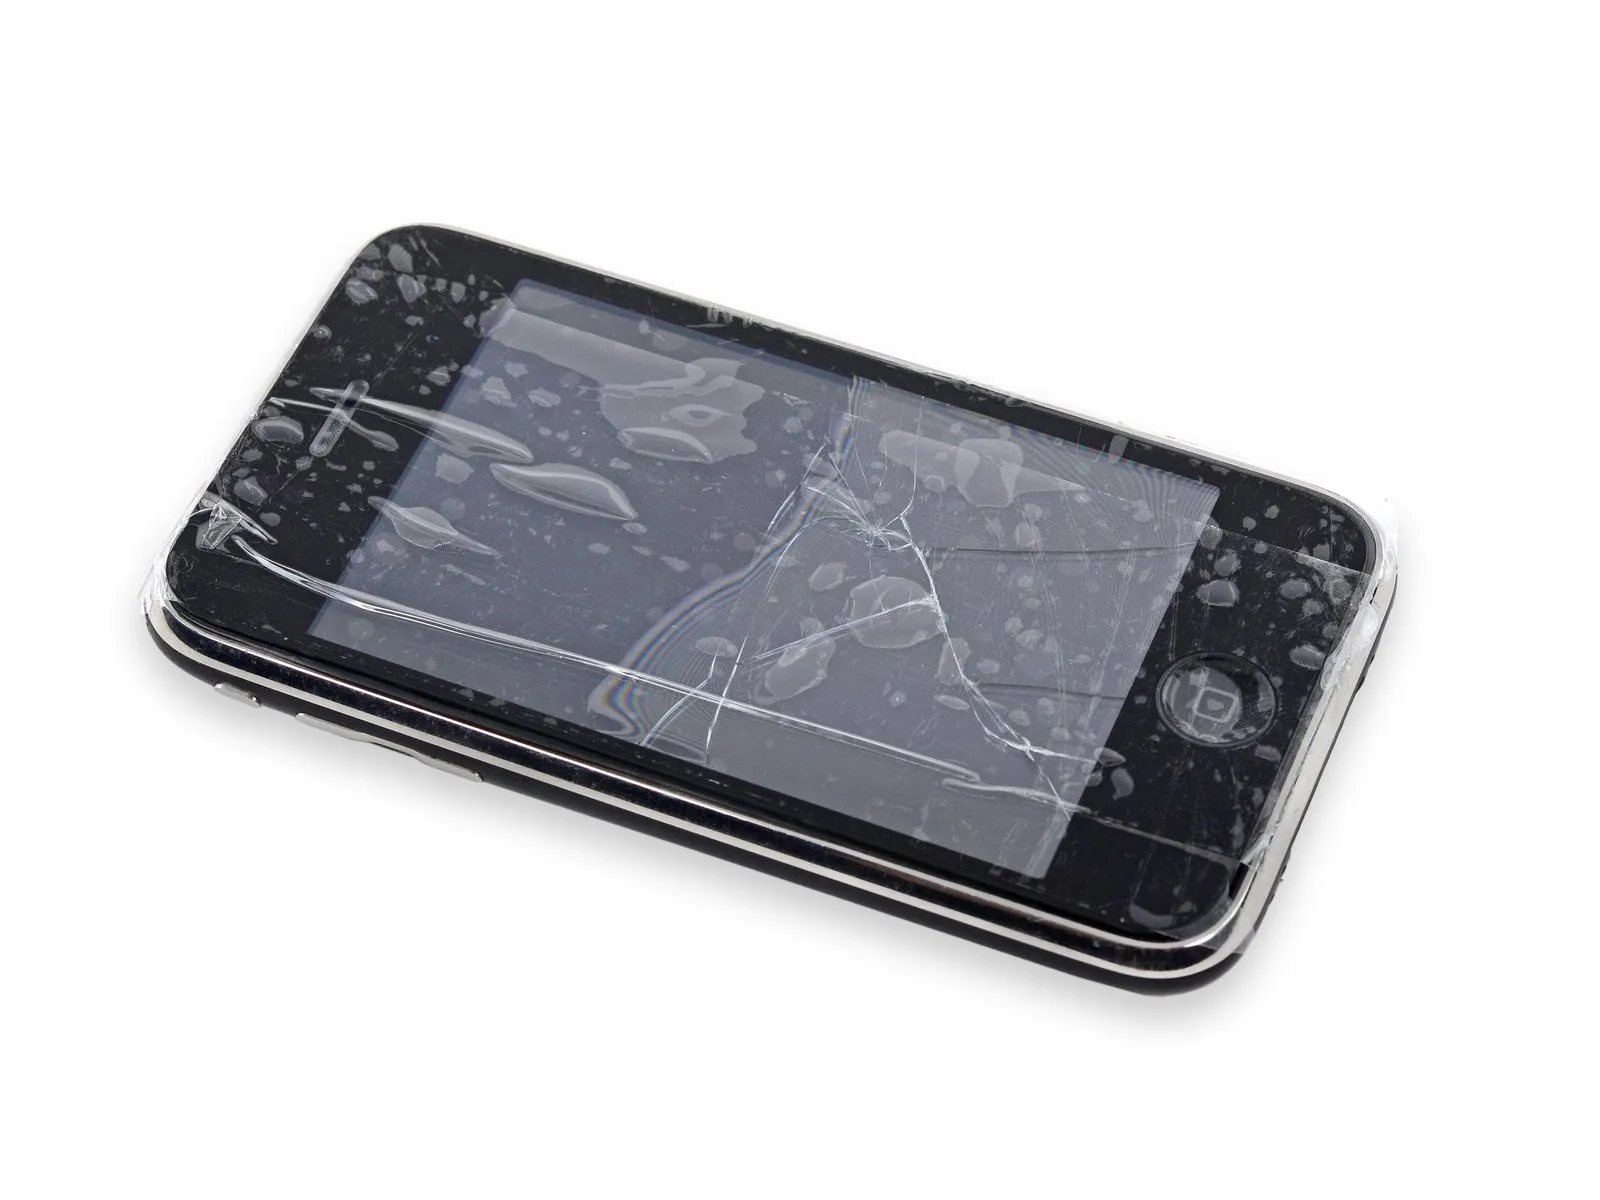
To mitigate the risk of additional shattering and potential injury while repairing a cracked display glass, secure the glass with tape.
Apply strips of transparent packing tape across the iPhone screen, ensuring complete coverage by layering them.
To prevent glass fragments from scattering and maintain stability during the display separation process, this technique is essential.
To safeguard your eyes from potential glass fragments released during the repair process, always use safety glasses.
Apply strips of transparent packing tape across the iPhone screen, ensuring complete coverage by layering them.
To prevent glass fragments from scattering and maintain stability during the display separation process, this technique is essential.
To safeguard your eyes from potential glass fragments released during the repair process, always use safety glasses.
Step 2 | Remove the bottom screws
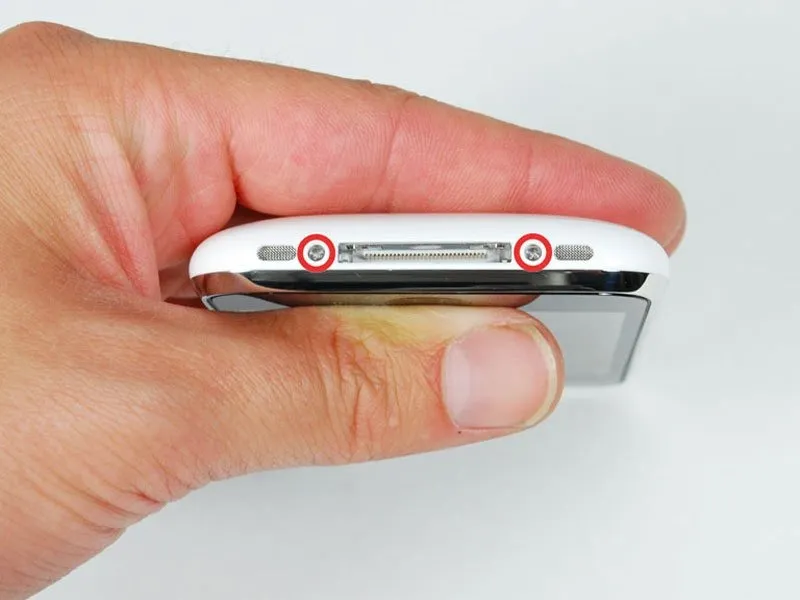
Using a Phillips #00 screwdriver, detach the two screws, each measuring 3.7mm, located at the dock connector interface.
Step 3 | Loosen the display
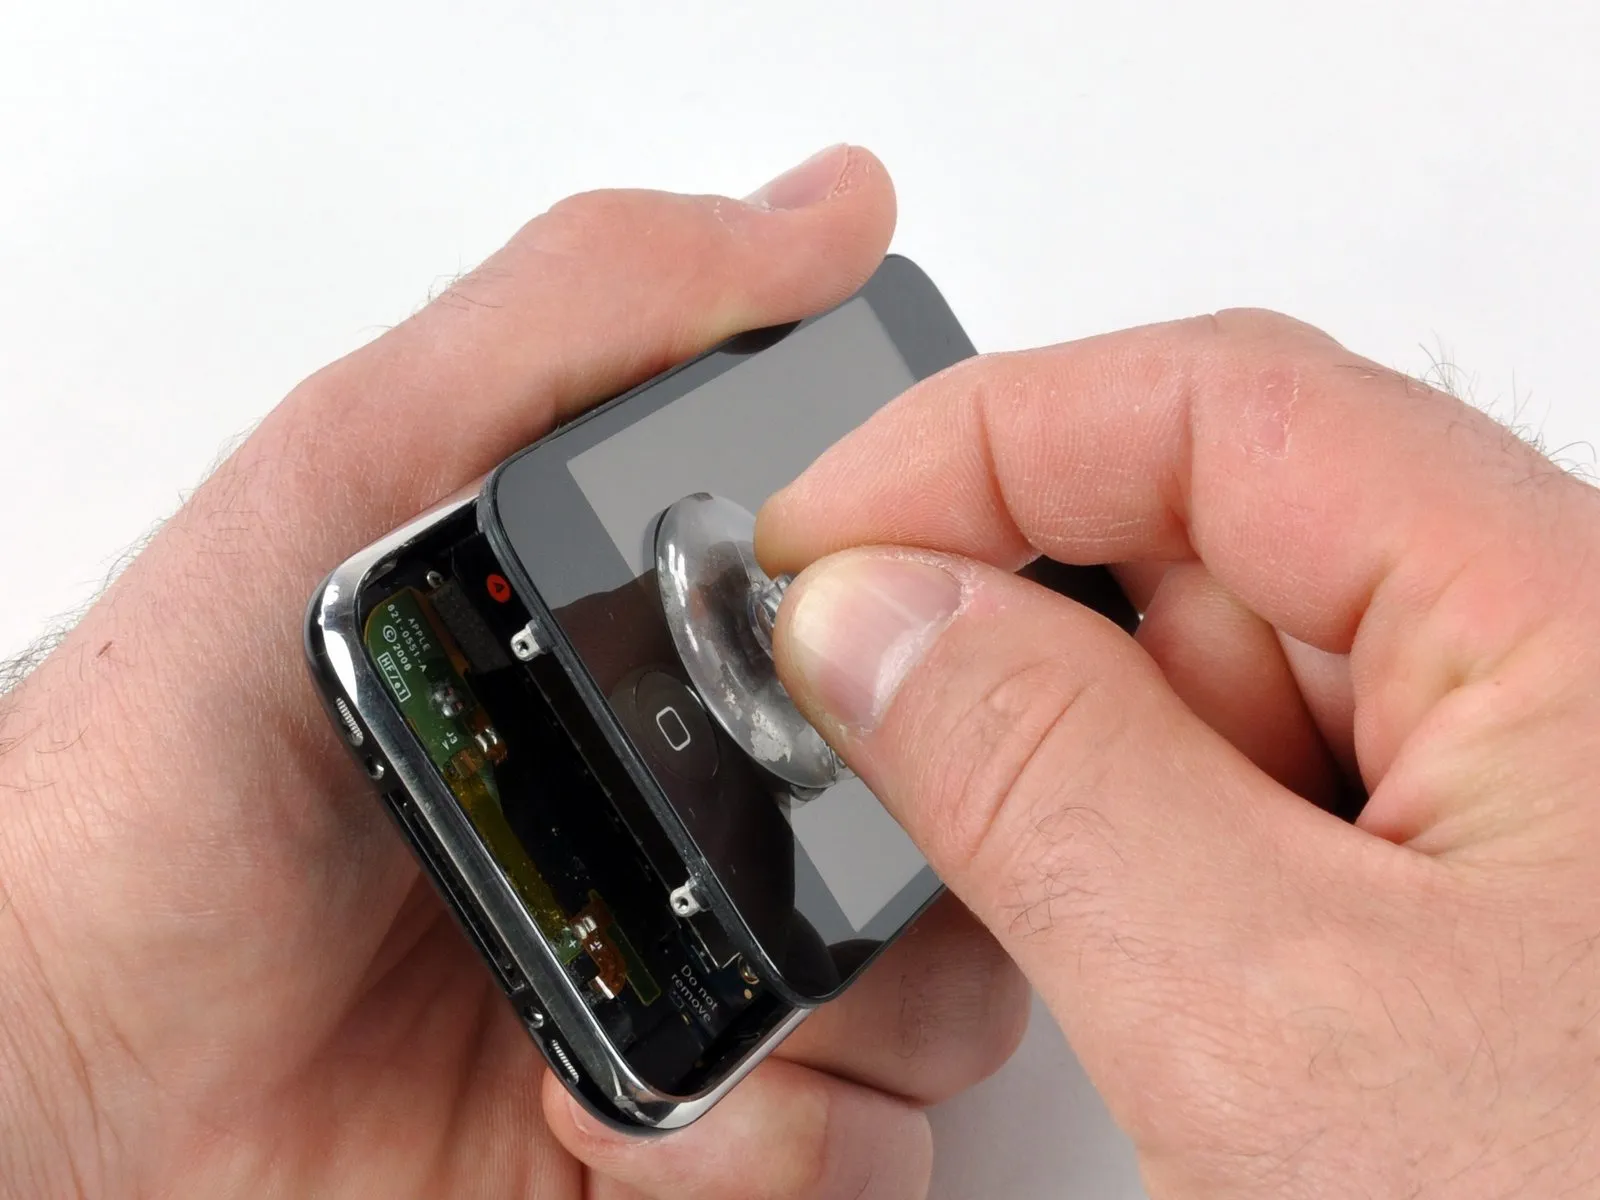
For improved handling and safety, detach the metal handle from the suction cup; gripping the suction cup's base directly provides a more secure hold.
Exercise extreme caution during iPhone disassembly to prevent damage to the delicate display cables.
A rubber gasket sits between the silver front bezel and the black display assembly; separating these components necessitates applying moderate pressure, and rocking a suction cup back and forth can aid in display assembly removal.
Carefully lift the lower edge of the iPhone's display assembly by applying gentle upward force with a suction cup positioned close to the Home button.
When the display assembly's surface prevents proper suction cup attachment due to damage, secure it with a robust adhesive tape like duct tape or packing tape.
Exercise extreme caution during iPhone disassembly to prevent damage to the delicate display cables.
A rubber gasket sits between the silver front bezel and the black display assembly; separating these components necessitates applying moderate pressure, and rocking a suction cup back and forth can aid in display assembly removal.
Carefully lift the lower edge of the iPhone's display assembly by applying gentle upward force with a suction cup positioned close to the Home button.
When the display assembly's surface prevents proper suction cup attachment due to damage, secure it with a robust adhesive tape like duct tape or packing tape.
Step 4 | Pull up the display
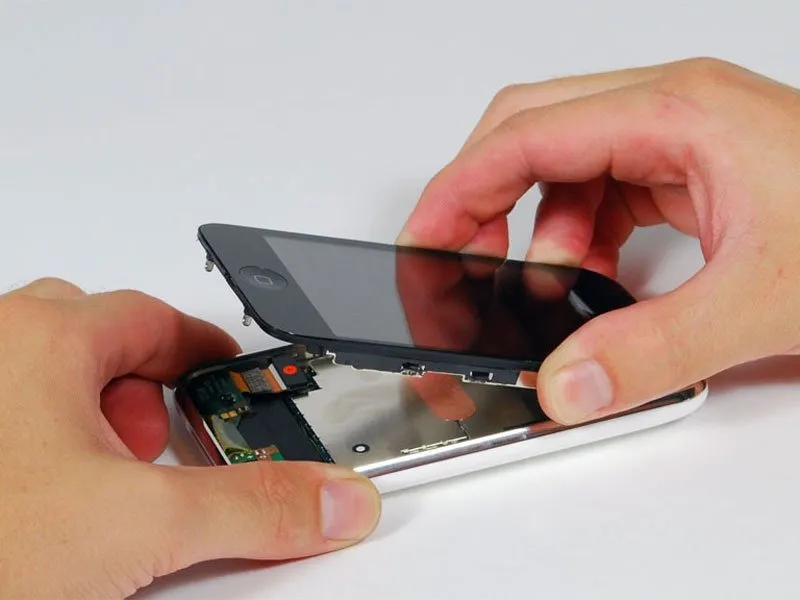
Several cables continue to secure the display assembly to the iPhone's internal components; therefore, avoid attempting complete separation at this stage.
Tilt the display assembly until it forms a roughly 45-degree angle.
Tilt the display assembly until it forms a roughly 45-degree angle.
Step 5 | Disconnect cable 1
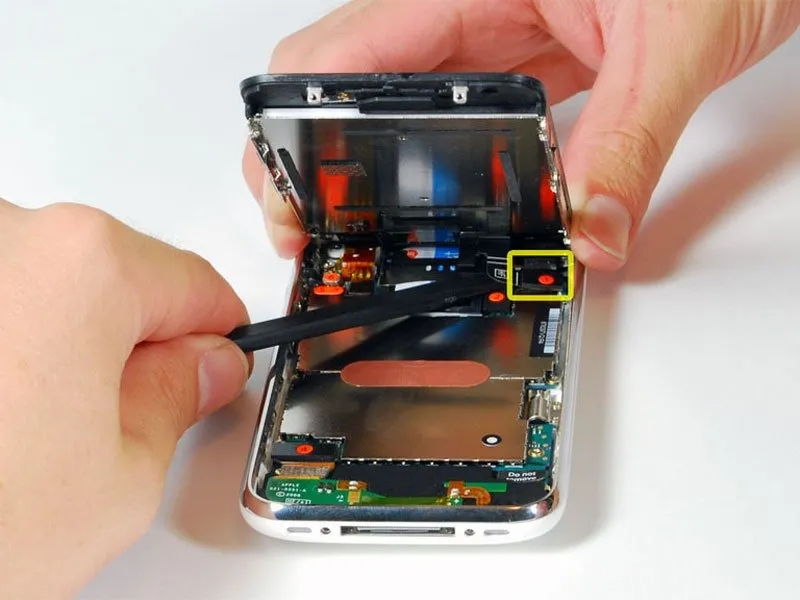
Several cables maintain the connection between the display assembly and the iPhone; therefore, avoid completely separating them at this stage.
Tilt the display assembly upwards, achieving roughly a 45-degree angle.
Using one hand to secure the display assembly, employ a spudger with your other hand to carefully detach the display's black ribbon cable, identified as "1."
To avoid damaging the ribbon connector and requiring a display replacement, carefully slide the spudger in from the left side, positioning it beneath the ribbon as illustrated. Attempting to lift the ribbon from the right will likely result in connector damage.
Tilt the display assembly upwards, achieving roughly a 45-degree angle.
Using one hand to secure the display assembly, employ a spudger with your other hand to carefully detach the display's black ribbon cable, identified as "1."
To avoid damaging the ribbon connector and requiring a display replacement, carefully slide the spudger in from the left side, positioning it beneath the ribbon as illustrated. Attempting to lift the ribbon from the right will likely result in connector damage.
Step 6 | Disconnect cable 2
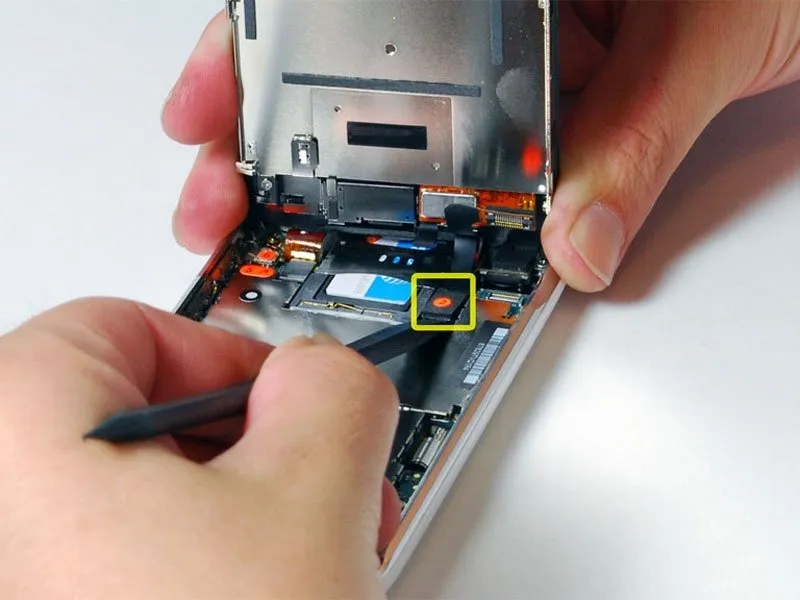
Orient the display assembly so it stands nearly upright, facilitating access for disconnecting the remaining cables.
Carefully detach the ribbon cable identified as "2," which connects to the capacitive touch panel, utilizing a spudger.
Carefully detach the ribbon cable identified as "2," which connects to the capacitive touch panel, utilizing a spudger.
Step 7 | Disconnect cable 3
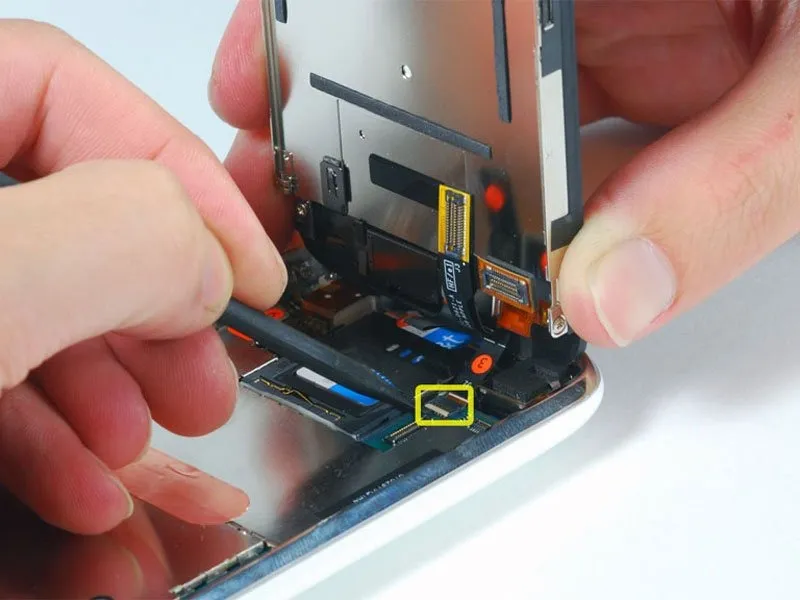
Certain international (Chinese, European) 3G models lack the plastic tab used to release the ribbon cable; instead, slide the cable toward the display to detach it. During reassembly, ensure the ribbon cable is firmly pressed into its connector.
Connector "3" on certain iPhone models exhibits a reversed color scheme, with a black plastic tab and a white connector; ensure careful lifting of this tab to prevent connector damage.
Employing a spudger, lift the white plastic tab—it secures ribbon cable "3"—until it achieves a 90-degree upward rotation, which will disengage the cable.
Carefully disconnect the black ribbon cable by sliding it from its connector, then detach the display assembly from the iPhone.
Connector "3" on certain iPhone models exhibits a reversed color scheme, with a black plastic tab and a white connector; ensure careful lifting of this tab to prevent connector damage.
Employing a spudger, lift the white plastic tab—it secures ribbon cable "3"—until it achieves a 90-degree upward rotation, which will disengage the cable.
Carefully disconnect the black ribbon cable by sliding it from its connector, then detach the display assembly from the iPhone.
Step 8 | Remove the SIM card tray
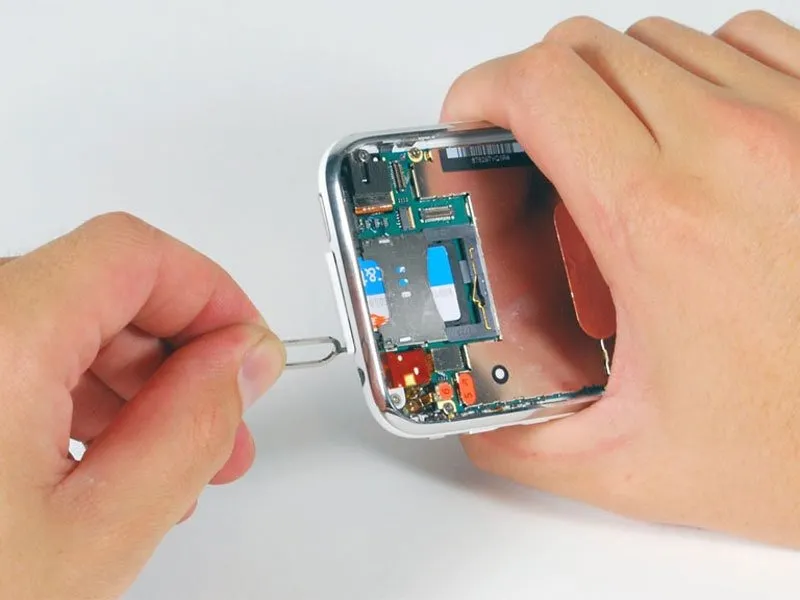
Using a SIM eject tool or a straightened paper clip, gently push into the small aperture located adjacent to the headphone jack.
Apply downward pressure to the ejection tool until the SIM card tray releases.
Using your fingers, carefully eject the SIM card tray from the iPhone by sliding it outward.
Apply downward pressure to the ejection tool until the SIM card tray releases.
Using your fingers, carefully eject the SIM card tray from the iPhone by sliding it outward.
Step 9 | Disconnect cable 4
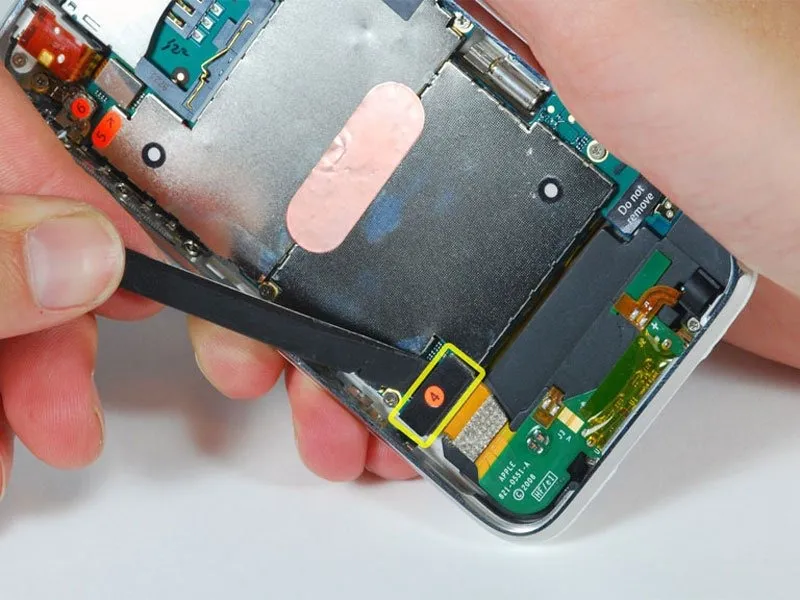
Carefully detach the ribbon cable identified as "4" using a spudger.
Step 10 | Disconnect cable 5
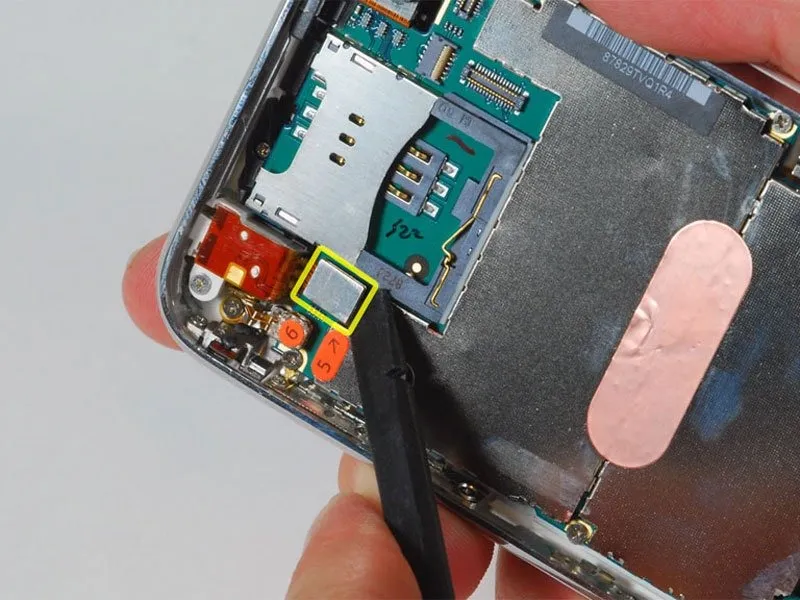
Carefully detach the ribbon cable identified as "5" using a spudger.
Step 11 | Disconnect cables 6 and 7
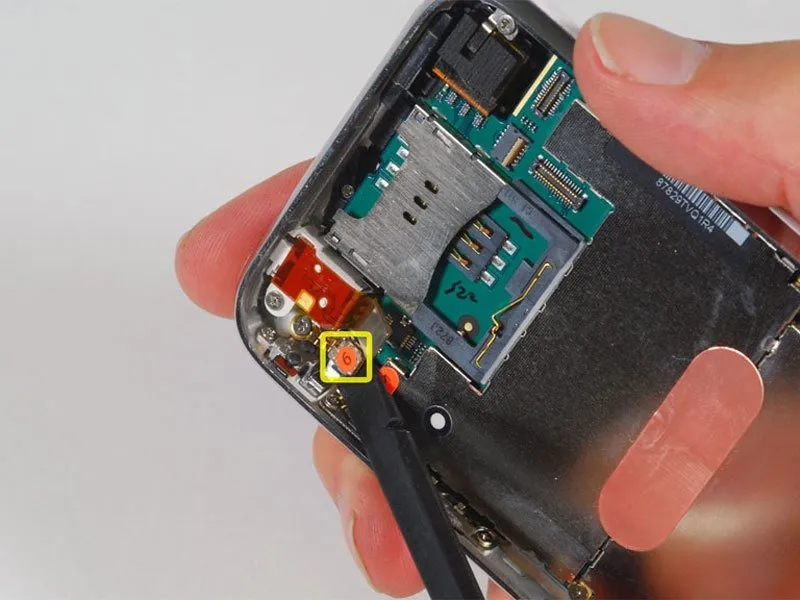
- Carefully detach the ribbon cable identified as "6" using a spudger.
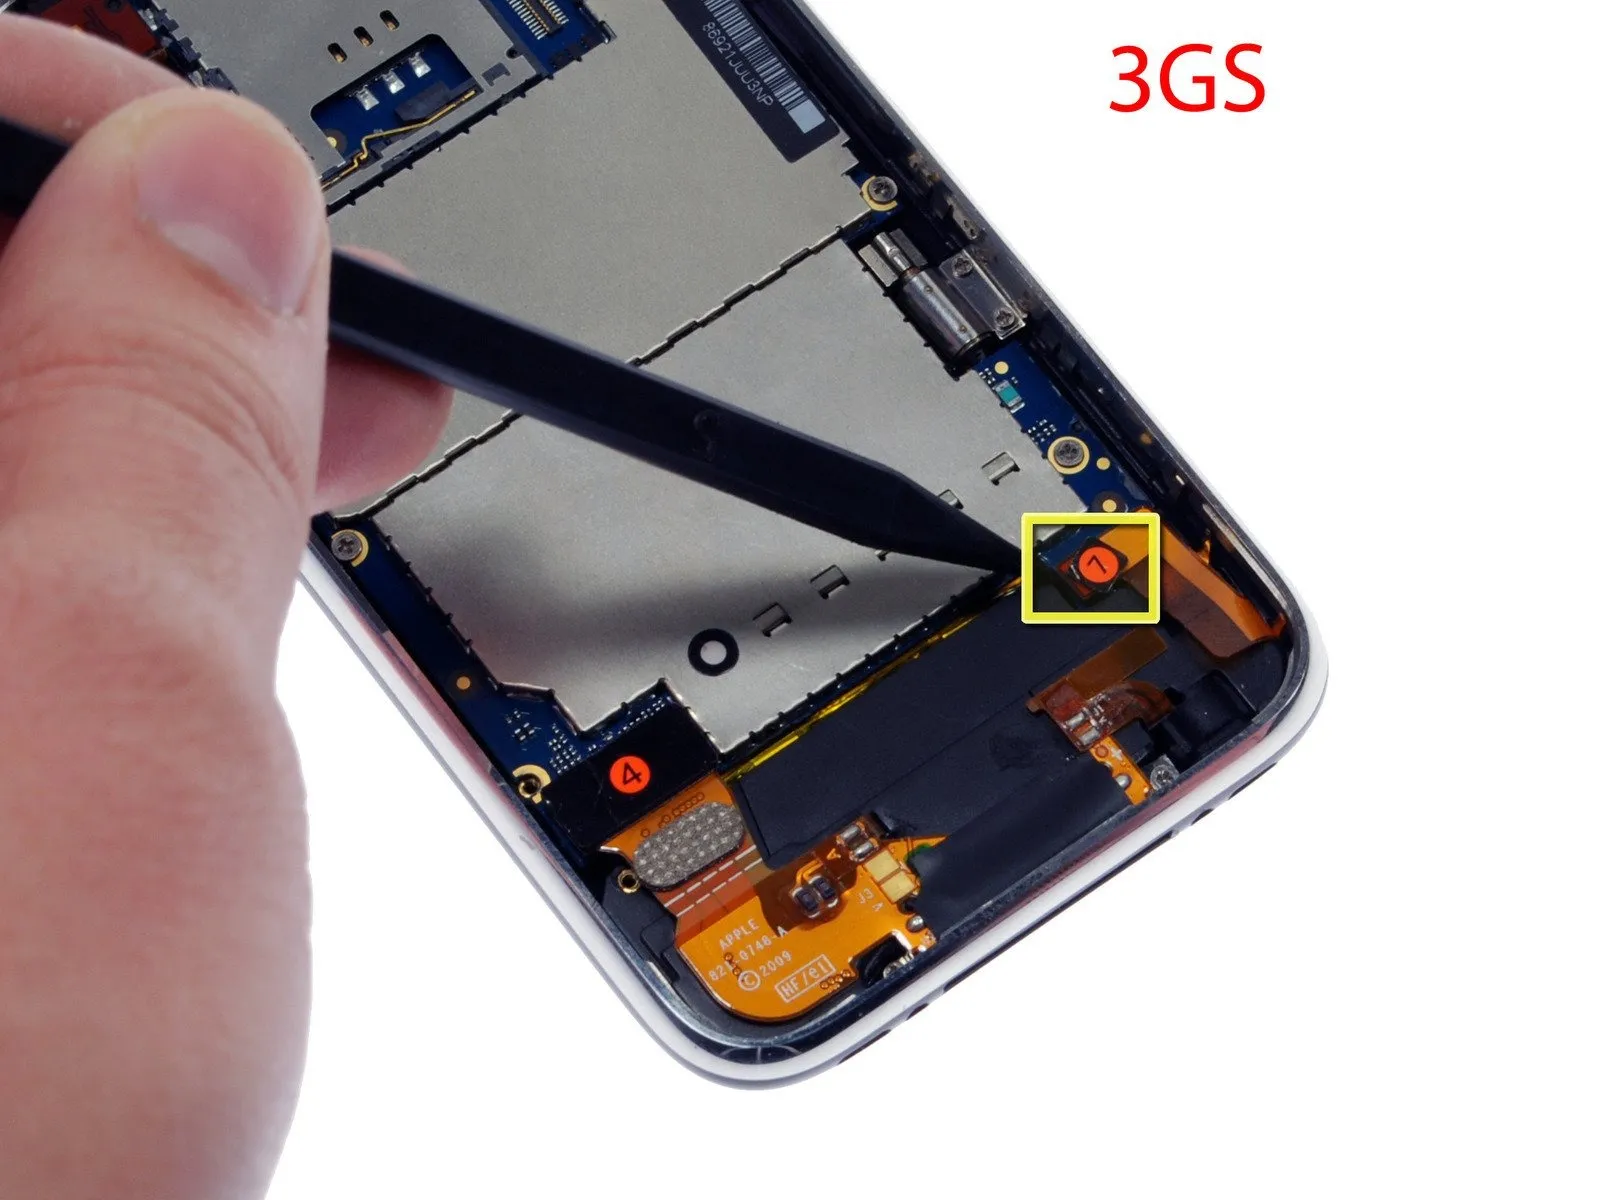
- For iPhone 3GS models, consult the provided image and employ a spudger to carefully detach the ribbon cable identified as "7."
- Before pressing the ribbon cables into place, carefully verify that their terminals match the corresponding receptacles on the motherboard, potentially using a magnifying glass or jeweler's loupe to ensure precise alignment.
Step 12 | Remove the logic board screws
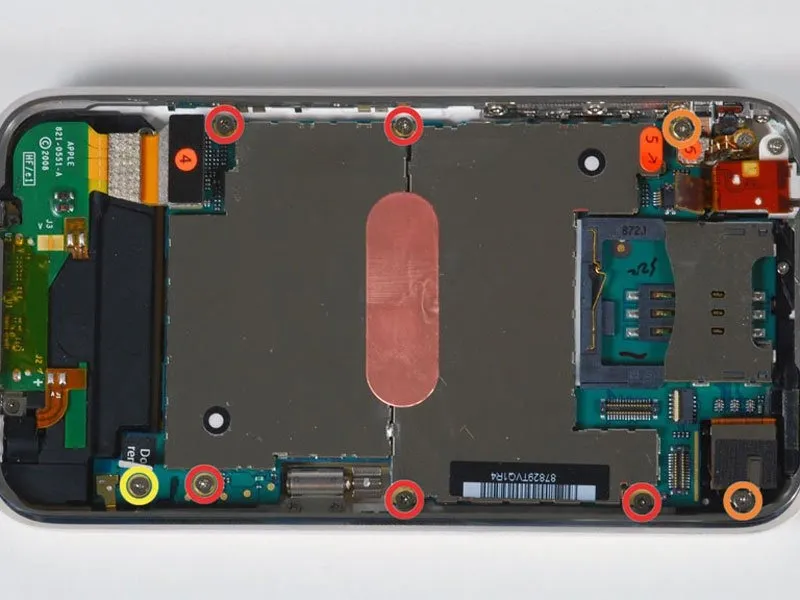
- Using the appropriate screwdriver, detach the eight screws.
- The logic board is fastened to the rear case using five screws; each is 2.3 mm in length, features a Phillips #00 head, and has partial threads.
- The logic board and camera are held in place by two screws; each is a full-thread Phillips #00 screw, measuring 2.3 mm in diameter.
- Beneath the "Do not remove" sticker, locate and unscrew a Phillips #00 screw with a 2.9 mm head.
When putting everything back together, ensure the 1/4-20 x 1-inch bolts are tightened to 18 lb-ft, and the retaining clips are properly seated to prevent component separation, using pliers as needed.
Located on the lower right side, near the camera, an orange-highlighted screw secures a metal component which stabilizes the camera's position.
Before securing the camera with the full-thread Phillips #00 screw, measuring 2.3 mm, ensure the strip is correctly positioned.
Step 13 | Loosen the camera
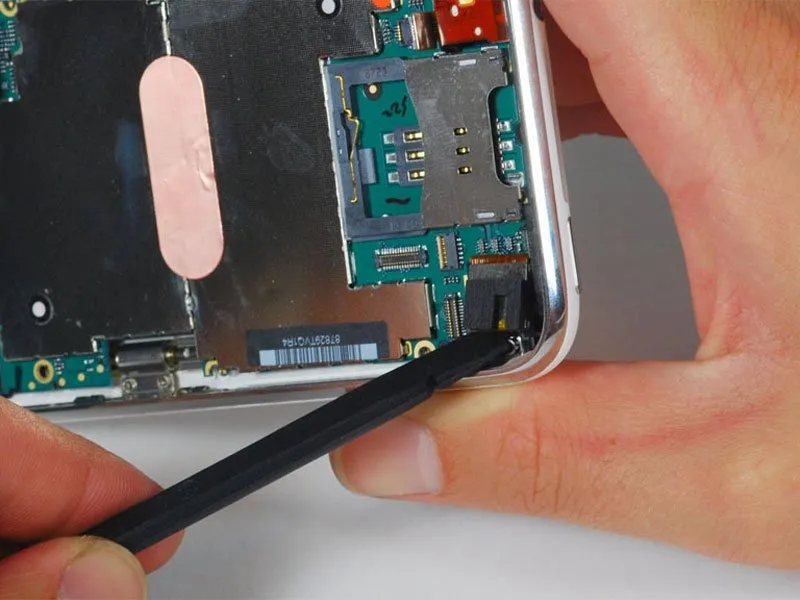
- Carefully leverage the camera module from its rear case housing using a spudger, ensuring no forceful movements are applied.
Due to a connection with the logic board's base, complete camera removal is currently restricted.
Step 14 | Remove the logic board
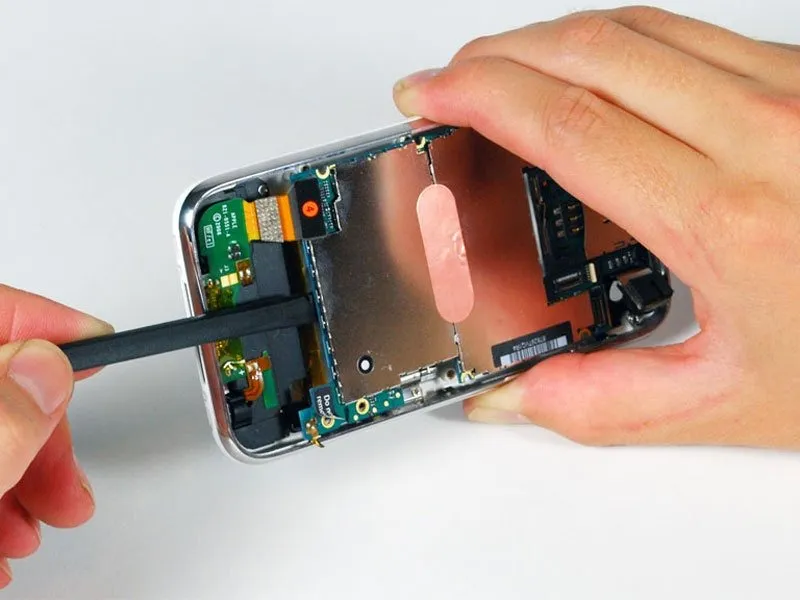
- Carefully lift the logic board's edge, near the dock connector, using a spudger.
Due to its proximity to the 'do not remove' label, the delicate, gold-colored grounding tab on the logic board is susceptible to damage. Exercise extreme caution to prevent this tab from catching on the enclosure’s edges during logic board separation; breakage occurs readily. Post-removal signal issues may indicate a damaged ground tab, requiring inspection.
Verify that each of the screws holding the logic board in place has been completely unscrewed if you encounter difficulty separating it from the device.
Step 15
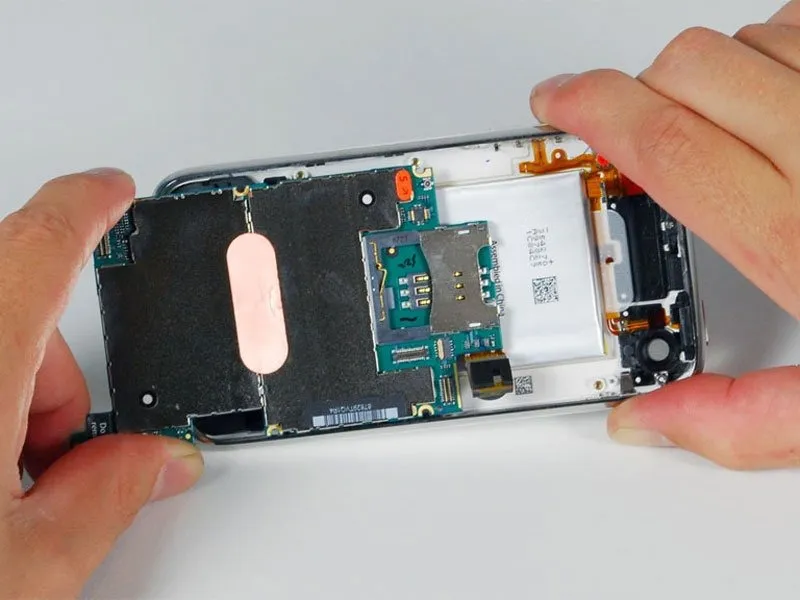
- Carefully advance the logic board in the direction of the dock connector to disengage it from the iPhone's chassis.
Before securing the logic board within the iPhone enclosure following battery replacement, attach the camera connector to the board. Ensure proper alignment of the logic board’s upper portion—specifically, the area containing the SIM tray—before fully positioning the entire board. Failure to do so may result in SIM tray misalignment. After the top section is correctly seated, the remaining portion of the logic board can be adjusted for proper placement; verification is achieved when the SIM tray aligns with its corresponding opening in the case and the camera module is fully and securely seated.
Step 16 | Loosen the battery
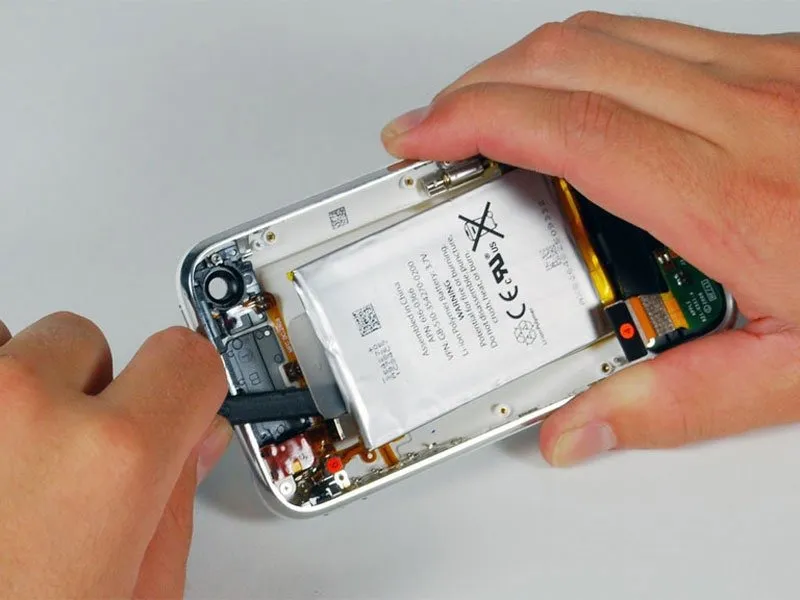
- Carefully lift the battery away from the rear case using a spudger, as it is secured by an adhesive strip that runs along its edges.
Employing solely the provided plastic pull-tab to detach the battery carries a risk of deformation; therefore, avoid this method.
Disconnecting the battery isn't required for GPS antenna replacement; however, doing so creates additional working room if you need to detach the headphone assembly, a step that isn't essential for the antenna replacement itself. - Because the iPhone battery is secured to the rear enclosure using a low-strength adhesive that typically remains on the battery during removal, ensure your replacement battery either has pre-applied adhesive or prepare to move the adhesive from the original battery to the new one.
To release a battery that is stuck to the back cover, carefully introduce a small amount of isopropyl alcohol with a concentration exceeding 90% between the battery's edge and the case. Permit approximately one minute for the alcohol to dissolve the adhesive bond. Then, utilize the spudger's flat end to delicately pry up the battery. Ensure the alcohol completely evaporates before proceeding with the new battery installation.
To prevent damage, avoid using excessive force when removing the battery; if the adhesive resists, add additional drops of alcohol to soften it. Ensure the battery remains intact and undamaged during removal by refraining from applying pressure that could warp or penetrate its casing with the pry tool. - Applying gentle heat to the rear case with a hair dryer or heat gun, set to its minimum temperature, softens the adhesive securing the battery, making it easier to detach the battery from the case back with a spudger.
To prevent battery ignition, avoid exposing the iPhone to excessive heat.